If you’ve just picked up Hollow Knight Silksong, you’ve probably already discovered that Pharloom is absolutely unforgiving. One moment you’re gracefully leaping between platforms as Hornet, and the next you’re staring at a death screen wondering what went wrong. The truth is, mastering healing mechanics isn’t just helpful in Silksong—it’s absolutely essential for survival.
Unlike many action games where you can pop health potions or regenerate health automatically, Silksong requires you to actively earn and strategically use your healing opportunities. This guide will break down everything you need to know about staying healthy in this beautifully brutal world.
Understanding the Bind System: Your Primary Lifeline
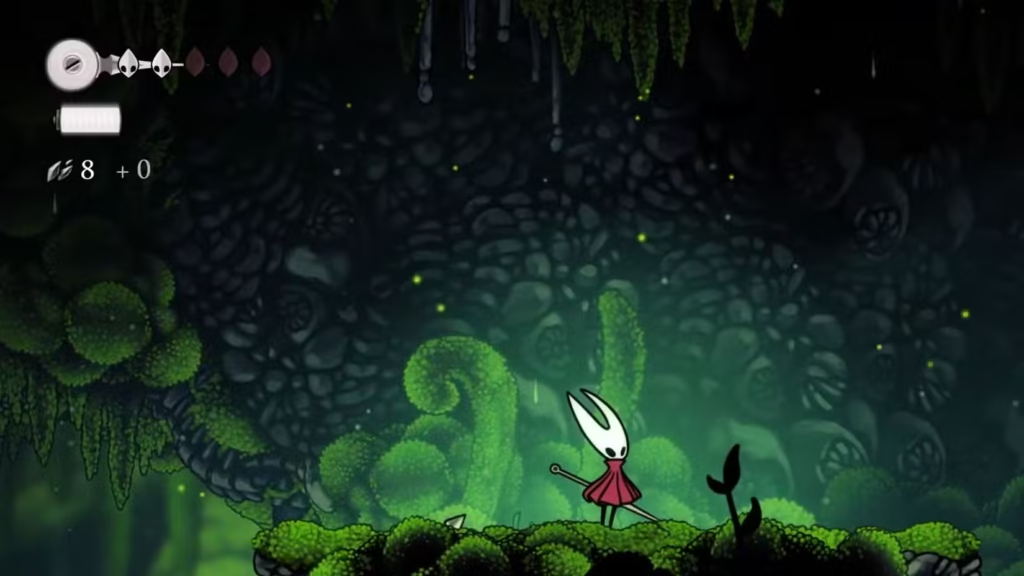
The heart of Silksong’s healing system revolves around something called Bind. Think of it as earning your health back through combat prowess rather than finding it lying around.
How Bind Actually Works
Every time you land a hit on an enemy, you’re not just dealing damage—you’re collecting thread material that fills a gauge beneath your health bar. This isn’t just busy work; it’s Silksong’s way of rewarding aggressive play and keeping you engaged in combat rather than running away from every fight.
Once that thread gauge is completely full, you can activate Bind to restore three health masks. But here’s the catch that catches most new players off guard: the entire gauge gets consumed every time you heal, regardless of whether you needed one mask or three.
This creates an interesting risk-reward dynamic. Should you heal immediately when the gauge is full, even if you’re only missing one mask? Or should you risk staying at low health to maximize the healing value? Generally, it’s better to wait until you’re missing at least two masks, but don’t get too greedy—dead Hornets can’t heal at all.
The Vulnerability Window
Here’s something the game doesn’t explicitly tell you: Hornet is completely vulnerable during the Bind animation. She’ll pause for a moment to perform the healing ritual, and enemies won’t politely wait for her to finish. This means timing your heals is just as important as having the thread to do it.
Look for natural breaks in combat—when enemies are staggered, when you’ve cleared a room, or when you have some distance between you and threats. Learning to recognize these safe moments is a skill that separates struggling players from thriving ones.
Essential Healing Tools and Upgrades
The Warding Bell: Your Healing Insurance Policy
One of the most game-changing tools you can acquire is the Warding Bell. This remarkable item creates a protective barrier around Hornet while she’s healing, essentially giving you a “get out of jail free” card for poorly timed heals.
The bell doesn’t make you invincible, but it can absorb a hit or two while you’re in the Bind animation. For newer players still learning enemy patterns and safe healing windows, this tool is invaluable.
The Multibinder: Double Your Healing Efficiency
Once you’ve completed the My Missing Courier quest, you can purchase the Multibinder tool from Frey. This upgrade allows you to store multiple thread charges, effectively letting you heal more than once before needing to build up your gauge again.
The Multibinder transforms the healing dynamic from “heal or don’t heal” to strategic resource management. You can save up healing charges for tough boss fights or challenging platforming sections where you expect to take damage.
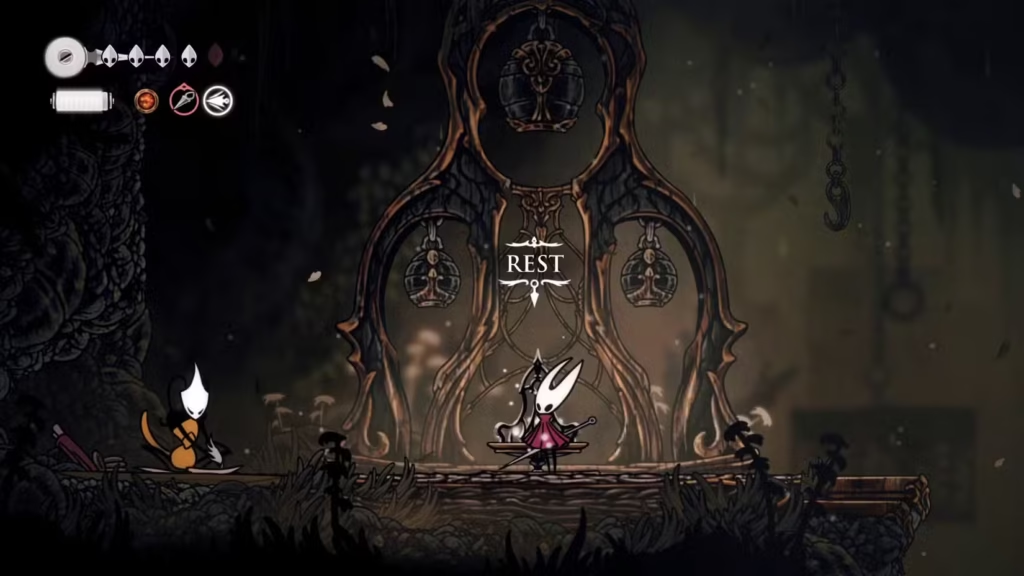
Mastering Bench Strategy: Your Safe Havens
Benches in Silksong serve dual purposes: they’re both healing stations and respawn points. Every time you rest at a bench, Hornet returns to full health, and if you die, you’ll respawn at the last bench you used.
Free vs. Paid Benches
Not all benches are created equal. Some are free to use—just walk up and rest. Others require Rosary Beads to unlock. This creates an interesting economy where you need to balance spending your currency on upgrades versus ensuring you have access to healing stations.
Pro tip: Always carry a few extra Rosary Beads. There’s nothing worse than finding a bench in a dangerous area only to realize you can’t afford to unlock it. Consider it insurance for your exploration.
Bench Placement Psychology
Pay attention to where benches are located. The developers didn’t place them randomly—benches often appear before challenging areas, after significant story beats, or in central hub locations. If you see a bench, it’s usually a good idea to rest there even if you don’t need healing, as it updates your respawn point.
Advanced Healing Strategies
Combat Flow and Thread Management
Experienced players develop a rhythm where they’re constantly aware of their thread gauge while fighting. Instead of focusing solely on avoiding damage, they balance aggression with caution, ensuring they’re always building toward their next heal.
Try to maintain at least some thread in your gauge at all times. Even if you don’t need to heal immediately, having thread ready means you can respond quickly to unexpected damage.
Area-Specific Healing Considerations
Different areas of Pharloom present unique healing challenges. In Greymoor, for example, tight corridors might limit your healing windows. Meanwhile, more open areas might offer better opportunities to build thread safely.
Learning these area-specific patterns will make your journey through Pharloom much smoother.
Where to Get Hollow Knight Silksong
Ready to test your healing skills? You can get Hollow Knight Silksong on multiple platforms:
- PC: Available on Steam
- Nintendo: Get it for Nintendo Switch
- PlayStation: Available on the PlayStation Store
- Xbox: Download from Xbox Store

Final Thoughts: Healing as a Core Skill
Healing in Silksong isn’t just about pressing a button when your health gets low—it’s about understanding the game’s combat rhythm, managing resources, and making strategic decisions under pressure. The Bind system encourages aggressive play while punishing recklessness, creating a perfectly balanced risk-reward system.
Remember, every expert player was once where you are now, learning these systems through trial and error. Don’t get discouraged if you’re dying frequently in your first few hours. Focus on building good healing habits: stay aggressive to build thread, look for safe healing windows, and always keep some Rosary Beads in reserve for emergency bench access.
With practice, you’ll develop the instincts to survive Pharloom’s deadliest encounters and maybe even enjoy the challenge along the way. After all, there’s nothing quite like the satisfaction of perfectly timing a heal in the middle of a boss fight and coming out victorious.