The Hunter’s March Guardian, officially known as Skarrguard, serves as one of Silksong’s early-game gatekeepers – a boss that tests your mastery of fundamental combat mechanics before granting access to new areas and opportunities. While not the most complex boss in the game, Skarrguard demands respect due to its high damage output and the timing precision required to defeat it safely.
What makes this fight particularly significant is its role as a skill check for the Swift Step ability. Players who attempt this boss without proper movement capabilities often find themselves overwhelmed by attacks they simply can’t avoid consistently.
Understanding the Stakes
Before diving into strategy, it’s crucial to understand what this boss represents in your Silksong progression. Defeating the Hunter’s March Guardian unlocks access to Hunter’s March, an area containing valuable resources, challenging optional content, and important NPCs that enhance your overall experience.
The fight itself deals two mask damage per attack, meaning mistakes are costly and require careful resource management. This isn’t a boss you can brute force through – success demands patience, timing, and strategic thinking.

Getting to the Hunter’s March Guardian
Navigation Through The Marrow
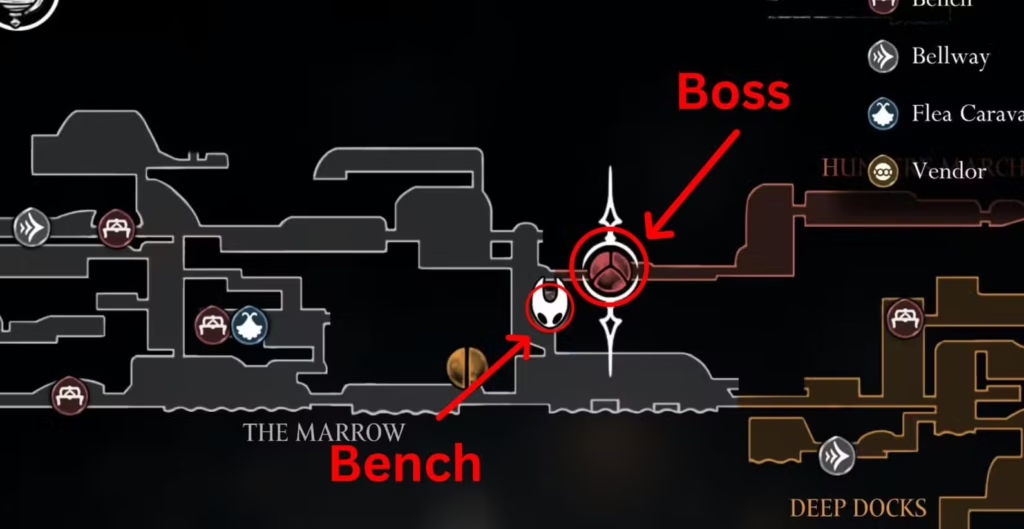
Your journey to Skarrguard begins in The Marrow, requiring you to traverse to the far right section of this underground area. The path presents several challenges that serve as preparation for the boss encounter:
Environmental hazards: Falling platforms require precise timing and can drain health if you’re not careful with your movements.
Enemy encounters: Flying bugs along the route can be particularly annoying, often attacking at awkward moments during platforming sequences.
Red bouncy objects: You’ll encounter elastic platforms that require downward slashes to cross gaps – practice this mechanic as similar timing skills apply to the boss fight.
The Grindle Decision Point
Just below the boss arena, you’ll encounter Grindle imprisoned in a cell. This presents an important decision: whether to free him or leave him imprisoned.
If you choose to free Grindle, you’ll receive the Straight Pin – a projectile Tool that can prove useful in the upcoming boss fight. Our detailed analysis of this decision covers the full implications, but for immediate boss preparation, the Straight Pin offers additional attack options.
Bench location: The closest rest point sits directly below the boss arena in the same area as Grindle, making this an ideal preparation spot.
Essential Preparation: Swift Step Ability
Critical recommendation: Obtain the Swift Step ability before attempting this boss. While technically possible to defeat Skarrguard without it, the fight becomes significantly more challenging and less forgiving.
Swift Step location: The ability is found in Deep Docks, an area accessible below the boss location. The path involves navigating magma-filled areas and defeating multiple enemies, but the investment pays dividends for this fight and future encounters.
Controls: Swift Step activates with R2/RT on controllers, providing both a quick dash for dodging and a sprint function when held down.
For complete guidance on obtaining this essential ability, check our Swift Step unlock guide.
Detailed Attack Analysis
Double Slash

Visual cue: Skarrguard extends its weapon and telegraphs a two-hit combo sequence.
Behavior pattern: Two consecutive slashing attacks with brief recovery between each hit.
Counter strategy:
- Dash backward immediately when you see the weapon extension
- Wait for both slashes to complete
- Dash back in during the recovery window for a safe counterattack
Timing note: Resist the urge to attack after the first slash – the second hit comes quickly and will catch greedy players.
Aerial Slam

Visual cue: The boss performs a distinctive jump animation, launching high into the air.
Behavior pattern: Skarrguard leaps upward then crashes down at Hornet’s position with significant force.
Counter strategy:
- Dash through the boss’s position to reach the opposite side
- Use the landing recovery time to land multiple hits
- Position yourself for the next attack sequence
Positioning advantage: This attack provides one of the best damage opportunities if executed correctly.
Burrowing Relocate

Visual cue: Skarrguard digs into the ground, disappearing from view with visible digging animation.
Behavior pattern: The boss travels underground and emerges at a new location, indicated by smoke or dust particles.
Counter strategy:
- Watch for emergence indicators (smoke/dust)
- Move away from marked locations
- Prepare for the boss’s next attack after repositioning
Important note: While this isn’t a direct attack, emerging underneath Hornet deals damage, so treat the smoke indicators as danger zones.
Combat Strategy and Tactics
The Hit-and-Run Approach
Primary strategy: Use Swift Step to dash in for single attacks, then immediately retreat to safety.
Attack discipline: Resist the temptation to land multiple hits per opening. The high damage output (two masks per hit) makes conservative play essential.
Spacing management: Maintain distance between attack opportunities to avoid being caught by surprise moves.
Healing Considerations
Safe healing windows: Only attempt to Bind when you have significant distance from Skarrguard and clear sight lines.
Emergency healing: If caught at low health, prioritize creating space over attempting immediate heals.
Resource awareness: With two-mask damage per hit, healing becomes more critical and less forgiving than in other encounters.
Underground Phase Management
Vigilance requirement: Pay constant attention when Skarrguard burrows, as emergence damage can quickly end attempts.
Positioning during burrow: Move to central arena positions where you have multiple escape routes available.
Predictive movement: Start moving as soon as you see digging animations rather than waiting for emergence indicators.

Advanced Tips and Techniques
Swift Step Mastery
Dash timing: Practice using Swift Step as both an offensive approach tool and defensive escape mechanism.
Distance control: Learn the exact range of your dash to position optimally for counterattacks.
Combo potential: Chain Swift Step movements to maintain aggressive positioning while staying safe.
Attack Window Optimization
Double Slash recovery: This provides the most consistent damage opportunity with proper timing.
Aerial Slam positioning: Master the through-dash technique to maximize damage during landing recovery.
Patience over pressure: Wait for clear openings rather than forcing attack opportunities.
Equipment Recommendations
Straight Pin usage: If obtained from Grindle, use projectiles to maintain pressure from safe distances.
Health considerations: Ensure you have adequate HP masks before attempting – the two-mask damage makes health management crucial.
Tool preparation: Consider bringing healing support items like the Warding Bell if available.
What Victory Unlocks
Hunter’s March Access
Defeating Skarrguard opens the path to Hunter’s March, a significant area offering:
New NPCs and services: Vendors with useful Tools and upgrades Multiple bench locations: Strategic rest points for further exploration
Resource opportunities: Materials and currency for character progression Optional challenges: Additional content for skilled players
The Savage Beastfly Challenge
Hunter’s March contains one of Silksong’s most challenging optional bosses on its right side. This encounter requires the Drifter’s Cloak ability (obtained in Far Fields) and represents a significant step up in difficulty from the Guardian fight.
Strategic note: The skills developed fighting Skarrguard – timing, positioning, and Swift Step mastery – directly apply to this more challenging encounter.
Progression Implications
Skill validation: Successfully beating the Guardian demonstrates readiness for more complex boss encounters.
Area unlocking: Hunter’s March serves as a hub for accessing other important locations and quests.
Character development: The area provides opportunities for
When to Attempt This Boss
Readiness Indicators
Movement mastery: Comfortable with basic platforming and combat timing Swift Step acquisition: Essential for consistent success Health preparation: At least 4-5 HP masks recommended for survivability Combat fundamentals: Understanding of attack patterns and defensive positioning
Alternative Timing
If you’re struggling with the fight, consider:
- Exploring other areas for additional upgrades
- Practicing Swift Step mechanics in safer environments
- Obtaining additional health or defensive Tools
- Returning when you’re more comfortable with combat timing
The boss will remain available, so there’s no pressure to attempt it before you’re adequately prepared.
Why This Fight Matters
The Hunter’s March Guardian serves multiple important functions in Silksong’s progression:
Skill gate: Tests fundamental combat competencies before granting access to more challenging content Movement validation: Confirms players have essential abilities for upcoming encounters Strategic teaching: Demonstrates the importance of patience and precision over aggressive tactics Area access: Unlocks valuable resources and progression opportunities
Success against Skarrguard indicates readiness for Silksong’s more complex challenges while providing immediate benefits through Hunter’s March access. The fight represents a crucial stepping stone in your journey through Pharloom.
Essential Preparation:
- Swift Step Unlock Guide – Essential ability for this boss fight
- Should You Free Grindle? – Decision that affects your Tool options
- Warding Bell Location – Helpful Tool for safer healing
- HP and Silk Upgrades – Increase survivability against high-damage attacks
Related Content and Progression:
- Deep Docks Navigation – Area where Swift Step is located
- Essential Beginner Tips – Master fundamentals before boss attempts
- Tool and Equipment Strategies – Optimize your loadout for boss encounters
Navigation and Resources:
- Maps and Navigation Guide – Navigate The Marrow efficiently
- Shell Shard Management – Maintain resources for boss attempts
- Merchant Buying Priority – Invest in the right upgrades
For New Players:
- Complete Beginner’s Guide – Build foundational skills
- Fast Travel System – Efficient movement for exploration
External Resources: