Learn how to get maps in Hollow Knight: Silksong. Complete guide to finding Shakra, buying essential mapping tools like Compass and Quill, and navigating Pharloom effectively.
Don’t Get Lost in Pharloom – Master the Mapping System Early
Unlike most modern games, Hollow Knight: Silksong doesn’t hand you a functional map system. You’ll start completely blind in Pharloom, and many players quit in frustration because they can’t figure out where they are or where they’ve been.
After extensive exploration and testing different approaches, I’ve developed the most efficient route to unlock Silksong’s complete mapping system. This guide will show you exactly how to find Shakra, which mapping tools to prioritize, and how to budget your Rosaries for maximum exploration efficiency.

Understanding Silksong’s Navigation Philosophy
Why Silksong Starts You Mapless
Team Cherry’s design choice to remove initial mapping serves several purposes:
- Emphasizes exploration over efficient routing
- Creates tension in unfamiliar areas
- Makes finding the map vendor a meaningful achievement
- Rewards thorough investigation of early areas
Strategic insight: Early disorientation is intentional. The game wants you to feel lost initially, making map acquisition feel like a major upgrade rather than a basic feature.
The Complete Mapping System Components
Silksong’s navigation requires multiple purchased items:
- Area Maps – Show room layouts and connections
- Compass – Displays your current location on maps
- Quill – Auto-updates maps as you explore
- Map Markers – Custom pins for important locations
Critical understanding: Each component serves a specific function. Missing any piece makes navigation significantly more difficult.
Step-by-Step: How to Find Shakra (Silksong Map Vendor Guide)
Navigation Route from Moss Grotto
Starting from your crash site in Moss Grotto:
Phase 1: Reach Bone Bottom
- Progress through Moss Grotto using the linear tutorial path
- Defeat Moss Mother (the first boss – mandatory for progression)
- Meet the Chapel Maid and continue to Bone Bottom
- Save at the bench and establish your base
Phase 2: Navigate to The Marrow
- From Bone Bottom, head right until you encounter Sherma and the large Bone Gate
- Don’t try to help Sherma open the gate musically – it won’t work
- Go above and around the Bone Gate to approach from behind
- Fight the enemies in the back room (including a dangerous crawler)
- Hit the lever to open the Bone Gate for Sherma
- Continue right into The Marrow proper
Phase 3: Locate Shakra
- Platform to the top-right in the first Marrow room
- Go up and left until you reach a chasm
- Pass the Flea Caravan (note this for later – there are hidden Rosaries above it)
- Head to the top-left of the chasm room, then continue left
- Jump across the bell platforms in the next room
- Listen for singing – Shakra’s voice will guide you to her location
Audio cue: Shakra’s singing is distinctive and carries across rooms. If you hear melodic vocalizations, you’re heading in the right direction.
ALso Read: How to Complete the Flexile Spines Quest in Hollow Knight: Silksong (Full Guide)
Essential Mapping Purchases (Priority Guide)
Budget Planning: 210 Rosaries for Full Setup
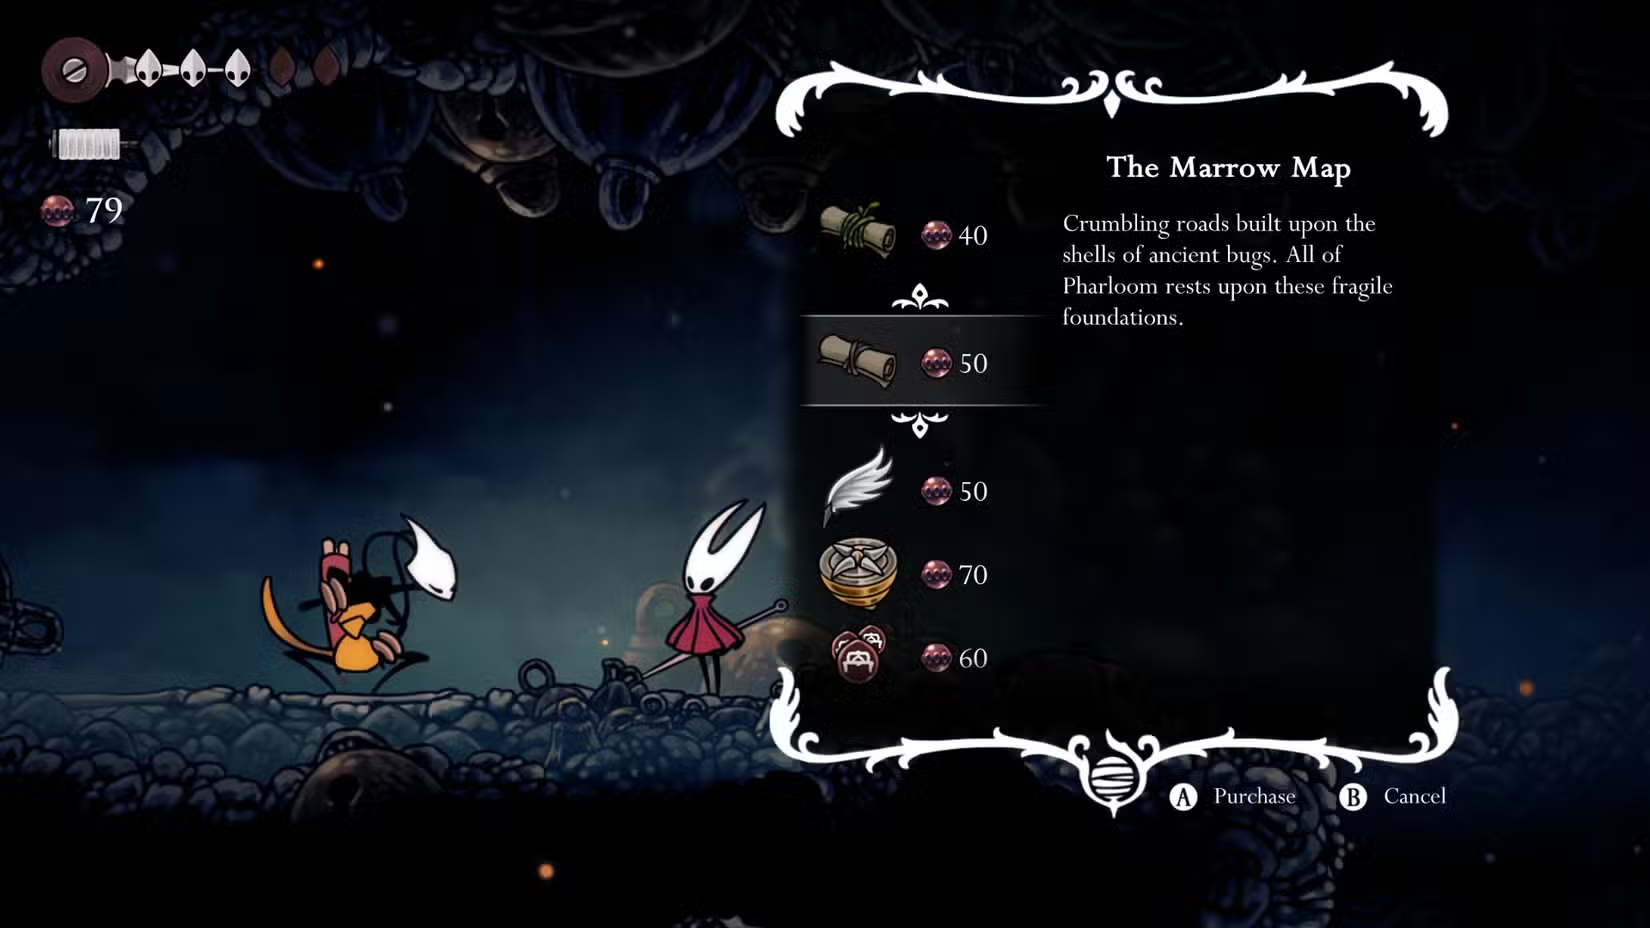
Total cost for complete mapping functionality:
- Mosslands Map: 40 Rosaries
- Marrow Map: 50 Rosaries
- Compass: 70 Rosaries
- Quill: 50 Rosaries
- Total: 210 Rosaries
If you’re short on Rosaries, here’s the optimal purchase order:
Priority 1: Buy at Least One Map (90 Rosaries)
Purchase both area maps (Mosslands and Marrow) first:
- Without maps, you can’t see room layouts or connections
- Both maps together cost 90 Rosaries
- This unlocks the map interface (left bumper) and Map tab in status menu
Strategic note: Don’t buy just one map – you’ll be exploring both areas extensively, and having both provides complete context for your current exploration.
Priority 2: Compass for Location Awareness (70 Rosaries)
The Compass is a yellow Tool that must be equipped at benches:
- Shows your position on purchased maps
- Essential for understanding where you are within mapped areas
- Can’t be used with other yellow Tools simultaneously (initial Crest limitation)
Equipment tip: Equip the Compass immediately after purchase at the nearest bench.
Priority 3: Quill for Automatic Updates (50 Rosaries)
The Quill provides passive map updating:
- Automatically fills in explored rooms when you rest at benches
- No equipment required – passive effect once purchased
- Eliminates need to manually track explored areas

Optional Additions: Map Markers
Bench Pins (60 Rosaries):
- Automatically marks discovered benches on your map
- Helpful for planning rest stops and safe zones
- Lower priority than core mapping tools
Shell Markers (40 Rosaries):
- Custom map pins you can place anywhere
- Useful for marking obstacles to return to later
- Marking merchant locations or quest objectives
- Advanced feature for experienced players
Funding Your Mapping System
Efficient Rosary Collection Strategies
Before visiting Shakra, collect enough Rosaries to buy core items:
High-value early sources:
- Secret room above Flea Caravan – 24 Rosaries (easy to miss)
- Thorough enemy clearing in Moss Grotto and early Marrow
- Breaking suspicious walls for hidden Rosary caches
- Exploring side rooms off the main progression path
Rosary cache locations in The Marrow:
- Hidden alcoves behind breakable walls
- Upper platforms requiring careful platforming
- Dead-end rooms that appear empty but contain secrets
Enemy farming (if needed):
- Respawnable enemies drop 1-3 Rosaries each
- Larger enemies tend to drop more
- Leave and re-enter areas to respawn enemies
The Flea Caravan Secret (Free 24 Rosaries)
Critical early-game resource:
- When passing the Flea Caravan on your way to Shakra
- Look for breakable walls above the caravan area
- Hit walls repeatedly until they break
- Collect 24 Rosaries from the hidden cache
Flea Caravan TL;DR: Find breakable wall above caravan → hit repeatedly → collect 24 free Rosaries
Why this matters: 24 Rosaries represents nearly 25% of your total mapping budget – don’t skip this.
Also Read: 7 Game-Changing Tips Every Hollow Knight: Silksong Beginner Needs to Know
Using Your New Mapping System
Map Interface Basics
Once you’ve purchased maps:
- Left bumper opens current area map
- Map tab in status menu shows full kingdom overview
- Different views for local navigation vs global planning
Navigation techniques:
- Zoom levels help with different scales of movement planning
- Room connections become clear once properly mapped
- Unexplored exits are highlighted for systematic exploration
Compass Integration
With Compass equipped:
- Blue dot shows your current position on maps
- Directional reference helps orient you in complex areas
- Position tracking makes backtracking much easier
Equipment management: Remember that Compass is a Tool requiring bench equipment. Plan tool swaps around exploration sessions.
Quill Automation Benefits
After purchasing Quill:
- Rest at benches to automatically update explored areas
- Room details fill in without manual exploration
- Connected areas become visible on maps
- Saves time previously spent manually mapping
Advanced Mapping Strategies
Multi-Area Exploration Planning
With complete mapping system:
- Plan routes across multiple areas efficiently
- Identify connection points between different zones
- Mark objectives across various locations
- Optimize backtracking for quest completion
Integration with Fast Travel
Once you unlock Bellways fast travel:
- Maps become crucial for planning fast travel routes
- Bellway stations are marked on maps for easy identification
- Combine mapping with fast travel for maximum exploration efficiency

Finding Additional Maps Later
Shakra’s Mobile Service
Shakra doesn’t stay in The Marrow permanently:
- She relocates to new areas as you progress
- Listen for her singing in unfamiliar zones
- She offers maps for each new area you discover
Progressive exploration: Each major area typically has Shakra available for new map purchases.
Alternative Map Sources
Later in the game:
- Some maps can be found on signposts or environmental locations
- Act 2 introduces alternative map acquisition methods
- Keep exploring thoroughly for non-vendor map sources
Environmental Clues
Even without maps, look for navigation aids:
- Distinctive landmarks for mental mapping
- Consistent visual themes within area sections
- Sound cues that indicate area transitions
- Environmental storytelling that suggests directions
Common Mapping Mistakes to Avoid
Budget Mismanagement
Don’t buy optional items first:
- Maps and Compass are essential
- Bench Pins and Shell Markers are convenience features
- Prioritize function over convenience early in the game
Equipment Oversights
Remember Tool limitations:
- Compass must be equipped to function
- Yellow Tool slot conflicts with other yellow Tools
- Plan Tool loadouts around exploration needs
Exploration Inefficiency
Don’t explore without maps:
- Blind exploration is much less efficient
- Getting lost wastes significant time
- Invest in mapping before major exploration sessions
Your Navigation Mastery is Complete
Silksong’s mapping system might seem complicated initially, but mastering it early transforms your entire experience. Proper navigation tools turn Pharloom from a confusing maze into a manageable, explorable kingdom.
Essential completion checklist:
- ✅ Navigate to Shakra in The Marrow
- ✅ Collect sufficient Rosaries (210 for full setup)
- ✅ Purchase both area maps (Mosslands + Marrow)
- ✅ Buy and equip Compass for position tracking
- ✅ Purchase Quill for automatic map updates
- ✅ Consider Bench Pins for advanced navigation
- ✅ Test complete system with rest at bench
With full mapping functionality, Pharloom’s secrets are yours to discover systematically. No more getting lost – just strategic exploration of one of gaming’s most beautifully designed interconnected worlds.
Related Article: How to Unlock Fast Travel in Hollow Knight: Silksong (Complete Bellways Guide)
Hollow Knight Silksong Official Game Link
Hollow Knight Silksong Steam Link
Hollow Knight Silksong Nintendo Link
