Find the Memorium map location in Hollow Knight Silksong. Complete guide on accessing Memorium through Mount Fay, getting the double jump, and navigating to the map vendor.
TL;DR
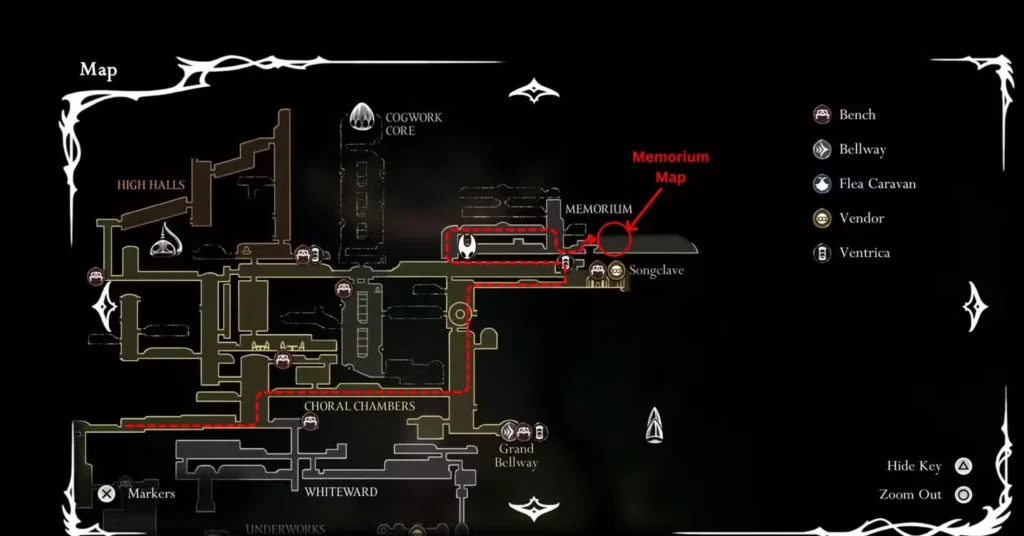
To reach Memorium, you need the Faydown Cloak (double jump) from Mount Fay peak. Head to Songclave, go left past two tough enemies, then use double jump to reach the area above. The map costs 70 Rosaries and is found by going right from the entrance to the bench, then up and through the right passage past enemies including a Rhinoguard, then left and down when you see the sign. If you’re broke, kill the two powerful enemies to the right of the bench for Rosary farming.
The Memorium is one of those areas in Silksong that feels properly mysterious when you first encounter it. This isn’t just another zone to explore – it’s a gateway hub that connects to multiple other areas, making it pretty crucial for efficient navigation later in the game. But getting there? That’s where things get interesting.
Unlike some of the earlier areas where you can stumble around and eventually find what you need, reaching the Memorium requires specific abilities and a bit of planning. It’s not the hardest area to access, but it definitely tests whether you’ve been thorough in your exploration.
Prerequisites: What You Need Before Starting

Before you can even think about reaching the Memorium, you need to tick off several progression boxes:
Essential abilities:
- Clawline (grappling hook from eastern Underworks)
- Faydown Cloak (double jump from Mount Fay peak)
Location access:
- Songclave unlocked (where you got the White Key)
- Comfortable with tougher combat encounters
The Mount Fay journey is particularly worth mentioning – getting to the peak requires the Clawline ability, and the climb itself is genuinely challenging. Don’t attempt it unless you’re confident in your platforming skills and have a solid combat build.
The Route to Memorium
Step 1: Get to Mount Fay Peak This is the big prerequisite. Mount Fay’s peak is where you’ll acquire the Faydown Cloak (double jump ability), and reaching it is no joke. The mountain climb involves precise platforming, grappling sections, and some genuinely tough enemies. Take your time and don’t be afraid to retreat if things get overwhelming.
Step 2: Navigate to Songclave Head to the top-left of the Citadel to reach Songclave. This should be familiar territory since you needed to come here earlier for the White Key to access the Whiteward.
Step 3: The Guardian Gauntlet Here’s where things get spicy. Head left from Songclave, and you’ll encounter two powerful enemies. These aren’t your typical fodder – they hit hard and have complex attack patterns. You can choose to fight them or try to run past, but fighting is generally the safer option since you need to navigate carefully anyway.
Step 4: The Double Jump Access After dealing with the guardians, you’ll see an area above you that was previously unreachable. This is where the Faydown Cloak shines – use your double jump to reach the Memorium entrance.
Finding the Map: Navigation Strategy
Once you’re inside the Memorium, the map location follows a specific route that’s easy to miss if you’re not paying attention:
The optimal path:
- From entrance, go right first – this leads to the bench (always good to have a save point)
- Exit the bench room and head up
- Take the passage on the right (this is where you’ll encounter multiple enemies)
- Deal with the Rhinoguard at the end of this section (or skip if you’re feeling brave)
- Head left through the next passage
- Go down when you spot the sign – this is your landmark
- Find the map vendor – 70 Rosaries for the Memorium map
The beauty of this route is that it naturally leads you through the area’s main sections, giving you a feel for the layout before you commit to buying the map.
Combat Encounters and Enemy Management
The Rhinoguard challenge: This enemy is the main threat in the map-hunting sequence. Rhinoguards are tanky, hit hard, and have charging attacks that can catch you off-guard. However, they’re also optional – you can often run past them if you’re more interested in exploration than combat.
Enemy variety: The Memorium has a good mix of enemy types scattered throughout. None of them are individually overwhelming, but in groups they can create pressure. The key is managing your positioning and not letting yourself get surrounded.
Strategic approach:
- Clear enemies if you want to explore safely
- Skip them if you’re just after the map
- Use the terrain to your advantage – many rooms have platforms that help with positioning
The Map Purchase: 70 Rosaries

The map vendor wants 70 Rosaries, which isn’t exactly pocket change but shouldn’t be too difficult if you’ve been exploring thoroughly. If you find yourself short on funds, there’s a built-in farming solution.
Rosary farming strategy: From the bench, head down and look for two powerful enemies on the right. These aren’t pushovers – they’re genuinely challenging encounters – but they drop decent Rosaries when defeated. It’s basically the game’s way of saying “prove you belong here, then you can afford the map.”
Resource management tip: Consider using our Rosary beads farming guide for more efficient currency collection strategies throughout your playthrough.
Beyond the Map: What Memorium Connects To
Once you have the map, you’ll discover that Memorium serves as a hub connecting to several important areas:
Direct connections:
- Putrified Ducts (through the secret passage on the right)
- Multiple areas accessible through breakable walls
- Connection points to other major zones
This hub function makes the Memorium map particularly valuable – it’s not just about navigating one area, but understanding how multiple zones connect through this central location.
Navigation Tips for Efficient Exploration
Bench strategy: Always visit that bench room first. Having a close respawn point makes exploration much less stressful, especially when you’re dealing with the tougher enemies scattered throughout the area.
Combat vs. speed: Decide early whether you’re doing a thorough clear or a quick map grab. Mixing approaches often leads to unnecessary resource expenditure and confusion.
Secret hunting: The Memorium has multiple breakable walls and hidden passages. Our maps and navigation guide can help you identify areas worth investigating more thoroughly.
Common Mistakes to Avoid
Attempting without double jump: Don’t try to reach Memorium before getting the Faydown Cloak. The access point is specifically designed to require this ability.
Underestimating the guardian enemies: Those two powerful enemies near Songclave aren’t optional tutorial fights – they’re legitimate threats that require proper preparation.
Skipping the bench: Not establishing a save point near the entrance can turn a simple map-buying trip into a frustrating slog if you die to the area’s enemies.
Resource management: Going in with insufficient Rosaries and no backup plan for earning more can leave you stuck in the area longer than intended.
Ready to Explore the Memorium?
Want to experience this mystical hub area yourself? Hollow Knight: Silksong is available on:
For more area guides and navigation tips, check out the official Hollow Knight: Silksong website or our essential beginner tips.
Final Thoughts
The Memorium represents one of Silksong’s more thoughtful area designs – it’s not just about reaching a destination, but about proving you’ve mastered the game’s traversal and combat systems along the way. The double jump requirement ensures you’ve conquered Mount Fay, while the guardian encounters test your combat readiness.
The hub nature of the area makes the map particularly valuable, turning it from a simple navigation aid into a key strategic resource for understanding how different zones connect. It’s the kind of purchase that pays dividends throughout your entire playthrough.
My advice? Don’t rush through this area. Take time to explore thoroughly, engage with the combat encounters, and appreciate how the Memorium serves as both destination and gateway. It’s one of those locations that perfectly encapsulates what makes Metroidvania design so compelling – every area serves multiple purposes and rewards thorough exploration.
Now get out there and add another map to your collection!