Moorwing represents a significant difficulty spike in Silksong’s progression, serving as the gatekeeper to one of the game’s major hub areas. This isn’t just another optional boss you can skip – defeating Moorwing is essential for accessing Haunted Bellhart and continuing your journey through Pharloom.
What makes Moorwing particularly challenging is its combination of high-speed attacks, devastating damage output, and complex wind-based projectiles that can catch even experienced players off guard. Most of its attacks deal two masks of damage, meaning a couple of mistakes can quickly end your attempt.
The fight demands mastery of movement abilities, precise timing, and strategic positioning – skills that will serve you well throughout the rest of Silksong’s challenging encounters.
Getting to Moorwing
Reaching Greymoor
Before you can face Moorwing, you’ll need to navigate to Greymoor, which requires substantial progression through the Far Fields area. The journey involves taking a series of air vents up and out of the top-right section of Far Fields.
Essential requirement: You’ll need the Drifter’s Cloak for this journey, as floating upward through the vent system is mandatory. From Pilgrim’s Rest, take the top exit heading left, then use your cloak to float upward while breaking open vents along the way to access Greymoor.
For detailed navigation through the Far Fields, our Far Fields progression guide covers the optimal routes and important landmarks.
Navigating Greymoor to Moorwing
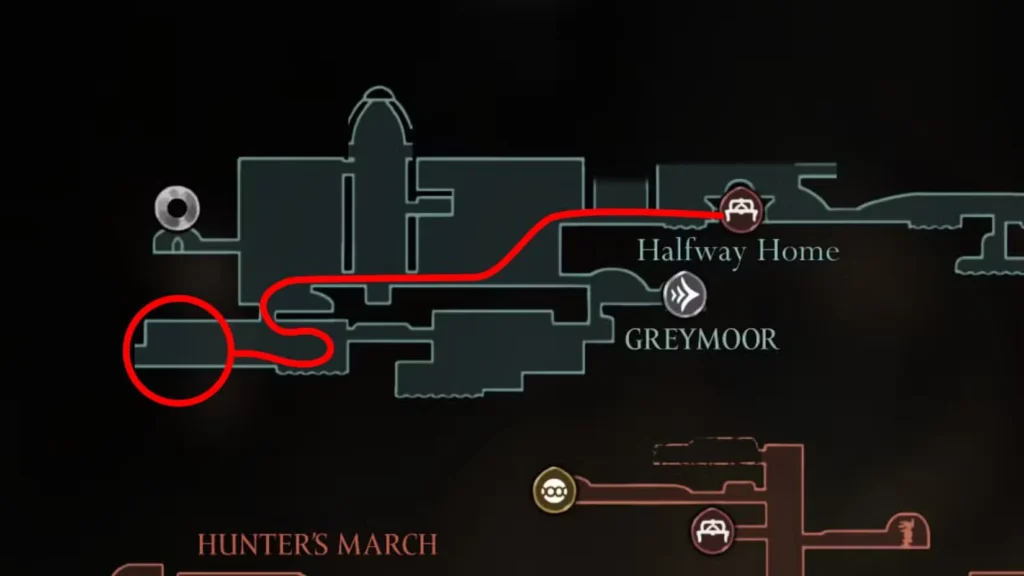
Moorwing’s arena sits on the far left side of Greymoor, requiring you to traverse a significant portion of this atmospheric area. The trek itself presents challenges with environmental hazards and tough enemies, so don’t expect a casual stroll to the boss fight.
Critical Bench Location: Halfway Home
Before attempting Moorwing, establish your respawn point at the Halfway Home bench. This location provides the shortest route back to the boss and includes some important NPCs and services.
At Halfway Home:
- Talk to Nuu to obtain the Hunter’s Journal (essential for tracking enemy encounters)
- Rest at the bench to save your progress and restore health
- Prepare mentally for the challenging route ahead

Route from Halfway Home to Moorwing
From the Halfway Home bench, follow this step-by-step path:
- Head left through interior rooms – These connected chambers lead deeper into Greymoor
- Drop down to the area with two Pilgrim enemies – Clear these enemies or carefully navigate around them
- Continue left until you reach a significant drop – Look for the cage with a scissor-wielding bug on top as your landmark
- Follow the path as it curves right – The terrain becomes more complex here
- Drop down into the water-filled room at the bottom-left of Greymoor
- Continue left to find solid ground and enter Moorwing’s boss arena
Navigation tip: Take your time through this route on your first attempt. The path contains valuable resources and you’ll want to memorize it for potential repeat attempts.
Understanding Moorwing’s Phases
Phase 1: Learning the Basics
The first phase serves as an introduction to Moorwing’s core mechanics:
Single Gust attacks: Moorwing launches one wind projectile at a time, giving you clear opportunities to practice timing and positioning.
Limited moveset: Only Low Charge and Double Downward Slashes are available, making pattern recognition more manageable.
Damage assessment: Use this phase to understand the boss’s damage output and your defensive options.
Phase 2: Escalated Complexity
After dealing sufficient damage, Moorwing roars and enters its more dangerous second phase:
Multiple Gusts: The boss now launches several wind projectiles simultaneously, dramatically increasing the complexity of dodging.
Combo attacks: Moorwing often chains slashing attacks immediately after gust launches, requiring faster reactions.
Looping Gust introduction: A new attack pattern that creates unpredictable projectile paths.
Increased aggression: Attack windows become shorter and more dangerous to capitalize on.
Detailed Attack Analysis
Single Gust

Visual cue: Moorwing rears back and visibly summons wind energy in its clutches before launching.
Behavior: The gust travels along the ground initially, then curves upward after a few seconds.
Counter strategy: Simple jump timing over the projectile. Use this attack to practice your timing for more complex gust patterns later.
Low Charge

Visual cue: The boss flattens its body profile and opens its mouth wide.
Behavior: Moorwing flies horizontally across the arena at ground level, often using this to close distance if you’ve moved too far away.
Counter strategy: Jump over the boss and attempt a downward strike as it passes underneath. This is one of your best opportunities for safe damage.
Advanced technique: The recovery period after this attack provides a brief healing window if you’re positioned correctly.
Double Downward Slashes

Visual cue: Moorwing straightens vertically with mouth open, clearly telegraphing its intention to dive.
Behavior: Rapid diagonal charge toward Hornet’s current position with claw slashes that can hit twice if you’re caught early in the animation.
Counter strategy: Use Swift Step immediately in the opposite direction. Quick players can land hits on Moorwing’s head during the recovery animation.
Critical timing: Don’t try to dodge this attack with regular movement – Swift Step is essential for reliable avoidance.
Looping Gusts (Phase 2)

Visual cue: Moorwing hovers above Hornet with its tail visibly raised.
Behavior: Launches two gusts in opposite directions that curve inward, collide, and bounce outward along the ground.
Counter strategy: Avoid the initial launch areas, then jump over the returning projectiles. The hovering period provides a brief attack opportunity on the boss’s head.
Positioning key: Stay aware of both the initial gust directions and their return paths – getting caught by the bounce-back is a common mistake.
Double Gust (Phase 2)

Visual cue: Similar rear-back animation to Single Gust, but Moorwing maintains aggressive positioning.
Behavior: First gust travels full distance, immediately followed by a shorter-range gust that loops back to the boss’s location.
Counter strategy: Short jump over the first gust, then dodge the second. Watch carefully for the looping return path.
Timing emphasis: The follow-up gust comes quickly – don’t relax after dodging the first projectile.
Triple Gust (Phase 2)

Visual cue: Extended rear-back animation indicating maximum gust preparation.
Behavior: Three projectiles with different travel distances and curve patterns – long range, medium range with upward curve, and short range with loop-back.
Counter strategy: Carefully time jumps over all three projectiles, then dodge sideways when the third gust approaches to avoid its upward curve.
Complexity note: This is Moorwing’s most challenging attack to navigate consistently. Focus on survival over offense during these sequences.
Advanced Combat Strategies
Healing Optimization
Primary healing window: During Low Charge attacks – Bind in mid-air while jumping over the boss.
Emergency healing: Stagger periods provide longer healing windows, but they’re less predictable.
Critical timing: Keep Swift Step ready immediately after Bind animations, as Moorwing often follows Low Charge with slashing attacks.
Positioning Principles
Stay mobile: Static positioning makes you vulnerable to combo attacks and multiple gust patterns.
Central arena preference: Avoid corners where escape options become limited during complex gust attacks.
Height awareness: Many attacks target ground level – controlled jumping provides both dodging and attack opportunities.
Attack Windows
Safest opportunities:
- During Low Charge recovery (downward strikes)
- Head attacks while Moorwing hovers for Looping Gusts
- Brief windows after successful Swift Step dodges from slashing attacks
Risky but rewarding:
- Head attacks during Double Downward Slash recovery
- Quick strikes between gust launches in phase 2
Equipment Recommendations
Essential Tool: Warding Bell – Prevents damage during Bind animations, crucial for safe healing during this high-damage fight.
Movement prerequisite: Swift Step ability is nearly mandatory for consistent dodging of slashing attacks.
Health consideration: Additional HP masks from Silk upgrades provide crucial survivability against two-mask damage attacks.
Critical Success Factors
Focus on Defense First
Gust mastery: The majority of your attention should be on successfully navigating wind attacks rather than maximizing damage output.
Patience over aggression: Moorwing punishes greedy attack attempts severely. Wait for clear openings rather than forcing damage opportunities.
Pattern recognition: Each attack has distinct visual cues – invest time in learning them rather than relying on reflexes.
Swift Step Mastery
Use as primary dodge: Treat Swift Step as your main defensive tool rather than just a movement option.
Timing precision: Master the timing for dodging immediately when slashing attacks begin rather than waiting for the last moment.
Recovery awareness: Always be ready to move again immediately after using Swift Step – Moorwing often chains attacks.
Phase 2 Adaptation
Complexity acceptance: Phase 2 requires significantly more defensive focus – don’t expect the same attack frequency as phase 1.
Gust priority: When multiple projectiles are active, prioritize dodging over attacking every time.
Combo awareness: Be prepared for immediate follow-up attacks after gust launches.
Reward and Progression
Immediate Reward: Access to Haunted Bellhart

Defeating Moorwing unlocks the path leading left from the boss arena, providing access to Haunted Bellhart – Silksong’s second major town hub.
What this means: Haunted Bellhart offers new NPCs, quests, upgrades, and services that become essential for mid-game progression.
Story significance: The transition includes a atmospheric cutscene showcasing Hornet’s reaction to this mysterious settlement.
Strategic Importance
This isn’t just another boss fight – it’s a mandatory progression gate. You cannot access Haunted Bellhart and its resources without defeating Moorwing, making this encounter essential rather than optional.
Preparation payoff: The skills developed fighting Moorwing – precise dodging, pattern recognition, and positioning under pressure – directly apply to later boss encounters and challenging areas.
When to Attempt Moorwing
Recommended Preparation
Minimum requirements:
- Swift Step ability unlocked and comfortable to use
- At least 5-6 HP masks for survivability against two-mask damage
- Warding Bell for safe healing opportunities
- Solid understanding of basic combat timing
Optimal preparation:
- Additional health upgrades
- Familiarity with advanced movement techniques
- Practice with similar high-speed boss encounters
Signs You’re Ready
- Comfortable dodging multiple projectiles simultaneously
- Can consistently use Swift Step defensively under pressure
- Successfully navigate complex environmental challenges in Greymoor
- Rarely take damage from basic enemy encounters
If you’re struggling with the fight, consider exploring more of Greymoor and Far Fields for additional upgrades before returning. The boss will still be there when you’re better prepared.
Essential Preparation:
- Warding Bell Location Guide – Critical Tool for safe healing during high-damage fights
- Swift Step and Movement Abilities – Essential for dodging slashing attacks
- HP and Silk Upgrades – Increase survivability against two-mask damage attacks
- Far Fields Progression Guide – Navigate to Greymoor efficiently
Combat and Strategy:
- Essential Beginner Tips – Master defensive fundamentals before attempting this boss
- Tool and Equipment Strategies – Optimize your loadout for boss encounters
- Merchant Buying Priority – Invest in the right upgrades for boss preparation
Navigation and Resources:
- Maps and Navigation Guide – Essential for navigating complex areas like Greymoor
- Shell Shard and Tool Management – Maintain resources for extended boss attempts
- Fast Travel System – Efficient movement for repeat attempts
For New Players:
- Complete Beginner’s Guide – Build foundational skills before major boss encounters
- Hunter’s Journal and Bestiary – Track your progress and enemy encounters
External Resources: