If you’ve been playing Hollow Knight Silksong and wondering why finding maps suddenly became more challenging after Act One, you’re not alone. During the early stages of your journey through Pharloom, Shakra the cartographer was your reliable companion, appearing in almost every new area with a fresh map ready for purchase.
But as you progress deeper into Silksong’s story, particularly after completing Act 2 in the Citadel, Shakra becomes increasingly scarce. Instead, you’ll encounter mysterious map-selling mechanisms scattered throughout various regions—and the Whispering Vaults is one of these areas where you’ll need to hunt down the map yourself.
This shift in map availability isn’t just a gameplay quirk; it reflects Hornet’s journey into more dangerous, less civilized parts of Pharloom where even brave cartographers fear to tread.
The Whispering Vaults: A Hidden Treasure Trove
Before we dive into finding the map, let’s talk about why the Whispering Vaults deserves your attention. This isn’t just another area to check off your exploration list—it’s a secret-filled region that connects multiple important locations and houses some of Silksong’s most valuable items.
The Whispering Vaults serves as a crucial hub area, providing shortcuts between the Choral Chambers, Cogwork Core, and Underworks. More importantly, it’s home to the elusive Pale Oil, which you’ll need for the Pinmaster’s Oil quest—one of the game’s more rewarding side quests.
Step-by-Step Guide to Finding the Map
Prerequisites: What You’ll Need
Before attempting to reach the Whispering Vaults map, make sure you have:
- Wall Jump ability (essential for accessing the attic area)
- At least 70 Rosary Beads for purchasing the map
- Completion of the rotating wheel bridge section between Cogwork Core and Choral Chambers
If you’re missing the wall jump ability, you’ll need to backtrack and acquire it first. Don’t worry about the Rosary Beads if you’re short—you can always come back once you’ve gathered enough currency.
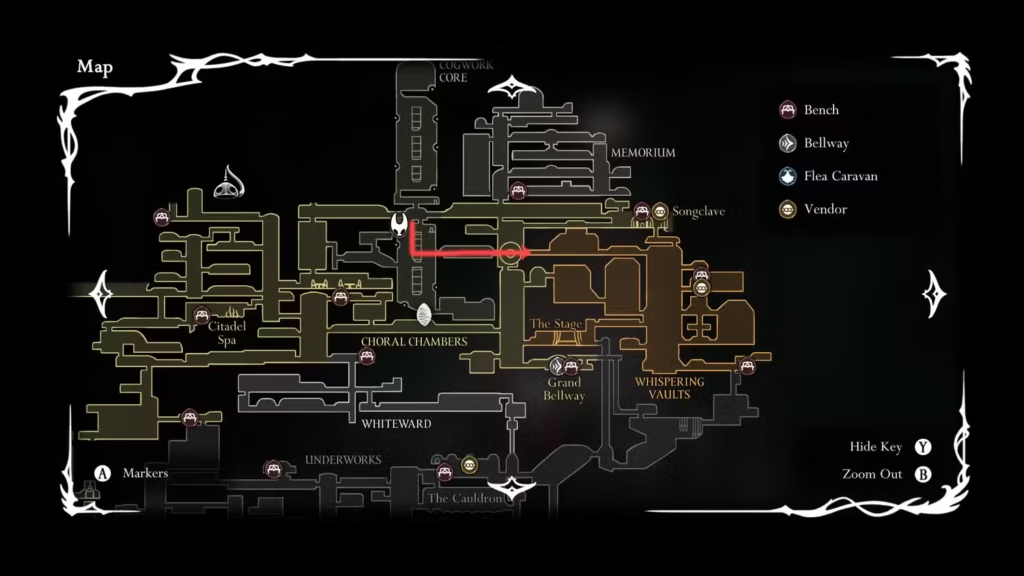
The Journey Begins: Crossing the Rotating Wheel Bridge
Your map hunt starts at the rotating wheel bridge that connects Cogwork Core to Choral Chambers. This mechanical marvel is hard to miss—it’s a massive rotating structure that provides access between these two significant areas.
After successfully navigating across this bridge, you’ll find yourself in the first room of the Whispering Vaults. The atmosphere here is immediately different from other areas—there’s an eerie, almost sacred quality to the architecture that hints at the secrets hidden within.
Surviving the Welcome Committee
The Whispering Vaults doesn’t roll out the red carpet for visitors. Almost immediately after entering the first room, you’ll find yourself locked in combat with multiple enemies. This isn’t just a random encounter—it’s essentially a mini-boss fight that serves as a gatekeeper for the rest of the area.
Combat tip: Focus on managing your thread gauge for healing during this fight. You’ll want to enter the deeper areas with full health, and this battle provides a good opportunity to practice your combat flow before facing tougher challenges ahead.
The Guardian and the Hidden Ladder
After clearing the initial enemy gauntlet, continue deeper into the Whispering Vaults. You’ll eventually encounter a lone, large enemy acting as a guardian for this section. This isn’t just any random foe—defeating this guardian is your key to accessing the hidden map location.
Once you’ve dealt with the guardian, look carefully for an iron pole ladder at the far end of the area. Here’s where many players get stuck: the ladder isn’t immediately usable. You need to attack it first, causing it to fall and create a climbable path.
This mechanical puzzle reflects Silksong’s design philosophy of making players actively engage with their environment rather than passively navigating through it.
Scaling to the Secret Attic
With the iron pole ladder now positioned correctly, you can use your wall jump ability to climb into the hidden attic area. This space has a distinctly different feel from the main Whispering Vaults—it’s cramped, dusty, and filled with the sense that you’ve discovered something few other explorers have found.
The attic also connects directly to the Songclave area in Choral Chambers, specifically beneath the first shrine. This connection isn’t just convenient for navigation—it provides multiple escape routes and creates interesting possibilities for sequence breaking if you’re an advanced player.
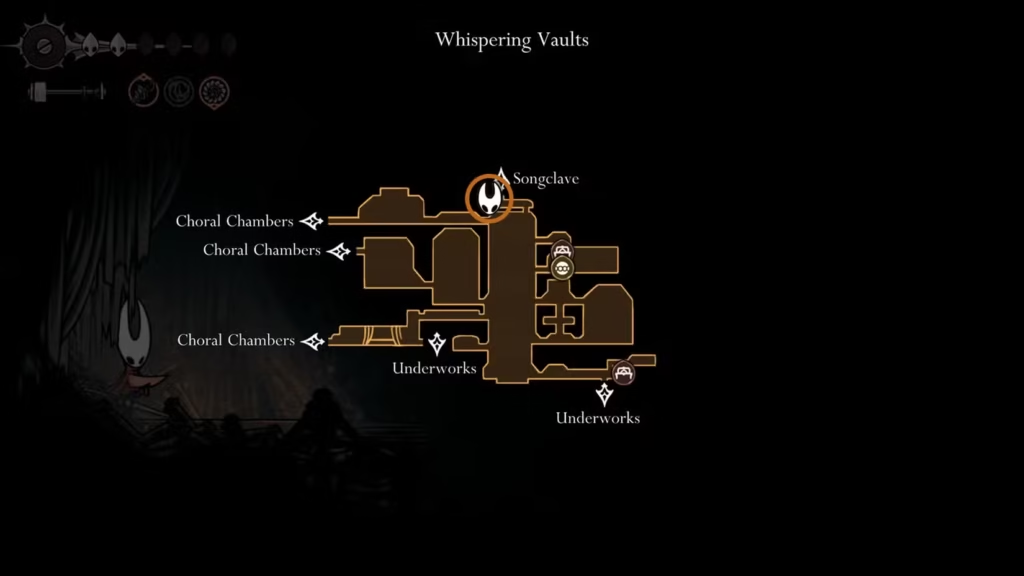
The Map’s Final Hiding Spot
Once you’re in the attic, head left and continue to the very end of the area. The map mechanism will be waiting there, but don’t expect it to be obviously placed. Like many of Silksong’s secrets, it requires thorough exploration to locate.
Having those 70 Rosary Beads ready is crucial here. Unlike Shakra’s reasonable prices in earlier areas, these automated map vendors charge premium prices for their cartographic services. Consider it a tax for accessing maps in Pharloom’s more dangerous regions.
Why This Map Matters for Your Journey
Strategic Value Beyond Basic Navigation
The Whispering Vaults map isn’t just about knowing where you are—it reveals the interconnected nature of this hub area and helps you plan efficient routes between major regions. Understanding these connections becomes increasingly important as you progress toward Act 3 and the Abyss.
Secret Hunting Made Easier
With the map in hand, you can more easily locate the various secrets scattered throughout the Whispering Vaults. This includes not only the famous Pale Oil but also various Bone Scroll locations and hidden passages that connect to other areas.
Essential Tips for Whispering Vaults Exploration
Resource Management
Before diving deep into the Whispering Vaults, stock up on Rosary Beads. Beyond the 70 needed for the map, you’ll want extra for unlocking benches and purchasing items from various vendors you’ll encounter.
Combat Preparation
The enemies in Whispering Vaults hit harder than those in earlier areas. Make sure your needle is upgraded and consider acquiring defensive tools like the Warding Bell if you haven’t already.
Navigation Strategy
The Whispering Vaults’ hub-like nature means it’s easy to get turned around. Having the map helps enormously, but also pay attention to environmental landmarks. The attic area, in particular, can be confusing without proper reference points.
Where to Experience This Adventure
Ready to hunt down the Whispering Vaults map yourself? Get Hollow Knight Silksong on your preferred platform:
- Steam: Download for PC
- Nintendo Switch: Get the latest edition
- PlayStation: Available on PlayStation Store
- Xbox: Download from Xbox Store
Making the Most of Your Discovery
Finding the Whispering Vaults map is just the beginning of your exploration in this fascinating area. With the map in hand, you’re now equipped to uncover the region’s many secrets, complete important quests like the Pinmaster’s Oil quest, and efficiently navigate between Pharloom’s interconnected regions.
Remember, the shift from easily accessible maps to hidden, expensive ones reflects your progression into Silksong’s more challenging content. Each map you hunt down represents not just a navigation tool, but a badge of your growing expertise as an explorer of Pharloom’s deepest secrets.
The Whispering Vaults holds many more mysteries beyond its map, so take your time exploring once you’ve secured this essential navigation tool. After all, some of Pharloom’s greatest treasures are found by those patient enough to search every hidden corner.