StarRupture is doing something really special — it’s taking the cozy base-building vibes of Satisfactory and Factorio, mixing in some legit survival mechanics, and then throwing in everyone’s favorite nightmare fuel: giant alien bugs. If you’ve played Helldivers, you know exactly what I’m talking about. Meet the Vermin, Arcadia-7’s resident arachnid menace.
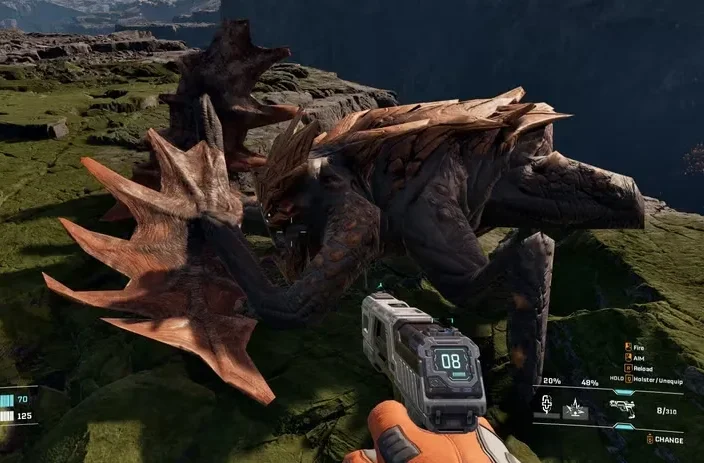
Among these creepy crawlies, the Goliath stands out as one of the absolute worst enemies you’ll encounter. This thing is basically a mobile tank with anger management issues, and it will absolutely wreck you if you’re not prepared. But here’s the good news: with the right strategy, you can take down this armored nightmare and claim its incredibly valuable Biological Sample.
Let me break down everything you need to know about finding, fighting, and farming Goliaths in StarRupture.
What Makes the Goliath So Dangerous in StarRupture?
The Goliath isn’t just another Vermin variant — it’s essentially a boss-tier enemy that commands entire swarms. Here’s what makes this thing such a threat:
Physical Stats:
- Heavily armored carapace that deflects most damage
- Surprisingly fast despite its massive size
- Can one-shot unprepared players with its attacks
- Often surrounded by support Vermin (Swarmers, Spitters, Exploders, and Bladers)
Behavioral Traits:
- Burrows underground and waits for players to enter its aggro zone
- Emerges suddenly and pursues relentlessly
- Commands other Vermin in the area, coordinating attacks
- Will chase you across the entire map if provoked
If you’re still working on your basic survival setup, check out the StarRupture beginner’s guide before taking on these beasts. You’ll want solid gear and weapons first — speaking of which, make sure you’ve unlocked all weapons available to you.
Understanding Goliath Attack Patterns
Knowledge is power, especially when fighting something that can delete your health bar in seconds. The Goliath has four main attacks you need to recognize:
1. Defensive Mode (Shield Stance)
The Goliath slows down and covers its front with massive claws, becoming completely invulnerable to frontal damage. Don’t waste ammo shooting at it during this phase — you literally cannot hurt it from the front when it’s shielding.
While defending, it continues pursuing players and will execute a devastating charge when in range.
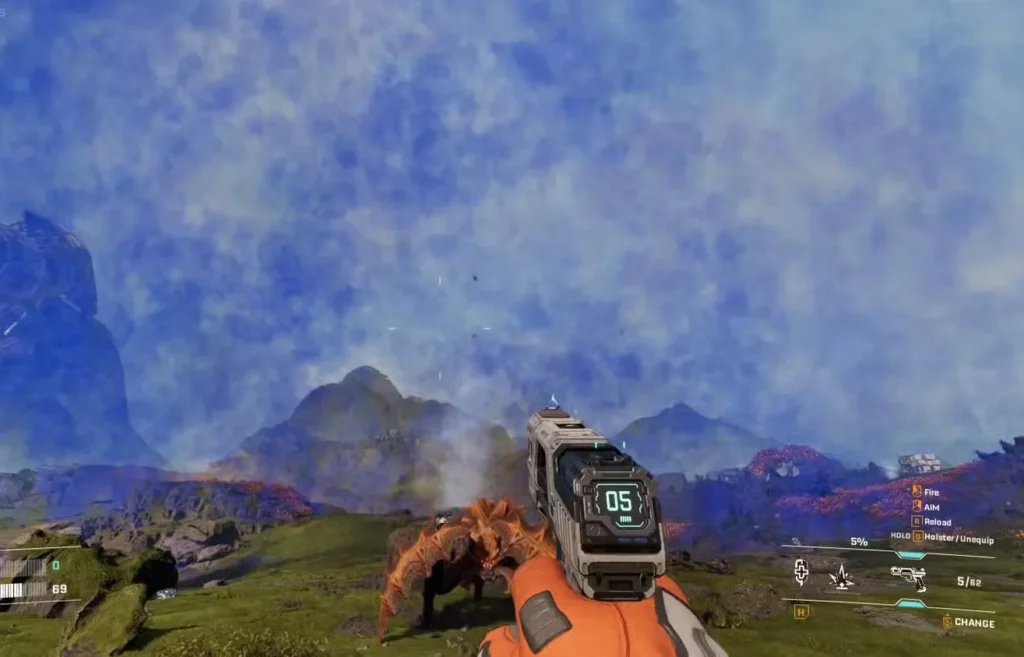
2. Charge Attack
The Goliath rushes forward in a straight line, dealing heavy damage and knocking players down.
Dodge tip: This attack is telegraphed and can be sidestepped with good timing. However, getting hit leaves you vulnerable to follow-up attacks, which is often how players get killed. Stay mobile and don’t get greedy with your shots.
3. Pincer Attack (Sweep)
The Goliath performs a wide sweeping attack with its claws, either in front or executing a quick 180° spin to catch players behind it.
This is its counter to flanking attempts, so be ready to back off when you see the animation start.
4. Shockwave (Ground Pound)
The Goliath slams the ground, sending a shockwave in a straight line that damages everything in its path.
Counter: Move perpendicular to the shockwave direction. Since it travels in a straight pattern, side-stepping avoids it entirely.
How to Kill a Goliath: Core Strategy
Alright, here’s the fundamental approach that actually works:
The Weak Spot: There’s a small gap in the carapace on the Goliath’s backside. This is the only vulnerable point where your damage actually counts. You need to repeatedly shoot this spot to bring the creature down.
Damage Requirements: With an LMG or Assault Rifle, expect to pump two to three full magazines into the weak spot (theoretically — sometimes it takes more depending on your weapon mods).
Team Strategy (Recommended)
Fighting Goliaths is exponentially easier with a squad. Here’s the optimal approach:
Step 1: Assign Roles
- One player acts as the tank/distraction — their job is to keep the Goliath’s attention
- Remaining players position themselves behind the Goliath
Step 2: Execute the Kill
- Tank player maintains aggro, keeping the Goliath facing them
- DPS players focus fire on the back weak spot
- Tank should strafe and dodge, not just face-tank damage
Step 3: Manage the Swarm
- Goliaths are rarely alone — expect Swarmers, Spitters, and other variants
- Use grenades to thin out supporting enemies
- Don’t waste grenades on the Goliath itself — they’re not effective against its armor
- Save explosives for crowd control when the swarm gets overwhelming
Pro tip: Make sure your squad has enough inventory space for loot and ammunition before engaging.
Solo Strategy (For the Brave or Foolish)
Taking on a Goliath solo is genuinely challenging, but it’s doable if you play smart:
Step 1: Separate and Conquer
- RUN. Seriously, just sprint away from the initial engagement
- Keep running until the Goliath is separated from its support swarm
- Create significant distance between you and the pursuing enemies
Step 2: Take the High Ground
- Find elevated terrain, rocks, or structures
- Goliaths will circle around trying to find a path up to your position
- This is your opportunity — when it’s pathfinding and circling, it exposes its back
Step 3: Exploit the Opening
- As the Goliath searches for a way up, it temporarily stops its aggressive pursuit
- This is when the weak spot becomes accessible
- Unload into the back gap until it goes down
Step 4: Stay Mobile
- Never stay in one spot too long
- If the Goliath reaches you, reposition immediately
- Use your medtool to heal between engagements
Important: Make sure you’re adequately leveled before attempting this solo. Check the max level cap to understand your progression.
Where to Find Goliaths in StarRupture
Goliaths aren’t randomly scattered across Arcadia-7 — they have preferred spawn areas:
Primary Location: Head northeast from the Landing Zone toward the more hostile regions of the map. Goliaths frequently spawn around Sulfur Pits, which makes sense thematically since those areas are already dangerous and toxic.
Look for areas with:
- Higher Vermin density
- Yellow sulfuric gas plumes (indicating Sulfur deposits)
- Barren, rocky terrain
- Multiple Vermin variants roaming together
If you’re exploring and suddenly see a massive swarm commanded by an armored behemoth, congratulations — you’ve found a Goliath.
Is Farming Goliaths Worth It?
Short answer: Absolutely yes.
Long answer: The Goliath drops a Biological Sample worth 5,000 Data Points when killed. That’s a massive reward, especially considering how valuable Data Points are for unlocking tech and progression.
Each Goliath drops at least one sample, making them one of the most lucrative farming targets in the game.
Farming Tips and Warnings
The Good:
- 5,000 Data Points per kill is exceptional
- Biological Samples can be analyzed at the Analysis Station
- Consistent spawn locations make farming predictable
- Great for late-game progression
The Challenges:
- Fighting multiple Goliaths simultaneously is extremely dangerous
- Take them one at a time — getting greedy leads to death
- Requires significant ammunition investment
- Solo farming is risky and time-consuming
Recommended Farming Setup:
- Full squad of 3-4 players
- Everyone equipped with LMGs or Assault Rifles
- Plenty of ammunition stockpiled
- Grenades for swarm control
- Healing supplies and water for sustain
If you’re farming Goliaths regularly, consider setting up a forward operating base near Sulfur Pits with weapon storage, ammunition production, and healing facilities. Check out guides on basic building materials and connecting power to build an effective outpost.
Additional Combat Tips
- Ammunition management: Bring way more ammo than you think you need. Running dry mid-fight is a death sentence.
- Positioning is everything: Never let the Goliath corner you against terrain or structures.
- Sound cues: Listen for the burrowing sound — it indicates a Goliath is about to surface.
- Retreat is valid: If the fight goes south, disengage and regroup. Your life is worth more than one kill.
- Resource the samples: Don’t forget to actually collect the Biological Sample after killing it — I’ve seen players forget in the chaos.
For additional enemy intel, check out the all characters guide to understand how different characters might approach this fight.
Frequently Asked Questions
Can I kill a Goliath with just grenades?
Unfortunately, no. Grenades are largely ineffective against the Goliath’s heavy armor. They’re much better used for clearing out the supporting swarm of smaller Vermin. Save your explosives for crowd control and focus rifle fire on the weak spot for the Goliath itself.
What’s the minimum level/gear needed to fight a Goliath?
While there’s no strict level requirement, you should have at least an Assault Rifle or LMG fully upgraded with decent weapon mods. Make sure you have adequate armor and healing supplies. If you’re still using starter gear, focus on progression first before hunting these beasts.
Do Goliaths respawn, and how often?
Yes, Goliaths do respawn in their designated areas after a certain period. The exact timer isn’t publicly confirmed, but players report seeing them return after several in-game days. This makes them a renewable source of Data Points for dedicated farmers.
Can I avoid Goliaths entirely while exploring Sulfur areas?
Technically yes, but it’s risky. Goliaths have large aggro ranges and will pursue you relentlessly once triggered. If you’re just trying to get Sulfur and not looking for a fight, move quickly, stay alert, and be ready to retreat to safe ground if one surfaces. Consider scouting the area first and clearing threats before setting up extraction operations.
The Goliath is genuinely one of StarRupture’s most challenging enemies, but mastering the fight is incredibly rewarding both in terms of Data Points and pure satisfaction. Whether you’re farming them for progression or just trying to survive an encounter, remember: patience, positioning, and teamwork are your best weapons. Good hunting out there on Arcadia-7!