Farming in Hytale opens up a whole new dimension of gameplay, providing cooking ingredients, tradeable goods, and decorative items you won’t find anywhere else. While the basic concept is straightforward—plant seeds, wait, harvest—the actual mechanics involve several systems working together that can trip up newcomers.
This guide walks you through every step of establishing your first farm, from building the necessary workbenches to harvesting your first crops. Whether you’re looking to become self-sufficient or just want fresh ingredients for cooking, understanding farming fundamentals will serve you well throughout your Hytale journey. For even more strategies and essential gameplay tips, explore our comprehensive Hytale guides hub.
Step 1: Build the Farmer’s Workbench
Before you can plant anything, you need a Farmer’s Workbench. This specialized crafting station handles everything farming-related—tools, seeds, fertilizer, and more. It’s your one-stop shop for agricultural needs.

Farmer’s Workbench Recipe:
- Any Tree Log x6
- Plant Fiber x20
- Crafted at: Regular Workbench
Gathering softwood logs early on makes this process quick. Plant Fiber drops from breaking grass and small plants, so you should have plenty lying around from general exploration. Once crafted, place your Farmer’s Workbench somewhere accessible—you’ll be returning here frequently.
Pro Tip: Position storage chests within six blocks of your Farmer’s Workbench. Materials stored in nearby chests become available for crafting without cluttering your inventory, which saves tons of time when batch-crafting seeds or tools.
Step 2: Craft Essential Farming Tools
With your Farmer’s Workbench ready, head to the Farming tab and craft these three critical items. You can’t start farming without them.
Crude Hoe
Recipe:
- Any Tree Log x2
- Any Stone x1
- Crafted at: Farmer’s Workbench (Farming tab)
The hoe prepares soil for planting. You’ll use it to till dirt and grass blocks, converting them into farmland where crops can grow. It won’t work on stone, marble, or other hard surfaces—only natural soil.
Empty Watering Can
Recipe:
- Iron Ingot x3
- Crafted at: Farmer’s Workbench (Farming tab)
Watering dramatically speeds up crop growth (2.5x faster), making this tool essential for efficient farming. Each watering can holds enough water for 20 uses before needing a refill.
Wooden Bucket
Recipe:
- Any Wood x3
- Iron Ingot x1
- Crafted at: Farmer’s Workbench (Farming tab)
You’ll use the bucket to transport water from natural sources to your farm. Think of it as the intermediary between lakes and your watering can.
Step 3: Obtain Crop Seeds
Seeds come from two sources: crafting at the Farmer’s Workbench or finding them in loot chests scattered throughout the world. When you’re just starting out, crafting is the reliable option.
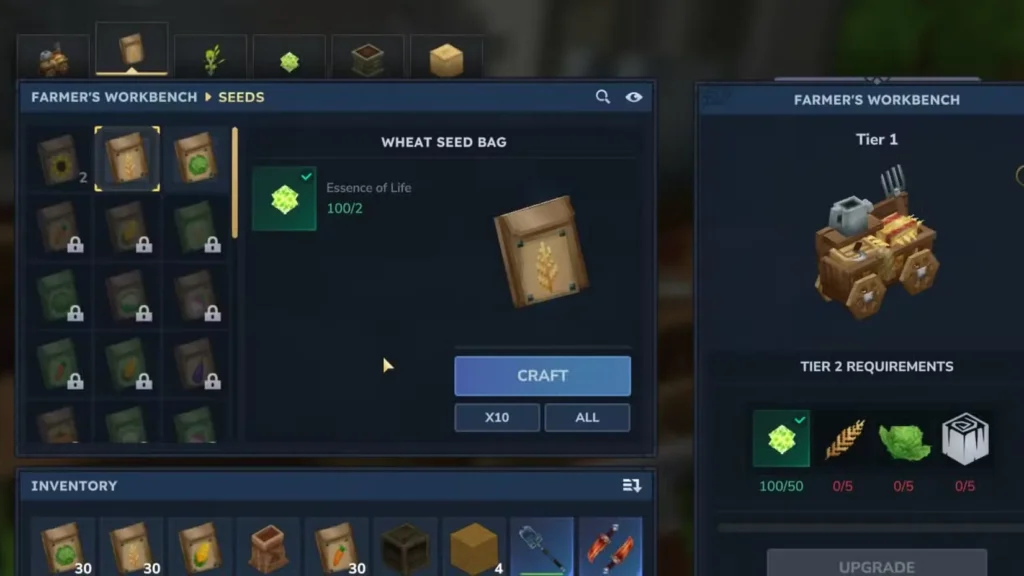
Early-Game Seeds (Tier 1 Farmer’s Workbench):
Cabbage Seed Recipe:
- Essence of Life x2
- Crafted at: Farmer’s Workbench (Seeds tab)
Wheat Seed Recipe:
- Essence of Life x2
- Crafted at: Farmer’s Workbench (Seeds tab)
Your first farm will almost certainly feature wheat and cabbage since they’re the only crops available at Tier 1. Upgrading your workbenches unlocks additional seed varieties, expanding your agricultural options significantly.
Essence of Life drops from harvested crops, creating a self-sustaining loop once you get rolling. Your initial seeds require Essence from other sources, but after your first harvest, you’ll generate enough to keep planting indefinitely.
Step 4: Set Up a Water Source
Before planting, establish a convenient water supply near your farm. Running back and forth to a distant lake every time your watering can runs dry gets old fast.
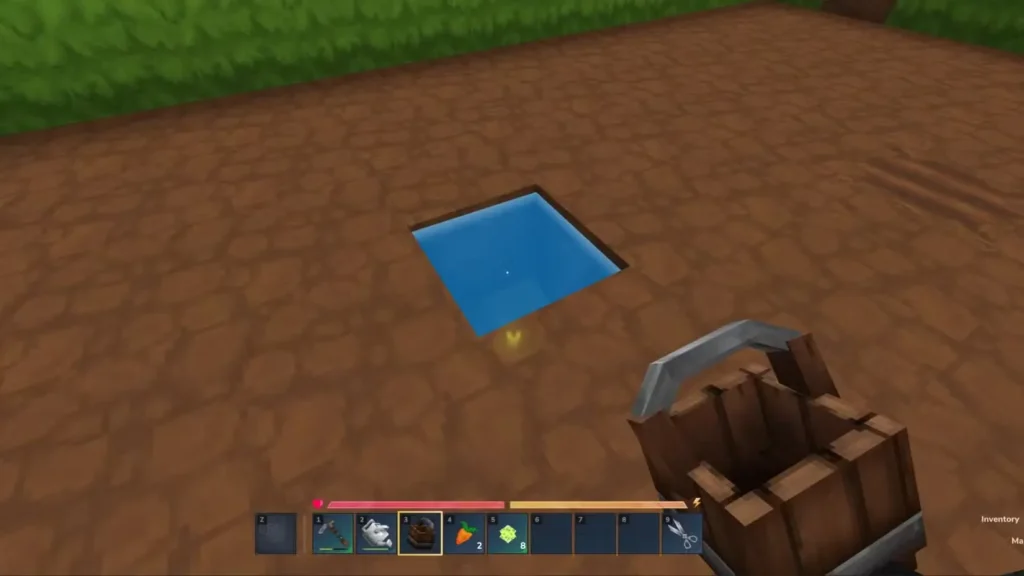
Creating a Farm Water Source:
- Locate any natural water body (lakes, ponds, rivers appear clearly on your map)
- Equip the Wooden Bucket and right-click on the water to fill it
- Return to your farm location
- Dig a one-block hole in the ground
- Right-click with the bucket to pour water into the hole
This creates a permanent, infinite water source right at your farm. You can refill your watering can here anytime without traveling. Since the watering can depletes after 20 uses, having water nearby becomes increasingly important as your farm expands.
Step 5: Prepare Your Farmland
Now comes the actual farming part. Equip your Crude Hoe and prepare the soil.
Tilling Process:
- Locate suitable ground (dirt or grass blocks work perfectly)
- Right-click with the hoe equipped to till the soil
- Tilled blocks change appearance, indicating they’re ready for planting
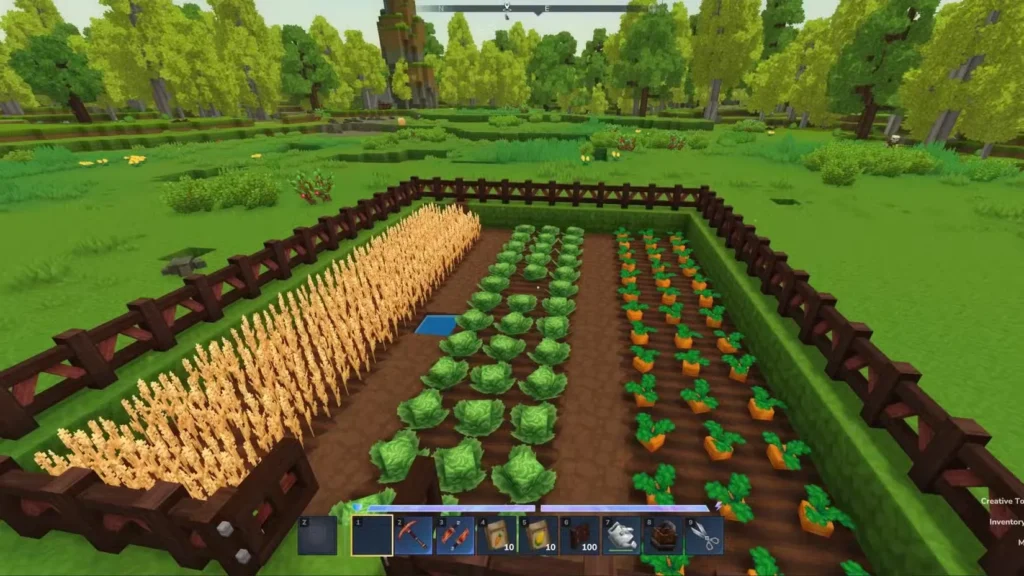
You can only till natural soil blocks—the hoe won’t work on stone, wood, or crafted materials. Plan your farm layout in advance to maximize efficiency. Rectangular plots with water access on multiple sides tend to work best.
Step 6: Plant and Water Your Crops
With prepared farmland ready, it’s planting time.
Planting Steps:
- Equip the seeds you want to plant
- Right-click on tilled soil to plant a seed
- Repeat until your farm is full
- Equip your watering can
- Right-click on each planted crop to water it
Watering isn’t technically required—crops will grow eventually without it—but the 2.5x growth speed boost makes it practically mandatory. The difference between a 30-minute wait and a 10-minute wait adds up quickly.
Advanced Tip: If you’ve upgraded to a Tier 3 Farmer’s Workbench, you can craft Fertilizer Bags. Using fertilizer on watered crops provides an additional 2x growth multiplier, cutting maturation time even further. One fertilizer bag enriches five soil blocks before being consumed.

Crop Growth Speed Comparison (Using Carrots as Example)
| Soil Condition | Growth Time |
|---|---|
| No Water + No Fertilizer | 30 minutes |
| Water + No Fertilizer | 10 minutes |
| Water + Fertilizer | 5 minutes |
As you can see, the investment in watering and fertilizing pays massive dividends in time saved.
Step 7: Harvest Your Crops
Once crops reach full maturity (you’ll notice visual changes when they’re ready), harvesting is simple.
Harvesting Process:
- Walk up to a mature crop
- Press the Interact key (default: F)
- Hold F to harvest multiple adjacent crops in one action
Each harvested crop yields two things:
- The crop itself (Wheat, Cabbage, etc.)
- Essence of Life
If you harvest 10 wheat plants, you receive 10 wheat plus 10 Essence of Life. This Essence feeds back into your seed production, creating that self-sustaining cycle mentioned earlier.
Rare Drop Alert: Very occasionally, harvested crops drop Eternal Seeds. These rare items have special properties worth investigating when you find them.
Farming Tips for Long-Term Success
Expand Gradually: Start with a small farm to understand the rhythm of planting, watering, and harvesting. Scale up once you’ve got the process down.
Automate Where Possible: Keep chests near your Farmer’s Workbench for instant access to materials. Store harvested crops separately from seeds and tools for better organization. Consider building bigger chests as your yields increase.
Plan for Progression: New crop types unlock as you upgrade your Farmer’s Workbench. Think ahead about what you’ll need for recipes or trading, and prepare space for diverse crops.
Protect Your Investment: Depending on your world settings and difficulty, consider crafting better armor to defend your farm from hostile mobs. Nothing’s worse than losing crops to unexpected attacks.
Cooking Synergy: Many healing items require farmed ingredients. Maintaining a steady crop supply supports your exploration and combat activities.
For more information about Hytale and game updates, visit the official Hytale website.
Frequently Asked Questions
Do crops grow when I’m offline or in other areas?
Crops continue growing based on in-game time, even when you’re not actively near your farm. However, the chunks containing your farm need to be loaded (you need to be relatively nearby) for growth to progress. If you travel to distant biomes, crop growth effectively pauses until you return.
What happens if I forget to water my crops?
Nothing catastrophic—they’ll still grow to maturity, just much slower. Without water, crops take 2.5x longer to mature. You can water crops at any point during their growth cycle, and the speed boost applies immediately to the remaining growth time.
Can I plant crops anywhere, or are there biome restrictions?
Most basic crops (wheat, cabbage, carrots) can be planted in any biome as long as you have tillable soil. However, some advanced crops unlocked through workbench upgrades may have specific environmental requirements. Check the Farmer’s Workbench tooltips for details on each seed type.
Is it worth using fertilizer on every crop?
It depends on your resource availability and patience. For crops you need urgently or when farming in bulk, fertilizer’s 2x multiplier (combined with watering) is fantastic. For casual farming or when resources are tight, watering alone provides most of the benefit. Prioritize fertilizer for high-value or slow-growing crops.