Exploring the Continent in Clair Obscur: Expedition 33 always brings a sense of mystery—and sometimes, a bit of dread.
You never know what’s waiting in the most remote corners of the map. Sometimes it’s a neat little surprise; other times, it’s a whole hidden area you might’ve missed if you weren’t looking closely.
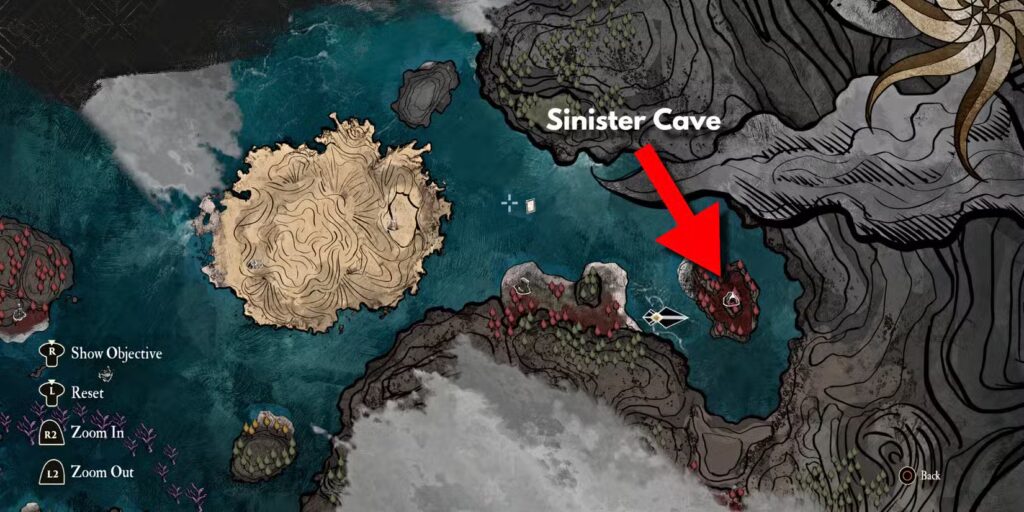
One such hidden gem is the Sinister Cave, tucked away under the looming shadow of the Monolith.
If this name doesn’t ring a bell, no worries—we’ve got a full walkthrough to guide you through all its secrets, loot, and that tricky boss fight at the end. Also check How to Find and Beat Chromatic Orphelin.
How to Find the Sinister Cave
You’ll come across the Sinister Cave around midway through Act 2, at the earliest. That said, we don’t recommend heading in until your party is at least Level 50 or higher. You’ll have a much easier time if you wait until the endgame.
So, where is it? The Sinister Cave is the only notable spot on a remote isle east of Sirene Island. Once you hit this part of the story, you’ll be able to swim out there using Esquie’s ability.
The island is hard to miss with its red trees and otherwise empty layout—except for a Hexga encounter and a few stray Nevrons.
When you’re set, head up to the main entrance and dive in.
️ Inside the Sinister Cave
As soon as you enter, save your game at the Expedition Flag—trust us on this one.
Start making your way through the tight tunnel ahead. You’ll spot a glowing item off to the right, but don’t stress about it yet—it’s out of reach for now.
Move forward until you reach the main chamber, which is creepy-dark and easy to get turned around in.
You’ll also spot the faint lantern glow of a Gestral Merchant up on a ledge, though you can’t reach them just yet either.
️ First Left: Get the Elerim Weapon
Take the left path first. This leads to a collapsed Nevron with a glow-up—you’ll find the Elerim (Earth-element) weapon for Lune here.
Keep following this route until you hit a fork. Go right to loop back to the start of the main area.
♂️ Right Path: Grapple and Explore
Now take the right path from the main chamber. Eventually, you’ll spot a cliff wall to grapple up.
Do that, then turn around and grapple across a gap behind you. Follow this trail until you hit a dead end—but wait, look for a hole in the floor.
Drop down and boom—you’ll land right where that unreachable item was. Pick it up to snag the Nocturne Pour Lumiere music record.
️ Merchant Platform and Corderon Weapon
Head back to the main area and retrace your steps up the grapple cliff. This time, before the dead end, look to your right for an opening.
Below, you’ll see the Gestral Merchant’s platform. Jump down to collect the Corderon (Dark-element) weapon for Sciel.
And the Merchant? Yeah, it’s dead. Just adds to the vibe.
♂️ Boss Time: The Chromatic Chalier
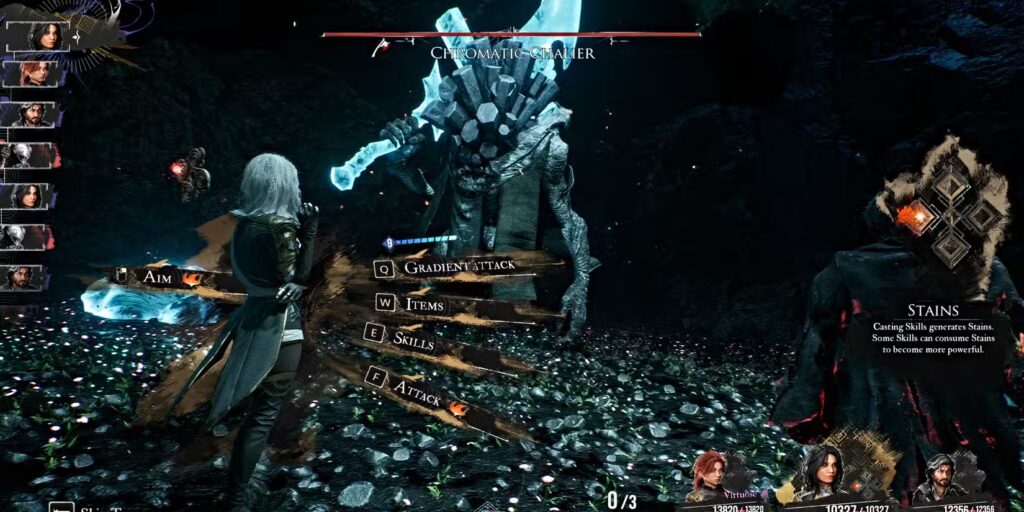
Once again, head back to the right path—but now take the lower trail instead of grappling. Around the corner, you’ll meet your final challenge in this cave: the Chromatic Chalier.
⚔️ How to Beat the Chromatic Chalier
This fight kicks off fast. The Chromatic Chalier starts with Berserk status active, so its attack power ramps up by 5% each turn. Its moves are mostly close-range melee combos, so dodge and parry as much as you can.
Pro Tips:
- Land a First Strike to start the fight on your terms.
- Use counterattacks (equip Pictos that buff counter damage).
- Stack Burn effects, especially using Lune and Maelle.
- Focus on breaking its stagger gauge to open it up for big hits.
This boss is tanky, so make sure your squad is loaded with their best gear and high-damage skills. Stay sharp and wear it down.
Rewards for Beating the Chromatic Chalier
After winning, you’ll walk away with:
- Chalium (Light-element) weapon for Maelle
- A Resplendent Chroma Catalyst (or Grandiose if you’re on NG+)
- 5x Colour of Lumina
Not a bad haul for one spooky cave, right?. You can also check How to break Paint Spikes, How marking enemies works and How to beat Golgra.
For more Games Guide follow us