Arcadia-7 is constantly trying to kill you. Hostile Vermin swarms, deadly heatwaves right after Ruptures, toxic gas clouds from those annoying blue Vermin—there’s no shortage of ways to lose health in StarRupture.
Yes, you can eat food to recover, but that’s not exactly efficient when your hunger meter is already full. Plus the food heals slowly, and when you’re being swarmed by creatures, slow healing equals death.
That’s where the Medtool comes in. It’s a dedicated healing device that restores health fast without burning through your food and water supplies. But the problem is, it’s locked behind corporation progression, and you’ll need to set up some production infrastructure to unlock it for you.
Here’s exactly how to get the Medtool in StarRupture and how to use it effectively.
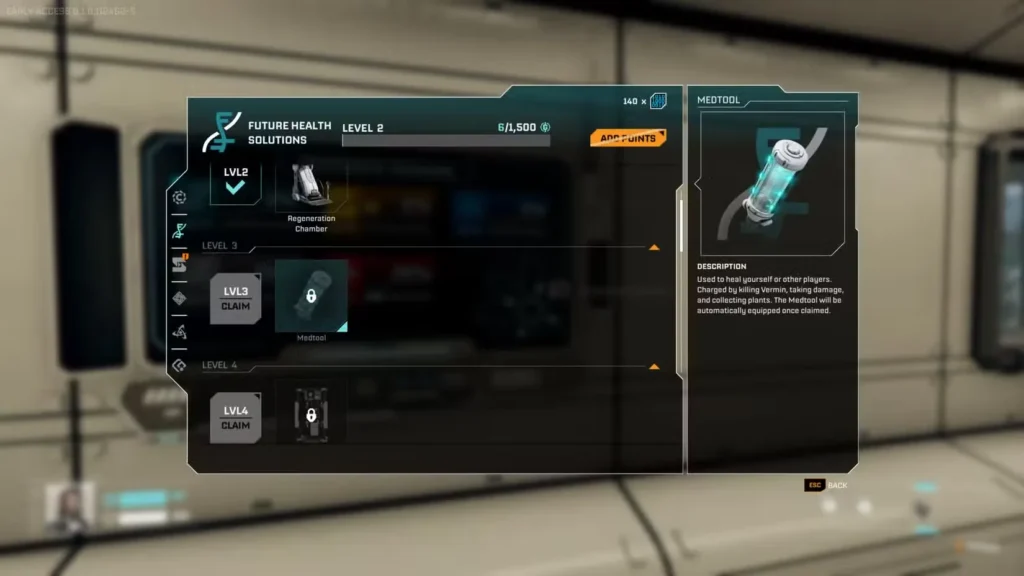
How to Unlock Medtool (Health Solutions Level 3)
The Medtool is a Level 3 reward from Health Solutions Corporation, the faction specializing in medical tech and survival equipment.
To reach Level 3 you have to complete two commission tasks:
- Level 2 Task: Deliver 200 Wolfram Bars
- Level 3 Task: Deliver 1,500 points worth of Wolfram Bars and Wolfram Wire
Both tasks revolve around Wolfram processing, so you’ll be building a dedicated production chain for this material. If you’ve already unlocked grenades from GriffithsBlue, the setup process should feel familiar.
Task 1: Delivering 200 Wolfram Bars (Level 2)
This first commission is straightforward—just raw Wolfram processing.
Production Setup
Here’s what you needs:
- Ore Extractor – Place on a Wolfram Ore deposit
- Smelter – Connect to the Extractor via Rail
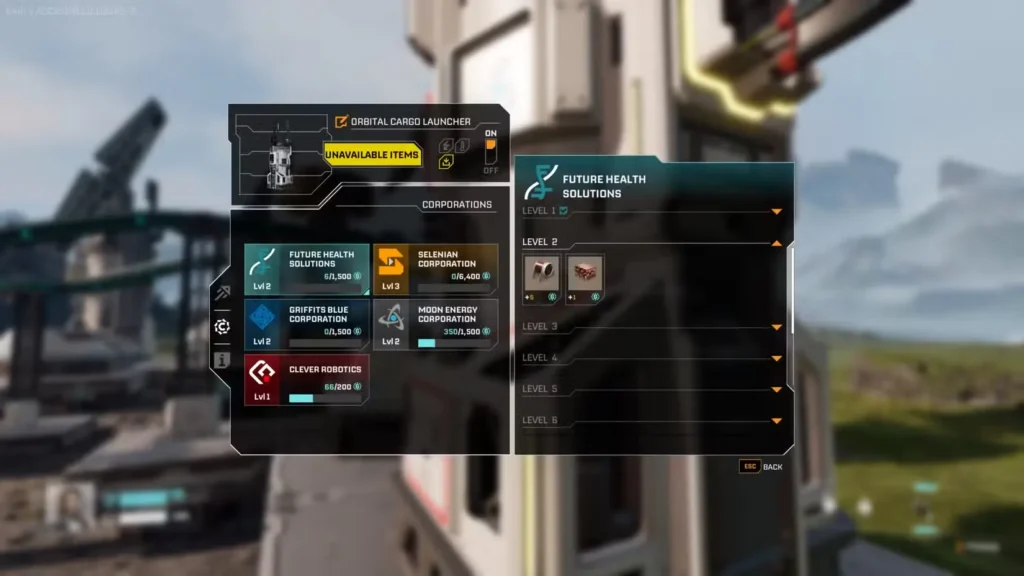
- Orbital Cargo Launcher – Connect to the Smelter via Rail
Full Step-by-Step Process
Find Wolfram Ore deposits. These are usually a bit farther from the starting area than Titanium, but still relatively accessible if you followed the base location advice from our beginner’s guide.
Extract and smelt. Set up your Ore Extractor on the deposit, connect it to a Smelter with Rails, and select the Wolfram Bar recipe at the Smelter.
Set the commission. At your Orbital Cargo Launcher, select the Health Solutions Level 2 task to route Wolfram Bars to them.
Ensure power supply. Make sure all structures have adequate power from Solar Generators or other power sources.
Wait for completion. Your automated production line will process 200 Wolfram Bars and send them off. This takes some time, but you can explore or work on other projects while it runs.
Once this completes, you’ll unlock the Regeneration Chamber and can move on to Level 3.
Task 2: Delivering Wolfram Bars & Wire (Level 3)
This task is trickier than you think because it uses a point system instead of fixed quantities:
- Wolfram Bars: 1 point each
- Wolfram Wire: 5 points each
You need 1,500 total points to complete the task. Obviously, Wolfram Wire is way more efficient since each one counts for 5 points instead of just 1.
Why Wolfram Wire is Better?
Let’s do this simple math:
- Sending only Wolfram Bars: 1,500 bars needed
- Sending only Wolfram Wire: 300 wire needed
Wolfram Wire requires an extra production step (Fabricator), but it cuts the total materials needed by 80%. That’s a massive difference.
The smart approach: Focus primarily on Wolfram Wire with maybe a small Wolfram Bar production line as backup.
Production Setup for Wolfram Wire
- Ore Extractor on Wolfram deposit
- Smelter to create Wolfram Bars
- Fabricator to turn bars into Wolfram Wire
- Orbital Cargo Launcher to send the final product
Connect everything with Rails and verify power connections.
At the Fabricator, select the Wolfram Wire recipe. It’ll automatically pull Wolfram Bars from your Smelter and process them into the Wire.
Optional: Running Both Simultaneously
If you have the resources, you can run both production chains at once:
- One line producing Wolfram Wire (primary)
- One line producing Wolfram Bars (supplementary)
This speeds up completion, though Wire should be your focus since it’s 5x more efficient.
Time-Saving Tips
Multiple production lines are your friend. If you can afford it, set up 2-3 Wolfram Wire production chains running simultaneously. This cuts wait time dramatically.
Prioritize Wire over Bars. Only produce Bars if you have extra capacity or excess Wolfram that’s easier to smelt than fabricate for some reason.
Check your Rail connections carefully. The most common issue is forgetting to connect the Fabricator output to the Launcher. Materials pile up at the Fabricator with nowhere to go.
Balance your power grid. Running multiple Fabricators requires decent power generation. Make sure you’ve got enough Solar Generators or Wind Turbines to keep everything running smoothly.
If you’re running low on building materials, consider deconstructing old structures you’re not using anymore to reclaim the resources.
Claiming Your Medtool
Once you’ve sent enough Wolfram materials to hit 1,500 points and complete Level 3, head to the Corporate Terminal in your habitat.
Navigate to Health Solutions Corporation and claim your Level 3 rewards. The Medtool will be added to your equipment automatically.
How to Use the Medtool
The Medtool doesn’t work like food—you can’t just use it whenever you want. It operates on a charge system that fills up through specific activities.
Charging the Medtool
Your Medtool charges by:
- Killing Vermin – Combat fills the charge
- Taking damage – Ironically, getting hurt helps charge your healing tool
- Collecting plants – Gathering flora adds small amounts of charge
Once fully charged, you can use it to heal yourself or teammates in co-op.
Using the Medtool
Press H to equip the Medtool.
To heal yourself: Press and hold the left mouse button (LMB)
To heal a teammate: Aim at them and press the right mouse button (RMB)
The Medtool provides fast, substantial healing—way better than slowly munching food while enemies are attacking you.
Why the Medtool is Essential
Food and water work for healing, but they’re inefficient for several reasons:
Food heals slowly. When you’re being swarmed by Vermin or dealing with multiple threats, you need health NOW, not gradually over time.
Food wastes your hunger meter. If your hunger is already full but you’re low on health, eating food doesn’t make sense. You’re burning resources unnecessarily.
The Medtool is faster in combat. Quick burst healing can be the difference between surviving a fight and respawning at your base.
It doesn’t consume food/water supplies. Your food is better saved for actually managing hunger and thirst, not emergency healing.
The Medtool is especially useful during:
- Geo Scanner activations when you’re defending against waves
- Exploring dangerous areas far from your base
- Collecting Ignitium after Ruptures in hazardous conditions
- Boss fights or large Vermin nest encounters
Strategic Healing Tips
Keep your Medtool charged. Don’t wait until you desperately need it to start charging. Kill Vermin and collect plants regularly to maintain charge levels.
Use it proactively in dangerous areas. If you’re heading into a high-risk zone, top off your health with the Medtool before engaging threats. Don’t wait until you’re at 20% health.
Save food for hunger management. Only eat when your hunger meter is low. Use the Medtool for health recovery whenever possible.
Coordinate with teammates in co-op. The ability to heal others makes the Medtool incredibly valuable in multiplayer. Designate someone as the “medic” if you’re playing with friends who specialize in different roles.
Combine with other Health Solutions tech. As you level Health Solutions further, you unlock additional medical equipment like the Regeneration Chamber and LEM Augments that boost survivability even more.
Progression Beyond the Medtool
Health Solutions doesn’t stop at Level 3. The corporation offers tons of useful survival tech as you level up:
- LEM Station (Level 4) – Augmentation system for stat boosts
- LEM Augments (Levels 5, 8, 10, 11) – Various survivability enhancements
- Food Station (Level 6) – Better food production
- Inventory Slots (Level 7) – +8 slots for carrying more supplies
- Compounder (Level 9) – Advanced crafting
If survival and exploration are your focus, Health Solutions is one of the most valuable corporations to invest in alongside Moon Energy and Clever Robotics.
Pro Tips for Efficient Unlocking
Use Data Points if material farming feels tedious. Like all corporations, you can deliver Data Points instead of specific materials to level up. Check our guide on farming Data Points fast for efficient methods.
Set up permanent Wolfram production. You’ll need Wolfram for other projects anyway, so building a permanent production line kills two birds with one stone.
Expand inventory space if needed. Wolfram deposits might be farther from your base, so having extra inventory slots helps when manually transporting materials. See our guide on increasing inventory size for details.
Balance multiple corporation tasks. While working on Health Solutions, keep other corporations progressing too. Don’t tunnel vision on one faction at the expense of others.
FAQ’s
Can I use the Medtool on myself and teammates simultaneously in co-op?
No, it’s one or the other. You equip the Medtool and choose to either heal yourself (LMB) or a teammate (RMB). You can’t heal multiple people at once—it requires focusing on one target at a time.
Does the Medtool charge deplete if I don’t use it?
No, charges persist. You don’t lose Medtool charge over time or between sessions. Once charged, it stays charged until you use it, so there’s no pressure to “use it or lose it.”
How much health does the Medtool restore per use?
The exact numbers aren’t clearly stated, but it provides substantial healing—enough to take you from critical health to mostly recovered in one use when fully charged. It’s significantly more effective than eating food.
Can I upgrade the Medtool later in the game?
The base Medtool doesn’t have direct upgrades, but Health Solutions unlocks various LEM Augments at higher levels that boost your overall survivability, health regeneration, and damage resistance. These work alongside the Medtool to keep you alive in dangerous situations.
Getting the Medtool in StarRupture requires a bit of a infrastructure setup and patience, but it’s absolutely worth the investment and your time. Fast, efficient healing that doesn’t waste your food supplies is crucial for exploring dangerous areas and surviving combat encounters.
Focus on building efficient Wolfram Wire production chains to reach Health Solutions Level 3 as quickly as possible. The sooner you get the Medtool, the sooner you can stop relying on inefficient food healing and start exploring Arcadia-7’s more dangerous regions with confidence.
Keep it charged by killing Vermin and collecting plants, and don’t hesitate to use it when you need healing. The charge system refills pretty quickly if you’re actively playing, so there’s no reason to hoard it for “emergencies only.”
Now get that Wolfram production running and unlock yourself some proper medical equipment. Arcadia-7 is dangerous enough without handicapping yourself by lacking basic healing tools.