How to Get Fire Shot and Bypass Fire Blockers in Metroid Prime 4 Beyond
If you’ve been exploring Metroid Prime 4: Beyond thoroughly, you’ve definitely run into those frustrating Fire Blockers—glowing red locks and thick webbing that completely block your path. You’ve probably tried shooting them with your beam, blasting them with missiles, and maybe even ramming them with the Vi-O-La motorcycle. Nothing works.
That’s because Fire Blockers require a specific elemental weapon to bypass: the Fire Shot. This is the first of four elemental upgrades you’ll unlock throughout your journey on Viewros, and it’s absolutely essential for progression. Without it, huge chunks of the map remain inaccessible, including valuable collectibles and entire dungeon areas.

Getting the Fire Shot requires completing two major dungeons (Fury Green and Volt Forge), exploring the Flare Pool area, and delivering a special chip back to your engineer buddy, Myles. It sounds complicated, but the game guides you through most of it naturally as part of the main story.
This guide walks you through the entire process: where to find the Fire Chip, how to unlock the Fire Shot weapon, and what you can finally access once those Fire Blockers are no longer an obstacle.
For more ability unlocks and progression strategies, check out our Metroid Prime 4: Beyond gameplay guide.
Prerequisites: Complete Fury Green and Volt Forge First
Before you can even think about getting past Fire Blockers in Metroid Prime 4, you need to complete significant story progression.
Required Dungeons
1. Fury Green (First Major Dungeon)
This is where your adventure truly begins. Fury Green teaches you the fundamentals:
- Unlocking the Psychic Bombs after defeating Carvex
- Mastering the Control Beam for puzzle-solving
- Navigating Morph Ball passages and platforming challenges
You’ll need to fully complete this dungeon before moving forward. For detailed strategies on the toughest sections, see our guide on the Sanctum of Guardians in Fury Green.
2. Volt Forge (Second Major Dungeon)
This electric-themed area is more complex than Fury Green:
- Restoring power to Tower 1 and Tower 2
- Unlocking the Vi-O-La motorcycle for faster travel
- Obtaining Psychic Boots after defeating Xelios
- Learning advanced combat mechanics against Sylux
For a detailed walkthrough of this area, check our Manufacturing Floor Volt Forge guide.
Important Note:
You technically don’t need to 100% complete Volt Forge on your first visit. The game allows you to progress once you’ve restored power to both towers and defeated the area boss. But you’ll have accomplished everything necessary for Fire Shot access by the time you leave.
Welcome to Sol Valley: The Illusion of Freedom
Once you escape Volt Forge, you’ll emerge into Sol Valley—the semi-open desert region that featured heavily in the game’s marketing materials. The sprawling landscape makes it look like you have total freedom to explore wherever you want.
Spoiler: You don’t. Not yet, anyway.
The Reality of Progression
While Sol Valley technically offers multiple paths and dungeon entrances, you really only have one viable option: head to Flare Pool. Almost every other area you can see is blocked by:
- Fire Blockers you can’t bypass yet
- Ice barriers requiring the Ice Shot (which comes later)
- Electric obstacles needing the Shock Shot (also later)
- Other environmental hazards requiring suit upgrades
The game creates the appearance of freedom while subtly funneling you toward Flare Pool. It’s classic Metroid design—giving you glimpses of what’s to come while maintaining a structured progression path.
For more guidance on optimal routes after leaving Volt Forge, see our guide on where to go after completing Volt Forge.
Should You Return to Fury Green First?
Before heading to Flare Pool, you might be tempted to backtrack to Fury Green. After all, you just unlocked Psychic Boots and Psychic Bombs, which means there are collectibles you couldn’t reach before.
The Short Answer: Wait
While you can technically return to Fury Green immediately after Volt Forge, it’s more efficient to wait. Here’s why:
Reason #1: You’ll Need to Return Anyway
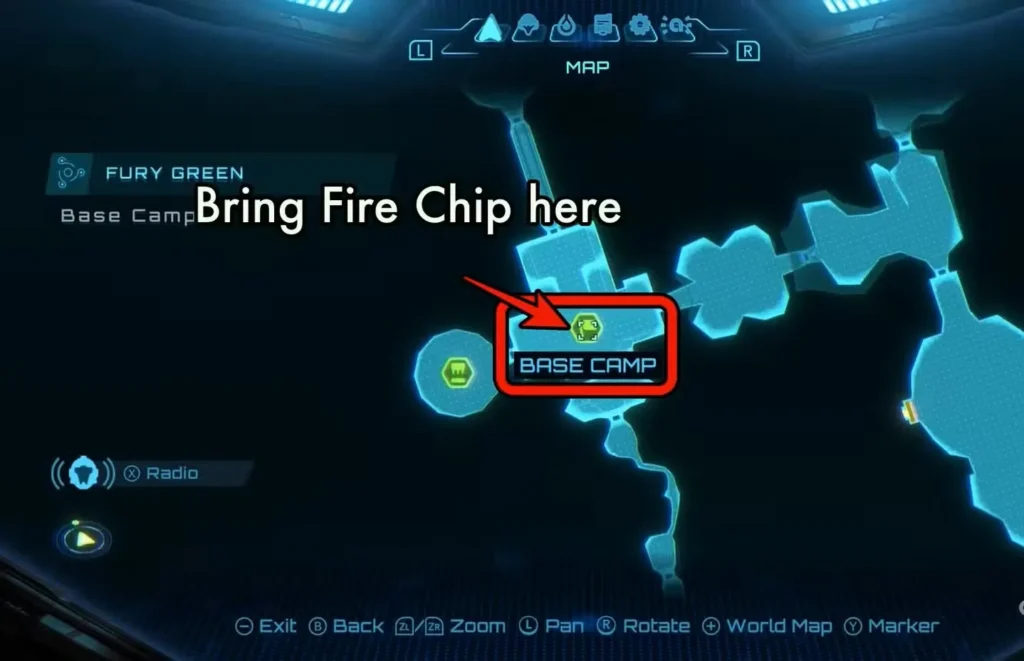
After you grab the Fire Chip from Flare Pool, you must return to Fury Green’s Base Camp to deliver it to Myles. He’s the one who converts the chip into the Fire Shot weapon. So you’re making the trip regardless.
Reason #2: Fire Shot Opens Even More
With the Fire Shot equipped, you’ll be able to access significantly more collectibles in Fury Green than with just Psychic Boots and Bombs alone. Fire Blockers and webbing seal off several valuable items—Energy Tanks, Missile Expansions, and lore scans.
Reason #3: Efficiency Matters
Why make two separate trips when you can combine them into one comprehensive sweep? Get the Fire Shot first, then return to Fury Green fully equipped to grab everything in a single efficient run.
Exception:
If you’re a completionist who hates leaving anything uncollected, you can grab the Psychic Boot/Bomb items now and return for the Fire Shot items later. But most players will appreciate the streamlined approach of waiting.
How to Get the Fire Chip in Metroid Prime 4
Unlike previous Metroid games where you’d simply find a weapon upgrade sitting in a room, Metroid Prime 4: Beyond changes the formula slightly. You need to locate data chips containing weapon schematics, then bring them back to Myles for installation.
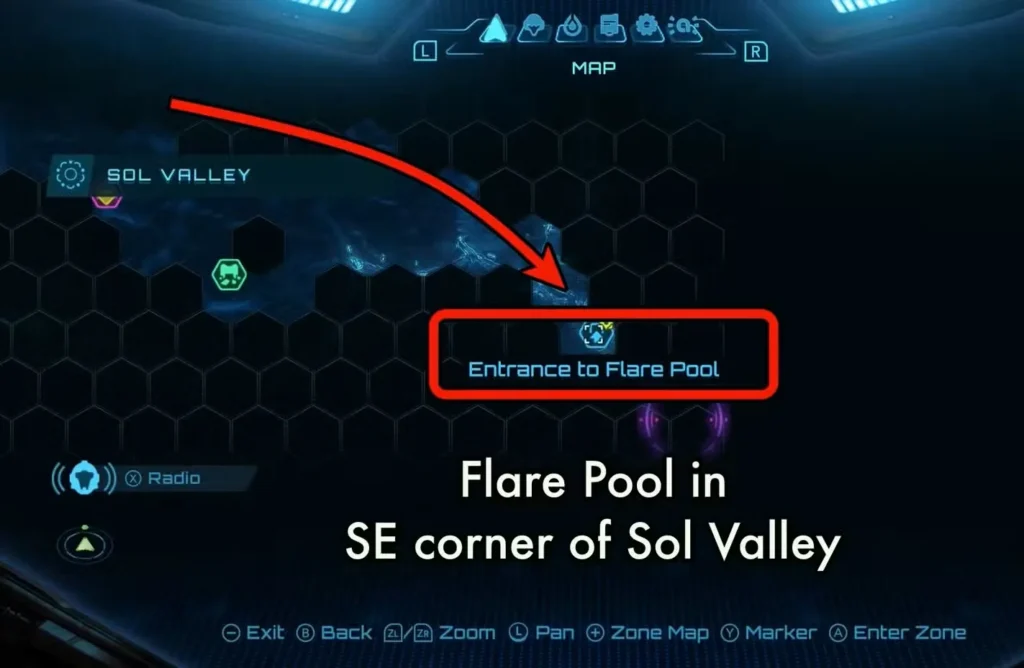
Locate Flare Pool (Southeast Sol Valley)
Flare Pool is located in the southeast corner of the Sol Valley map. It’s a flame-themed dungeon that’s hard to miss once you’re exploring the region.
How to Reach It:
- Exit Volt Forge into Sol Valley
- Head southeast across the desert terrain
- Look for the distinctive volcanic/industrial aesthetic
- Use your map if you’re having trouble navigating
Enter Flare Pool
At the entrance, you’ll see a spinner platform that requires the Vi-O-La motorcycle to activate.
Steps to Enter:
- Approach the spinner platform on the Vi-O-La
- Activate it to open the main entrance
- Dismount and enter on foot (the interior isn’t motorcycle-accessible)
Once inside, there’s really only one path forward. Follow it deeper into the dungeon.
The Bridge Collapse Cutscene
As you progress through Flare Pool’s main path, you’ll reach a large chamber with a bridge spanning molten lava. When you attempt to cross, a cutscene triggers.
What Happens:
A mysterious figure (heavily implied to be Sylux, the game’s antagonist) sabotages the bridge, causing it to collapse. Samus is forced to retreat without crossing.
Why You Can’t Progress:
You don’t yet have the suit upgrade required to traverse lava safely. This upgrade comes later in the game, so attempting to cross here is impossible. The game is essentially telling you: “Remember this spot—you’ll be back.”
This is classic Metroid design: show players an area they can’t fully explore yet, making them eager to return once they have the proper equipment.
Turn Back and Watch for the Opened Door
As you retreat from the collapsed bridge back toward the entrance, pay attention. A previously locked door will now be open, revealed through another brief cutscene.
Enemy Encounter:
Robot enemies pour out of the newly opened door. They’re not particularly tough if you’ve been upgrading your arsenal:
- Use charged beam shots for efficiency
- Missiles from your Missile Launcher work great
- Strafe to avoid their projectiles
- Don’t waste too many resources—you’ll need them later
After defeating the enemies, enter the door they came from and follow the path to its end.
The Crane Puzzle: Retrieving the Fire Chip
At the end of the newly opened pathway, you’ll enter a large chamber with a massive crane. This is where the Fire Chip is hidden.
Analyzing the Room
What You’ll See:
- A crane arm extending out over the central area
- A red glowing light at the tip of the crane arm
- Platforms positioned around the room that lead to the crane’s body
- The central area below (where the item will eventually fall)
The solution requires combining your Morph Ball ability with Psychic Bombs—both of which you should have by now.

Step-by-Step Solution
Step 1: Reach the Crane
Navigate the platforms around the room’s perimeter. They’re designed to guide you toward the back of the crane’s main body. Use your platforming skills—nothing too difficult if you’ve made it this far.
Step 2: Transform into Morph Ball
Once you’re on top of the crane’s body, press Y to enter Morph Ball mode. You’ll notice a small pathway leading along the crane’s arm toward the tip.
Step 3: Navigate to the Tip
Roll along the crane arm, using Psychic Bombs to destroy any obstacles in your path. The pathway is narrow but straightforward—just keep moving forward toward the red glow.
Step 4: Drop a Psychic Bomb at the Tip
When you reach the glowing machinery at the crane’s tip, drop a Psychic Bomb (press A). This triggers the release mechanism.
Step 5: Collect the Fire Chip
A brief cutscene shows the glowing item breaking free and falling to the central area below. Navigate back down to ground level and approach the glowing object.
Interact with it to receive the Fire Chip—the key component needed to unlock the Fire Shot weapon.
Return to Fury Green Base Camp
After collecting the Fire Chip, exit Flare Pool the same way you entered. Once you’re back in Sol Valley, you’ll receive a communication from Myles MacKenzie instructing you to return to Base Camp at Fury Green.
Fast Travel via Cargo Launcher
Rather than manually traversing all the way back through Fury Green, the game provides a convenient shortcut.
How to Fast Travel:
- Enter Fury Green’s main chamber
- Look for the Cargo Launcher station
- Activate it to fast-travel to the launcher near Base Camp
- This saves significant time compared to walking
Pro Tip: The Cargo Launcher system becomes increasingly useful as you unlock more stations throughout Viewros. Familiarize yourself with their locations to streamline backtracking.
Locate Myles at Base Camp
Once you’ve fast-traveled (or walked, if you prefer the scenic route), check your map. You’ll see a small flag icon indicating Myles’ location.
Navigate to that chamber and approach Myles. A cutscene will trigger.
How to Unlock the Fire Shot Weapon
Interacting with Myles at Base Camp triggers the Fire Shot unlock sequence.
What Happens:
Myles takes the Fire Chip and analyzes its data. Using his engineering expertise (and probably some Federation technology), he installs the Fire Shot upgrade directly into Samus’ arm cannon.
Installation Details:
- The process is automatic—no manual configuration required
- The Fire Shot becomes immediately available after the cutscene
- You don’t need to “equip” it from a menu
- The weapon switches automatically based on what you’re targeting
Fire Shot Capabilities:
Now that it’s unlocked, the Fire Shot allows you to:
- Melt ice barriers and frozen obstacles
- Burn through organic webbing blocking pathways
- Destroy Fire Blocker locks instantly
- Deal fire-based damage to enemies (especially effective against ice-type creatures)
- Access previously sealed areas throughout Viewros
This is the first of four elemental weapons in Metroid Prime 4: Beyond. The others (Ice Shot, Shock Shot, and one more) come later in your adventure, each opening up new areas and gameplay possibilities.
How to Get Past Fire Blockers and Webbing
Now that you have the Fire Shot, those frustrating Fire Blockers are no longer obstacles.
Using Fire Shot on Fire Blockers
The Process:
- Approach a Fire Blocker lock or webbing
- Aim at it with your arm cannon
- Fire a single shot from the Fire Shot
- The blocker will instantly burn away, granting access
Important Notes:
- You only need one shot—don’t waste ammunition spamming
- The Fire Shot doesn’t consume missiles or special ammo; it uses your standard beam energy
- There’s no charge time required—a single quick shot does the job
- The effect is instantaneous; no waiting for animations
Visual Identification
Fire Blockers Appear As:
- Red glowing locks sealing doors or pathways
- Thick organic webbing blocking Morph Ball passages
- Flammable barriers with distinctive fire-resistant visual design
Once you know what to look for, they’re easy to spot. If you’ve been exploring thoroughly, you’ve probably mentally noted several locations where these blockers prevented progress.

Where to Go After Unlocking Fire Shot
With the Fire Shot now in your arsenal, huge portions of the map suddenly become accessible. Here’s what you should prioritize:
Priority #1: Explore Fury Green Thoroughly
Return to Fury Green (you’re already there after delivering the chip to Myles) and conduct a comprehensive sweep:
What’s Now Accessible:
- Energy Tanks behind Fire Blocker seals
- Missile Expansions in previously blocked Morph Ball passages
- Lore scans and environmental data locked behind webbing
- Hidden rooms sealed by fire-based obstacles
Efficiency Tip: Use your map to mark areas where you previously encountered Fire Blockers. Systematically revisit each location to ensure you don’t miss anything.
Priority #2: Continue Main Story to Ice Belt
After fully exploring Fury Green, the next major story dungeon is Ice Belt, located in the northwest corner of Sol Valley.
Why Ice Belt is Next:
- The entrance is now accessible with Fire Shot
- It contains the next elemental weapon (Ice Shot)
- Story progression naturally leads you there
- New abilities unlock further exploration options
Priority #3: Backtrack Through Sol Valley
With Fire Shot, you can now access several side areas and collectibles scattered throughout Sol Valley:
- Optional mini-dungeons previously sealed
- Energy Tanks hidden behind fire barriers
- Lore terminals with story context
- Combat challenges that reward completion with upgrades
Priority #4: Hunt for Collectibles Everywhere
Fire Blockers appear throughout the entire game, not just in specific regions. Consider revisiting:
- Earlier areas you briefly passed through during tutorial sections
- Side paths you noted but couldn’t explore
- Dead ends that turned out to be Fire Blocker-sealed passages
Combat Applications of Fire Shot
Beyond just removing obstacles, the Fire Shot is a legitimate combat tool with specific advantages.
Best Uses in Combat
Ice-Based Enemies:
- Fire Shot deals bonus damage to ice-elemental creatures
- Melts frozen shields and armor
- Often stuns or staggers ice-based bosses
Environmental Interactions:
- Ignite flammable objects to create hazards for enemies
- Melt ice platforms enemies are standing on
- Burn through organic enemy constructs
Standard Enemies:
- Works as effectively as your regular beam against most foes
- Doesn’t consume special ammunition
- Can be combined with missiles for devastating combos
Energy Management
Important Considerations:
- Fire Shot uses the same energy pool as your standard beam
- Don’t spam it unnecessarily in combat
- Reserve it for situations where fire damage provides tactical advantage
- Regular beam shots are more energy-efficient for standard encounters
Tips for Maximizing Fire Shot Efficiency
Exploration Strategy:
- Mark Fire Blocker locations on your mental map as you encounter them
- Revisit areas systematically after unlocking Fire Shot
- Check both main pathways and side routes—Fire Blockers appear in both
Combat Tactics:
- Scan enemies to identify fire vulnerability
- Combine Fire Shot with charge shots for maximum damage
- Use it to create openings against defensive enemies
Resource Management:
- Fire Shot doesn’t use missiles, so fire freely when needed
- Energy is your only limiting factor
- Collect energy pickups before tackling Fire Blocker-heavy areas
Completionist Advice:
- The game tracks collectible percentages by area
- Use this to identify which regions still have missing items
- Fire Shot is required for approximately 30% of all collectibles
Common Mistakes to Avoid
Mistake #1: Skipping Flare Pool
Some players try exploring other Sol Valley areas first, hitting roadblocks everywhere. Flare Pool is the critical path—don’t delay visiting it.
Mistake #2: Not Backtracking After Fire Shot
Many players unlock Fire Shot and immediately push forward with the main story, missing dozens of collectibles. Take time to backtrack thoroughly.
Mistake #3: Forgetting Visual Cues
Fire Blockers have distinctive appearances. Learn to recognize them so you know when to use Fire Shot versus other abilities.
Mistake #4: Wasting Resources
One Fire Shot is enough to destroy any blocker. Don’t spam multiple shots thinking it’ll be faster—it won’t.
Frequently Asked Questions (FAQs)
How do you get past Fire Blockers in Metroid Prime 4?
To get past Fire Blockers in Metroid Prime 4, you need to unlock the Fire Shot weapon. First, complete Fury Green and Volt Forge dungeons. Then visit Flare Pool in southeast Sol Valley, retrieve the Fire Chip from the crane puzzle, and return it to Myles at Fury Green Base Camp. He’ll install the Fire Shot, which destroys Fire Blockers and webbing with a single shot.
Where is the Fire Chip located in Metroid Prime 4 Beyond?
The Fire Chip is located in Flare Pool, the fire-themed dungeon in the southeast corner of Sol Valley. After entering and triggering the bridge collapse cutscene, backtrack to find a newly opened door. Defeat the robot enemies, follow the path to a large chamber with a crane, use Morph Ball and Psychic Bombs to reach the crane’s tip, and drop a bomb to release the chip.
Can you return to Fury Green after getting Fire Shot?
Yes, and you should return to Fury Green after unlocking Fire Shot. The game requires you to deliver the Fire Chip to Myles at Fury Green Base Camp anyway, and numerous collectibles throughout Fury Green are sealed behind Fire Blockers that you can now destroy. Use the Cargo Launcher for fast travel to save time.
What does Fire Shot do in Metroid Prime 4?
Fire Shot is the first elemental weapon in Metroid Prime 4: Beyond. It instantly destroys Fire Blocker locks and organic webbing with a single shot, opening previously inaccessible areas. In combat, it deals bonus damage to ice-based enemies, melts frozen shields, and ignites flammable environmental objects. It uses standard beam energy, not special ammunition.
Your First Elemental Upgrade
Learning how to get past Fire Blockers in Metroid Prime 4 marks a significant milestone in your progression. The Fire Shot isn’t just a weapon—it’s a key that unlocks approximately a third of the game’s explorable content.
Once you’ve obtained it, take advantage of the expansion in accessible areas:
- ✅ Complete Flare Pool and get the Fire Chip
- ✅ Return to Fury Green and deliver it to Myles
- ✅ Immediately backtrack through Fury Green for Fire Blocker collectibles
- ✅ Explore Sol Valley thoroughly with your new capabilities
- ✅ Progress to Ice Belt to continue the main story
The Fire Shot is your introduction to the elemental weapon system that defines much of Metroid Prime 4: Beyond’s progression. You’ll eventually collect Ice Shot and Shock Shot as well, each opening new areas and providing unique combat advantages.
If you’re interested in maximizing your arsenal, check out guides on other major upgrades like the Missile Launcher and special unlocks from Metroid Prime 4 amiibo.
For comprehensive walkthroughs, boss strategies, and collectible locations throughout your entire adventure, visit our main Metroid Prime 4: Beyond hub. And if you’re ready to experience it yourself, grab the game from Nintendo’s official store.
Now get out there and burn through those obstacles, bounty hunter. Viewros is waiting to be fully explored!