So you’ve been grinding away at faction relationships, earning those War Bonds, and suddenly the corporations in StarRupture are asking for more complex stuff. What started as simple ore deliveries has escalated to bars, wire, sheets… and now they want rotors and tubes?
Here’s the problem: you can’t craft rotors without the blueprint first. And unlike some basic building materials you can figure out on your own, this one requires a specific blueprint found out in the dangerous world beyond your base.
Let me walk you through exactly where to find the Rotor Blueprint (plus a bonus Tubes Blueprint while you’re at it), how to get there safely, and what to expect when you arrive.
Exact Location: SMB ‘Purple Haze’ Outpost
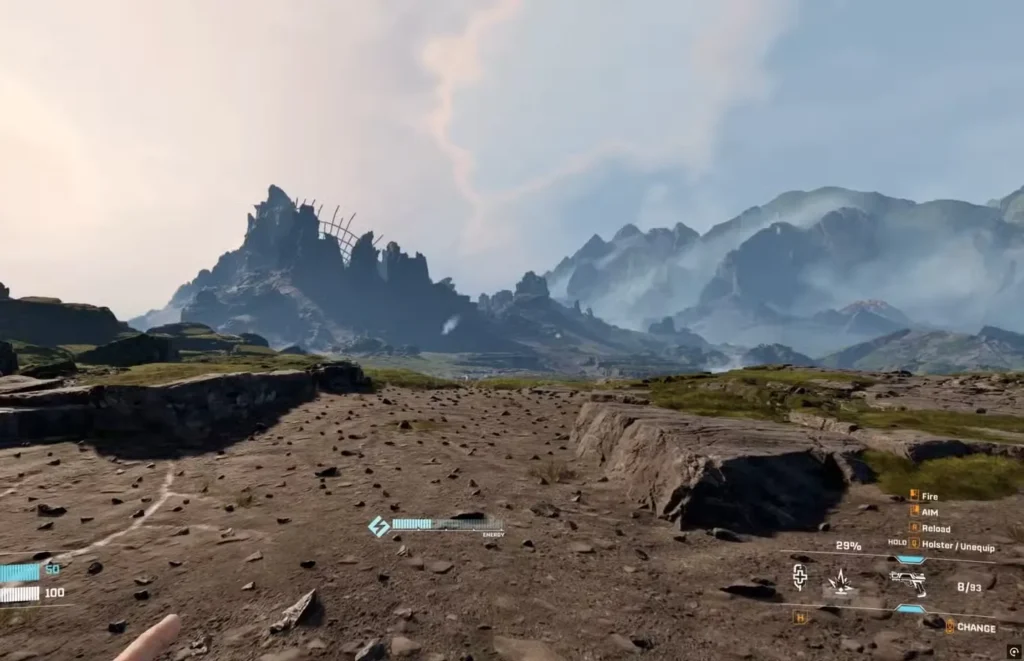
The Rotor Blueprint is located northwest of your starting base at a place called the SMB ‘Purple Haze’ outpost. This isn’t a marked location on your map initially, so you’ll need to navigate there manually.
How to Spot It From Your Base
The easiest landmark to look for is a damaged satellite dish or communication array sticking out of the top of a crater. It’s pretty distinctive on the horizon—looks like someone tried to build a radio telescope and things went very, very wrong.
Head northwest from your base and keep that damaged array in your sights. You can’t miss it once you know what you’re looking for.
What to Bring: Gear Up Before You Go
Here’s the thing about the Purple Haze outpost: it’s absolutely crawling with enemies. This isn’t a quick in-and-out loot run—you’re going to be fighting your way through multiple waves of Vermin.
Essential loadout:
- Plenty of ammo for your weapons—I’m talking full reserves, not just a handful of bullets
- Fully charged Medtool—you WILL take damage here
- Grenades at full charge—these are lifesavers when enemies swarm you
- Extra healing items like Calcium supplements or food
If you’ve been modding your weapons, now’s the time to equip your best gear. This outpost doesn’t mess around.
Step-by-Step: Getting Inside the Building
Once you arrive at the outpost, you’ll immediately notice it’s swarming with hostiles. Clear out the immediate area first—don’t rush straight for the building or you’ll get flanked.
Step 1: Navigate to the West Side
The blueprint is inside the only two-story building at the back (west side) of the outpost. You can’t just walk through the front door, though. You’ll need to get creative with your entry.
Step 2: Climb the Rocks
Look for rocks on the west-facing side of the building, right next to it. These rocks form a natural ramp that leads up to a cliff face overlooking the structure.
Climb up these rocks—use your movement skills here, especially if you’ve been leveling up your Movement tree for those augments.
Step 3: Jump Through the Roof
Once you’re on top of the cliff, you’ll see the building has an open roof section. Jump down through this opening to land on the second floor.
Be ready to fight as soon as you land—there might be enemies inside or patrolling nearby.
Looting the Blueprint (Plus Bonus Items)
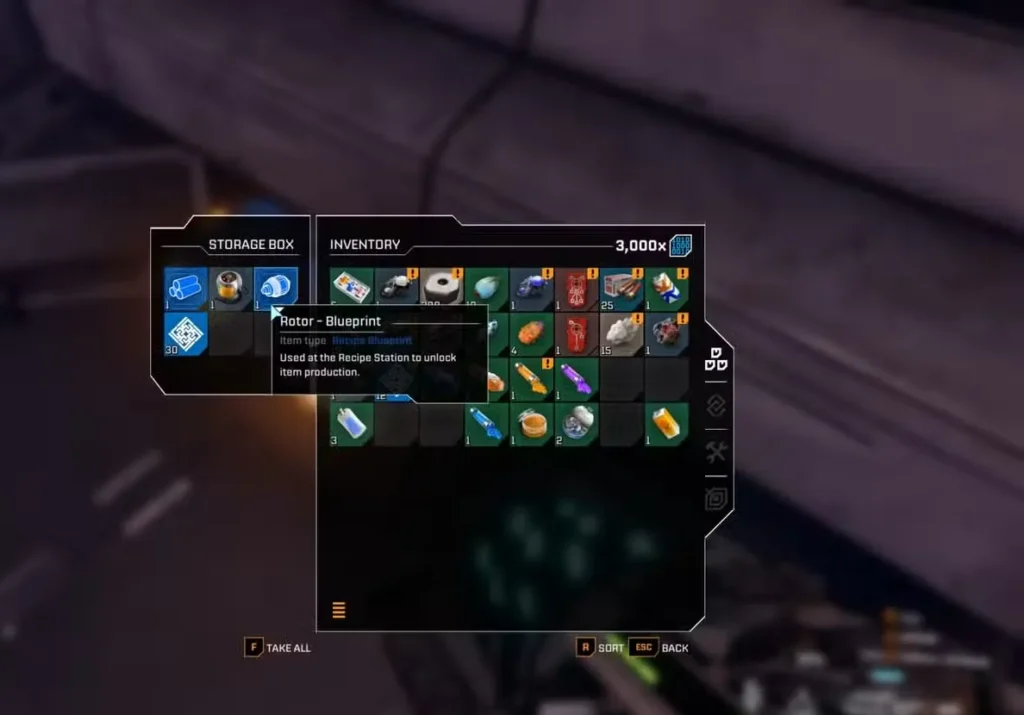
Once you’re inside on the second floor, look for a blue container. This is your jackpot.
Inside you’ll find:
- Rotor Blueprint
- Tubes Blueprint (bonus!)
- Various other loot items
But don’t just grab and go. Search both floors thoroughly before you leave. This building is packed with:
- Materials you can analyze for Data Points
- Lore collectibles that fill in the world’s backstory
- Consumable items (ammo, health, etc.)
- Random crafting materials
Take your time here. You came all this way—might as well increase your inventory value while you’re at it.
Warning: The Exit Ambush
Here’s something that caught me off guard: as soon as you pick up the blueprints from that container, another wave of enemies spawns outside the building.
Seriously. It’s like the game knew you were feeling confident after clearing the place.
My advice:
- Keep the first floor door shut while you’re looting
- Finish grabbing everything you want from both floors
- Then make your exit when you’re ready to fight your way out
Don’t get greedy and try to loot while fighting the second wave. Just sprint back toward your base once you have what you came for.

Unlocking the Recipe at Your Base
Alright, you survived the Purple Haze outpost and made it back with the blueprints. Now what?
Head to your Recipe Station in your base. (If you haven’t built one yet, check out our guide on how to unlock crafting recipes.)
Here’s how to unlock the Rotor recipe:
- Interact with the Recipe Station
- Open the Fabricator section of the menu
- Submit the Rotor Blueprint
- Pay the required Data Points and materials
As long as you have enough Data Points (which you should if you’ve been exploring and analyzing materials), you’ll unlock the recipe immediately.
Once unlocked, you can craft Rotors at your Fabricator using the appropriate materials. Same process for the Tubes Blueprint you grabbed.
What You’ll Need to Craft Rotors
After unlocking the recipe, you’ll need specific materials to actually craft rotors. While the exact requirements are shown at your Fabricator, expect to need:
- Metal bars (crafted from processed ore)
- Possibly wire or sheets
- Other refined materials from your production chain
If you haven’t already, consider setting up automated ore extraction to keep your material supply flowing. Rotors aren’t a one-time craft—corporations will keep asking for them as you progress.
Make sure your power grid is properly connected to keep everything running smoothly.
Tips for Farming Blueprints and Outposts
Since you’re going to be hitting up dangerous locations like Purple Haze, here are some general tips:
Scout before engaging: Use your ranged weapons to pick off enemies from a distance before rushing in.
Use terrain to your advantage: Don’t fight in open areas. Kite enemies around buildings and use cover.
Bring a friend: If you’re playing co-op, expeditions like this are way easier with backup.
Mark resources: If you spot valuable materials but your inventory is full, mark them on your map so you can return later.
Save before big fights: If you die at the outpost, you lose whatever you were carrying. Make sure you’ve deposited valuable items at your base before heading out.
Frequently Asked Questions
Can I get the Rotor Blueprint anywhere else?
No, the SMB ‘Purple Haze’ outpost northwest of your base is the only location where the Rotor Blueprint spawns. You’ll need to make the trip there to get it—there’s no alternative source or workaround.
What level should I be before attempting this outpost?
I’d recommend having at least level 20-25 in Combat before attempting Purple Haze. The enemy density is high, and you’ll need decent weapon damage and survivability. Make sure you’ve leveled up enough to have some combat augments unlocked.
Do I need the Rotor Blueprint to progress in the game?
Yes, rotors become essential for fulfilling corporation contracts and unlocking higher faction levels. You can’t craft them without the blueprint, and many mid-to-late game progression gates require rotor deliveries.
What other blueprints are at the Purple Haze outpost?
The Tubes Blueprint is also found in the same blue container as the Rotor Blueprint. Both are important for advanced crafting, so grabbing both in one trip saves you from having to return later.
The Rotor Blueprint might seem like a hassle to grab, but it’s absolutely worth the effort. Rotors unlock a whole new tier of crafting and faction progression in StarRupture, and the Purple Haze outpost has other valuable loot that makes the trip worthwhile.
Just remember: bring ammo, bring healing, and don’t underestimate how many enemies are waiting for you. Clear methodically, loot thoroughly, and sprint back to base when that second wave spawns.
Now get out there and claim those blueprints. Those corporations aren’t going to wait forever, and you’ve got weapons to unlock, characters to master, and a whole base to expand and automate. Check out our beginner’s guide if you need more help getting started, or learn how to get Ignitium and other rare resources to keep your production lines running smoothly.