Crafting recipes in StarRupture aren’t all unlocked from the start—some require you to hunt down blueprints scattered across Arcadia-7. The Stabilizer Blueprint is one of these hidden treasures, tucked away in a dangerous location that’ll test both your navigation skills and combat readiness.
If you’re trying to progress your crafting capabilities and need the Stabilizer recipe unlocked, this guide will walk you through exactly where to find the blueprint, how to reach it safely, and what materials you’ll need to actually craft Stabilizers once you’ve got it.
Where to Find the Stabilizer Blueprint in StarRupture
The Stabilizer Blueprint is located at Claywood’s Research Outpost, positioned northeast of your starting base. Specifically, you’ll find it inside a blue storage box at the top of a tall tower within the outpost.
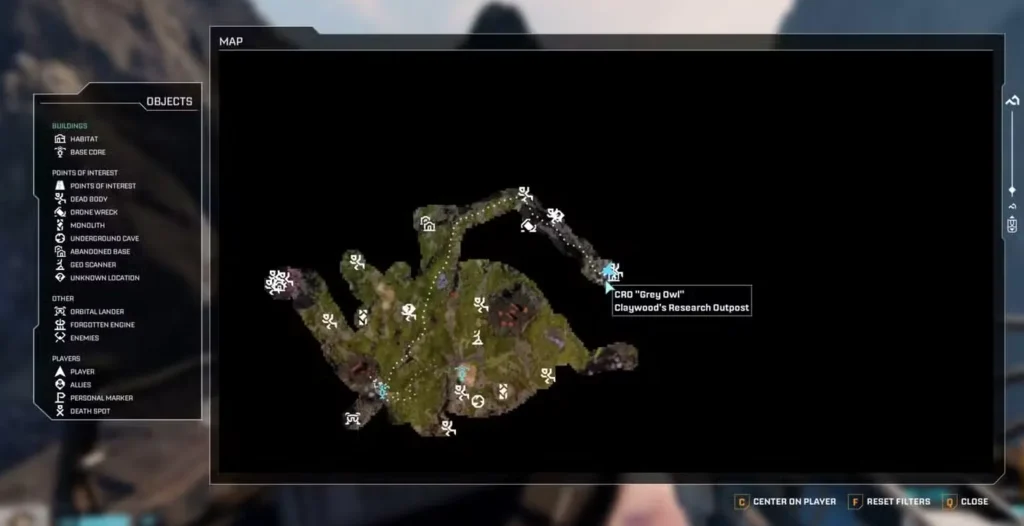
Navigating to Claywood’s Research Outpost
There are two reliable routes to reach this location:
Route 1: Follow the crashed ship engine
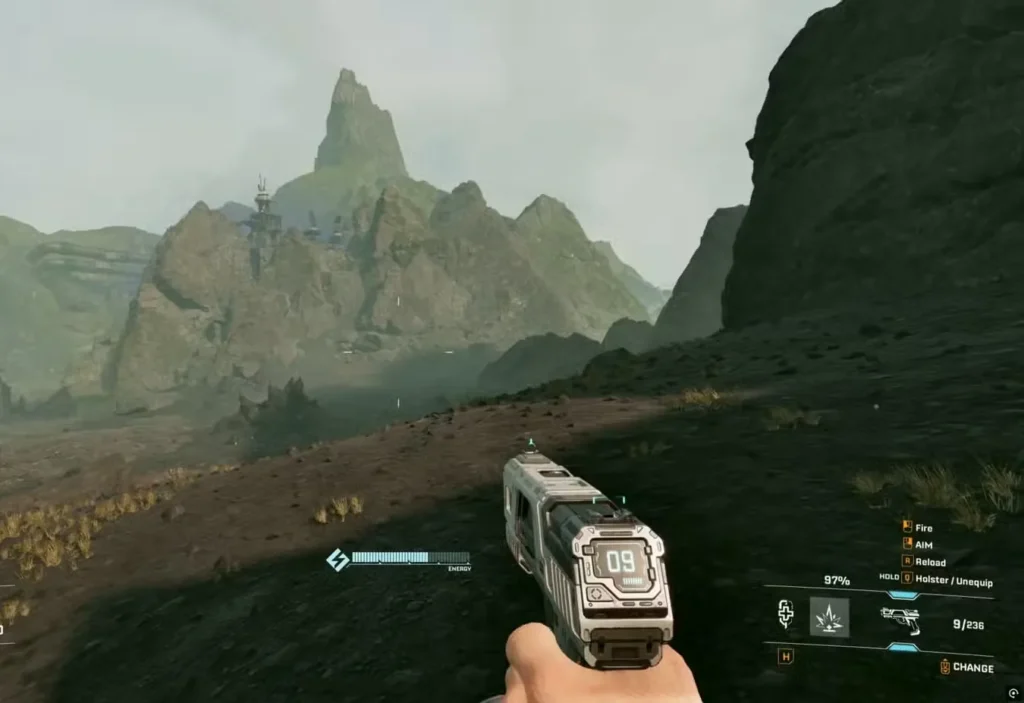
Head northeast from your base toward the massive ship engine that’s crashed into the planet’s surface. You can’t miss it—it’s huge and serves as an excellent landmark. Claywood’s Research Outpost sits just before you reach the engine itself, so keep your eyes open as you approach.
Route 2: Mountain range route
Alternatively, start from Griffith’s Research Outpost (located directly north of your starting base), then take the path heading northeast. Hug the mountain range as you travel east, and you’ll spot Claywood’s Research Outpost directly ahead.
I’ve found the second route slightly easier to navigate if you’re still getting familiar with the terrain, but both work perfectly fine.
Preparing for Combat at the Outpost
Before you head out, let’s talk loadout. This isn’t a peaceful collection mission—Claywood’s Research Outpost is crawling with hostile Vermin, including ranged variants that spit venom from a distance.
Recommended gear:
- Assault Rifle with plenty of ammo (seriously, don’t skip this—check our Wolfram Powder guide for ammo crafting)
- Fully charged grenades (you’ll want these for the ambush at the end)
- Healing supplies and medkits (trust me on this)
- Decent armor if you’ve unlocked any
The pistol can work if that’s all you have, but dealing with ranged enemies from a distance becomes significantly harder. The Assault Rifle makes this entire expedition much smoother. Our weapons unlock guide can help you get better firepower if you’re still rocking basic gear.
Climbing the Tower: Step-by-Step
Once you arrive at Claywood’s Research Outpost, here’s the exact route to the blueprint:
Step 1: Locate the Southwest Mountain Side
Head to the southwest side of the outpost and start climbing up the mountainside. You’re looking for the metal walkway that’s been constructed along the cliff face—you’ll need to position yourself underneath it.
Combat warning: As soon as you get close, Vermin will start attacking. Clear them out methodically, prioritizing the ranged spitters first since they can chip away at your health while you’re dealing with melee enemies.
Step 2: Access the Stairs
Once you’re underneath the metal walkway, crouch down to navigate through and reach the stairs. Climb onto the platform—you should now see a large tower structure next to you.
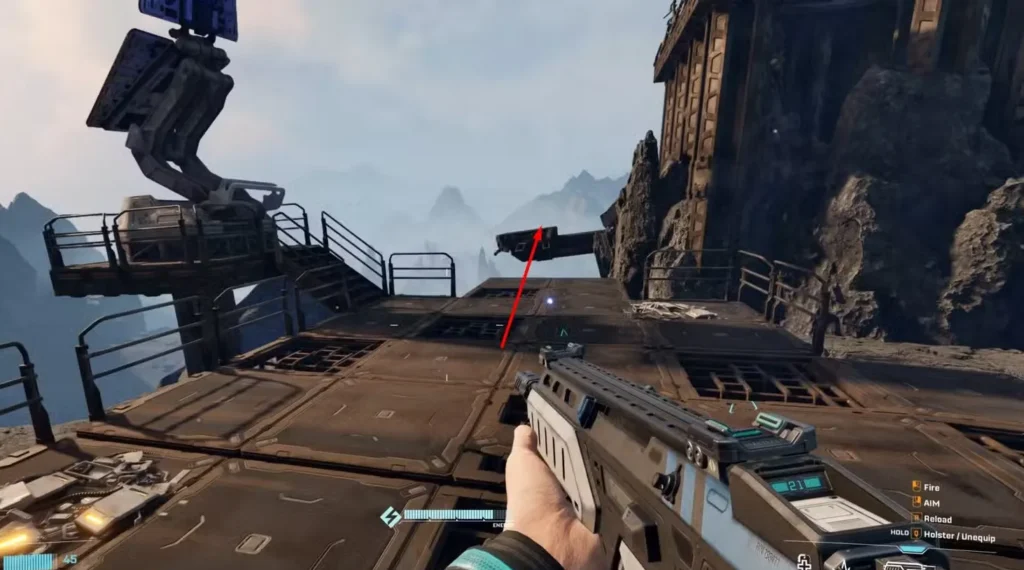
Step 3: Navigate Around the Tower
This is where platforming comes in. On the northwest side of the tower, you’ll spot a small walkway you can jump to. The jumps require some precision, so take your time:
- Jump to the first platform on the northwest side
- Continue working your way around the tower by jumping from platform to platform
- Eventually, you’ll reach the intact stairs that lead to the tower’s summit
Tip: If you’re struggling with the jumps, make sure you’re not carrying too much weight. Drop some resources temporarily if needed—you can always come back for them.
Step 4: Claim Your Prize
At the top of the tower, you’ll find a blue storage box tucked in the corner. Open it up and grab:
- Stabilizer Blueprint (your main objective)
- War Bonds (these are valuable currency)
- Analyzable tech (easy Data Points for corporation reputation)
Don’t just grab and run—analyze that tech for quick Data Points while you’re here.
The Post-Pickup Ambush
Here’s something the game doesn’t warn you about: the moment you pick up the blueprint, another wave of Vermin spawns and attacks.
This is where having a fully charged grenade pays off massively:
- Let the Vermin group up and rush toward you
- Throw your grenade into the cluster
- The grenade attracts enemies before exploding—perfect for crowd control
- Pick off any survivors with your Assault Rifle
- Make your escape back down the tower
If your grenade isn’t charged, focus on creating distance and picking them off with ranged weapons. Don’t let them surround you on those narrow platforms.
Unlocking the Stabilizer Recipe
Getting the blueprint is only half the battle. Now you need to actually unlock the crafting recipe:
Step 1: Return to Your Base
Head back to your habitat and locate your Recipe Station.
Step 2: Navigate to the Fabricator Menu
Access the Recipe Station interface and find the Fabricator sub-menu. The Stabilizer recipe should be listed here.
Step 3: Insert the Blueprint and Materials
Select the Stabilizer recipe and choose the ‘Insert’ option. To complete the unlock, you’ll need:
- 1 Stabilizer Blueprint (you’ve got this now)
- 100 Rotors (check our Rotor Blueprint guide if you need help with these)
- 300 Titanium Rods
Material farming tips:
Titanium is one of the more common resources on Arcadia-7, so setting up automated ore extraction for Titanium deposits will help you accumulate the rods you need. For Rotors, you’ll need to progress through other crafting recipe unlocks first.
Why Stabilizers Matter
Stabilizers are essential components for advanced crafting projects in StarRupture, particularly as you progress into mid-to-late game content. They’re used in various high-tier equipment and structures that become necessary for surviving tougher areas and underground cave exploration.
Think of this blueprint as an investment in your long-term progression—the materials might seem steep now, but you’ll be glad you unlocked this recipe when you need Stabilizers for critical builds later.
Additional Tips for Blueprint Hunting
While you’re out collecting this blueprint, consider these efficiency tips:
Map everything: Use your map system to mark other points of interest you discover along the way. Blueprint locations, resource deposits, and safe routes all deserve markers.
Inventory management: Make sure you’ve increased your inventory size before heading out. Nothing’s worse than finding great loot and having to leave it behind.
Corporation progression: Use those Data Points you collected from the tech analysis to boost your standing with key corporations. This unlocks more blueprints and recipes down the line.
Frequently Asked Questions
Where exactly is Claywood’s Research Outpost in StarRupture?
Claywood’s Research Outpost is located northeast of your starting base, just before the massive crashed ship engine landmark. You can also reach it by heading northeast from Griffith’s Research Outpost and following the mountain range eastward. The outpost is built into the mountainside with a distinctive tall tower structure.
What weapons should I bring to get the Stabilizer Blueprint?
Bring an Assault Rifle with plenty of ammunition as your primary weapon. The outpost is heavily populated with Vermin, including ranged enemies that spit venom. While a pistol can work in a pinch, the Assault Rifle’s range and damage make combat significantly easier. Also bring a fully charged grenade for the Vermin ambush that triggers when you pick up the blueprint.
What materials do I need to unlock the Stabilizer recipe?
After obtaining the Stabilizer Blueprint, you need to insert it into your Recipe Station along with 100 Rotors and 300 Titanium Rods. The blueprint itself is found in the blue storage box at the top of the tower in Claywood’s Research Outpost. Once you’ve submitted all three items, the Stabilizer recipe becomes available for crafting.
Is there an easier way to reach the top of the tower?
The platforming sequence around the tower’s northwest side is the intended route. Take your time with the jumps—they require precision but aren’t too difficult once you get the rhythm. Make sure you’re not over-encumbered, as extra weight can affect your jump distance. Crouch under the initial walkway to access the stairs, then carefully work your way around the tower’s exterior platforms until you reach the main staircase leading to the summit.
The Stabilizer Blueprint is one of those essential unlocks that opens up new crafting possibilities as you progress through StarRupture. Yes, the location is dangerous and the platforming takes some precision, but the reward is absolutely worth the effort.
Just remember: bring that Assault Rifle, save your grenade for the post-pickup ambush, and take your time with the tower jumps. You’ve got this.
For more essential blueprint and crafting guides, check out our articles on weapon modding, unlocking grenades, and getting Calcium and Ignitium. And if you’re new to the game, our beginner’s guide covers all the fundamentals.
Ready to start your blueprint hunting adventure? Pick up StarRupture on Steam and explore everything Arcadia-7 has to offer!