Hytale’s finally here, and honestly? The modding support is one of the most exciting parts. Unlike some games that make modding a hassle, Hytale was built with mod support baked right in from the start. Whether you want quality-of-life improvements, custom skins, new creatures, or complete gameplay overhauls, the modding community has you covered.
The good news is that installing mods is pretty straightforward once you know the process. You’ve got two main options: download and install mods manually, or use the CurseForge App to handle everything automatically. I’ll walk you through both methods so you can choose whichever fits your comfort level.
Let’s get you modding. You can also check Hytale Guides Hub Page.
Two Ways to Install Hytale Mods
Hytale runs as a standalone application with its own launcher, and it has full mod support through CurseForge—the same platform that hosts mods for tons of other games. This makes finding, downloading, and managing mods way easier than sketchy third-party sites.
You can install mods either:
- Manually (download mod files and place them in the correct folder yourself)
- Using the CurseForge App (automated installation with one-click downloads)
Both methods work perfectly fine. Manual installation gives you more control, while the CurseForge App is faster and more convenient, especially if you’re running dozens of mods.
Method 1: How to Download Mods Manually in Hytale
If you prefer hands-on control over your mod files, manual installation is the way to go. It’s not complicated—just a few steps of downloading and file management.
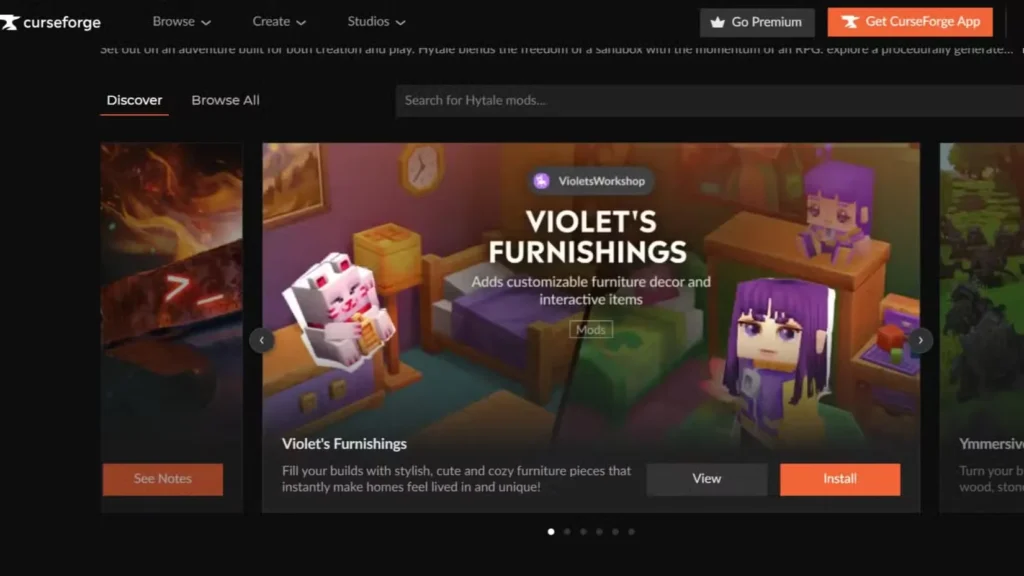
Step 1: Find Mods on CurseForge
Open your web browser and search for “CurseForge Hytale Mods” or head directly to the CurseForge Hytale mods section. You’ll find hundreds (maybe thousands eventually) of community-created mods ranging from simple tweaks to massive content additions.
Browse around until you find mods that interest you. Read the descriptions, check compatibility notes, and look at user reviews to make sure they’re legit and functional.
Step 2: Download Mod Files
Once you’ve selected a mod you want, click the download button. The mod will download as a ZIP or RAR file—this is completely normal and expected.
Pro tip: Create a dedicated “Hytale Mods” folder somewhere easy to find on your computer (like your Desktop or Documents folder). Save all your downloaded mod files there. This keeps everything organized and makes troubleshooting way easier if something goes wrong.
Step 3: Extract the Mod Files
Right-click on the downloaded ZIP or RAR file and select “Extract All” (or use whatever extraction software you prefer—7-Zip and WinRAR both work great). This will unpack the mod files into a regular folder.
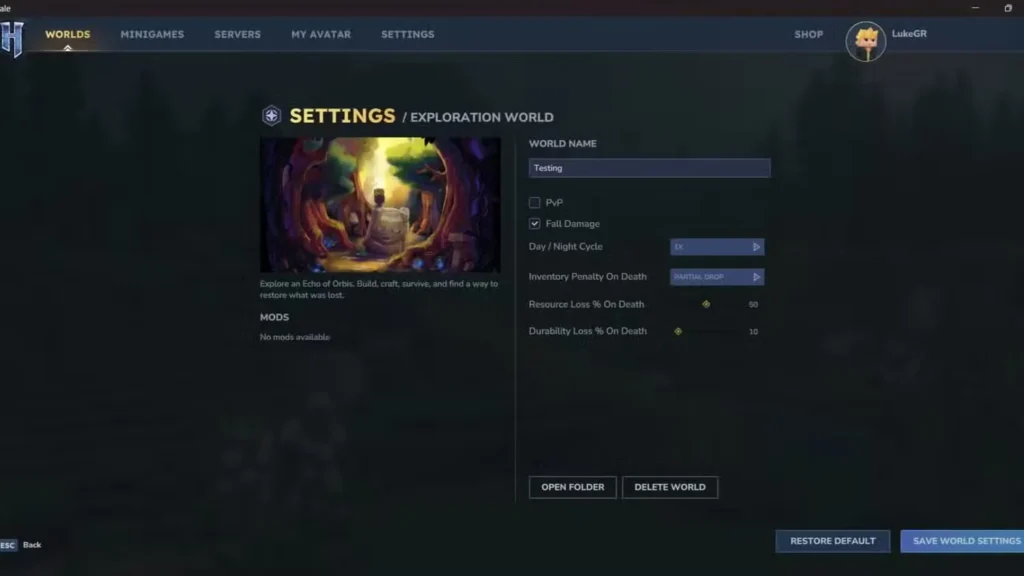
Step 4: Locate Hytale’s Mod Folder
Here’s where it gets slightly tricky, but don’t worry—it’s still simple:
- Launch Hytale
- Load into a created world (or create a new one if you haven’t already)
- Once in-game, press Escape to open the menu
- Select “Mods”
- Right-click and choose “Edit World”
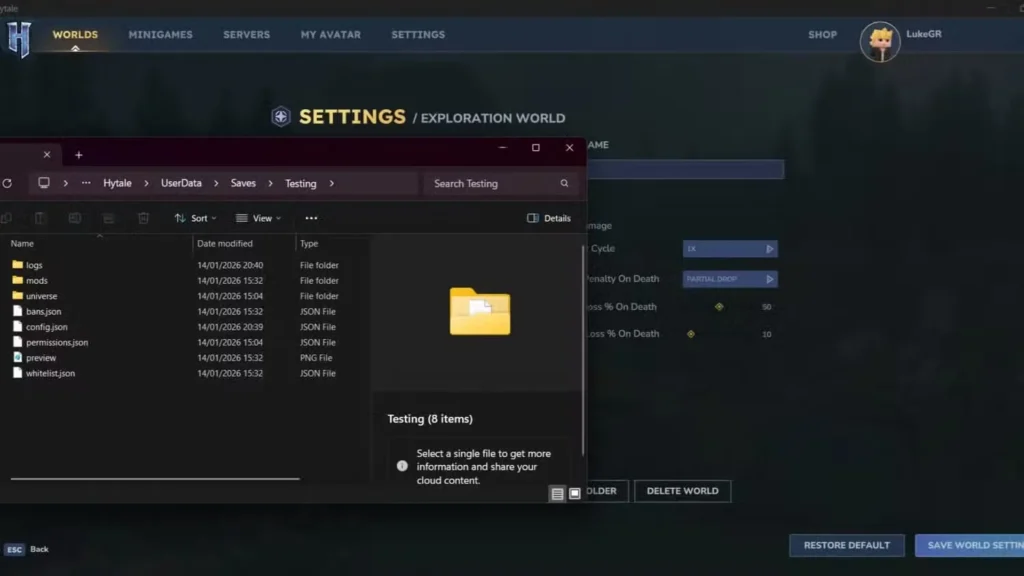
- Click “Open Folder” in the new window that appears
- Look for the “Mods” folder in the directory that opens
This folder is where all your mod files need to go. Bookmark this location or keep the window open—you’ll be coming back here every time you install a mod manually.
Step 5: Install the Mod
Take your extracted mod files and drag and drop them into the Mods folder you just opened. That’s it. Seriously.
The mod files should now be sitting in Hytale’s Mods directory. When you launch the game next time, Hytale will automatically detect and load these mods.
Step 6: Verify Installation
Launch Hytale and load into your world. Go back to the Mods section in the world settings to confirm your newly installed mods appear in the list and are activated. If they’re showing up, you’re golden.

Method 2: Using the CurseForge App (Recommended for Beginners)
If manually hunting down folder directories isn’t your thing, the CurseForge App automates the entire process. One-click downloads, automatic installation, easy mod management—it’s basically modding on easy mode.
Step 1: Download the CurseForge App
- Go to the CurseForge website
- Look for the orange icon in the top-right corner of the screen
- Click “Download CurseForge App”
Important note: When choosing which version to download, I’d recommend the Standalone Version. It’s cleaner and gives you more control without tying into other launchers unnecessarily.
Step 2: Install and Open the App
Run the installer and follow the prompts—standard software installation stuff. Once it’s installed, launch the CurseForge App.
You’ll be prompted to either log in with a CurseForge account or Continue as Guest. Either option works fine, though logging in lets you sync your mod lists across devices.
Step 3: Select Hytale
The CurseForge App will automatically detect games installed on your PC, including Hytale. You should see Hytale listed in your game library.
Click on Hytale to access its dedicated modding section.
Step 4: Browse and Download Mods
Now you can browse mods directly within the app. Use the search function, filter by categories, or check out the most popular/trending mods.
When you find a mod you want, just click “Download” or “Install.” The CurseForge App handles everything automatically—downloads the file, extracts it, and places it in the correct Mods folder. No manual file management required.
Step 5: Manage Your Mods
The app also lets you:
- Enable/disable mods without deleting them
- Update mods when new versions release
- Create mod profiles for different playstyles or worlds
- Check for compatibility issues between mods
It’s honestly the easiest way to manage a large mod collection, especially if you’re running 10+ mods simultaneously.
Types of Hytale Mods You Can Find
The modding community is already churning out some seriously cool stuff. Here’s what you can expect to find:
Quality of Life Mods:
- Auto-repair tools and weapons
- Inventory management improvements
- UI enhancements like “Advanced Item Info” by Buuz135 (adds an integrated browser for searching items and their details)
Visual Mods:
- Custom skins and textures
- Shader packs for improved graphics
- New building blocks and decorative items
Content Mods:
- Custom creatures and enemies
- New biomes and structures
- Additional weapons, tools, and armor sets
- Quest and storyline expansions
Utility Mods:
- Map enhancements
- Minimap additions
- Crafting helpers
- Resource trackers
Some of these mods are as useful as knowing how to get Azure Kelp or how to craft windows—they fundamentally improve your gameplay experience.
Important Things to Know About Hytale Mods
Before you go mod-crazy, here are some critical tips and warnings:
Check World Settings After Installing Mods
Always open your World Settings after installing new mods to verify which ones are active. Mods are automatically added to all active worlds by default, which can sometimes cause issues if you didn’t intend for a mod to affect a specific save.
If you want certain mods only in specific worlds, you’ll need to manually disable them in the worlds where you don’t want them active.
Mods Work in Multiplayer
Here’s something cool: mods work in both Dedicated Servers and Hosted Worlds. But there’s a catch—everyone needs compatible mods installed.
If you’re hosting a modded server:
- Let your friends know which mods are installed before they join
- Share a mod list or CurseForge collection link
- Make sure everyone’s running the same mod versions
Mismatched mods between host and players can cause crashes, desync issues, or prevent people from joining entirely. Communication is key when playing with friends.
Read Mod Descriptions and Requirements
Some mods have dependencies—they require other mods to function properly. Always read the mod description page on CurseForge to check for:
- Required dependency mods
- Known compatibility issues
- Minimum game version requirements
- Installation instructions (some complex mods need specific setup)
Back Up Your Worlds
Before installing a bunch of mods, back up your world saves. Most mods are safe, but occasionally one might cause corruption or unexpected behavior. Having a backup means you can restore your progress if something goes wrong.
Performance Considerations
Running tons of mods simultaneously can impact performance, especially on lower-end PCs. If you notice frame rate drops or stuttering, try disabling some mods to identify which ones are resource-intensive.
Start with a few essential mods and gradually add more, testing performance as you go.
Useful Mods to Start With
If you’re new to Hytale modding, here are some beginner-friendly recommendations:
- Advanced Item Info (by Buuz135): Adds a searchable UI for items and crafting recipes—super helpful when you’re still learning the game
- Auto-repair utilities: Saves you from constantly repairing items manually
- Inventory management mods: Makes organizing your upgraded backpack way easier
- Minimap mods: Helps with navigation and marking important locations
These mods enhance the base game without drastically changing core mechanics, making them perfect for your first modding experience.
Troubleshooting Common Mod Issues
Mod not showing up in-game?
- Verify the file is in the correct Mods folder
- Check if the mod requires dependencies you haven’t installed
- Ensure the mod is compatible with your game version
Game crashing after installing mods?
- Remove the most recently installed mod and test
- Check CurseForge comments for known issues
- Make sure all mods are updated to the latest version
Multiplayer connection issues?
- Confirm all players have identical mod lists
- Check if server-side mods are properly installed
- Verify everyone’s running the same game version
Frequently Asked Questions
Are Hytale mods safe to install?
Mods from CurseForge are generally safe—the platform moderates content and scans for malicious files. That said, always read user reviews and check the mod’s reputation before downloading. Stick to popular, well-reviewed mods when possible, and avoid downloading mods from sketchy third-party websites. If you use the CurseForge App, it adds an extra layer of security by verifying files before installation.
Can I use mods in single-player and multiplayer?
Yes, absolutely! Mods work in both single-player worlds and multiplayer sessions. However, for multiplayer, everyone connecting to the server or hosted world needs to have the same mods installed. If the host has 15 mods running and a player only has 5 of them, connection issues or crashes will likely occur. Always coordinate mod lists with your friends before joining modded sessions.
Will installing mods disable achievements or progress?
This depends on how Hytale implements achievement tracking in the final release. Many games allow achievements even with mods, while others disable them to prevent cheating. Since Hytale is in early access, achievement systems might not be fully implemented yet. Check official documentation or patch notes for the most current information on how mods affect progression tracking.
How do I uninstall or disable mods in Hytale?
To disable a mod: Go to your World Settings, open the Mods section, and toggle off the mods you don’t want active. They’ll remain installed but won’t affect gameplay.
To completely uninstall a mod: Navigate to your Hytale Mods folder (use the same steps from Method 1), find the mod file, and delete it. If you’re using the CurseForge App, you can uninstall mods directly through the app interface. Always remove mods one at a time if you’re troubleshooting issues so you can identify which mod was causing problems.