Progression in Hytale is directly tied to your equipment, and unlocking better gear means upgrading your crafting stations. You can’t just slap together high-tier armor or weapons without first investing in your workbenches—the game literally gates advanced recipes behind tier upgrades.
If you want to move beyond basic starter gear and tackle harder content, upgrading your workbenches isn’t optional—it’s essential. Let me walk you through the entire upgrade system, what materials you’ll need, and which crafting stations deserve priority attention.
Understanding the Workbench Tier System in Hytale
Every crafting station in Hytale operates on a tier system, ranging from Tier 1 to Tier 3. When you first craft a workbench, it starts at Tier 1 with limited recipe access. Upgrading it to higher tiers unlocks progressively better crafting options.
How to check your workbench tier:
- Interact with any crafting station
- Look for the Tier indicator in the interface
- Click the “Upgrade” button (if available) to see requirements
Exceptions to the tier system:
Some workbenches are capped at Tier 1 only and don’t require upgrades:
- Furniture Bench
- Builder’s Workbench
- Chef’s Stove
These stations give you all their recipes immediately and don’t need further investment.
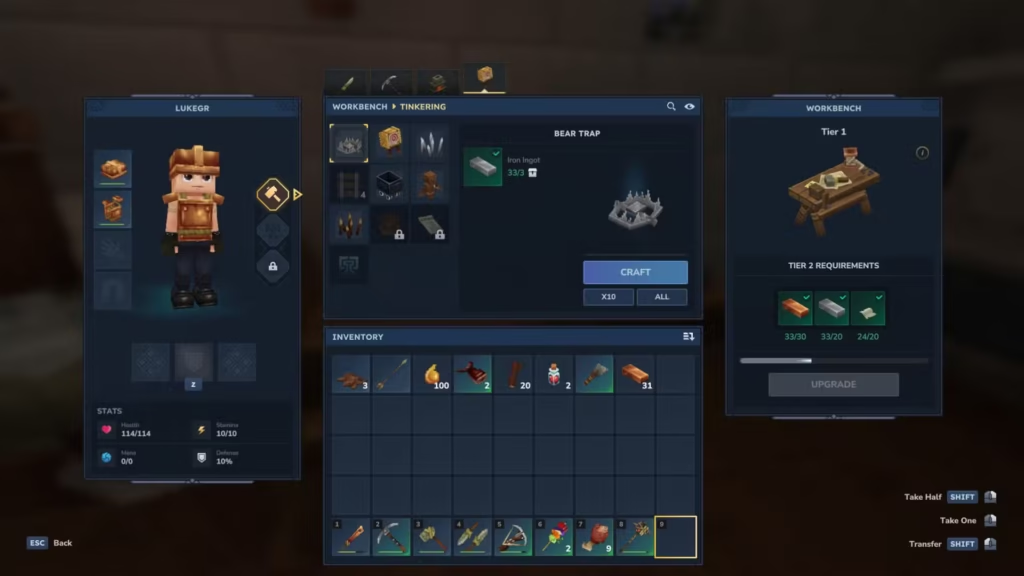
Workbench Upgrade Requirements in Hytale
Each crafting station requires specific materials for upgrades, usually related to what you craft at that station. This makes logical sense—if you’re upgrading an anvil for better weapons, you need metal ingots and combat-related materials.
Example: Blacksmith’s Anvil Tier 2 Upgrade
Required materials:
- 20x Iron Ingots
- 30x Light Leather
- 30x Linen Scraps
- 15x Venom Sacs
Notice the pattern? Blacksmith’s Anvil deals with weapons and armor, so it requires metals, leather for armor components, fabric for padding, and monster drops for enchantments or special properties.
Each workbench follows similar logic—upgrade costs align with what that station produces.
Efficient Material Farming for Upgrades
Workbench upgrades require substantial material investment, especially for higher tiers. Here’s how to farm efficiently:
Early Game Strategy: Skip Copper Tier
Here’s a game-changing tip: you can skip Copper-tier upgrades entirely if you’re smart about progression.
Optimal early progression path:
- Craft a Furnace immediately
- Smelt a few pieces of Copper Ore into ingots
- Craft a Copper Pickaxe
- Use the Copper Pickaxe to mine Iron Ore (way faster than with Crude Pickaxe)
- Smelt Iron and jump straight to Iron-tier upgrades
Why this works:
Copper and Iron deposits often spawn near each other in cave systems. You can find both metals in a single mining expedition, allowing you to skip the Copper tier almost entirely and save tons of resources.
Plus, Copper Pickaxes mine Iron efficiently, but you don’t actually need full Copper armor or weapons—just use the pickaxe as a stepping stone to better materials.
Exploring Caves, Ruins, and Crypts
Don’t limit yourself to manual mining. Natural cave systems, ruins, and crypts contain abundant ore deposits and often have pre-placed loot chests with valuable materials.
Benefits of dungeon exploration:
- Find multiple ore types in one location
- Discover chests with upgrade materials
- Encounter enemies that drop crafting components
- Uncover Memories for additional rewards
Combining cave exploration with targeted mining is way more efficient than just digging randomly.
Which Workbenches to Upgrade First
Not all crafting stations are equally important. Some unlock critical progression items, while others are nice-to-have bonuses. Here’s the priority order:
Priority 1: Standard Workbench (UPGRADE FIRST)
Why it’s essential:
The standard Workbench unlock is absolutely critical because it grants access to the Backpack Upgrade, which dramatically increases your inventory capacity. More inventory space = more resources per trip = faster progression across the board.
Additionally, upgrading the Workbench unlocks higher-tier tools (pickaxes, hatchets, shovels), which makes gathering all other materials significantly faster.
Recommendation: Upgrade your Workbench to Tier 2 ASAP. Don’t delay this—the quality-of-life improvement is massive.
Priority 2: Blacksmith’s Anvil
Why it matters:
The Blacksmith’s Anvil controls weapon and some armor crafting. Better weapons = faster combat = safer resource gathering and dungeon exploration.
Upgrading this station lets you craft Iron-tier weapons and eventually Cobalt gear, which is essential for surviving mid-game content.
Priority 3: Armorer’s Workbench
Why it’s important:
Armor keeps you alive. Upgrading the Armorer’s Workbench unlocks better protective gear, allowing you to tackle tougher enemies and dangerous biomes without constantly dying.
Combined with Blacksmith’s Anvil upgrades, you’ll have a full loadout of improved equipment.
Priority 4: Alchemist’s Workbench
Why you need it:
The Alchemist’s Workbench crafts potions, buffs, and consumables that provide massive advantages:
- Healing potions for survival
- Stat buffs for combat
- Utility effects for exploration
This station becomes critical for long-term survival, especially when facing endgame content or farming dangerous enemies like those that drop Essences of the Void.
Priority 5: Arcanist’s Workbench
Why it’s valuable:
The Arcanist’s Workbench handles magical and mystical crafting, including Teleporters (made with Azure Kelp).
Teleporters completely transform exploration by allowing instant fast travel between locations. This station isn’t essential for immediate survival, but it’s absolutely worth upgrading once you’ve handled the basics.
Optional: Farmer’s Workbench
Why it’s situational:
The Farmer’s Workbench isn’t mandatory for core progression, but if you want to unlock 100% of Hytale’s crafting system, you’ll eventually need to upgrade it.
It handles agricultural recipes, seeds, and farming-related items. Upgrade this when you’ve got spare resources and want completionist satisfaction.
Stations that DON’T need upgrades:
- Furniture Bench (Tier 1 only)
- Builder’s Workbench (Tier 1 only)
- Chef’s Stove (Tier 1 only)
These are already maxed out when you craft them.
Tier 2 and Tier 3 Upgrade Costs
As you progress through tiers, upgrade costs escalate significantly:
Tier 1 → Tier 2:
- Mid-tier materials (Iron, Copper, Linen, etc.)
- Relatively accessible through normal gameplay
- Achievable in early-to-mid game
Tier 2 → Tier 3:
- High-tier materials (Cobalt, Mithril, rare components)
- Requires exploring dangerous biomes
- Late-game investment
Each successive upgrade demands rarer resources that only spawn in harder regions. You’ll need to venture into snowy tundras for Cobalt, fight nighttime Void creatures for essences, and explore endgame zones for the rarest materials.
Resource planning tip: Start stockpiling upgrade materials early. If you know Tier 3 requires 50 Cobalt Ingots and 30 Shadoweave Scraps, begin gathering them during Tier 2 so you’re ready when the time comes.
Tips for Efficient Workbench Upgrading
Want to streamline the upgrade process? Here are some veteran strategies:
Batch Your Upgrades
Don’t upgrade workbenches one at a time randomly. Instead:
- Farm all materials for multiple upgrades in one expedition
- Upgrade several stations in a single session
- Immediately test new recipes to see what’s unlocked
This prevents constant back-and-forth between farming and upgrading.
Use Teleporters for Material Runs
Once you’ve crafted Teleporters at the Arcanist’s Workbench, place them strategically:
- Main base
- Iron mining location
- Cobalt farming zones
- Dangerous biomes with rare materials
Instant fast travel makes gathering upgrade materials infinitely faster.
Prioritize Backpack Upgrades
Seriously, I can’t stress this enough—upgrade your backpack capacity as soon as the Workbench tier allows it. More inventory space means:
- Fewer trips between base and farming locations
- Ability to carry diverse materials simultaneously
- Less time wasted on logistics
Farm with Friends
Playing with friends makes material gathering way more efficient:
- Split farming tasks (one person mines, another fights enemies for drops)
- Share materials to upgrade multiple bases
- Tackle dangerous biomes safely with backup
Consider Using Mods
Quality-of-life mods can make workbench management easier:
- Recipe trackers that show upgrade requirements
- Material counters for planning
- Inventory management improvements
Check CurseForge for helpful mods as the community develops them.
Common Upgrade Materials You’ll Need
Here’s a quick reference of materials frequently required for workbench upgrades:
Metals:
Fabrics:
- Linen Scraps
- Cindercloth Scraps
- Shadoweave Scraps
Monster Drops:
- Venom Sacs
- Essences of the Void
- Voidhearts
Other:
Having these materials stockpiled makes upgrades smooth and painless.
Frequently Asked Questions
Do I need to upgrade every single workbench to progress in Hytale?
No, you don’t need to upgrade every workbench to progress through the main game. The essential upgrades are: Standard Workbench (for tools and backpack), Blacksmith’s Anvil (for weapons), and Armorer’s Workbench (for armor). These three give you the combat power and utility needed to advance. Alchemist’s and Arcanist’s Workbenches are highly recommended for late-game content but not strictly mandatory. The Farmer’s Workbench is entirely optional unless you want 100% recipe completion.
Can I upgrade workbenches in any order, or is there a required sequence?
You can upgrade workbenches in any order you want—there’s no forced sequence. However, some upgrades are more impactful than others, which is why prioritizing the Standard Workbench first (for backpack upgrades and better tools) makes logical sense. Upgrading the Blacksmith’s Anvil before the Armorer’s Workbench works fine if you prefer offense over defense, for example. Just be strategic about what unlocks you need most urgently.
What happens to items I’ve already crafted when I upgrade a workbench?
Absolutely nothing upgrading workbenches only unlocks new recipes, it doesn’t affect existing items in any way. Your current weapons, armor, and tools remain exactly as they were. The upgrade simply expands what you can craft going forward, allowing access to higher-tier equipment. You won’t lose progress or need to re-craft anything you’ve already made.
How expensive are Tier 3 workbench upgrades compared to Tier 2?
Tier 3 upgrades are significantly more expensive than Tier 2—often requiring 2-3x the materials and featuring rare components only found in dangerous late-game biomes. For example, while Tier 2 might need 20 Iron Ingots and some common drops, Tier 3 could demand 50+ Cobalt Ingots, multiple Essences of the Void, and other endgame materials. Start stockpiling resources early if you’re planning to max out all your crafting stations.