Find every charm in Mafia: The Old Country with this complete guide. Includes all medallion and bead locations, effects, and tips for best loadouts.
Introduction: Why Charms Matter in Mafia: The Old Country
In Mafia: The Old Country, charms are more than simple collectibles. They’re gameplay enhancers that can tilt the balance of a mission, whether you’re stalking enemies in the shadows or exchanging fire in the middle of an ambush.
These charms come in two forms:
- Medallions – The “big” perks. You can equip one at the start of the game.
- Beads – Smaller yet useful bonuses. You start with one bead slot, but Pasquale’s store sells Silver Upgrade (adds +1 slot) and Gold Upgrade (adds +2 more, for a total of 4).
34 charms in total
- 22 found in story missions (via San Celeste statues)
- Others purchased from Pasquale or unlocked via DLC/pre-order bonuses.
Important: These are chapter-specific and missable. If you leave a chapter without finding its charm(s), you’ll need to replay the mission in another save.
Default Charms (Unlocked from the Start)
- Rusty Medallion – No effect. Purely a placeholder for your medallion slot until you find an upgrade.
- Wooden Bead – No effect. Serves as a filler bead until more powerful beads are earned.
These may seem useless, but they still occupy your equipment slots until you replace them, allowing you to familiarize yourself with the charms menu early on.
Chapter 1: Famiglia
Narrative Context: The game opens with you in Enzo’s home during a quiet family moment before heading into the day’s business. You have time to explore before the meal.
Charm: Sant’Agata (Medallion)
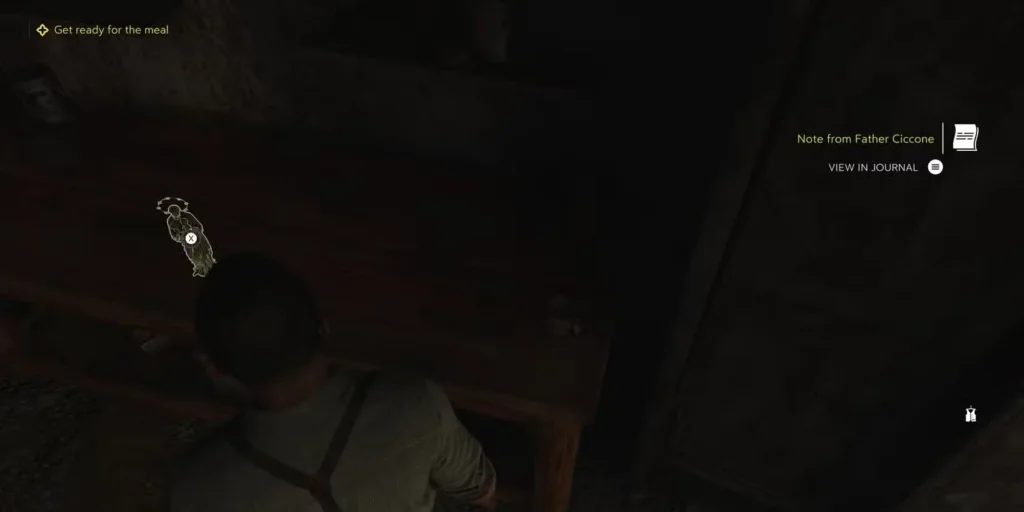
- Effect: Grants a short burst of invulnerability when you’re near death.
- Location Step-by-Step:
- During the “Get ready for the meal” segment, head to Enzo’s living quarters.
- Look for a wooden desk in the corner.
- On top lies a small gold San Celeste statue — interacting with it grants the charm.
Expert Tip: This charm is a literal lifesaver during early firefights when your health bar is small. Keep it equipped until you find a medallion more suited to your playstyle.
Chapter 2: Palio
Narrative Context: Enzo and Luca head to Collezolfo for the horse race. The festival atmosphere means the area is packed — a perfect location for pickpockets and charm hunters alike.
Charm: Fortunato (Bead)
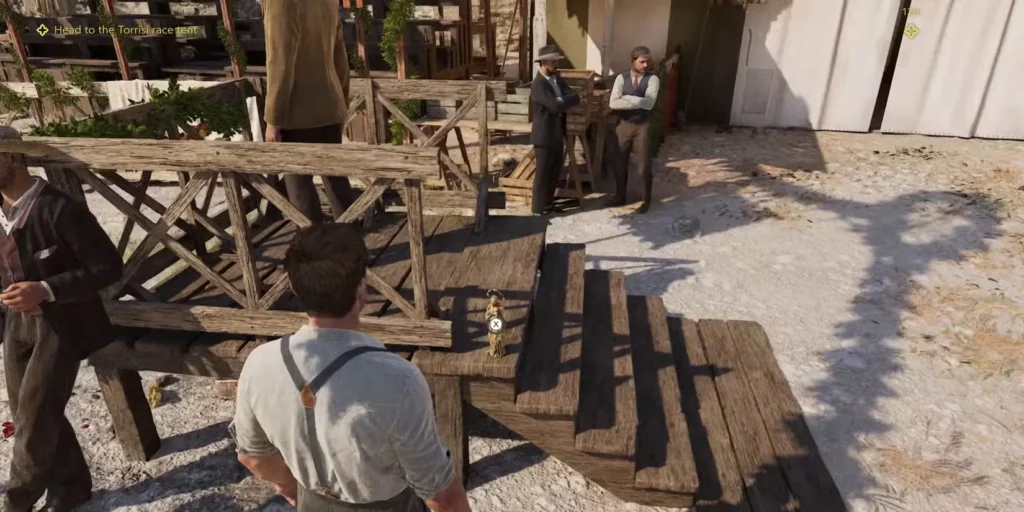
- Effect: Increases Dinari gained from looting enemies.
- Location Step-by-Step:
- At the start of “Head to the Torrisi race tent”, don’t go straight in.
- To the left of the tent entrance are wooden steps.
- The San Celeste statue is resting on these steps.
Expert Tip: If you plan on buying store charms early, Fortunato’s bonus cash stacks up quickly — especially useful before big weapon purchases.
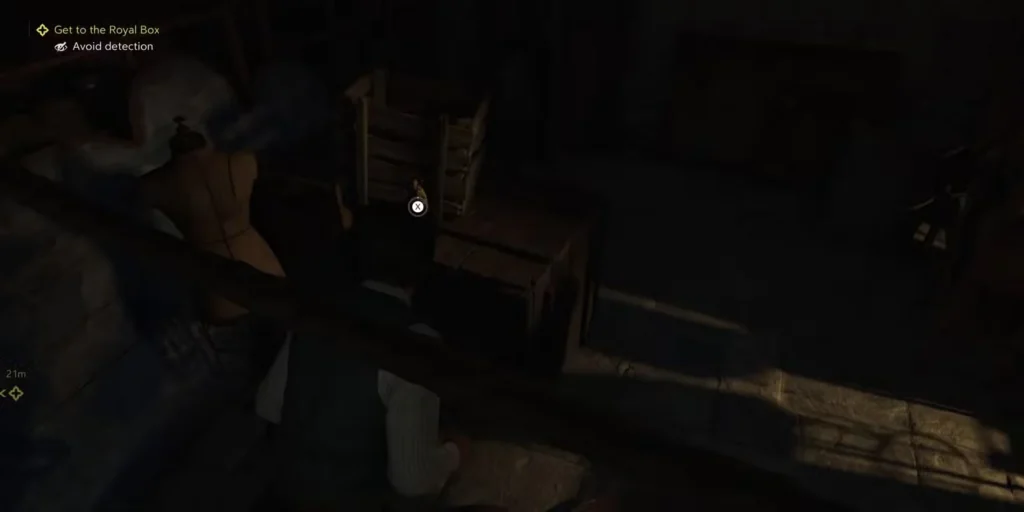
Chapter 3: Pizzu
Narrative Context: After a conversation with Isabella in the vineyard garden, you’ll move toward a stables meeting and later an abandoned farmhouse.
Charm 1: Astuzia (Bead)
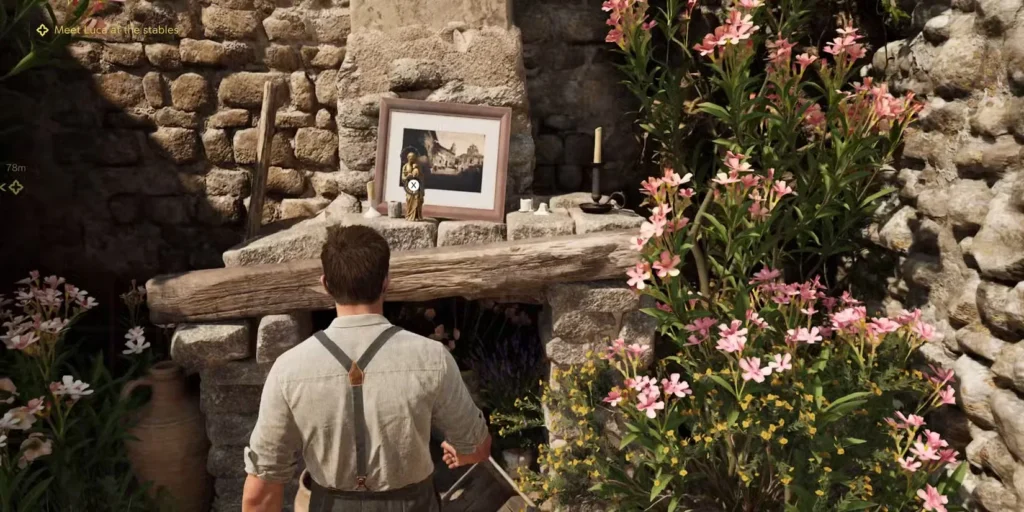
- Effect: Increases the blast radius of thrown items like grenades and Molotovs.
- Location: After speaking with Isabella in the garden, check the old fireplace mantel close by.
Tip: A bigger blast radius allows you to damage enemies around corners or behind cover.
Charm 2: Ingegnoso (Bead)
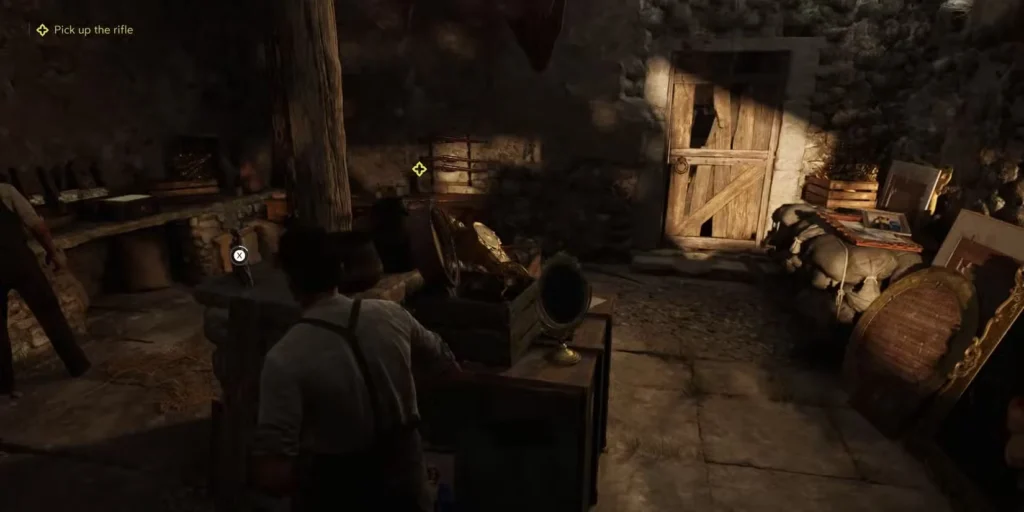
- Effect: Speeds up blade sharpening.
- Location: In the “Pick up the rifle” sequence, go inside the abandoned farmhouse. The charm sits on a table in the center.
Tip: Essential for knife-focused stealth runs where quick blade maintenance reduces downtime.
Chapter 4: Il Barone
Narrative Context: Cesare takes Isabella back to safety, leaving you to rescue Gennaro from Messina’s camp.
Charm 1: Fantasma (Bead)
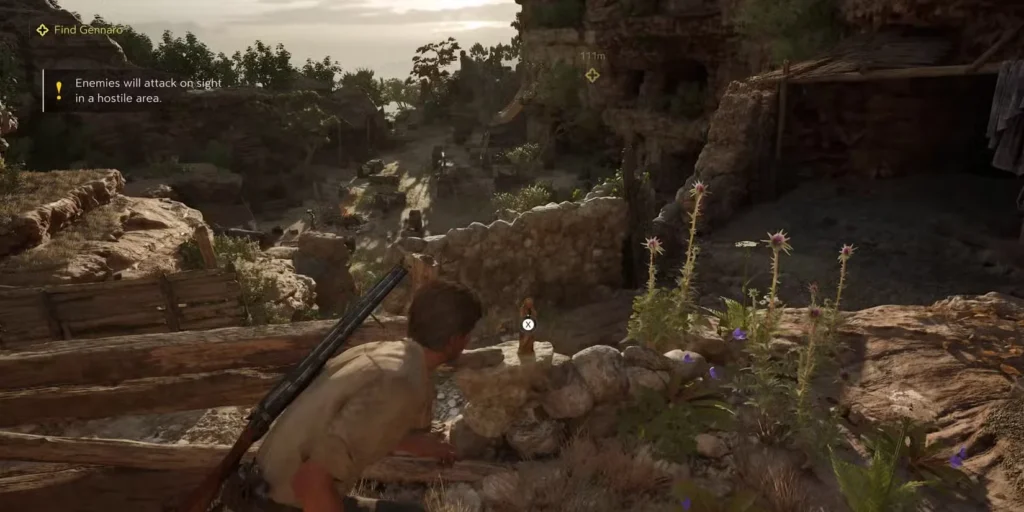
- Effect: Dampens footstep noise.
- Location: On a stone wall near Messina’s camp entrance.
Tip: One of the most valuable stealth-oriented charms in the entire game, letting you move freely during infiltration without attracting guard attention.
Charm 2: San Giuda (Medallion)
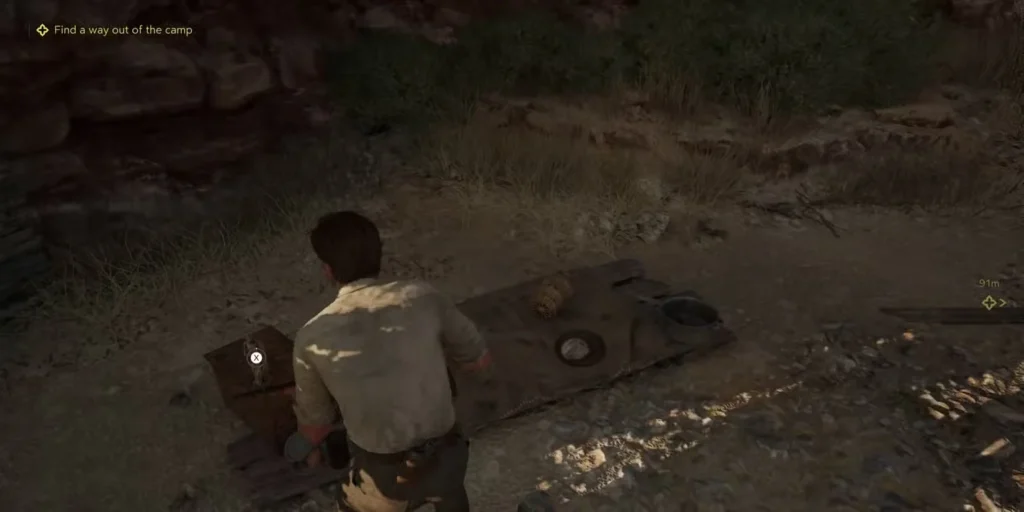
- Effect: Looted weapons always contain full ammo.
- Location: Wooden box next to the fire pit where Gennaro is rescued.
Tip: Combine this with high-capacity firearms for endless fighting without running dry.
Chapter 5: Vendetta D’Onore
Narrative Context: Your objective is to locate Ludovici and bring him back to Tino.
Charm: Caricato (Bead)
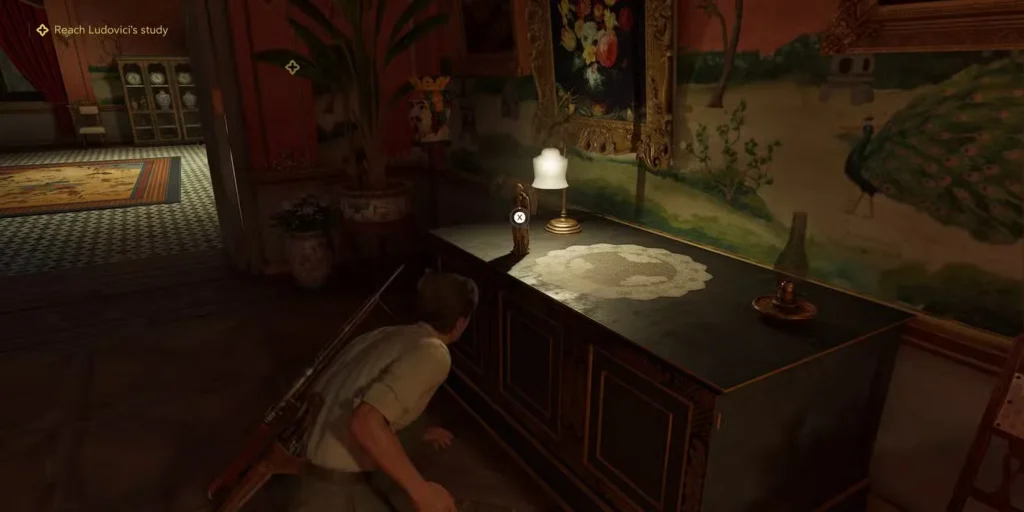
- Effect: Increases rifle ammo capacity.
- Location: Inside Ludovici’s house, by the ornate cabinet near the entrance to his study.
Tip: A perfect match for marksmen who favor long-range engagements.
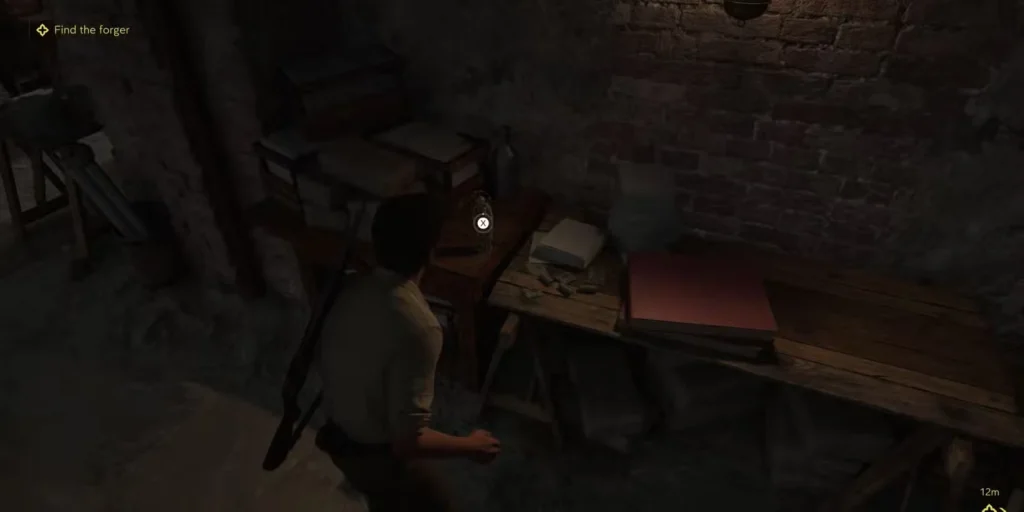
Chapter 6: La Difesa Siciliana
Narrative Context: You must rescue a key forger from Guardia custody, navigating guarded areas and locked rooms.
Charm 1: Abile (Bead)

- Effect: Stronger knife throws.
- Location: On a wooden barrel beside the forger’s cell.
Charm 2: Acuto (Bead)
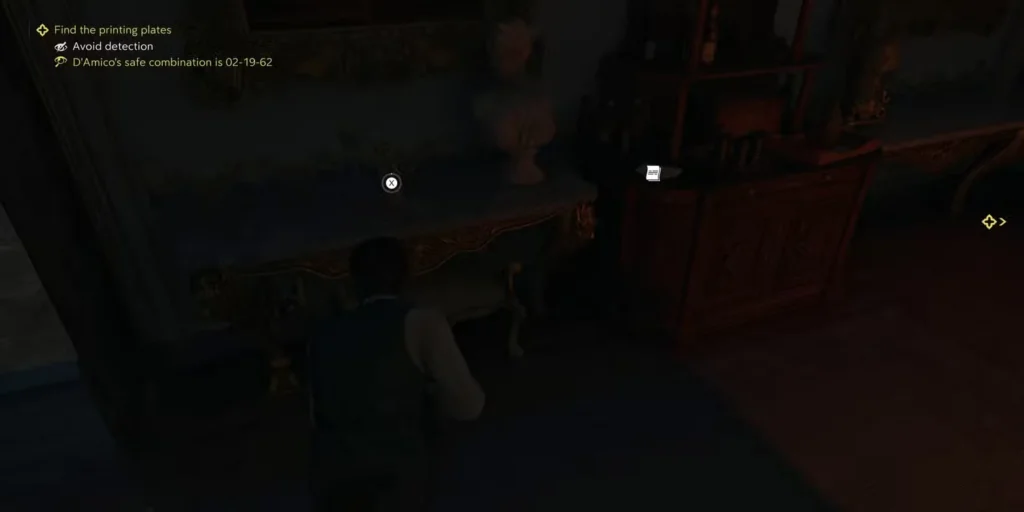
- Effect: Reduces time to full aiming accuracy.
- Location: In D’Amico’s office, check the ornate dresser to the left of the marble bust near the safe.
Tip: Acuto makes snap headshots far more reliable.
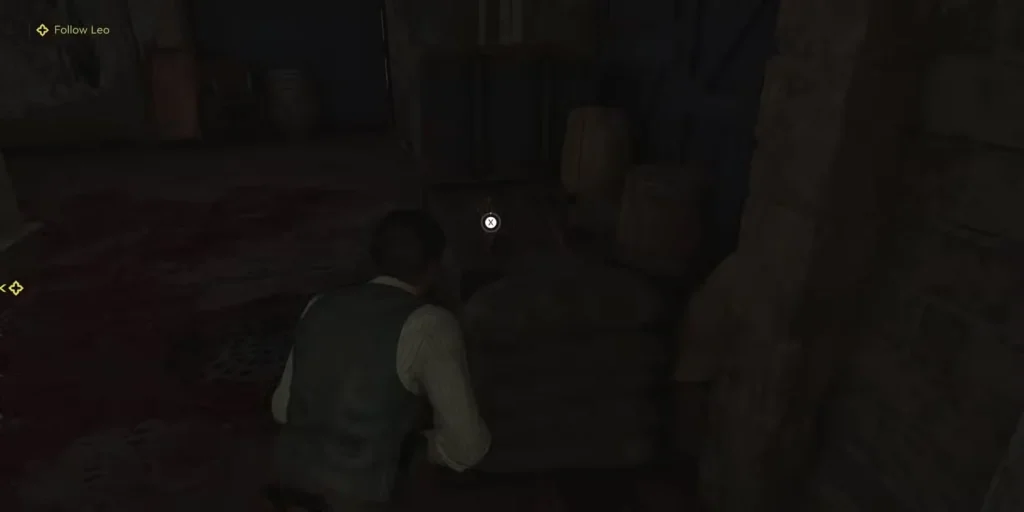
Chapter 7: Spirito Sportivo
Narrative Context: You’re assisting Leo in moving American goods, with opportunities for both stealth and open fighting.
Charm 1: Astuto (Bead)
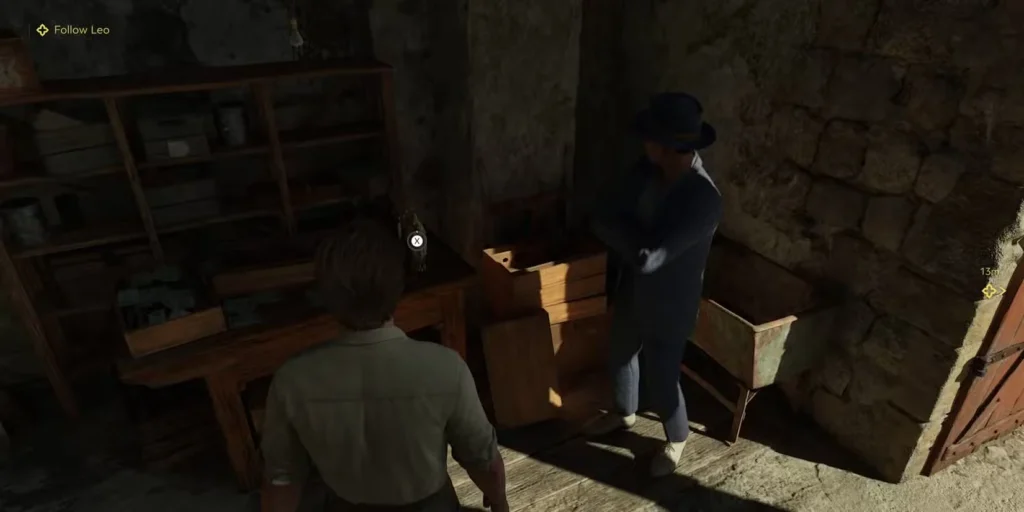
- Effect: Higher chance to find consumables when looting.
- Location: On a table near the warehouse’s main door, right at mission start.
Charm 2: Medicale (Bead)
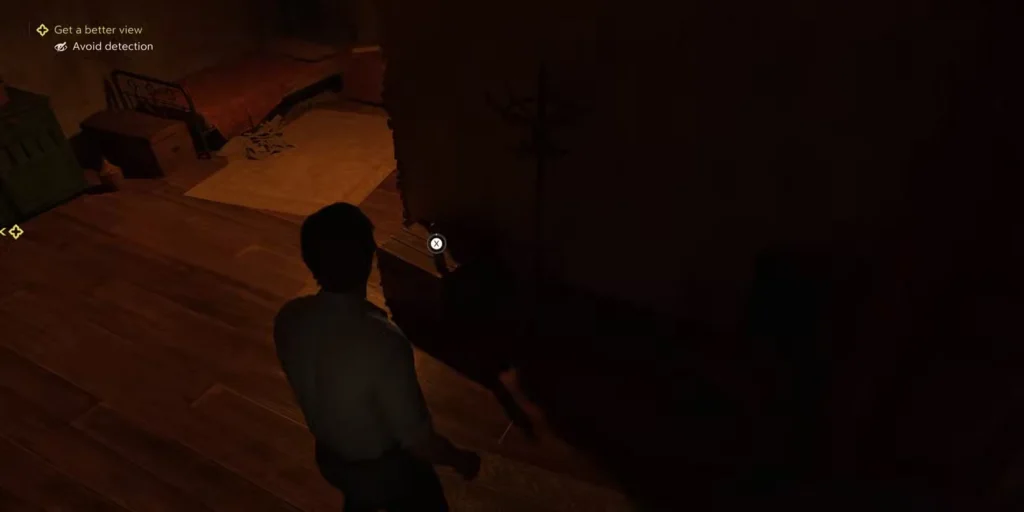
- Effect: Apply bandages faster.
- Location: Later in the mission (“Get a better view”), ascend to the upper floor and find a small wooden crate containing the charm.
Tip: Medicale drastically cuts healing downtime mid-combat.
Chapter 8: Disgrazia
Narrative Context: Your hunt for the forger intensifies, leading you to investigate the printing press and then chase a shadowy figure known as L’Ombra.
Charm 1: San Bernardo da Corleone (Medallion)
- Effect: Grants a chance to kill an enemy with a single shot.
- Location Step-by-Step:
- Mid-mission, you’ll enter the printing press room, where a Torrisi Mafioso briefly mistakes you for an enemy before apologizing.
- Once you can freely move, check the table in the same room before leaving — the San Celeste statue is there.
- Expert Tip: This medallion’s one-shot kill effect is a godsend in missions where enemies have armor or helmets.
Charm 2: Collettore (Bead)
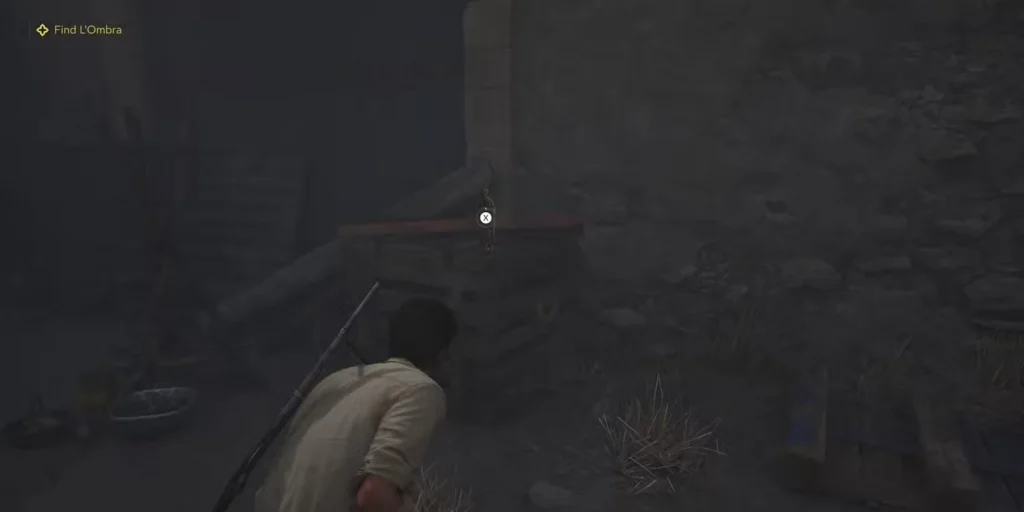
- Effect: Increases loot pickup speed.
- Location Step-by-Step:
- While chasing L’Ombra toward the abandoned Collezolfo building, stop before approaching the metal gate.
- Near the boarded-up doorway is a crate with the San Celeste statue holding this charm.
- Expert Tip: Handy in open firefights — faster looting means less time standing still under fire.
Chapter 9: Industria
Narrative Context: You’ll be investigating Lorenzetti’s industrial plant, searching for clues and forcing your way into tightly controlled areas.
Charm 1: Perseveranza (Bead)
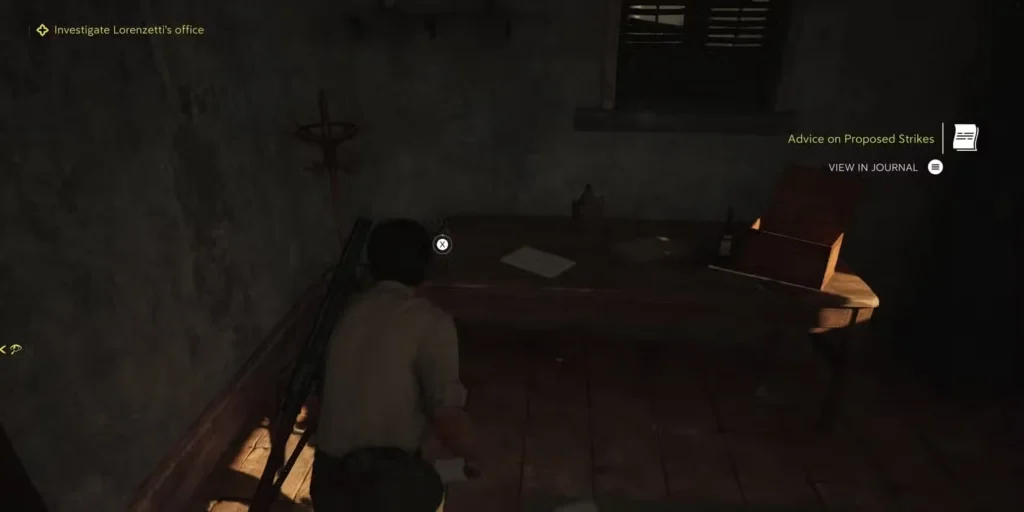
- Effect: Speeds up health recovery when close to death.
- Location: On the desk in Lorenzetti’s office at the start of your search.
Charm 2: Brutale (Bead)

- Effect: Boosts ranged weapon damage.
- Location: On a wooden bench near the entrance to the foreman’s office during your infiltration.
Charm 3: Pragmatico (Bead)
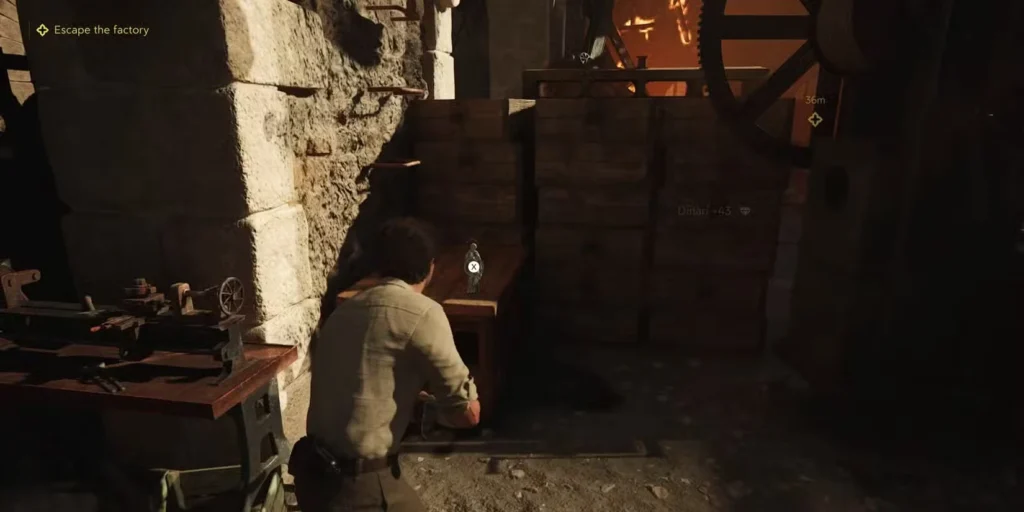
- Effect: Improves blind-fire and hip-fire accuracy.
- Location: Ground floor of the factory, on a table hidden behind crates, during the “Escape the factory” sequence.
Expert Tip: For maximum close-quarters impact, equip Brutale + Pragmatico here — the boosts to raw damage and hip-fire accuracy synergize perfectly.
Chapter 10: La Festa
Narrative Context: Escort Isabella to San Celeste during the festival and keep a lookout along the path for hidden opportunities.
Charm: San Cristoforo (Medallion)
- Effect: Increases the ammo capacity of all firearms.
- Location Step-by-Step:
- Climb the stone steps into San Celeste during the escort.
- On the right-hand side, just before the barber shop, is a brick wall with the statue.
- Expert Tip: More bullets per reload means longer sustained fire, especially for SMGs and LMGs.
Chapter 11: Mattanza
Narrative Context: A tense sit-down with Don Spadaro at the tonnara quickly escalates into combat and sniper defense.
Charm 1: Economico (Bead)

- Effect: You’ll find more ammo when looting.
- Location: After arriving, follow Don Torrisi toward the meeting room — check the wooden box in the corridor to your right.
Charm 2: Valore (Bead)
- Effect: Reduces visual blur from incoming gunfire.
- Location: After defending Leo from the sniper, pass through the blue door — the charm is on the table to the right.
Expert Tip: Valore is crucial in missions with multiple snipers or heavy incoming fire to maintain visibility while aiming.
Chapter 12: La Forza Del Destino
Narrative Context: The mission takes you through eerie catacombs before reaching the grand opera house for a climactic sequence.
Charm 1: Resistenza (Bead)
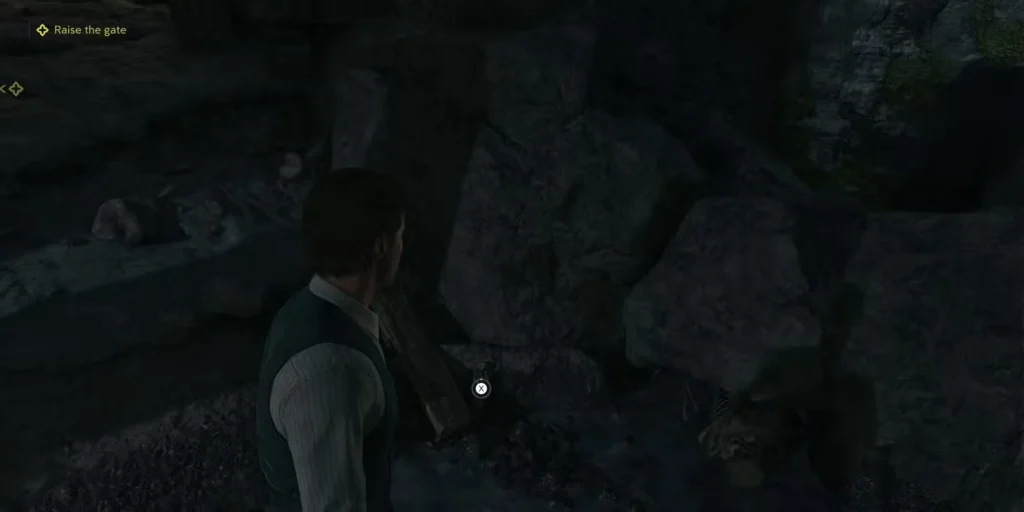
- Effect: Boosts your healing when near death.
- Location Step-by-Step:
- In the catacombs, you’ll encounter a locked gate.
- After crawling under rocks to open it from the other side, look for a skeleton and debris on your right — the statue is here.
Charm 2: Paziente (Bead)
- Effect: Improves aiming accuracy.
- Location: After reaching the opera house, you’ll push a cart to create a path. In the adjacent room to the right, the charm is on a table.
Expert Tip: Paziente is one of the best precision-boosting beads — ideal for headshot-heavy playstyles.
Chapter 13: Capiregime
Narrative Context: Your target is Mazzone — find him, kill him, and regain control.
Charm: Destrezza (Bead)
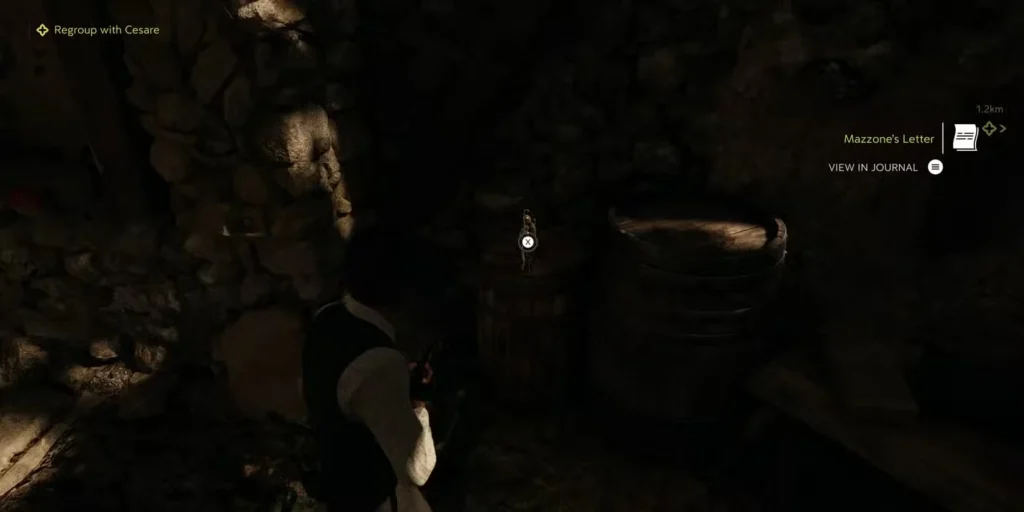
- Effect: Speeds up reload times for all guns.
- Location: In the same room where you take down Mazzone, the charm sits on a wooden barrel.
Expert Tip: This is a universal all-star bead — faster reloads cut downtime and boost your damage output over time.
Store-Bought Charms (Pasquale’s Shop)
These are unmissable as long as you can afford them. They can be purchased once unlocked in the shop’s inventory:
- San Francesco d’Assisi (Medallion) – Improves blade durability. (800 Dinari)
- Munito (Bead) – More pistol ammo. (500 Dinari)
- Potente (Bead) – More shotgun ammo. (500 Dinari)
- Preparato (Bead) – Carry more bandages. (750 Dinari)
- Explosivo (Bead) – Carry more grenades. (600 Dinari)
- Fortezza (Bead) – Reduces damage taken during duels. (1,200 Dinari)
Expert Tip: San Francesco d’Assisi is great for melee-focused builds, especially if you use a knife with naturally low durability.
Special / Pre-Order / Bonus Charms
Some powerful charms are tied to buying specific editions or linking accounts:
- Lupara (Medallion) – Improves Lupara fire/reload speed (Soldato Pack – pre-order)
- Immortale (Medallion) – Chance to auto-dodge bullets (Padrino Pack – Deluxe Edition)
- Velocita (Medallion) – Improves handling, suspension, and damage resistance in vehicles (Gatto Nero Pack – Deluxe Edition)
- Lincoln’s Charm (Medallion) – Faster choke/struggle animations (Link 2K account with Mafia III Definitive Edition)
Master Quick-Reference Charm Table
| Charm Name | Type | Effect | Unlock Method / Chapter |
| Rusty Medallion | Medallion | No effect | Default |
| Wooden Bead | Bead | No effect | Default |
| Sant’Agata | Medallion | Invulnerability when near death | Ch.1 – On Enzo’s desk |
| Fortunato | Bead | More Dinari from looting | Ch.2 – Wooden steps near race tent |
| Astuzia | Bead | Bigger thrown object AoE | Ch.3 – Fireplace mantel in garden |
| Ingegnoso | Bead | Faster blade sharpening | Ch.3 – Table in abandoned farmhouse |
| Fantasma | Bead | Quieter footsteps | Ch.4 – Stone wall near Messina’s camp |
| San Giuda | Medallion | Looted guns come full of ammo | Ch.4 – Wooden box near Gennaro |
| Caricato | Bead | More rifle ammo capacity | Ch.5 – Ornate cabinet in Ludovici’s house |
| Abile | Bead | Stronger knife throws | Ch.6 – Barrel near forger’s cell |
| Acuto | Bead | Faster to max aiming accuracy | Ch.6 – Dresser in D’Amico’s office |
| Astuto | Bead | Higher consumable drop rate | Ch.7 – Table in warehouse |
| Medicale | Bead | Faster bandaging | Ch.7 – Crate upstairs during “Get a better view” |
| San Bernardo da Corleone | Medallion | Chance to kill with one shot | Ch.8 – Table in printing press room |
| Collettore | Bead | Faster looting | Ch.8 – Crate near boarded-up doorway |
| Perseveranza | Bead | Faster recovery at low HP | Ch.9 – Desk in Lorenzetti’s office |
| Brutale | Bead | More ranged weapon damage | Ch.9 – Bench near foreman’s office |
| Pragmatico | Bead | Better blind/hip-fire accuracy | Ch.9 – Table behind crates |
| San Cristoforo | Medallion | More ammo capacity for all guns | Ch.10 – Brick wall in San Celeste |
| Economico | Bead | More ammo from looting | Ch.11 – Wooden box in corridor |
| Valore | Bead | Less blur when taking fire | Ch.11 – Table past blue door |
| Resistenza | Bead | More healing when near death | Ch.12 – Near skeleton past gate |
| Paziente | Bead | Better aiming accuracy | Ch.12 – Table after cart in opera house |
| Destrezza | Bead | Faster reloads | Ch.13 – Barrel near Mazzone |
| San Francesco d’Assisi | Medallion | Better blade durability | Shop – 800 Dinari |
| Munito | Bead | More pistol ammo | Shop – 500 Dinari |
| Potente | Bead | More shotgun ammo | Shop – 500 Dinari |
| Preparato | Bead | More bandages | Shop – 750 Dinari |
| Explosivo | Bead | More grenades | Shop – 600 Dinari |
| Fortezza | Bead | Reduced duel damage | Shop – 1,200 Dinari |
| Lupara | Medallion | Faster Lupara fire/reload | Soldato Pack (Pre-Order) |
| Immortale | Medallion | Chance to auto-dodge bullet | Padrino Pack (Deluxe) |
| Velocita | Medallion | Better vehicle handling/resistance | Gatto Nero Pack (Deluxe) |
| Lincoln’s Charm | Medallion | Faster choke and struggle | Link 2K account with Mafia III DE |
Expert Loadout Recommendations
Stealth Loadout
- Medallion: Fantasma (quiet footsteps) or Immortale (extra survivability)
- Beads:
- Fantasma (if available as bead)
- Abile (knife throws)
- Medicale (stealth healing)
- Astuto (more stealth consumables)
Combat-Heavy Loadout
- Medallion: San Bernardo da Corleone (one-shot potential) or San Cristoforo (max ammo)
- Beads:
- Brutale (damage boost)
- Destrezza (fast reloads)
- Acuto (faster aim)
- Resistenza (death recovery)
Loot & Resource Farming Loadout
- Medallion: San Giuda (full ammo from looted guns)
- Beads:
- Fortunato (more cash)
- Economico (more ammo from loot)
- Collettore (faster looting)
- Astuto (more consumables)
Chapter-by-Chapter Prep Plan
Early Game (Ch. 1–4)
- Prioritize Sant’Agata and Fantasma for survival and stealth edge.
- Use Fortunato to boost cash early for store upgrades.
Mid Game (Ch. 5–9)
- Grab Caricato, Acuto, Brutale for combat boosts.
- Start mixing survivability charms like Perseveranza to smooth over boss fights.
Late Game (Ch. 10–13)
- Shift focus to reload/ammo capacity — San Cristoforo, Destrezza.
- Finish with accuracy charms like Paziente for final precision combat.
Pro Tips for 100% Completion
- Replay friendly: Be aware you cannot backtrack once a chapter is completed — use a separate save slot before milestones.
- Pasquale’s store rotation: Check the shop each time you return from a mission for new charms.
- Charm synergy: Some beads work better together — e.g., Acuto + Paziente for sharpshooting, or Brutale + Destrezza for DPS maximization.
FAQ – Charms in Mafia: The Old Country
A: No, only one medallion can be active — but you can have up to four beads with Pasquale’s upgrades.
A: Yes, they’re permanent in your save, even if you unequip them.
A: Not in standard story progression — you’d need to reload a save from before finishing that chapter.
A: Some like Immortale can make things easier, but given the challenge spikes in certain missions, they’re not overly OP — just strong bonuses