Let’s talk about one of the most annoying early-game problems in The Outer Worlds 2: you start with only two weapon slots. Two! That means if you want to switch between your sniper rifle, shotgun, and pistol mid-combat, you’re pausing the game and digging through inventory menus like some kind of amateur.
It doesn’t have to be this way. You can unlock up to four weapon slots total, and honestly, it’s one of the best quality-of-life improvements you can make to your build. Here’s everything you need to know about expanding your arsenal and never fumbling through menus mid-fight again.
Why More Weapon Slots Actually Matter
Before we dive into the how, let’s talk about why you should care. Having only two weapon slots creates some genuinely frustrating situations:
Common problems with limited slots:
- Can’t adapt to different enemy types without pausing
- Miss out on specialized weapons for specific situations
- Forced to choose between long-range and close-range options
- Can’t experiment with different weapon types freely
- Breaking combat flow to swap gear is immersion-breaking
What four weapon slots enable:
- Long-range sniper for opening fights
- Mid-range rifle for general combat
- Close-quarters shotgun for when enemies rush you
- Specialty weapon for specific enemy types (plasma for robots, bio for creatures)
Once you experience combat with four weapon slots, you’ll never want to go back. It’s not just convenient—it genuinely changes how you approach fights and makes combat significantly more dynamic.
Method 1: The Commando Perk (The Permanent Solution)
The single best way to unlock an additional weapon slot is through the Commando perk. This is a permanent unlock that doesn’t require you to wear specific armor or worry about losing it if you change gear.
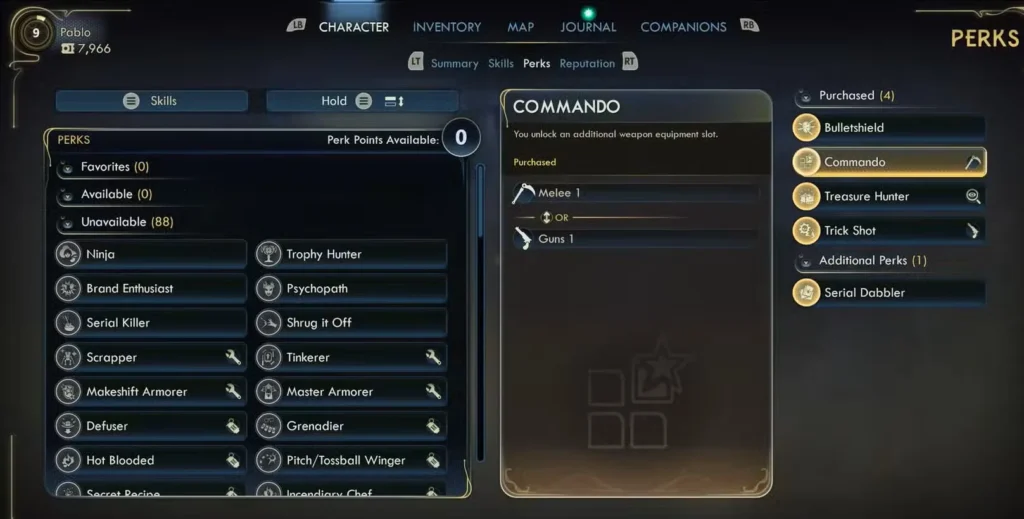
How to Unlock Commando
Requirements:
- 1 skill point in either Guns OR Melee
- Access to the perk selection screen (available at even levels starting at Level 2)
Why this is the best option:
- Permanent: Once unlocked, you have the extra slot forever
- No equipment requirements: Works regardless of what armor you’re wearing
- Early access: You can get this as early as Level 2 if you started with Guns or Melee
- No resource cost: Unlike armor mods, this doesn’t require crafting materials
Strategic Timing
Here’s when you should grab Commando:
Grab it early if: You’re running a combat-focused build and constantly switching weapons. The convenience is worth using an early perk point.
Wait a bit if: You’re playing a stealth or dialogue-heavy character who rarely uses multiple weapons. Other perks might give you more value initially.
My recommendation? Unless you’re doing a very specialized non-combat build, grab Commando within your first 4-6 levels. The quality-of-life improvement is massive, and you’ll appreciate it throughout the entire game.
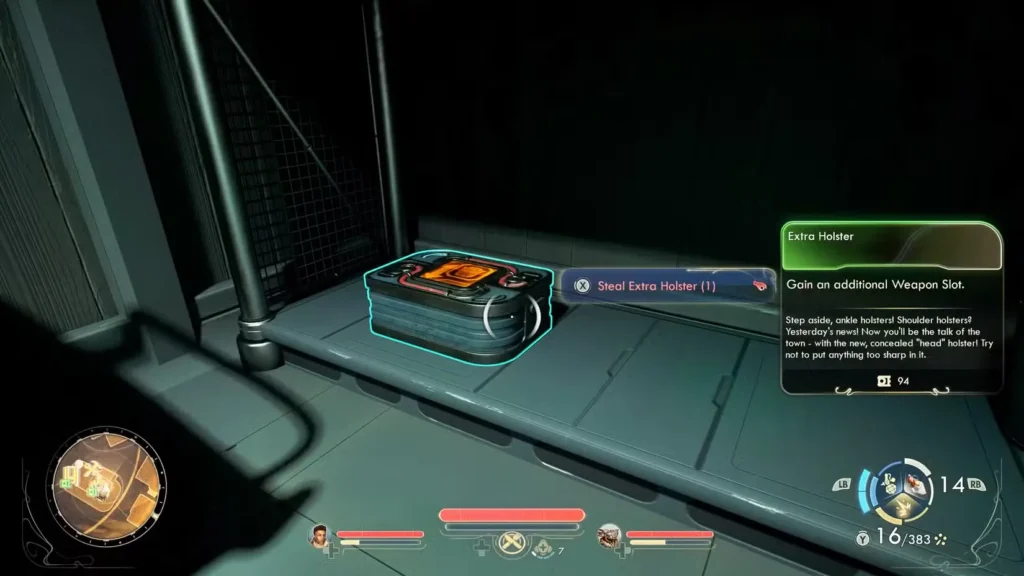
Method 2: Extra Holster Armor Mods (The Flexible Option)
The second way to unlock additional weapon slots is through the “Extra Holster” armor mod. This attaches to your armor and grants one extra weapon slot while you’re wearing that piece of gear.
Where to Find Extra Holster Mods
Option 1: Buy it from Paradise vendor
The easiest early-game source is the vendor in Paradise (the first major area you visit). They typically stock the Extra Holster mod, though you’ll need enough Bits to purchase it.
Option 2: “Acquire” it through creative means
If you’re short on cash or just feeling morally flexible, you can steal an Extra Holster mod from the Paradise vendor:
- Head to the vendor’s shop
- Go through the door on their right side
- Close the door behind you (important for stealth)
- Grab the mod from the bottom shelf
- Walk out like nothing happened
Just be aware this might affect your reputation if you’re caught, so save beforehand.
Option 3: Craft it yourself
You can craft Extra Holster mods at any workbench or through Niles’ Field Tinkering companion ability.
Crafting requirements:
- 25 Cloth (fairly common material)
- Access to a workbench or Niles
This is the most reliable method if you’re looting thoroughly and breaking down unnecessary gear for materials.
Option 4: Find it while exploring
Extra Holster mods spawn as loot throughout the world, but they’re uncommon rarity. You’ll occasionally find them in containers, on dead enemies, or in hidden areas. Don’t count on this as your primary source, but grab them when you find them.
How to Install Armor Mods
Once you’ve got an Extra Holster mod, here’s how to install it:
- Go to any workbench
- Select the “Mods” option
- Choose the piece of armor you want to attach it to
- Select the Extra Holster mod from the right-hand menu
- Confirm the installation
Critical warning: Mods are permanent!
Once you attach a mod to a piece of armor, it cannot be removed. If you unequip that armor or find better gear later, you lose the mod along with the weapon slot it provides. Choose your armor piece carefully—ideally something you’ll use long-term.
Pros and Cons of Armor Mods
Advantages:
- Don’t require perk points
- Can stack multiple mods on different armor pieces
- Available earlier than you might unlock perks
- Good for non-combat builds that don’t invest in Guns/Melee
Disadvantages:
- Equipment-dependent (lose the slot if you change armor)
- Permanent installation means you can’t get the mod back
- Requires crafting materials or Bits
- Takes up a mod slot that could be used for other bonuses
Maxing Out: How to Get All Four Weapon Slots
Here’s the important part: you can unlock two additional weapon slots beyond your starting two, giving you four total. To max out your weapon capacity, you need to use a combination of both methods.
The Two Paths to Four Slots
Option A: One perk, one mod
- Unlock the Commando perk (permanent 3rd slot)
- Install Extra Holster armor mod (conditional 4th slot)
- Total cost: 1 perk point + 25 Cloth + one armor mod slot
Option B: Two mods, no perk
- Install Extra Holster on two different armor pieces
- Total cost: 50 Cloth + two armor mod slots
- Trade-off: Saves a perk point but makes you dependent on equipment

Which Path Should You Choose?
For most players: Option A (perk + mod)
The Commando perk is simply better as a long-term investment. Having one permanent slot means you only need to worry about maintaining one armor mod. Plus, if you find better armor later, you still keep three weapon slots while you decide where to install the new mod.
For specialized builds: Option B (two mods)
If you’re running a non-combat build where Guns and Melee skills aren’t priorities, and you have armor pieces you know you’ll keep long-term, double mods can work. This saves a perk point for something more aligned with your build.
My recommendation: Unless you have a very specific reason not to, go with Option A. The flexibility and permanence of the Commando perk is worth more than saving one perk point.
Optimal Weapon Loadout Strategies
Now that you know how to get more slots, let’s talk about what to actually equip. With four weapon slots, you can cover almost any combat scenario without pausing.
The Balanced Loadout (Recommended)
- Long-range weapon: Sniper rifle or hunting rifle for opening shots and distant enemies
- Medium-range weapon: Assault rifle or pistol for general combat
- Close-range weapon: Shotgun or SMG for when enemies get in your face
- Specialty weapon: Elemental or anti-armor weapon for tough enemies
This gives you answers to every situation without needing to think too hard about which weapon to pull out.
The Ammo-Conscious Loadout
- Primary gun (most common ammo type)
- Secondary gun (different ammo type as backup)
- Melee weapon (no ammo required)
- Emergency weapon or throwables
Perfect for early-game when ammo is scarce and you need to be conservative with resources.
The Specialized Hunter Loadout
- Shock weapon for automechanicals and robots
- Plasma weapon for shields and armor
- Bio weapon for creatures
- Ballistic weapon for humans
This is overkill for most situations but incredibly effective if you’re fighting diverse enemy groups.
Early-Game Priority: When to Unlock Extra Slots
Here’s my recommended timeline for unlocking weapon slots:
Level 2-4: If you have Guns or Melee skill, grab Commando perk. The early quality-of-life is worth it.
Arriving at Paradise: Either buy, steal, or craft your first Extra Holster mod. Install it on armor you plan to keep for a while.
Mid-game (Level 8-12): Craft or find a second Extra Holster mod if you skipped the Commando perk. By now you should have stable armor pieces.
Don’t rush it if: You’re primarily playing stealth or dialogue builds and rarely use weapons. Focus on perks that align with your playstyle first.
Common Mistakes to Avoid
Installing mods on temporary armor: Don’t attach Extra Holster to early-game armor you’ll replace quickly. Wait until you have decent gear.
Forgetting about Niles’ crafting ability: You don’t need to run back to town to craft mods. Niles can do it in the field.
Not planning your loadout: Four random weapons isn’t better than two strategic choices. Think about ammo types and range diversity.
Neglecting weapon maintenance: More weapons mean more gear to manage and upgrade. Keep your loadout maintained.
Additional Tips for Weapon Management
Keep backup weapons: Even with four slots, carry extra weapons in inventory with different ammo types for emergencies.
Consider weight… wait, no: The Outer Worlds 2 has no weight limit, so carry whatever you want in your inventory.
Mod your weapons: With more weapon slots, you can specialize each weapon for different situations through mods.
Match weapons to builds: If you invested in specific weapon skills through character creation, equip those weapon types in your active slots.
The Bottom Line: More Slots = More Fun
Combat in The Outer Worlds 2 is at its best when you can adapt to situations on the fly. Having four weapon slots transforms fights from “which two weapons should I bring” to “I have an answer for everything.”
Whether you unlock slots through the Commando perk, Extra Holster mods, or both, you’re making a massive quality-of-life improvement that’ll pay dividends throughout your entire playthrough.
My advice? Prioritize the Commando perk early, then add an Extra Holster mod when you find armor worth keeping long-term. You’ll never have to pause mid-fight to swap weapons again, and combat will flow so much better.
Now get out there, load up that arsenal, and show the Arcadian system what four weapons of corporate destruction can accomplish.
For more essential gameplay tips, check out our beginner’s guide and our guide on what to do first when starting your adventure.