Why the Paradise Island Substation Matters
Here’s a secret most players miss during their first hours in The Outer Worlds 2: there’s a powerful machine gun hidden behind a broken substation on Paradise Island, and you can grab it way earlier than the game expects. The catch? You need to solve a multi-step environmental puzzle that requires specific character skills.
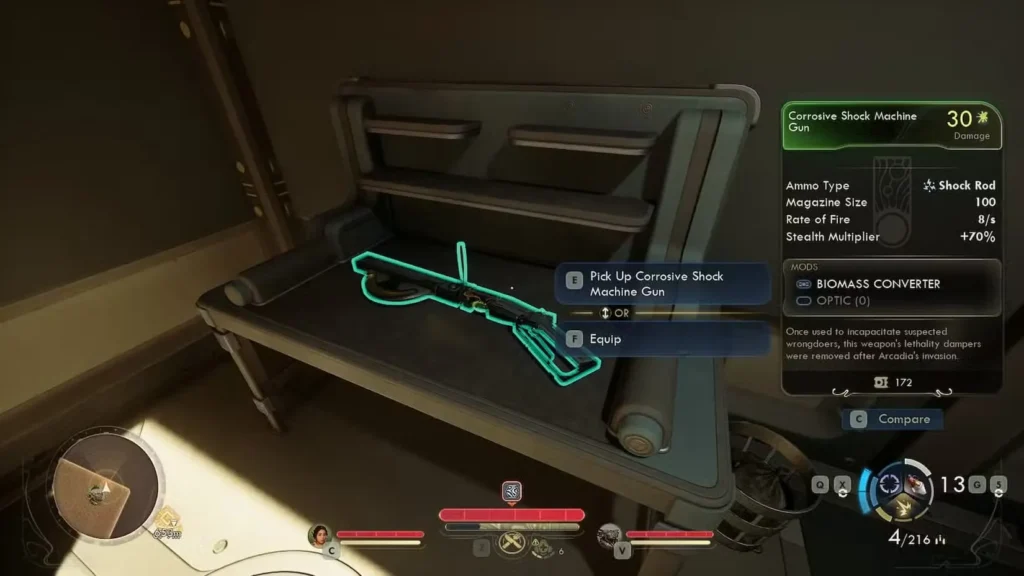
The Corrosive Shock Machine Gun waiting inside absolutely shreds armored enemies and automechanicals, making it one of the best early-game weapons for players who invest in the Guns skill tree. It’s essentially a free upgrade that trivializes several upcoming combat encounters—if you know how to get it.
What makes this quest interesting: Unlike traditional fetch quests with obvious markers, the substation repair puzzle requires exploration, environmental awareness, and forward-thinking character building. It rewards players who experiment and investigate rather than just following waypoints.
Let’s break down exactly how to repair this substation and claim your reward.
Skill Requirements: Can You Actually Complete This Quest?
Before you invest time hunting for the repair kit, let’s talk about how your character can access this reward—because there are actually multiple paths depending on your build.
Path 1: Skip the Kit Entirely (Engineering 3 or Innovative Trait)
If your character has Engineering Level 3 or selected the Innovative trait at character creation, you don’t need the Substation Repair Kit at all. Simply climb the ladder to the substation rooftop and interact with the control panel to repair it directly. No vent grate, no kit hunting required.
- Engineering 3: A skill investment path—requires spending points, but pays off here and in many other Engineering checks throughout the game
- Innovative Trait: Must be selected at character creation; cannot be acquired later
Path 2: Find the Repair Kit (Sneak 2 or Nimble Trait)
If you don’t have Engineering 3 or the Innovative trait, you’ll need to retrieve the Substation Repair Kit from inside the main building. To access it, you must open a vent grate on the building’s exterior, which requires one of these:
Option A: Sneak Level 2
- Most flexible and accessible option
- Can be obtained by any character except those with the Dumb flaw
- Achievable after a single level-up if you start at Sneak 0
Option B: Nimble Trait
- Must be selected during character creation
- Cannot be acquired later in the game
- Automatically bypasses the Sneak requirement for the grate
The Dumb Flaw Problem
If you accepted the Dumb flaw at character creation (which locks you out of leveling certain skills), and you didn’t take the Nimble or Innovative traits, you may be completely blocked from accessing the repair kit via the vent grate. However, Engineering 3 remains an alternative if your build allows it.
Why this matters: The Dumb flaw is tempting because it offers significant benefits, but it comes with hidden costs like this. Before accepting it in future playthroughs, consider whether you’re willing to miss optional content. Check our complete flaws guide for detailed analysis of long-term flaw impacts.
Quick Sneak Leveling Strategy
Don’t have Sneak 2 yet? No problem. Here’s the fastest way to get it:
Step 1: Complete a few side quests or exploration objectives on Paradise Island to gain experience
Step 2: Level up once (this happens quickly in the early game)
Step 3: When allocating skill points, remember you can put two points into skills below 50
Step 4: If you have Sneak 0, level it directly to Sneak 2 in one go
Pro tip: Don’t waste skill points on Sneak if you’re not planning a stealth build. Just get the minimum required for this quest, then invest future points into your core skills. For more on skill allocation strategies, check our best starting builds guide.
Finding the Substation Repair Kit (Step-by-Step)
If you’re going the kit route, here’s exactly where to find it.
Location Overview
The southern substation is located in the Paradise Island area—you’ll likely stumble across it during early exploration. The facility consists of:
- A main building with a rooftop access panel (your repair target)
- An auxiliary building directly opposite the main building (contains your weapon reward)
- Various outdoor equipment and structures
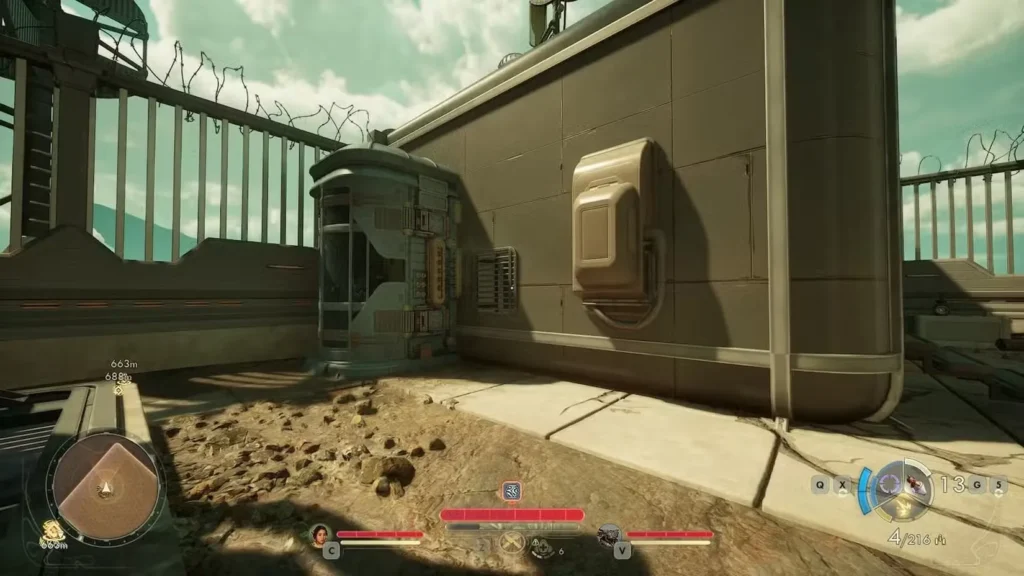
The Vent Grate: Your Entry Point
The main substation building’s doors are sealed shut. The only access point is a vent grate on the building’s exterior side wall.
Finding the grate:
- From the Power Substation, turn left and drop down
- Look for the grate on the side of the building’s exterior wall
- It’s positioned right next to an automech cabinet—a distinctive military-green storage unit
- It’s at ground level and relatively easy to spot once you’re looking in the right area
Visual landmark: The automech cabinet is your key reference point. If you’ve found the cabinet, you’ve found the grate—they’re right next to each other.
Opening the Grate
Interact with the vent grate. If you have Sneak 2 or the Nimble trait, you’ll successfully pry it open. If you lack these requirements, the interaction will fail with a notification about insufficient skills.
What happens if you can’t open it?
- Go complete more quests to level up and invest points in Sneak
- Alternatively, if your build can support it, level Engineering to 3 and repair the panel directly from the rooftop instead
Inside the Building
Once through the vent, you’ll find yourself inside the main building. The Substation Repair Kit is on a table in plain sight—you can’t miss it once you’re inside.
Bonus loot: While you’re in here, look around for additional items including spare parts, ammunition, and consumables worth grabbing before you head back out.
Complete Substation Repair Process
You’ve got the kit (or Engineering 3). Now let’s fix this thing and get your reward.
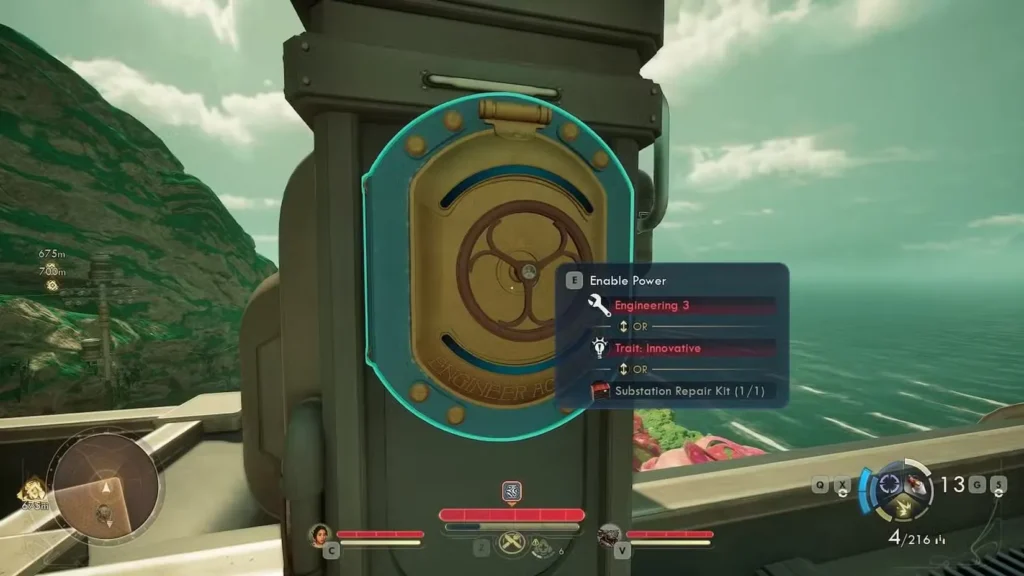
Step 1: Repair the Rooftop Panel
Climb the ladder on the outside of the main substation building to reach the rooftop.
Using the repair kit (or skill):
- Interact with the damaged panel on the roof
- If you have Engineering 3 or the Innovative trait, the repair completes immediately
- Otherwise, select the Substation Repair Kit from your inventory and watch the repair animation complete
- Audio and visual cues will confirm success
What this accomplishes: Repairing the rooftop panel restores primary power to the facility, unsealing the main building’s doors and activating internal systems—including the crucial charging station you’ll need next.
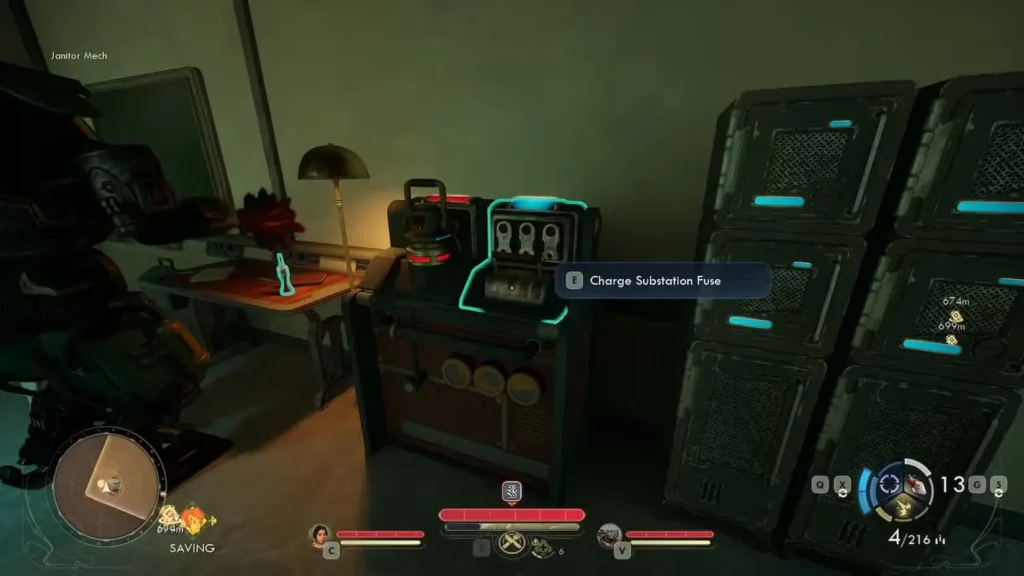
Step 2: Charge the Substation Fuse
Head back down from the roof and enter the main substation building through its now-unsealed doors.
Inside the main building:
- Turn right immediately upon entering
- You’ll find both the Substation Fuse and its charging station beside the pair of lockers on the right side of the room
- Place the fuse into the charging station and wait for the charging cycle to complete
- When charging is done, remove the now Charged Substation Fuse
Why this matters: The charged fuse acts as a portable power source that will activate the auxiliary building’s locking mechanism.
Step 3: Unlock the Auxiliary Building
With your Charged Substation Fuse in hand, exit the main building.
Finding the right slot:
- Exit the main building and head straight
- The auxiliary building’s empty fuse slot and unpowered door are directly opposite the main substation, to the right
- Insert the Charged Substation Fuse into the slot
- The auxiliary building’s door will unlock
Step 4: Claim Your Reward
Enter the now-accessible auxiliary building and grab everything inside.
Confirmed loot inside:
- Corrosive Shock Machine Gun (on the table)
- Defensive Plates mod
- Ammunition and other items
Bonus: The Befuddled Fisherman’s House
Repairing the substation doesn’t just unlock the armory—it also powers the Befuddled Fisherman’s house at the bottom of the hill. Don’t leave without visiting it. The house contains significant loot of its own, including:
- An Advanced Decryption Key
- Consumables and other items inside the house
- A safe containing an Explosive Light Revolver and an Emergency Deflectors mod
This makes the substation repair one of the highest-value optional activities on Paradise Island—you’re effectively getting two separate loot caches for a single puzzle.
Corrosive Shock Machine Gun: Is It Worth the Effort?
Let’s talk about whether this weapon justifies the 15-20 minutes of puzzle-solving and exploration.
Weapon Stats & Performance
Damage Type: Corrosive + Shock (dual damage types)
Weapon Class: Machine Gun (automatic, high rate of fire)
Best Stat Synergy: Guns skill tree, Heavy Weapons perks
Damage profile:
- Corrosive: Excellent against armor, melts through defensive plating
- Shock: Strong against shields and electrical systems
- Combined: Devastating against automechanicals and heavily armored humanoids
Where This Weapon Excels
Against Automechanicals: This is where the Corrosive Shock Machine Gun truly shines. Robots, mechs, and automated defense systems take massive damage from both damage types. The shock component disrupts their systems while corrosive eats through their armor plating.
Against Heavily Armored Factions:
- Protectorate soldiers in heavy armor
- Corporate security forces
- Any enemy type wearing metal plating or exoskeletons
The corrosive damage bypasses armor effectiveness, making this weapon ideal for situations where standard ballistic damage would be significantly reduced.
Crowd Control Situations: The machine gun’s high rate of fire combined with its area denial potential makes it excellent for suppressing multiple enemies simultaneously.
Where This Weapon Struggles
Creature-Type Enemies: Most organic creatures in The Outer Worlds 2 are resistant or immune to corrosive and shock damage. This includes:
- Wildlife and fauna
- Mutated creatures
- Biological threats
Why this matters: You can’t rely on this weapon as your only gun. It’s situationally powerful but not universally effective. Always keep a secondary weapon for creature encounters.
Ammunition Considerations: Machine guns burn through ammunition quickly. Manage your ammo reserves carefully or risk running dry during extended combat sequences.
Optimal Usage Strategy
Primary weapon for: Robot-heavy areas, faction combat, armored targets
Secondary weapon for: Creature encounters, precision situations, ammo conservation
Loadout recommendation:
- Slot 1: Corrosive Shock Machine Gun (anti-armor/anti-mech)
- Slot 2: Conventional ballistic weapon or energy weapon (general purpose)
Skill investment: If you’re planning to use this weapon extensively, invest in:
- Guns skill (obvious damage boost)
- Heavy Weapons perks (if available for machine guns)
- Ammo efficiency perks
- Armor penetration bonuses
For comprehensive perk recommendations, check our complete perks guide.
Early Game Impact & Progression Value
Early Game (Levels 1-8)
Power level: Significantly above-average for this stage
Impact: Trivializes several upcoming combat encounters, particularly in robot-heavy areas
Recommendation: Absolutely worth grabbing if your build can access it
At early levels, most players are still using starter weapons with basic stats. The Corrosive Shock Machine Gun represents a substantial upgrade in raw damage output and specialized effectiveness. It can carry you through the early-mid game with proper ammunition management.
Mid Game (Levels 9-15)
Power level: Still competitive with level-appropriate drops
Impact: Remains your go-to anti-armor option unless you’ve found specialized alternatives
Recommendation: Keep it as a secondary weapon for specific encounters
Late Game (Levels 16+)
Power level: Outclassed by endgame gear but still viable with upgrades
Impact: Niche role as anti-mech specialist weapon
Recommendation: Replace with better options unless you’ve heavily invested in upgrades
Weapon Upgrade Potential
If this weapon accepts mods and upgrades through the crafting system, its long-term value increases significantly. Weapons that can scale through modifications can remain viable into endgame—check a Workbench to see what mod slots it has available.
Crafting tip: Our sell or break down guide helps you decide whether to scrap old weapons for parts or sell them for bits when you find better alternatives.
Alternative Approaches & Character Builds
If You Can’t Access the Repair Kit
Scenario: You have the Dumb flaw, didn’t take Nimble or Innovative, and can’t reach Engineering 3
Alternatives:
- Focus on other early-game weapon acquisition opportunities
- Invest in companions who can handle armored/mech enemies
- Use explosive weapons or crowd control tactics instead
- Accept this as content your build can’t access
Silver lining: The Outer Worlds 2 offers multiple paths to power. Missing one weapon doesn’t cripple your playthrough. Our A Noble History quest guide details another excellent early weapon acquisition opportunity that might be more accessible to your build.
If You Don’t Use Guns
Scenario: You’re running a melee, science weapon, or companion-focused build
Should you still get it?
- Vendor value: Worth grabbing just to sell for bits
- Build flexibility: Always good to have a backup option
- Don’t forget the Befuddled Fisherman’s house and its loot—that alone justifies the trip
Common Mistakes & Troubleshooting
Mistake #1: Not Knowing All Access Paths
Players assume they need Sneak 2 or the Nimble trait and give up if they don’t have them—without realizing that Engineering 3 or the Innovative trait lets you skip the kit entirely and repair the panel directly from the rooftop.
Solution: Check all four options before writing off this content: Engineering 3, Innovative trait, Sneak 2, or Nimble trait.
Mistake #2: Missing the Vent Grate Location
The grate isn’t on the main doors—it’s on the building’s exterior side wall. Players often circle the building once, don’t spot it immediately, and give up.
Solution: Turn left from the substation, drop down, and look for the grate on the building’s side wall next to the automech cabinet.
Mistake #3: Forgetting to Charge the Fuse
Some players grab the fuse, try to use it immediately, and wonder why it doesn’t work. The charging step is mandatory.
Solution: Follow the steps in order. The fuse is found beside the lockers to the right when you enter the main building. Charge it there before trying to unlock the auxiliary building.
Mistake #4: Skipping the Befuddled Fisherman’s House
Many players grab the machine gun and leave without realizing the substation repair also powered a house at the bottom of the hill, which contains additional high-value loot.
Solution: After collecting the machine gun, head down the hill to the Befuddled Fisherman’s house. The safe inside contains an Explosive Light Revolver and an Emergency Deflectors mod.
Mistake #5: Using the Weapon Against Wrong Enemies
New players get the Corrosive Shock Machine Gun and try to use it against wildlife, then conclude the weapon is weak when it barely damages organic targets.
Solution: Understand damage type effectiveness. Keep a secondary weapon for creature encounters. Our beginner’s tips guide covers damage type strategies in detail.
Mistake #6: Wasting Ammunition
Machine guns have high fire rates. New users hold down the trigger and burn through entire magazines on single targets.
Solution: Practice burst fire control. Short, controlled bursts are more ammunition-efficient than constant full-auto spray. Save the sustained fire for emergency situations or when you have abundant ammo reserves.
Integration with Early Game Progression
This substation repair quest fits naturally into your Paradise Island exploration phase. Here’s how to integrate it efficiently:
Optimal Completion Timing
When to start: After reaching Paradise Island but before leaving for other major areas
Recommended level: 3-5 (gives you time to get Sneak 2 if needed)
Time investment: 15-20 minutes including exploration and puzzle-solving
Combining with Other Paradise Island Content
Efficient quest stacking:
- Complete side quests that grant experience
- Explore for skill magazines and stat boosts
- Clear nearby enemy camps for practice and loot
- Level up to meet Sneak or Engineering requirements
- Return to complete substation repair, then visit the Befuddled Fisherman’s house
Paradise Island Exploration Checklist
While you’re in the area:
- Main story objectives — Advance the critical path
- Companion recruitment — Don’t miss recruitable NPCs
- Substation repair — This quest
- Befuddled Fisherman’s house — Bonus loot from the substation repair
- Science Adventures Quarterly magazines — Skill boosts (magazine locations guide)
- Cloister Excogitation logs — Lore and bonuses (logs location guide)
Lore & Environmental Storytelling
Infrastructure Decay
The broken substation represents typical corporate negligence. Paradise Island—despite its idyllic name—suffers from deferred maintenance and failing infrastructure. The power grid is literally falling apart.
Self-Reliance Necessity
No one is coming to fix this substation. The repair kit exists, but it’s locked away and inaccessible through normal channels. You, the player, must take initiative to solve problems the factions have abandoned.
Reward for Curiosity
The weapon hidden behind this puzzle rewards players who explore thoroughly and engage with environmental challenges. This design philosophy permeates The Outer Worlds 2—optional content often yields disproportionate rewards compared to its difficulty.
Frequently Asked Questions
Yes—if you have Engineering 3 or the Innovative trait, you can repair the substation panel directly from the rooftop without needing the repair kit or the vent grate at all. If you have none of these four options (Engineering 3, Innovative, Sneak 2, or Nimble), you will be blocked from the repair kit.
Typically no. Unique quest rewards don’t respawn in The Outer Worlds series. Grab it once, and that’s it for this playthrough.
Depends on companion equipment mechanics in The Outer Worlds 2. Some companions accept player-given weapons, others have fixed loadouts. Check our complete companions guide for specifics.
Only if you permanently leave Paradise Island without completing the quest and can’t return. Generally, you can return to most areas in The Outer Worlds 2.
You might be able to buy it back from the same vendor if you catch the mistake quickly. Otherwise, it’s gone for that playthrough.
No. Difficulty affects enemy health and damage, not base weapon stats. The gun performs identically on Story Mode and Supernova difficulty.
Related Guides & Resources
Paradise Island Content:
Weapons & Combat:
Character Building:
Quest Guides:
Official Resources:
- The Outer Worlds 2 Official Website
- Xbox Store Page
- Steam – The Outer Worlds 2
- Wikipedia: The Outer Worlds 2
Final Verdict: Should You Prioritize This Quest?
Short answer: Yes, if your build can access it.
Long answer: The Corrosive Shock Machine Gun represents excellent value for minimal time investment. Fifteen minutes of exploration and puzzle-solving nets you a weapon that remains relevant for 10+ hours of gameplay with proper ammunition management. And don’t forget the Befuddled Fisherman’s house—the Advanced Decryption Key, Explosive Light Revolver, and Emergency Deflectors mod inside make this one of the highest-yield optional activities on the entire island.
The skill requirements are flexible—four different character options (Engineering 3, Innovative, Sneak 2, or Nimble) can complete this quest, and only very specific flaw combinations lock you out entirely.
Even if you’re not planning a Guns-focused build, the weapon’s vendor value and the bonus fisherman’s house loot justify grabbing it. At worst, you sell the machine gun for bits to fund your actual build. At best, you’ve got a powerful tool for robot-heavy sections and armored enemy encounters throughout the early-mid game.
My recommendation: Complete this quest during your initial Paradise Island exploration phase, immediately after confirming you meet at least one of the four access requirements. Then head down the hill to the Befuddled Fisherman’s house before moving on.
Paradise Island holds many secrets beyond just this substation. Take your time, explore thoroughly, and you’ll be rewarded with gear, lore, and experiences that make your playthrough richer. The Corrosive Shock Machine Gun is just one piece of that puzzle—but it’s a particularly explosive piece worth acquiring.
Now get out there and fix that substation. Your new favorite machine gun is waiting.