Complete Guide to Recalibrating All Lightning Towers in The Outer Worlds 2
Praetor is arguably the most hostile region in The Outer Worlds 2, with its constant lightning storms and aggressive wildlife. But those same dangerous storms are the key to one of the game’s most unique collection quests: “Fiddling With Fulgurating Fulminations.” Your mission? Recalibrate five malfunctioning Lightning Towers by accessing their connected Grounding Stations across the region.
Unlike the Cloister Excogitation Logs quest or the Golden Ridge mural hunt, this collection mission rewards you with something genuinely practical: Storm Grenades that harness Praetor’s lightning storms as a weapon, plus the permanent crafting recipe to make more whenever you need them.
The catch? Each Grounding Station presents unique challenges—missing parts, locked doors, deadly bug swarms, and environmental puzzles. Some require combat prowess, others demand lockpicking skills or special equipment. Let me walk you through exactly where to find all five stations and how to overcome each obstacle efficiently.

How to Start Fiddling With Fulgurating Fulminations
You have two methods for beginning this collection quest:
Method 1: Talk to Exemplar Simon (Recommended)
Head to the Grounding Station directly south of the landing pad, in the south-central part of Praetor. The station is a quick walk straight south from where you first arrive — you won’t face any enemies on the way there.
Follow the path that curves behind the Grounding Station building until you reach a raised lift platform. You’ll find Exemplar Simon, an Order of the Ascendant member, waiting there. Speak with him to officially start the “Fiddling With Fulgurating Fulminations” mission.
Simon explains the Lightning Tower situation and marks the other Grounding Stations on your map, making navigation significantly easier.
Method 2: Fix a Lightning Tower First (Alternative)
You can also trigger this quest organically by locating and repairing any Lightning Tower before meeting Exemplar Simon. The mission will activate automatically and track your progress.
However, you’ll still need to return to Exemplar Simon after completing all five towers to claim your final rewards, so talking to him first saves you a trip.
Pro tip: I strongly recommend meeting Simon first. Getting the quest markers upfront prevents wasted exploration time, and his dialogue provides helpful context about why the Order of the Ascendant cares about these towers in the first place. Plus, if you’re working through faction reputation quests, this conversation builds goodwill with the Order.
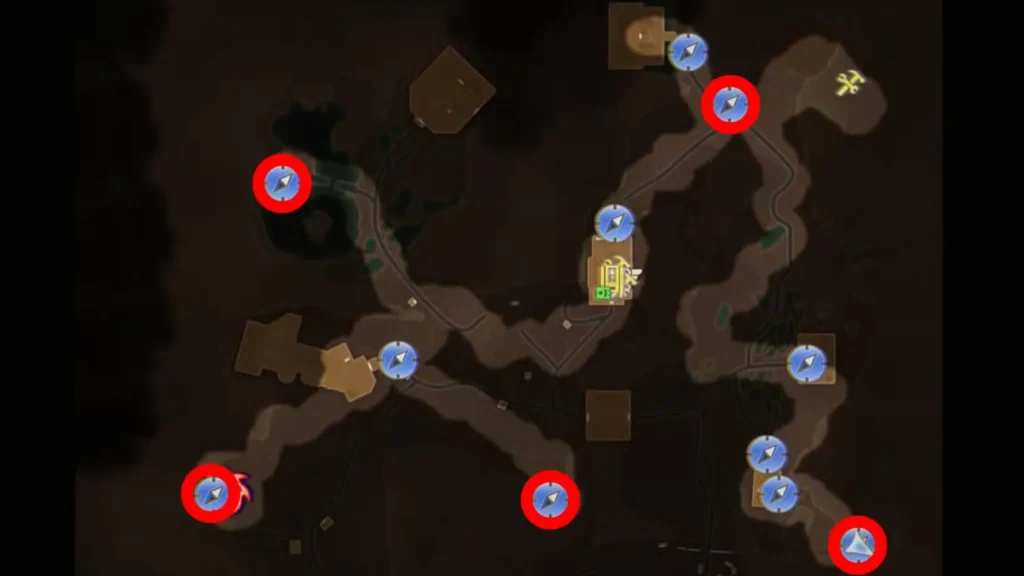
All 5 Grounding Station & Lightning Tower Locations
Here’s where to find each Grounding Station in Praetor, along with specific challenges you’ll face and how to overcome them. I’ve organized these in a logical exploration order, though you can tackle them in any sequence. Two towers are on Praetor’s eastern side and three are on the western side.
Lightning Tower #1: Northeast — North of the Landing Pad
Where to find it: North of the landing pad. Follow the road heading north from where you started — the tower sits on the east side of that road, just before you reach the Tomb of the Matriarch.
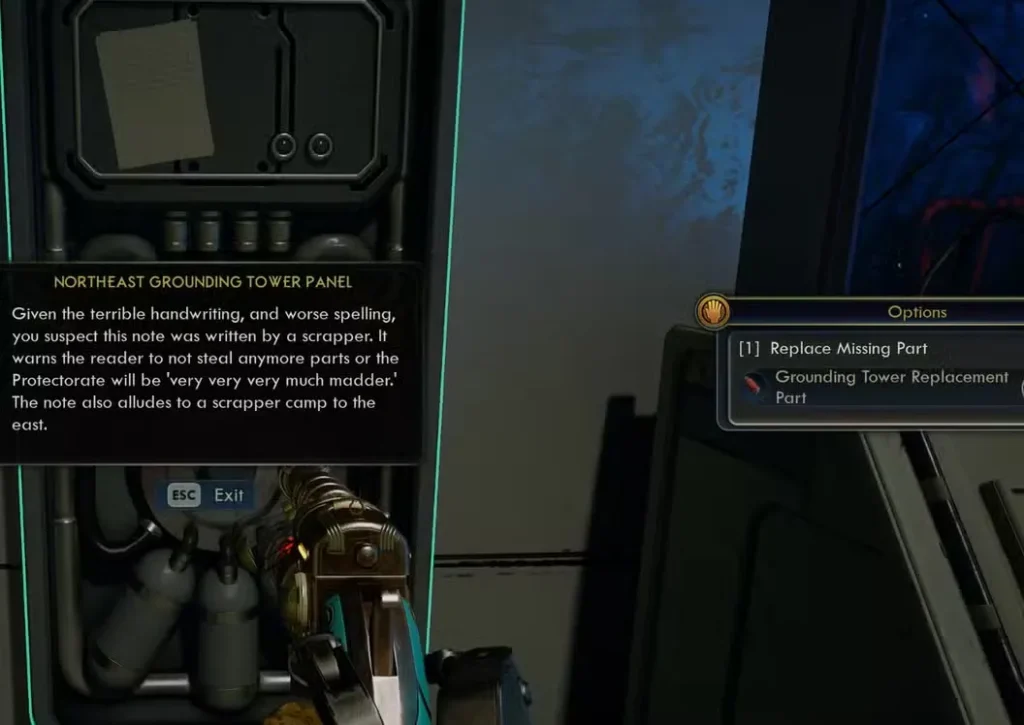
Challenge: Missing Replacement Part
When you enter this tower, you’ll find a note on the panel indicating a critical component is missing. Here’s how to fix it:
- Head east-northeast from the tower into a nearby Scrapper camp
- Clear out the hostile Scrappers — the camp is guarded but enemies are more spaced out toward the back, making stealth viable
- Find the Grounding Tower Replacement Part on a grey crate in the cave system at the far northeast corner of the encampment, near a campfire
- Return to the Grounding Station and insert the part into the designated port
- Activate the terminal to recalibrate the Lightning Tower
Combat tip: Scrappers are numerous but relatively weak. Bring companions with area-of-effect abilities to handle groups efficiently. Stock up on inhaler charges if you’re under-leveled. A bonus Tossball Card (Susan DeVenero) can be found inside this tower next to the terminal — don’t miss it.
Lightning Tower #2: Southeast — Behind the Main Grounding Station
Where to find it: Southeast of Exemplar Simon’s Grounding Station. This is actually the closest tower to where you start the quest — head through the Raptidon-infested cave just past Simon’s location, then scale the boulders upward.

Challenge: Mantisaur/Mantiwasp Swarm
The area surrounding this tower is guarded by swarms of Mantiwasps — flying insectoid enemies that spawn continuously from hives on the walls until all hives are destroyed. Keep fighting through the waves; they will eventually stop.
Combat approach:
- Mantiwasps are flying enemies — prioritize taking them down quickly before they surround you
- Try bottlenecking them in the tower doorway to funnel them into a chokepoint
- Watch for dive-bomb attacks and dodge accordingly
- Clear the area methodically before attempting to enter the station
Once you’ve defeated the Mantiwasps, enter the Grounding Station and use the terminal to recalibrate the Lightning Tower. This one is relatively straightforward compared to others once the enemies are cleared.
Lightning Tower #3: Northwest — South of Central Control
Where to find it: On Praetor’s western side, south of the Central Control area (the same area you’ll visit with Tristan for his companion quest). It’s also described as north-northwest of the Interstitial Reconfiguration Center, on the other side of an electrified river.

Challenge: Verachnid Infestation
The path leading to this Grounding Station is crawling with Verachnids — Praetor’s primary spider-type enemies. These bugs are aggressive and attack in swarms.
Survival strategy:
- Save before ascending the hill to the station (manual quicksave recommended)
- Consider using a long-range weapon such as a sniper rifle to thin the herd before closing the gap — once detected, Verachnids have surprisingly accurate ranged projectiles
- Keep moving to avoid getting surrounded
- Consider using grenades or explosive weapons to thin out groups
- Bring companions who can draw aggro while you flank
The tower itself is unoccupied by soldiers despite its proximity to Central Control — once the Verachnids are cleared, walk over to the terminal and recalibrate it.
Equipment note: Make sure your weapon loadout is optimized for dealing with multiple fast-moving enemies before attempting this one.
Lightning Tower #4: Central — West Side of the Blockade
Where to find it: The Central tower is located on the west side of the Protectorate blockade, roughly in the middle of the map. The blockade itself blocks the main path, so you’ll need to go around it to reach the tower.

Challenge: Locked Door + Enemy Conflicts
This Grounding Station presents multiple obstacles:
Access options:
- Lockpicking: The door requires Lockpick 2 and 1x Mag-Pick to open (confirmed by Fextralife wiki)
- Drop in from above: Navigate to the building’s roof and drop down through an opening (requires parkour and careful jumping)
Environmental hazard: The area around this station features warring Raptidon and Protectorate enemies fighting each other. Use the tall grass for cover and eliminate them stealthily, or:
- Let them weaken each other, then clean up survivors
- Sneak past while they’re distracted by combat
- Avoid the conflict entirely by taking the rooftop drop-in route
Note: After recalibrating this tower, a few Raptidons will spawn inside — be ready for another fight on your way out.
Lightning Tower #5: Southwest — Requires Rift Modulator
Where to find it: The Southwest tower is positioned between Auntie’s Choice Chemical Factory (in the southwest corner) and the area where you acquire the Rift Modulator (the westernmost point of the map).

Challenge: Requires Rift Modulator Equipment + Turrets
This is the most puzzle-oriented tower and cannot be fully accessed until you obtain the Rift Modulator during main story progression. The tower entrance is also protected by turrets.
How to reach it:
- First, get the Rift Modulator: Acquired during the main quest “An Instrument to Unfold Space & Time” in Praetor. You’ll naturally receive this device through story progression.
- Deal with the turrets: The tower entrance is guarded by turrets — defeat or sneak past them before proceeding.
- Activate the rift switch: Use the Rift Modulator on the rift switch near the tower’s door, then activate the one outside.
- Enter and recalibrate: Access the terminal inside to complete this fifth and final tower.
Important note: Don’t waste time searching for this station early in your Praetor exploration. It’s impossible to access without the Rift Modulator, which you won’t have until completing a key main quest. Focus on towers #1-4 first, then circle back here.

Quest Rewards: What You Get For Completing All Lightning Towers
Completing “Fiddling With Fulgurating Fulminations” offers excellent rewards that actually enhance your combat capabilities:
1. Storm Grenades (15x)
Exemplar Simon rewards you with 15 Storm Grenades—unique throwable weapons with special properties:
Storm Grenade effects:
- Stick to enemies upon impact (like plasma grenades)
- Increase incoming Shock damage on affected targets
- Call down lightning strikes from Praetor’s storms when used on the planet
These grenades are particularly devastating in Praetor itself, where the constant electrical storms amplify their power. They’re less flashy on other planets but still apply the Shock damage vulnerability debuff.
2. Storm Grenade Crafting Recipe (Permanent)
The real prize here is the permanent crafting recipe for Storm Grenades. Once you’ve completed the quest, you can craft unlimited Storm Grenades at any workbench using:
Crafting requirements per grenade:
- 1x Voltspore
- 3x Energy Canister
- 1x Black Powder
These materials are relatively common on Praetor, making it easy to maintain a steady supply of Storm Grenades for tough encounters. The recipe remains available for your entire playthrough.
Crafting tip: If you’re running low on materials, Voltspores drop from electrical creatures on Praetor, Energy Canisters can be looted from Automech enemies or purchased from vendors, and Black Powder is craftable or found in various containers.
3. Mission Completion XP
You’ll earn a substantial XP chunk for finishing the quest, helpful for pushing toward the max level cap.
4. Praetor Towers Powered Achievement/Trophy
Completing this collection quest unlocks:
- Xbox: 15 Gamerscore
- PlayStation: Bronze Trophy
Tips for Efficient Lightning Tower Collection
Here are strategies to streamline your Grounding Station expedition:
• Prepare for combat: Unlike some collection quests that emphasize exploration, Praetor’s towers involve significant combat. Bring strong weapons, plenty of ammo, and healing items.
• Optimize your build: Having Lockpick 2 opens the front door at the Central tower without any parkour. Check our best starting builds guide for skill distribution advice.
• Leverage companion abilities: Praetor’s enemies can be overwhelming solo. Bring companions who can handle crowds or provide tactical support.
• Save tower #5 for story progression: Don’t frustrate yourself searching for the Southwest tower early. Complete towers #1-4 while freely exploring, then return for #5 after acquiring the Rift Modulator naturally through the story.
• Stock crafting materials: Once you unlock the Storm Grenade recipe, start hoarding Voltspores, Energy Canisters, and Black Powder. These grenades are excellent for tough boss fights or challenging puzzle encounters.
• Use environmental advantages: At the Central tower, let enemy factions fight each other before engaging. At the Northwest tower, use terrain to funnel Verachnids into chokepoints.
• Mark stations on your map: If you spot a Grounding Station but aren’t prepared (low health, no lockpicks, etc.), place a custom waypoint so you can return later with proper equipment.
Comparing Praetor’s Collection Quest to Other Regions
The Outer Worlds 2 features four regional collection quests with distinct mechanics:
• Paradise: Collect Science Magazines for permanent stat bonuses • Golden Ridge: Recover Tramicular Station murals for the Art Enthusiast XP perk • Cloister: Find Excogitation Logs for a High Security Lockbox • Praetor: Recalibrate Lightning Towers for Storm Grenades and crafting recipe
The Praetor quest is the most combat-intensive but offers the most immediately useful reward. Storm Grenades remain relevant throughout your entire playthrough, whereas some other collection rewards are more situational.
If you’re building a combat-focused character, prioritize this quest. The grenades synergize beautifully with Shock-based builds and provide crowd control options against Praetor’s tougher enemies.
Should You Prioritize This Collection Quest?
Yes, if you’re:
- Running a combat-heavy build that benefits from grenades
- Planning to spend significant time in Praetor
- Looking for unique consumables with special effects
- A completionist targeting all achievements/trophies
- Interested in crafting and resource management
Maybe later, if you’re:
- Under-leveled for Praetor’s combat encounters
- Rushing through the main story
- Playing a pacifist or stealth-focused character
- Low on lockpicking supplies and combat resources
- Focused on other urgent questlines
Honestly, the Storm Grenade crafting recipe alone makes this quest worthwhile. Having access to powerful throwables that you can craft on-demand is incredibly valuable, especially during late-game content where consumable management matters.
The quest difficulty is moderate—more challenging than collecting magazines but less tedious than hunting down every mural. If you’ve invested in combat skills and have decent companions, you can complete all five towers in one focused exploration session.
Troubleshooting Common Issues
Can’t find the Replacement Part for Tower #1 (Northeast)? It’s in the Scrapper camp to the east-northeast of the tower. Look for a grey crate in the cave system at the far northeast corner of the camp, near a campfire. Clear all enemies first to search safely.
Getting overwhelmed by Verachnids at Tower #3 (Northwest)? Try using a long-range weapon to pick off enemies before closing the gap. The main path triggers the largest concentration. Also consider leveling up more before attempting this tower.
How do I get into Tower #4 (Central) without lockpicking? Look for nearby rocky outcroppings or environmental geometry you can jump from to reach the roof, then drop down inside. The lockpick option only requires Lockpick 2 and 1x Mag-Pick, which is a low bar.
Where exactly do I get the Rift Modulator? You’ll acquire it during the main quest “An Instrument to Unfold Space & Time” in Praetor. You cannot miss it if you’re following the campaign.
Storm Grenades aren’t as powerful as expected? They’re most effective in Praetor itself, where lightning storms amplify their damage. On other planets, they’re still useful for the Shock vulnerability debuff they apply to enemies.
Best Ways to Use Storm Grenades
Once you’ve unlocked the crafting recipe, here’s how to maximize your Storm Grenades:
• Praetor boss fights: The lightning-calling effect deals massive damage during storms • Crowd control: Toss into enemy groups to apply vulnerability, then follow up with Shock weapons • Automech encounters: Mechanical enemies are often weak to Shock damage • Shield breaking: The Shock effect quickly depletes enemy energy shields • Companion synergy: If your companions use Shock weapons, grenades amplify their damage output
Consider storing a healthy supply in your ship’s inventory for important story choices or faction conflicts where combat is inevitable.
Final Thoughts
The “Fiddling With Fulgurating Fulminations” collection quest exemplifies what makes The Outer Worlds 2 engaging: it blends exploration, combat, environmental puzzles, and meaningful rewards into one cohesive experience. Unlike collectibles that only offer completion satisfaction, Storm Grenades actively improve your combat effectiveness.
The quest difficulty feels appropriately tuned for Praetor’s danger level. You’ll face significant challenges, but they’re all overcome with proper preparation, smart tactics, and good character build choices. The variety of access methods (lockpicking, combat, environmental navigation, special equipment) also rewards diverse skill investments.
If you’re working through Praetor and making critical story decisions, definitely take time to complete this collection quest. The Storm Grenade crafting recipe remains useful throughout your entire playthrough, and the achievement adds to your completion percentage.
For new players just starting out, I recommend tackling the first four towers as you naturally explore Praetor, then circling back for the Southwest tower after story progression grants you the Rift Modulator. This approach minimizes backtracking while ensuring you don’t miss any stations.
Happy tower hunting, and may Praetor’s lightning storms power your grenades to devastating effect!
Related Guides:
- Cloister Excogitation Logs Guide
- Golden Ridge Mural Locations
- Science Magazine Locations
- All Perks Complete List
- Best Traits Tier List
Official Resources: