Why ‘Who Else But Us’ Is Worth Your Time
Let me be upfront: ‘Who Else But Us’ is one of those quests that initially seems like tedious fetch-and-collect busywork. You’re searching a massive, multi-level facility for five ID cards scattered among corpses, debris, and hostile wildlife. It sounds exhausting.
But here’s the thing—the reward waiting at the end completely justifies the effort. The Thunderstruck melee weapon is legitimately one of the most unique and powerful tools in The Outer Worlds 2, especially for melee builds. It fires electric shockwaves with heavy attacks, essentially giving you infinite-ammo ranged capabilities on a melee weapon. That’s absurd. That’s amazing.
What makes this quest special: Unlike straightforward combat or dialogue missions, ‘Who Else But Us’ requires environmental awareness, vertical exploration, and careful navigation through a dangerous facility. It’s environmental storytelling at its finest—you’re literally retracing the final moments of Protectorate soldiers who died defending their station.
Let’s break down exactly where to find every ID card and how to claim your rewards efficiently.
Quest Overview: The Skycutter A102 Situation
You’ll receive ‘Who Else But Us’ while exploring the Skycutter A102 facility, a towering Protectorate installation that’s seen better days. The station was overrun, guards were killed, and now Raptidons have made it their hunting ground.
Your objective: Collect five Protectorate Armorial ID cards from fallen soldiers to unlock a secured chest in the basement.
The challenge: The facility is massive, spanning seven floors with complex vertical layouts. IDs are scattered across different levels, often guarded by aggressive wildlife and automated defenses. You’ll need to navigate suspended platforms, climb ladders, ride elevators, and survive multiple combat encounters.
Parallel quest note: ‘Who Else But Us’ runs alongside another side quest, ‘Ascent in the Howling Tower’, in the same location. Both quests share the Skycutter A102 facility and the fifth corpse at the top. If you’ve received ‘Ascent in the Howling Tower’ from Acquisitions Officer Kaur in Fairfield, you’ll be completing objectives for both quests simultaneously on your climb.
No skill checks required: Unlike many Outer Worlds 2 quests, this one doesn’t gate progress behind Speech, Science, or Tech checks. If you can see it and reach it, you can grab it. Success depends entirely on exploration skills and combat capability.
Before You Start: Preparation Tips
Recommended Level: 8-12 minimum. The Skycutter facility throws Raptidon Hunters, sentry turrets, and automechs at you. Under-leveled characters will struggle.
Optimal Combat Setup:
- Shock damage weapons for automechs and turrets
- Corrosive damage as backup for armored enemies
- Long-range options for turret engagement
- Healing supplies (stock up on inhaler charges)
If you just completed our Paradise Island Substation repair quest, that Corrosive Shock Machine Gun is perfect for this facility.
Inventory Management: Clear inventory space before starting. You’ll be collecting IDs, keys, weapons, and loot throughout. Being over-encumbered mid-exploration is miserable.
Companion Selection: Bring companions with strong combat abilities. This isn’t a dialogue-heavy quest—you need firepower and damage soak. Check our complete companions guide for optimal pairings.
Protectorate Armorial ID #1: The Starting Point
Location: Basement level, next to the locked chest
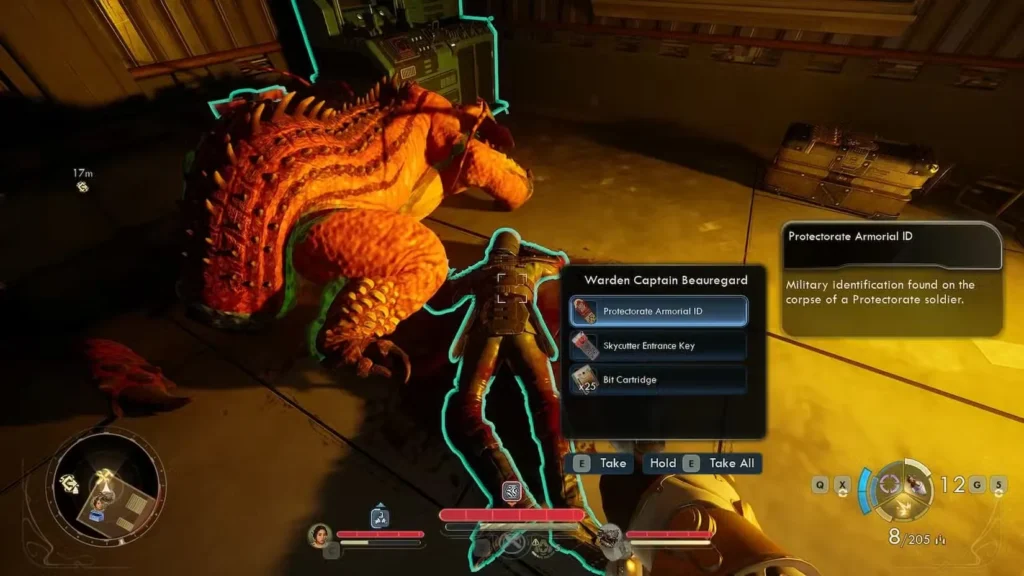
Once inside Skycutter A102, head down the stairs to the basement level. Defeat the Raptidon Hunters here, then look for a heavy-duty container (the Protectorate Cadre Vestige) in the corner. Right next to this chest is the first corpse. Loot the body, then interact with the chest itself and insert the first ID—this is what officially triggers the ‘Who Else But Us’ quest.
What you’ll find on this body:
- Protectorate Armorial ID #1
- Skycutter Entrance Key (crucial for progression)
- Bit Cartridges and minor loot
The Entrance Key is critical. This key unlocks a sealed door upstairs that opens access to the rest of the installation. Without it, you’d need Lockpick 3 and a Mag-Pick to proceed—the key saves you both.
Once you have the key:
- Note the chest’s location—you’ll return here with all five IDs
- Head back up the stairs toward the entrance level
- Use the Entrance Key on the sealed door to proceed deeper into the facility
Pro tip: This is a good checkpoint to save your game. The facility gets significantly more dangerous once you venture deeper.
Protectorate Armorial ID #2: Ground Deck Combat Zone
Location: Ground deck main room, near the central elevator structure

After unlocking the sealed door with the Entrance Key, you’ll enter a large viewing room with a broken window. Climb through the window to reach the main ground deck of the facility. This is where things get spicy.
Navigation:
- Go through the sealed door and through the broken window
- You’re now in the large main room of the facility
- Locate the central elevator structure—it’s a large vertical fixture in the room
- The corpse is positioned near this elevator structure
Combat Warning: This area is heavily defended by Security Turret Mk I emplacements on the walls and Protectorate automechs (Wasps and Dragoons) at ground level. Don’t rush in blind.
Tactical approach:
- Identify turret positions before engaging—they have fixed firing arcs, so use cover intelligently
- Shock damage melts turrets and automechs—this is exactly what those damage types are designed for
- Destroy turrets first—they can’t chase you, so eliminate them before dealing with mobile enemies
- Let companions draw fire while you flank or snipe from range
Pro tip: There’s a hidden crate underneath the staircase leading to Deck 2 in this room. Inside you’ll find a Scoped Shock Machine Gun, Short Rounds, a Mercy Oxymorphone, and crafting materials—well worth grabbing before heading up.
On the body:
- Protectorate Armorial ID #2
- The “No Retreat” recording (on the ground nearby)
- Ammunition and minor loot
Protectorate Armorial ID #3: Upper Floors Wildlife Zone
Location: A couple of floors above the ground deck, accessible via ladder
Now we’re climbing. Head up the stairs at the rear of the ground floor room. Continue ascending using stairways and platforms.
Finding the right level:
- Head up the stairs toward the upper floors
- You’ll know you’re in the right area when you encounter two Raptidon Hunters—the enemy type shifts from automechs to wildlife here
- After clearing the Raptidons, look for a ladder in the area and climb it
- On the platform above, look for bloodstains on the floor—environmental storytelling showing the soldier’s last stand
- Just past the bloodstain, find the corpse leaning against the railings next to a pillar
Combat shift: Raptidons require different tactics than turrets and mechs. They’re mobile, close-range threats that punish static positioning. Keep distance, backpedal while shooting, and use chokepoints to limit simultaneous engagements.
On the body:
- Protectorate Armorial ID #3
- Ammunition and consumables
Protectorate Armorial ID #4: Sixth Floor Elevator Access
Location: Sixth floor, near the elevator
Continue climbing from ID #3 using stairs and suspended platforms. The facility’s vertical layout becomes increasingly complex the higher you go.
Finding the sixth floor:
- Continue upward using stairs and platforms
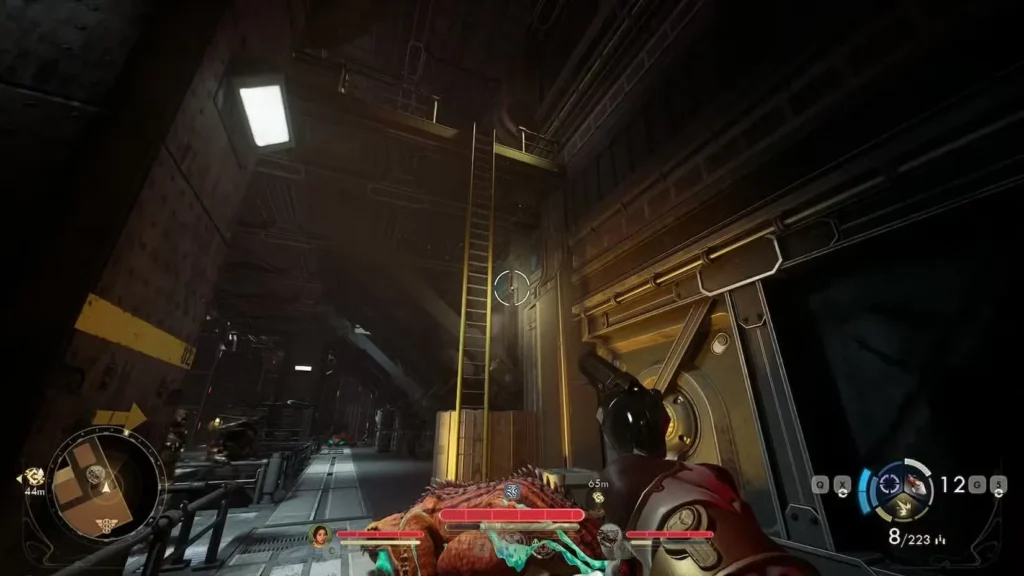
- Watch for a comically long ladder leading up to the sixth floor—you’ll know it when you see it
- Climb it to reach the sixth floor, where you’ll find the elevator terminal
At the elevator: Look for the corpse of Cadet Warden LaRue, positioned right next to the elevator terminal on the right side.
On the body:
- Protectorate Armorial ID #4
- Skycutter Lift Override Key (mandatory for activating the elevator to reach the seventh floor)
- The “Stand Tall for the Sovereign” recording
Critical Warning: Raptidon Ambush Incoming
The moment you use the Skycutter Lift Override Key to restart the elevator terminal, you’ll trigger a scripted Raptidon ambush. This is unavoidable.
Ambush preparation:
- Before activating the elevator, heal to full and have your best weapon equipped
- Position yourself away from the elevator doors so Raptidons don’t spawn directly on top of you
- Multiple Raptidons spawn simultaneously—use AOE damage (grenades, shockwaves) and focus fire one at a time
- Survive the ambush, and the elevator gates will unlock—take the lift up to Deck 7
Protectorate Armorial ID #5: Seventh Floor & Thunderstruck Location
Location: Seventh floor balcony (top of the facility)

You’ve made it to the top. This is where everything comes together.
Exiting the elevator:
- As you exit the elevator on Deck 7, loot the chest on the right for a Pitchball Card: Conor Walsh
- Use the AutoDoc Station here to heal up before heading outside
- Head through the door to reach the exterior balcony
On the balcony: You’ll find the corpse of Warden Engineer Hwan. Loot her body to find:
- Protectorate Armorial ID #5 (the final one)
- Control Panel Schematics (needed to operate the terminal)
- One Moderation Vodka
- The “My Dying Breath” recording is on the ground beside her body
Claiming Thunderstruck: The Real Treasure
Here’s where you claim the real reward of the climb—and it’s simpler than you might expect.
Thunderstruck location: With Hwan’s Control Panel Schematics in hand, look at the wall between the balcony door and the control panel terminal. Thunderstruck is wedged directly into the circuits/wall panel there. Simply interact with it to take the weapon—no power shutoff or special steps required to access it.
The control panel terminal: After grabbing Thunderstruck, interact with the control panel at the end of the walkway. With the Control Panel Schematics, you can send a power surge to the Vox Relay Station, damaging its automechanical defenses. This completes the objective for the parallel quest ‘Ascent in the Howling Tower’—if you have it active, your objective will update here. If you don’t have that quest, interacting with the terminal is optional for ‘Who Else But Us’ purposes.
Thunderstruck Weapon: Complete Analysis
Base Weapon Stats
Weapon Type: Two-handed melee weapon
Damage Type: Physical + Shock
Special Ability: Launches electric shockwaves on heavy melee attacks
Best Stat Synergy: Melee skill, Heavy Weapons perks, Shock damage bonuses
What Makes Thunderstruck Special
Infinite-Ammo Ranged Attacks: This is the game-changer. Heavy attacks launch electric shockwaves that travel forward, damaging enemies at range. You’re wielding a melee weapon that can attack from a distance without consuming ammunition.
Why this is absurd:
- Zero ammo management for ranged attacks
- Crowd control via shockwave spread
- Hybrid combat style unavailable to most melee weapons
- Stuns and disrupts enemies with shock damage
Combat applications:
- Open with shockwave attacks to soften groups from range
- Close distance while enemies are stunned
- Switch to normal melee attacks for close-range damage
- Disengage and fire more shockwaves if overwhelmed
Optimal Usage & Build Synergy
For Pure Melee Builds: Thunderstruck is a game-changer. Most melee builds struggle against ranged enemies who kite backward. The shockwave attacks solve this completely.
Recommended perks:
- Heavy attack damage bonuses
- Attack speed increases (essential—compensates for slow swing rate)
- Shock damage amplification
- Melee range extensions
- Stamina efficiency perks
For Hybrid Builds: Even if you’re not primarily melee-focused, Thunderstruck offers utility as a backup weapon with unlimited ranged potential—useful for conserving firearm ammo or engaging enemies across gaps.
The Speed Issue
Major drawback: Without investment in attack speed perks and skills, the shockwave firing rate is painfully slow. Heavy attacks have wind-up animations and recovery time between shots.
Solutions:
- Invest in melee speed perks explicitly—this is the primary fix
- Use light attacks for close range, heavy attacks for ranged shockwaves
- Time shockwaves carefully rather than spamming them
- Combine with mobility perks to reposition between shots
Check our best starting builds guide and complete perks list for optimal build planning.
Damage Type Effectiveness
Strong against:
- Automechanicals and robots (shock damage destroys them)
- Shielded enemies (shock disrupts shields)
- Groups (shockwave hits multiple targets)
- Human enemies in metal armor (conducts electricity)
Weak against:
- Heavily armored targets (physical melee portion gets reduced)
- Shock-resistant creatures (some wildlife has resistance)
- Fast-moving enemies (harder to hit with slower shockwaves)
Strategic weapon pairing: Keep a secondary weapon for situations where Thunderstruck struggles. The weapon is powerful but not universally optimal.
Chest Rewards: Completing the Collection
With all five Armorial IDs collected, return to the basement level of Skycutter A102—the same place you started.
Returning to the chest:
- Use the elevator to descend, then navigate back to the basement
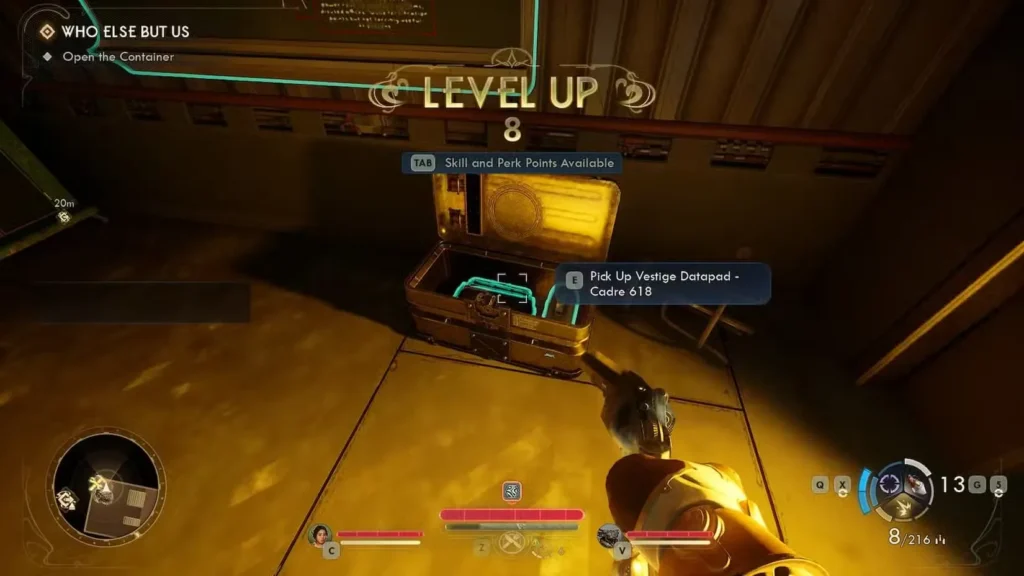
- Interact with the Protectorate Cadre Vestige (the heavy-duty container) where you started
- Open it using all five IDs—this completes the quest and awards 810 XP
Inside the chest:
Trauma Kit: High-tier healing consumable. Save it for emergencies or difficult boss fights.
934 Bit Cartridge: A solid cash injection for mid-game equipment purchases.
Advanced Decryption Key: Used to open high-security lockboxes throughout The Outer Worlds 2. These contain top-tier loot, making the key extremely valuable. Our Advanced Decryption Keys guide details where to use it for maximum value.
Vestige Datapad – Cadre 618: A lore item—a final message recorded by one of the dead troopers for his beloved Alex. Read it for worldbuilding context.
Value assessment: The chest contents are solid but not spectacular. The Advanced Decryption Key is the standout—use it wisely. The real treasure was always Thunderstruck.
Quest Timing & Progression Integration
Recommended completion window: Mid-game, levels 10-14
Why this timing:
- Too early (levels 5-9): The combat difficulty may overwhelm you, and you can’t fully utilize Thunderstruck without skill investment
- Sweet spot (levels 10-14): You have the combat skills and perks to both survive the facility and maximize the weapon’s effectiveness
- Too late (levels 15+): Still worthwhile for completionism and the unique weapon, but you may have found comparable gear
Parallel quest integration: If you’re pursuing ‘Ascent in the Howling Tower’ from Acquisitions Officer Kaur (available after completing ‘Above and Beyond Repair’ and siding with Kaur), complete both quests in a single run through Skycutter A102. The fifth corpse, the Control Panel Schematics, and the balcony terminal serve both objectives. After using the terminal on the balcony, return to Kaur in Fairfield Town Hall to complete ‘Ascent in the Howling Tower’ and claim its rewards: XP, Bits, +3 Reputation with Auntie’s Choice, and Kaur’s Korroder unique pistol.
Combat Strategy: Surviving Skycutter A102
Turret Encounters
Strengths: High damage, wide firing arcs
Weaknesses: Fixed positions, vulnerable to shock damage, can’t chase you
Strategy: Identify positions from cover, use shock weapons, destroy turrets before engaging mobile enemies.
Automech Encounters
Strengths: Armored, coordinated
Weaknesses: Shock and corrosive damage
Strategy: Shock damage for quick kills, corrosive as backup, keep moving, focus fire one at a time.
Raptidon Encounters
Strengths: Fast, aggressive, close-range, pack tactics
Weaknesses: Low health pools, predictable charge patterns
Strategy: Maintain distance with backpedaling, use chokepoints to limit simultaneous engagements, don’t let them surround you.
Resource Management
Healing: Don’t be stingy with inhaler charges. Dying and reloading wastes more time than using a heal.
Ammunition: Bring varied damage types. Shock for automechs, corrosive for armored enemies.
Companions: Use their abilities liberally. Cooldowns refresh; health lost doesn’t.
For detailed healing optimization, check our Inhaler Charges guide.
Common Mistakes & Troubleshooting
Mistake #1: Forgetting the Entrance Key
Players grab the first ID, rush off to explore, and hit the sealed door they can’t pass without the key or Lockpick 3.
Solution: The Skycutter Entrance Key is right there with ID #1. Don’t skip looting that first body completely.
Mistake #2: Inadequate Combat Preparation
Running in under-leveled or without shock damage weapons turns the facility into a meat grinder.
Solution: Stock up on shock and corrosive weapons before entering. This isn’t optional for efficient clearing.
Mistake #3: Missing the Hidden Crate on the Ground Deck
Many players walk right past the hidden crate under the staircase on the ground floor, missing a free Scoped Shock Machine Gun and supplies.
Solution: After clearing the main room combat, check under the staircase leading to Deck 2 before heading further up.
Mistake #4: Dying to the Raptidon Ambush
Activating the elevator terminal on the sixth floor and immediately getting shredded by the scripted ambush is common.
Solution: Heal to full and position yourself away from the elevator doors BEFORE using the Skycutter Lift Override Key. Have your best crowd-control weapon ready.
Mistake #5: Confusing the Terminal With Accessing Thunderstruck
Some players think they need to use the terminal to “unlock” Thunderstruck. They’re separate actions.
Solution: Thunderstruck is simply wedged in the wall/circuits between the balcony door and the terminal. Grab it directly. The terminal is for the ‘Ascent in the Howling Tower’ quest objective (sending a power surge to the Vox Relay).
Mistake #6: Selling Thunderstruck Immediately
Some players sell it for quick bits without testing it first.
Solution: Experiment with the weapon before deciding its fate. The infinite shockwave mechanic is genuinely unique and valuable for melee builds.
Advanced Tips & Optimization
Speed Run Strategy: For repeat playthroughs, you can optimize ID collection:
- Grab ID #1 and Entrance Key from basement
- Rush ID #2 in the main room (avoid unnecessary fights if tanky enough)
- Sprint climb to IDs #3–4 via stairs and the comically long ladder
- Survive elevator ambush, ride lift to Deck 7
- Grab ID #5, take Thunderstruck from the wall, use terminal if completing Ascent quest
- Fast travel back to basement, open the chest
Stealth Alternative: High Sneak builds can potentially avoid some combat encounters by sneaking past enemies. Less efficient for looting but faster for quest completion.
Companion Ability Timing: Save companion combat abilities for the scripted Raptidon ambush on the sixth floor—it’s the most dangerous concentrated combat moment in the quest.
Lore & Environmental Storytelling
What makes ‘Who Else But Us’ memorable is how it uses the placement of each corpse to tell a complete story without exposition dumps.
The Last Stand
Each corpse represents a soldier’s final position. They retreated upward, trying to survive:
- Basement: Overrun quickly, died near their post
- Ground deck: Fought near the defenses, killed alongside the turrets
- Upper floors: Climbed higher seeking safety or reinforcements
- Sixth floor: Made it to the elevator—so close to escape
- Seventh floor (Warden Engineer Hwan): The highest point, the furthest anyone got, recording a final message before falling
Protectorate Priorities
The presence of valuable equipment and secured loot suggests this station had strategic importance. Yet no reinforcements came—just soldiers dying at their posts while leadership abandoned them. This mirrors The Outer Worlds 2’s broader critique of authoritarian systems: individuals are expendable, even those defending critical facilities.
Integration with Other Questlines
While standalone, ‘Who Else But Us’ connects to the broader game:
Directly linked quests:
- ‘Ascent in the Howling Tower’ — Runs in parallel at the same location. Complete both in one visit to Skycutter A102. Requires siding with Kaur in ‘Above and Beyond Repair’.
Related quests exploring similar themes:
- A Noble History Quest — Protectorate ideology and propaganda
- Kaur vs Milverstreet Choice — Protectorate faction decisions
Trophy/Achievement Considerations
‘Who Else But Us’ itself does not appear to have a dedicated trophy, but it counts toward side quest completion tracking. For comprehensive achievement hunting, see our complete achievement guide.
Missable status: Generally not missable—you can return to Skycutter A102 at any time. Complete it before major story milestones to be safe.
Frequently Asked Questions
Generally no—you can return to Skycutter A102 at any time. Complete it before major story milestones to be safe.
Yes, especially for melee builds. The infinite shockwave mechanic remains useful throughout the game. Invest in attack speed perks to compensate for the slow swing rate.
Minimal. They won’t encumber you significantly during collection.
‘Ascent in the Howling Tower’ is a parallel side quest from Acquisitions Officer Kaur that takes place in the same Skycutter A102 facility. Both quests share the fifth corpse and the balcony terminal. If you have both active, you can complete them in a single visit. The terminal on the balcony is primarily for the Ascent quest—sending a power surge to the Vox Relay Station. Completing Ascent rewards you with XP, Bits, +3 Auntie’s Choice Reputation, and Kaur’s Korroder unique pistol.
You might be able to buy it back from the same vendor immediately. Otherwise, it’s gone for that playthrough. Always check before bulk-selling weapons.
No. Difficulty affects enemy scaling, not base weapon stats.
Related Guides & Resources
Quest Walkthroughs:
Combat & Builds:
Loot & Progression:
Character Building:
Final Verdict: Is ‘Who Else But Us’ Worth Completing?
Absolutely yes, especially for melee builds.
Thunderstruck alone justifies the quest. A two-handed melee weapon that fires infinite electric shockwaves fundamentally changes how melee builds engage with combat. The ranged attack capability solves melee’s biggest weakness—getting kited by ranged enemies. And if you pair the visit with ‘Ascent in the Howling Tower,’ you walk out with two quest completions, Thunderstruck, an Advanced Decryption Key, and Kaur’s Korroder pistol from a single dungeon run.
Time investment: 30-45 minutes depending on combat efficiency and navigation
Difficulty: Moderate—requires solid combat capability but no skill checks
Rewards: Excellent—unique legendary weapon plus valuable loot and 810 XP
Replayability: Medium—once you know ID locations, subsequent runs are much faster
Recommendation: Complete this during your mid-game exploration phase after investing enough skill points to handle the combat. Pair it with ‘Ascent in the Howling Tower’ to maximize efficiency. Thunderstruck will serve you well through endgame if you build around it properly—just invest in attack speed perks first.
The Outer Worlds 2 rewards thorough exploration, and ‘Who Else But Us’ exemplifies this design philosophy. Don’t just follow quest markers—investigate facilities, read environmental clues, and claim the powerful gear waiting for attentive players.
Now get climbing. Thunderstruck awaits at the top of Skycutter A102.
External Resources
Official Outer Worlds Information: