Complete Side Mission 001: A Big Ol’ Bunnelby in Pokemon Legends Z-A. Learn how to find, defeat, and catch the Alpha Bunnelby with our detailed boss fight guide.
Side Mission 001 in Pokemon Legends Z-A—”A Big Ol’ Bunnelby”—serves as your introduction to several important game mechanics: Alpha Pokemon, boss battles, and the concept of Pokemon roaming outside Wild Zones. It’s also your first real test of whether you’ve been building a competent team or just coasting through early content with your starter.
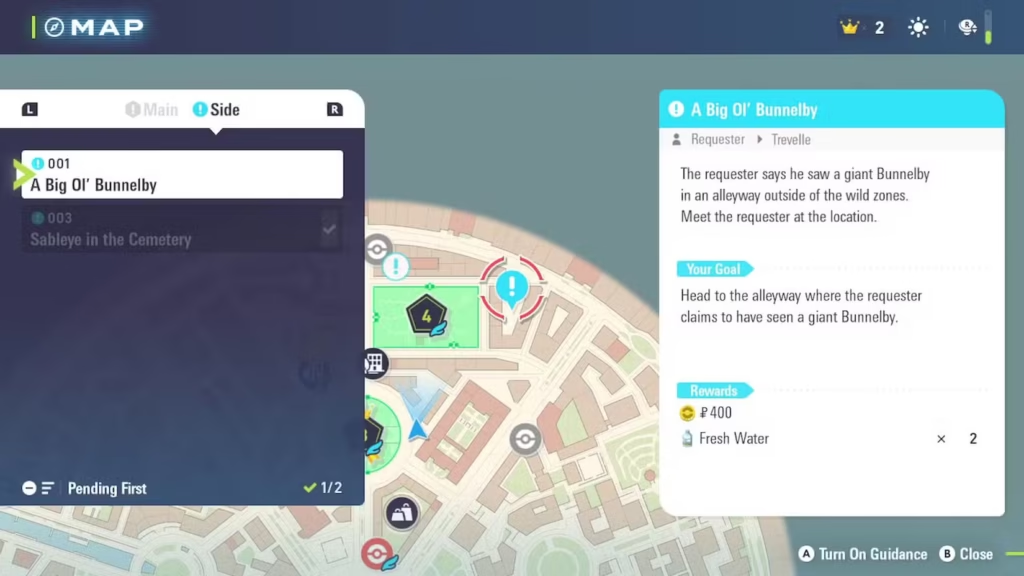
A concerned citizen named Travelle has spotted an abnormally large Bunnelby wandering Lumiose City’s streets, and he’s worried it’ll cause chaos if left unchecked. Your job? Track down this oversized rabbit and deal with it before property damage becomes a problem.
This isn’t just a standard wild Pokemon encounter—this is an Alpha Pokemon boss fight that can genuinely wipe your entire party if you’re unprepared. Let me walk you through finding Travelle, locating the giant Bunnelby, and strategies for defeating and catching this early-game challenge.
Mission Overview: A Big Ol’ Bunnelby
Mission Name: A Big Ol’ Bunnelby
Mission Number: Side Mission 001
Quest Giver: Travelle (concerned Lumiose City resident)
Objective: Find and defeat/catch an Alpha Bunnelby roaming the city streets
Level Requirement: Recommended level 8-12 for comfortable victory
Difficulty: Medium (can wipe unprepared parties)

Why This Mission Matters
Beyond being your first numbered side mission, “A Big Ol’ Bunnelby” teaches you several critical concepts:
Alpha Pokemon introduction: This is likely your first encounter with an Alpha Pokemon—oversized, more powerful variants with significantly higher stats and health pools than regular Pokemon.
Boss battle mechanics: Unlike random wild encounters, this is a structured boss fight with higher stakes and the risk of trainer knockouts.
Out-of-zone Pokemon: You learn that dangerous Pokemon don’t just stay confined to Wild Zones—they can appear in the city itself.
Guidance mode practice: The mission introduces the guidance system for tracking objectives across Lumiose City.
Early-game check: This fight tests whether your team composition and leveling are adequate. If you’re struggling, it’s a signal to strengthen your party before progressing further.
Accepting the Mission: Finding Travelle
Before you can hunt the giant Bunnelby, you need to talk to Travelle and officially accept the mission.
Prerequisites
Story requirement: You must have agreed to help Emma with investigation cases. This unlocks the side mission system and allows missions like “A Big Ol’ Bunnelby” to appear on your map.
When this happens: Early in the story, Emma (the investigation agency operator) asks for your assistance. Accepting her request activates side missions throughout Lumiose City.
Locating Travelle
Once the side mission system is active, “A Big Ol’ Bunnelby” will appear on your map with a marker indicating Travelle’s location.
Initial meeting spot: Travelle can be found at a specific location in Lumiose City where he’ll explain the situation and ask for your help.
What he tells you: Travelle describes encountering an unusually large Bunnelby in a secluded alleyway. The Pokemon ran off, but he’s worried it’ll cause trouble if it’s not dealt with.
Your objective: Agree to help, and Travelle will ask you to follow him to the alleyway where he originally spotted the oversized rabbit.
Using Guidance Mode to Track the Mission
Travelle doesn’t just tell you the exact address of the alleyway—you need to use the guidance system to find it. Here’s how:
Activating Guidance Mode (Method 1: Initial Prompt)
When you first accept the mission from Travelle, the game prompts you to activate guidance mode. Accepting this prompt creates a quest marker on your map showing exactly where to go.
If you accept the prompt: A glowing marker appears on your map and mini-map, guiding you directly to Travelle’s location in the alleyway.
Activating Guidance Mode (Method 2: Manual Activation)
If you declined the initial guidance prompt or navigated away from the mission, you can manually re-enable guidance:
Step 1: Open your Map (press the map button)
Step 2: Press X to open the Mission List
Step 3: Press R to switch to the Side Missions tab
Step 4: Scroll to “A Big Ol’ Bunnelby”
Step 5: Press A to activate guidance
Result: The quest marker reappears on your map, showing the path to Travelle’s alleyway location.
Pro tip: Guidance mode works for all side missions, not just this one. If you’re ever lost or forget where a quest objective is located, use this method to reactivate tracking. This becomes especially useful when juggling multiple quests like Pan-Tastic Pot of Tea or other investigation cases.
Following the Quest Marker to the Alleyway
Once guidance is active, follow the marker on your map. The marker leads you to a secluded alleyway where Travelle is waiting.
Navigation tip: If you’ve unlocked fast travel, you can teleport to a nearby Travel Spot and walk the remaining distance. If fast travel isn’t unlocked yet, you’ll need to navigate on foot.
What happens at the alleyway: When you reach Travelle’s location and talk to him, he’ll explain that the giant Bunnelby should appear soon. Moments later, the boss fight begins.

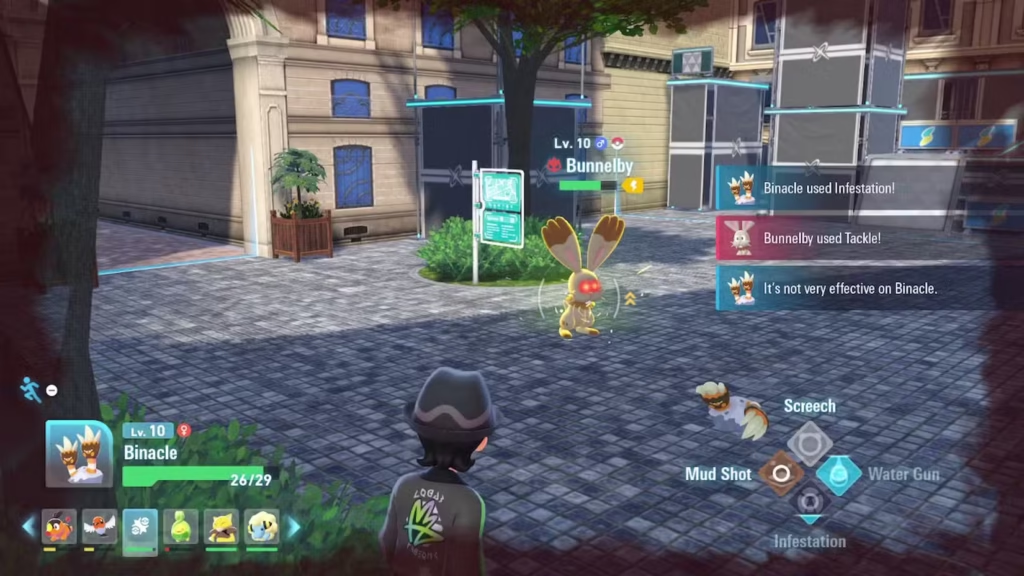
The Boss Fight: Alpha Bunnelby
This is where preparation matters. The “Big Ol’ Bunnelby” is actually an Alpha Pokemon—a significantly stronger variant with boosted stats and a massive health pool.
Alpha Bunnelby Stats and Behavior
Level: 10 (sounds low, but Alpha stats compensate)
Type: Pure Normal-type
Health Pool: Significantly higher than regular Bunnelby (Alpha Pokemon have roughly 2-3x the HP of standard Pokemon)
Aggressiveness: Targets the trainer directly—you’re in danger, not just your Pokemon
Known Moves:
- Earth Power (Ground-type special attack, surprisingly strong)
- Leer (lowers Defense, annoying but not dangerous)
- Tackle (Normal-type physical attack, standard damage)
Why This Fight Is Dangerous
1. Alpha stat boost: Even at level 10, Alpha Bunnelby hits harder and survives longer than you’d expect. Don’t underestimate it just because of the level number.
2. Direct trainer attacks: Alpha Bunnelby will regularly try to attack you, the trainer, not just your Pokemon. If you take too many hits, you’ll white out and lose the battle.
3. Earth Power coverage: Earth Power is a powerful Ground-type move that hits harder than Tackle. If you’re using Electric or Rock-types, expect significant damage.
4. High HP pool: This isn’t a fight you’ll end in 2-3 turns. Expect a sustained battle that requires healing items and strategic switching.
Type Matchup Strategy
Bunnelby’s type: Pure Normal
Weaknesses: Fighting-type moves
Resistances: None
Immunities: Ghost-type moves (Normal-types cannot be hit by Ghost attacks)
Optimal offense:
- Fighting-type moves deal super-effective damage (2x multiplier)
- Any other offensive type deals neutral damage
- Ghost-type moves do nothing (avoid these entirely)
Defensive considerations:
- Bunnelby’s Defense and Special Defense are nearly equal, so physical and special attacks are equally effective
- Using a Flying-type Pokemon makes you immune to Earth Power (Ground doesn’t hit Flying)
- If you use Flying-types, Bunnelby’s only damaging move becomes Tackle, drastically reducing its threat level
Recommended Team Composition
Best options:
Flying-types: Immune to Earth Power, only takes damage from Tackle
Examples: Fletchling (if you caught one as recommended in our early Pokemon guide)
Fighting-types: Deal super-effective damage
Examples: If you have any Fighting-type moves on your Pokemon, prioritize using them
Balanced team: Use your starter plus any support Pokemon you’ve caught
Examples: If you picked Tepig, Totodile, or Chikorita as your starter, they should be around level 10-15 by this point
What to avoid:
- Ghost-types (your attacks won’t connect)
- Pure defensive strategies (the fight drags on too long)
- Pokemon significantly under-leveled (level 6 or below will struggle)
Combat Strategy: How to Win the Fight
Now that you understand what you’re facing, here’s the tactical approach:
Phase 1: Opening Engagement (100%-75% HP)
1. Lead with your strongest Pokemon: Start with your highest-level Pokemon that has good offensive moves.
2. Test Bunnelby’s damage output: Let it attack once to gauge how much damage it’s dealing to your lead Pokemon.
3. Use Fighting-type moves if available: Super-effective damage shortens the fight significantly.
4. Watch for trainer-targeting: If Alpha Bunnelby turns toward you (the trainer), prepare to dodge.
Phase 2: Sustained Battle (75%-40% HP)
1. Heal proactively: Don’t wait until your Pokemon are at critical HP. Use Potions and Super Potions when Pokemon drop below 50% health.
Important limitation: You can only use one bag item at a time, and there’s a cooldown between uses. Plan healing around this restriction.
2. Switch Pokemon strategically: You can freely switch Pokemon during battle. If your lead is getting overwhelmed, swap to a fresh Pokemon with full HP.
Switching tip: Based on the new combat system, switching has changed slightly—your incoming Pokemon might land in Bunnelby’s attack range, so time switches when Bunnelby is recovering from moves.
3. Manage cooldowns: Remember, moves have cooldowns now instead of PP. Use your strongest move, then use weaker moves while it cools down rather than letting your Pokemon stand idle.
Phase 3: Dodging Trainer Attacks
When Bunnelby targets you:
Visual cue: The Alpha Bunnelby will turn toward your character and prepare to charge.
Your response: Press Y button to roll/dodge away from the attack.
Timing: Dodge just before impact, not too early (you’ll roll back into range) or too late (you’ll get hit).
Consequences of failure: If you take too many direct hits as the trainer, you’ll white out and lose the battle, even if your Pokemon team has remaining HP.
Practice tip: The dodge mechanic is crucial for future Alpha Pokemon encounters and boss fights. Get comfortable with the timing here.
Phase 4: Finishing and Capture (40%-0% HP)
1. Lower HP carefully: Once Bunnelby drops below 40% HP, start thinking about capture rather than just damage.
2. Watch for capture opportunity: When Bunnelby reaches low health, a notification appears indicating catch rate has drastically increased.
3. Throw Poke Balls: At low HP, standard Poke Balls have high success rates. You don’t need Great Balls or Ultra Balls for this fight.
4. Multiple attempts are fine: If the first ball fails, keep trying. With Bunnelby at low HP, you’ll succeed within 2-3 attempts.
Important: You can catch Alpha Bunnelby rather than knocking it out. Catching it completes the mission and adds a powerful Alpha Pokemon to your collection.
What Happens If You Lose
No permanent consequences: If your entire party faints or you white out from trainer damage, you’re transported to a Pokemon Center.
Mission remains active: “A Big Ol’ Bunnelby” stays in your Side Mission log. You can resume the mission at any time after healing.
No penalties: There’s no punishment for failing beyond the inconvenience of having to try again.
Recommendation if you lose: If you struggled significantly, consider:
- Leveling your team 2-3 levels higher
- Catching additional Pokemon for type coverage
- Stocking up on healing items (10+ Potions minimum)
- Reading our combat tips guide for general battle strategies
Rewards for Completing the Mission
Successfully defeating or catching Alpha Bunnelby completes Side Mission 001 and grants rewards:
Standard mission rewards: The game provides Poke Dollars and potentially items (exact amounts vary)
Alpha Bunnelby itself: If you caught it rather than defeating it, you now own an Alpha Pokemon with boosted stats—significantly stronger than regular Bunnelby
Investigation experience: Completing this mission contributes to your overall investigation progress with Emma
Unlocks progression: Some later side missions may require completing earlier ones, so finishing this opens future content
Should You Catch or Defeat Alpha Bunnelby?
Catch it if:
- You want a strong Normal-type for your team
- You’re interested in Alpha Pokemon collection
- You like having boosted-stat Pokemon for early-game content
Defeat it if:
- You don’t care about Alpha Pokemon collection
- Your team already has strong Normal-type coverage
- You just want to complete the mission quickly
My recommendation: Catch it. Alpha Pokemon are rare early-game, and even if you don’t use Bunnelby long-term, having it in your collection gives you flexibility. Plus, it’s easier to catch than to defeat at this point—once it’s at low HP, a few Poke Balls secure the win.
Alpha Bunnelby’s Long-Term Value
Evolution: Bunnelby evolves into Diggersby at level 20
Diggersby stats: Normal/Ground dual-type with respectable Attack stat
Alpha boost: The Alpha stats carry over through evolution, meaning Alpha Diggersby is significantly stronger than regular Diggersby
Team viability:
- Early-game: Excellent. Alpha stats make it stronger than most Pokemon you’ll encounter
- Mid-game: Solid. Still useful for story progression
- Late-game: Replaceable. You’ll find stronger options, but it can still contribute
Niche use: Ground-typing after evolution gives coverage against Electric, Steel, Poison, Rock, and Fire types—useful for specific matchups
Connection to Other Game Systems
This mission integrates with various Pokemon Legends Z-A mechanics:
Alpha Pokemon system: Introduction to Alpha encounters, preparing you for future Alpha Pokemon hunting
Investigation missions: Part of Emma’s investigation case system that unlocks more side content
Combat mechanics: Practical application of the new combat system with cooldowns and positioning
Trainer vulnerability: Teaches you that boss fights endanger your character directly, not just your Pokemon
Guidance system: Tutorial for quest tracking that you’ll use for dozens of future missions
Tips for Future Alpha Encounters
Since “A Big Ol’ Bunnelby” is your first Alpha fight, here are lessons that apply to future Alpha Pokemon:
1. Always stock healing items: 10-15 Potions minimum for any Alpha encounter
2. Level advantage helps: Being 3-5 levels above the Alpha makes fights significantly easier
3. Type advantage matters more: Super-effective moves become crucial when dealing with inflated HP pools
4. Dodge practice pays off: Getting good at trainer dodging saves battles
5. Catching is often easier than defeating: Once HP is low, Poke Balls are more reliable than trying to deliver finishing blows
6. Team diversity wins: Having multiple types available via switching gives you options mid-fight
Common Issues and Solutions
“I can’t find Travelle after accepting the mission!”
Activate guidance mode using the map screen → press X → press R for Side Missions → select “A Big Ol’ Bunnelby” → press A. Follow the marker.
“Alpha Bunnelby keeps wiping my party!”
Level your team to 12-15, stock up on 15+ Potions, and use Fighting-type moves or Flying-type Pokemon to minimize damage taken.
“I keep getting hit as the trainer!”
Practice dodge timing. Press Y button just before Bunnelby’s attack lands, not too early or too late.
“The catch rate seems low even at low HP!”
Keep trying. With Bunnelby below 25% HP, you should succeed within 5 Poke Ball attempts. If you’re burning through 10+ balls, consider lowering its HP further.
“Can I come back to this mission later?”
Yes. Side missions remain available indefinitely. If you’re struggling, level up your team and return when stronger.
After Completing the Mission
Once “A Big Ol’ Bunnelby” is complete, continue exploring Emma’s investigation cases and other side content:
More side missions: Additional side missions unlock as you progress, offering rewards and unique Pokemon encounters
Wild Zone exploration: Return to completing Wild Zones like Zone 2 or Zone 4 for Pokedex completion
Team optimization: Evaluate whether Alpha Bunnelby fits your team composition or if you need different type coverage
Resource management: Use mission rewards to purchase items like evolution stones or fund your treasure-selling income
Final Thoughts: Your First Real Challenge
“A Big Ol’ Bunnelby” is Pokemon Legends Z-A’s way of saying, “The tutorial is over. Time to prove you understand the game’s mechanics.” It’s your first genuine challenge that requires strategy, preparation, and execution—not just mashing the strongest move and hoping for the best.
Key takeaways:
✓ Side Mission 001 introduces Alpha Pokemon and boss fights
✓ Use guidance mode to track mission objectives
✓ Alpha Bunnelby is level 10 but has significantly boosted stats
✓ Fighting-type moves deal super-effective damage
✓ Flying-types avoid most of Bunnelby’s offense
✓ Dodge trainer attacks by pressing Y at the right moment
✓ Catch it at low HP for high success rates and Alpha Pokemon collection
✓ No penalty for losing—just heal and try again
If you struggled with this fight, take it as feedback to strengthen your team, diversify your type coverage, and stock up on items. If you demolished it easily, congratulations—you’re well-prepared for the challenges ahead.
Now get out there and deal with that oversized rabbit!
For official Pokemon Legends Z-A updates, visit the Pokemon Legends website or purchase the game from the Nintendo Store.
Also Read:
- How to Unlock and Use Fast Travel in Pokemon Legends Z-A
- How to Catch Pansage, Pansear & Panpour in Pokemon Legends Z-A (Pan-Tastic Pot of Tea Guide)
- Complete Wild Zone 4 Guide: Every Pokemon Location in Pokemon Legends Z-A
- What Are Tiny Mushrooms For in Pokemon Legends Z-A? Complete Money-Making Guide
- Pokemon Legends Z-A Mega Evolution Tier List: Ranking All 26 New Megas