Find all 7 Pokémon in Wild Zone 6 of Pokémon Legends: Z-A with our detailed location guide. Includes Alpha Pokémon spawns, level ranges, and 100% completion tips for this level 15-17 area.
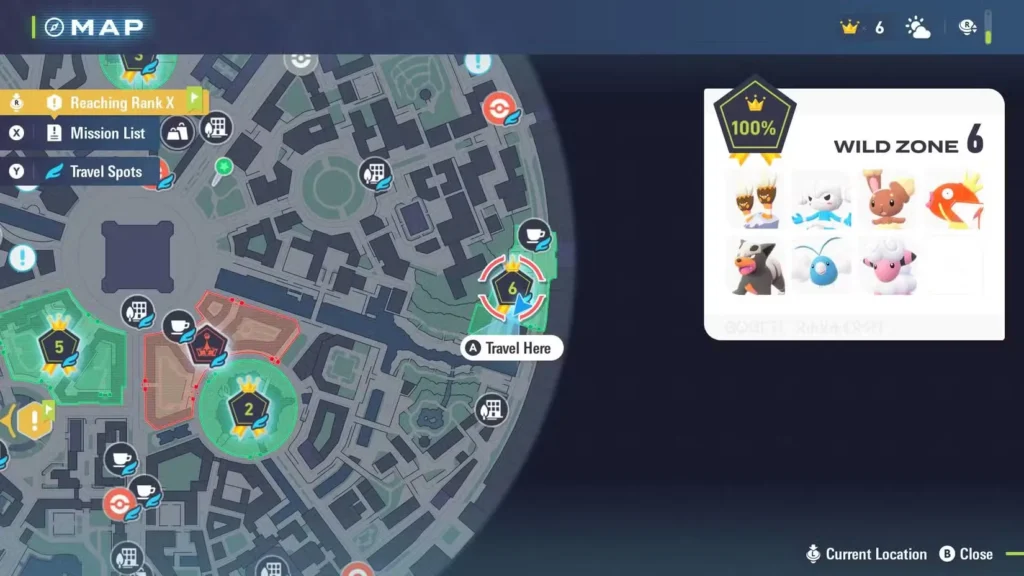
Wild Zone 6 is one of the more vertical and architecturally interesting areas in Pokémon Legends: Z-A. With rooftops to climb, pools to explore, and even a battle arena, this level 15-17 zone packs seven different Pokémon species into a relatively compact space—plus some powerful Alpha Pokémon for those looking for a challenge.
If you’re aiming for 100% completion or just want to know exactly where to find each species without wandering aimlessly, this guide has you covered. Let’s break down every Pokémon location, plus some tips to make your hunting more efficient.
What You Need to Know Before Exploring Wild Zone 6
Recommended Level: 15-17
Total Pokémon Species: 7
Alpha Pokémon: 3 (not required for 100% completion)
Time-Sensitive Spawns: Yes (Meditite is daytime only)
Before you dive in, make sure your team is at least level 15. While you can technically explore at lower levels, Wild Zone 6’s Pokémon can pack a punch if you’re underleveled. If you need to grind experience, check out our guide on the best early Pokémon to catch for team-building ideas.
Also, keep some healing items handy—Alpha Pokémon in this zone are aggressive and considerably stronger than their regular counterparts.
All 7 Wild Zone 6 Pokémon Locations
Let’s go through each Pokémon species systematically. I’ve organized them in a logical exploration order so you can efficiently sweep through the zone.
🐰 Buneary Location
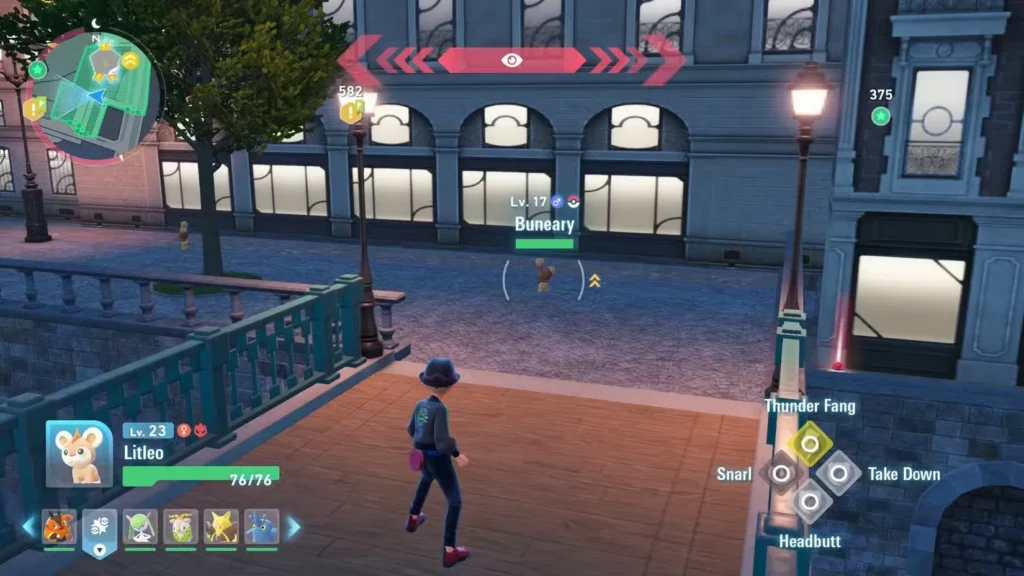
Type: Normal
Where to find it: Left side from the main entrance
As soon as you enter Wild Zone 6, turn left. You’ll spot a wooden bridge crossing over a shallow pool. Cross that bridge and you’ll find a small group of Buneary hopping around on the other side.
Quick tip: Buneary is fairly easy to catch and makes a decent Normal-type for your team if you’re looking for variety. It evolves into Lopunny with high friendship, so if you want to add it to your roster, start bonding early using happiness-increasing methods.
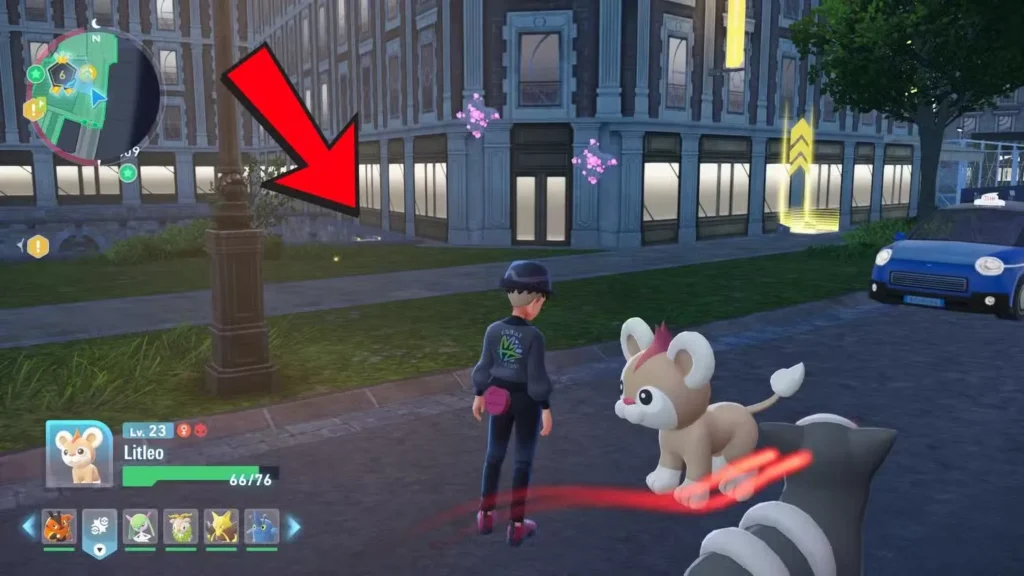
🔥 Houndour Location
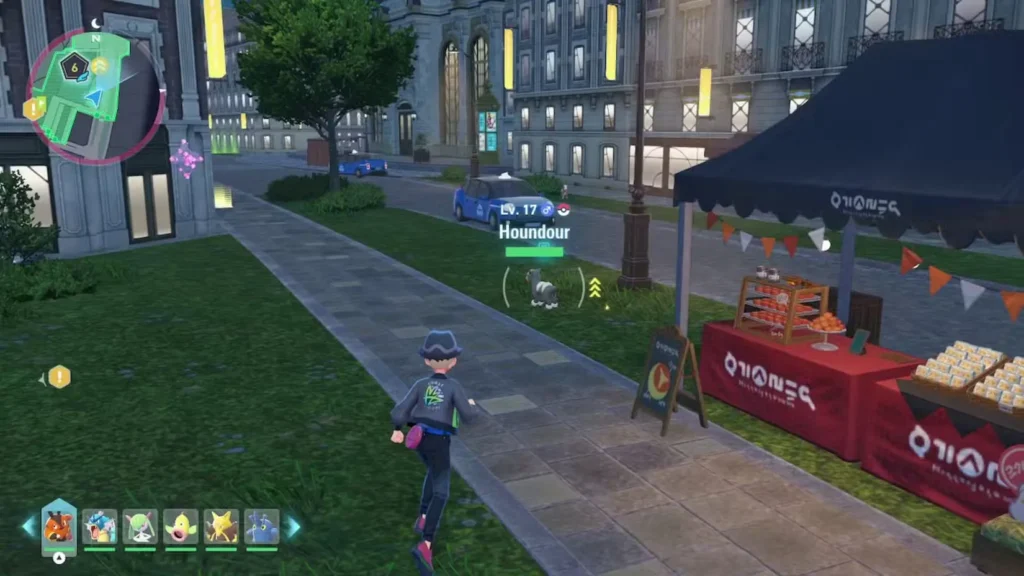
Type: Dark/Fire
Where to find it: Main road directly in front of the entrance
You literally can’t miss these. Multiple Houndour roam the main road that runs through Wild Zone 6, right in front of where you enter. They’re one of the first Pokémon you’ll encounter.
Bonus: There’s a blue taxi near these Houndour—keep this landmark in mind because several other Pokémon locations are referenced relative to it.
Strategic value: Houndour evolves into Houndoom at level 24, giving you a solid Dark/Fire-type attacker. Dark-types are useful throughout the game, so catching one here isn’t a bad idea.
⚡ Flaaffy Location
Type: Electric
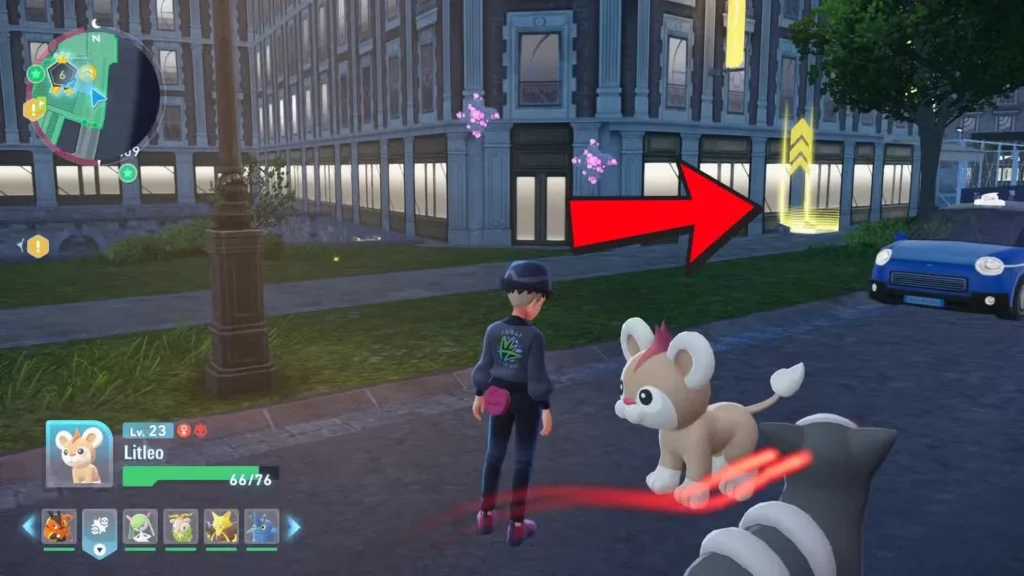
Where to find it: Rooftop accessible via yellow teleporter
Near the Houndour and that blue taxi, you’ll notice a yellow teleporter. Use it to jump up to the rooftop of the adjacent building. Several Flaaffy will be chilling up there, enjoying the elevated view.
Evolution note: Flaaffy is the middle evolution of Mareep → Flaaffy → Ampharos. If you catch a Flaaffy here, you’re already halfway to getting Ampharos, which can Mega Evolve later in the game. Definitely worth considering for your team!
☁️ Swablu Location
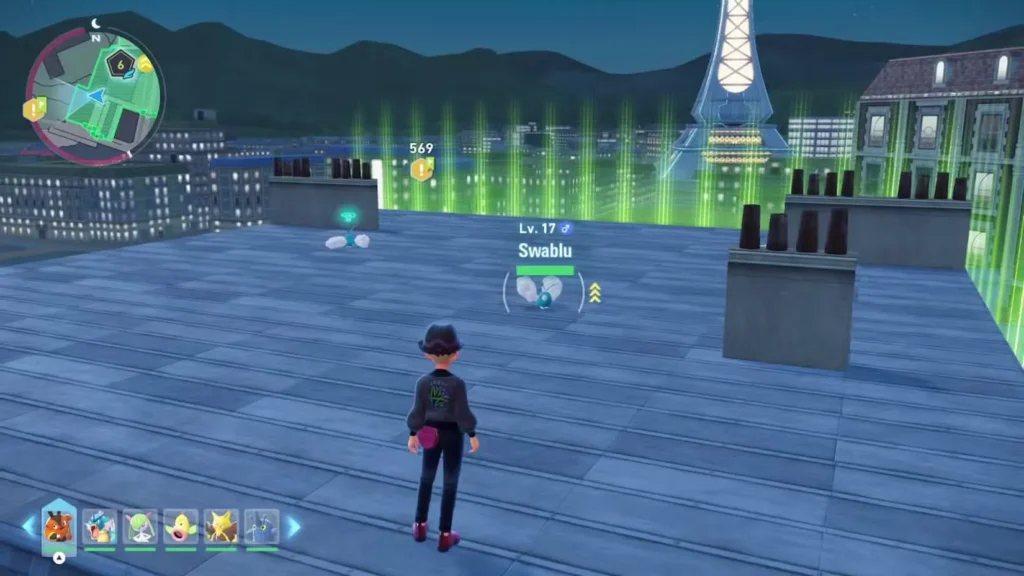
Type: Normal/Flying
Where to find it: Higher rooftop, accessed via ladder past the Flaaffy
From where you found the Flaaffy, look for a ladder that leads even higher up. Climb it and you’ll reach another rooftop level where Swablu nest near the chimneys.
Why Swablu matters: Swablu evolves into Altaria at level 35, and Altaria is a Dragon/Flying-type with decent stats. Plus, Altaria can Mega Evolve, making it a solid long-term investment. Dragon-types are always useful, especially when you can catch them relatively early.
🪨 Binacle Location
Type: Rock/Water
Where to find it: Pool area, ladder down from the yellow teleporter
Remember that yellow teleporter near the blue taxi? Right next to it, you’ll find a ladder that leads down toward a pool. Binacle can be found in this shallow water area.
Important note for completion hunters: If you’ve already caught a Binacle in Wild Zone 2, you don’t need to catch it again for 100% completion in Wild Zone 6. The game tracks your overall Pokédex, not zone-specific catches for completion purposes.
That said, if you’re hunting for better stats or an Alpha version (yes, there’s an Alpha Binacle here), this is a good spot to farm them.
🐟 Magikarp Location
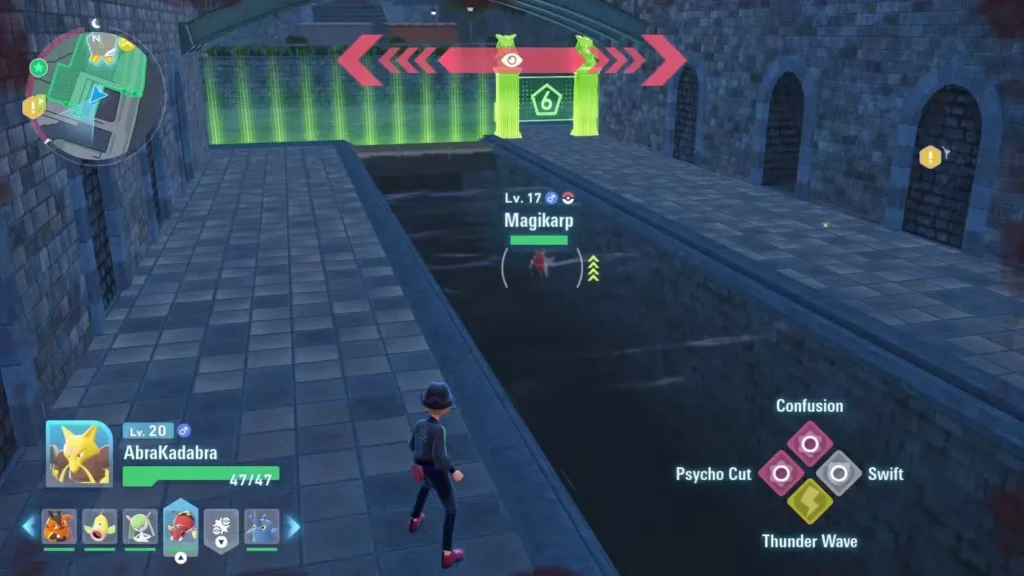
Type: Water
Where to find it: Deeper water past the Binacle
Continue past the Binacle pool and you’ll reach deeper water where two Magikarp are floating around. They spawn at level 17, which is actually perfect timing.
Here’s why this matters: Magikarp evolves into Gyarados at level 20. That means you only need to level your Wild Zone 6 Magikarp three times to get one of the most powerful Water/Flying-types in the game. Gyarados is an absolute beast with high Attack and decent bulk, making it worth the minimal investment.
If you’re looking for a strong Water-type and haven’t committed to one yet, this is your chance. Just be patient with Magikarp’s terrible early moveset—Gyarados makes it all worthwhile.
🥋 Meditite Location

Type: Fighting/Psychic
Where to find it: Battle arena (northern part, daytime only)
Meditite is the only time-sensitive spawn in Wild Zone 6. Head to the northern part of the zone where you’ll find a large caged-off Pokémon battle arena. Meditite only appears here during the day.
If it’s nighttime: Rest on any bench to change the time of day. Conveniently, there’s a bench right outside the Wild Zone 6 entrance. You can also check our guide on how to change time from day to night for more control over time mechanics.
Evolution and strategy: Meditite evolves into Medicham at level 37. While not the strongest Fighting-type available, Medicham has the unique combination of Fighting/Psychic typing and can hit reasonably hard with Pure Power as its ability (if the game includes abilities).
Alpha Pokémon in Wild Zone 6: Bonus Challenges
Alpha Pokémon are larger, more aggressive, and significantly stronger versions of regular Pokémon. Wild Zone 6 has three Alpha spawns, and while they’re not required for 100% completion, they’re worth hunting for several reasons:
- Higher stats than regular catches
- Bragging rights
- They look awesome in your party
- Good for challenging battles
For more information on what makes Alpha Pokémon special, check out our complete Alpha Pokémon guide.
Alpha Houndoom Location
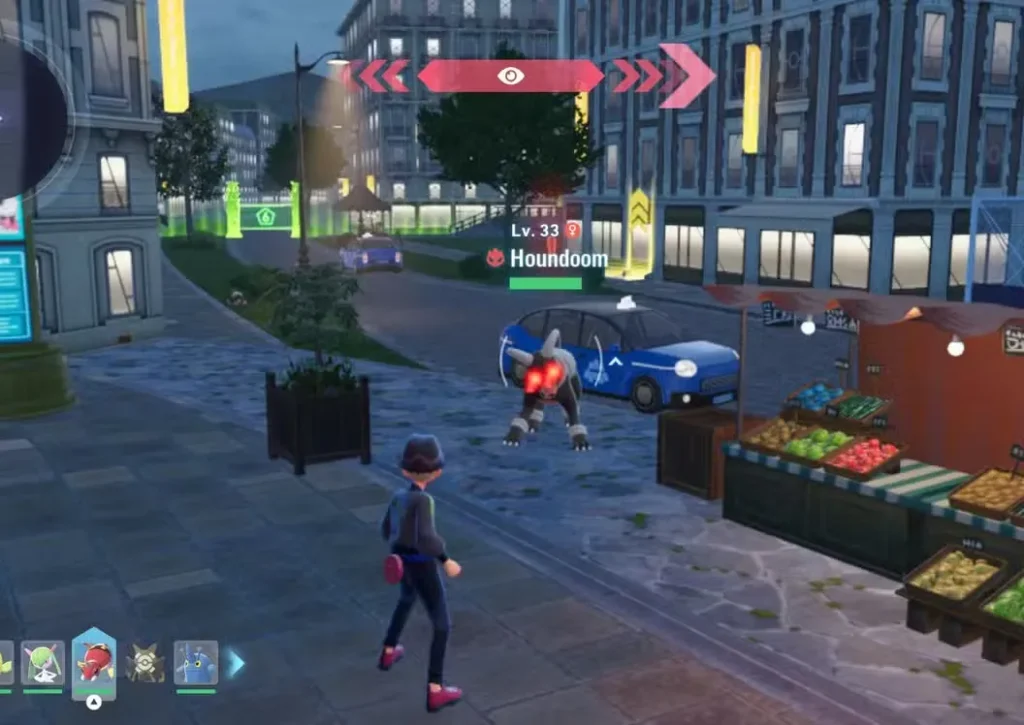
Where: Resting beside a taxi near the Houndour on the main road (right in front of the entrance)
This is probably the first Alpha you’ll encounter in Wild Zone 6. Alpha Houndoom is a Dark/Fire-type beast that hits hard and can burn you with Fire-type moves. Approach carefully and make sure you have Pokémon that can handle both Dark and Fire attacks.
Catching tip: Houndoom is weak to Water, Ground, Rock, and Fighting-types. Bring a strong Water-type to soften it up before throwing Poké Balls.
Alpha Pikachu Location
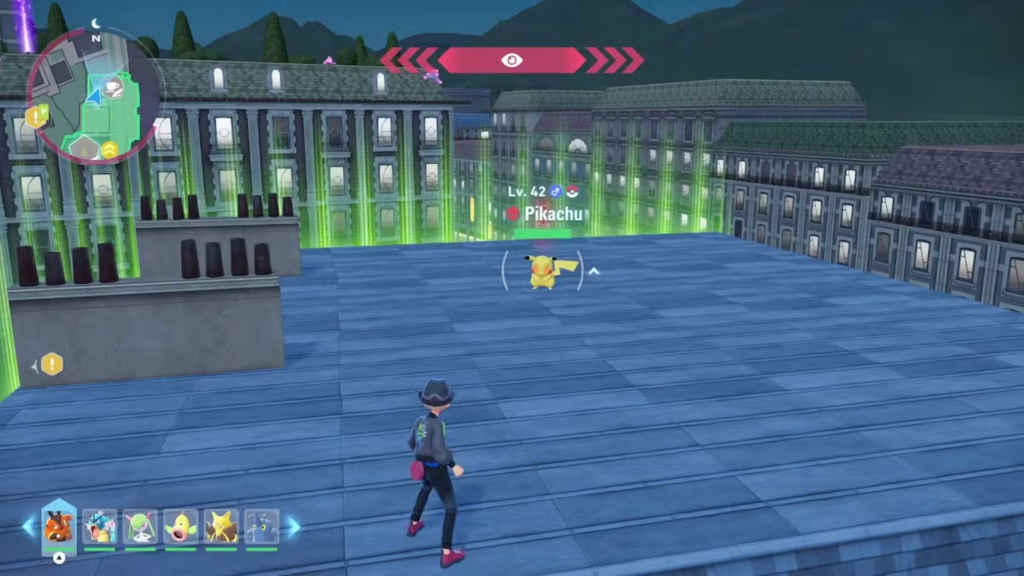
Where: Rooftops in the northern part of Wild Zone 6, ladder next to Meditite’s arena
From the battle arena where Meditite spawns, look for a ladder that leads up to the rooftops. Alpha Pikachu hangs out up there, probably enjoying the view and plotting how to zap unsuspecting trainers.
Why this matters: Alpha Pikachu is both rare and cool-looking. If you’re planning to use Pikachu on your team, the Alpha version gives you better stats right from the start. Plus, it’s just fun to have a massive Pikachu stomping around.
Catching tip: Pikachu is weak to Ground-types, so bring something that can tank Electric attacks and hit back with Ground moves. Alternatively, paralyze or sleep it first to improve your catch rate.
Alpha Binacle Location
Where: Next to the regular Binacles in the shallow pool
This Alpha is in the same pool area where you found the regular Binacle. It’s noticeably larger and more aggressive, so be ready for a fight.
Strategic note: Binacle evolves into Barbaracle at level 39, which is a Rock/Water-type with excellent Attack and decent defenses. An Alpha Binacle with boosted stats evolves into an even stronger Barbaracle, making it a solid choice if you’re building a physical attacker.
Efficient Route for 100% Completion
If you want to catch all seven species as quickly as possible, follow this route:
- Enter Wild Zone 6 → Catch Houndour right in front of you
- Turn left → Cross wooden bridge → Catch Buneary
- Return to entrance → Use yellow teleporter near blue taxi → Catch Flaaffy on rooftop
- Climb ladder from Flaaffy rooftop → Catch Swablu near chimneys
- Return to yellow teleporter → Take ladder DOWN to pool → Catch Binacle
- Continue to deeper water → Catch Magikarp
- Head to northern battle arena (change time to day if needed) → Catch Meditite
Total time: 15-25 minutes depending on catch rates and how many Alpha Pokémon you decide to battle.
Tips for Faster Exploration and Catching
Use fast travel – Once you’ve explored Wild Zone 6 once, you can fast travel back to specific points for revisits.
Stock up on Poké Balls – Bring at least 20-30 balls. Some Pokémon, especially Alphas, can break free multiple times.
Bring status-inflicting moves – Sleep, paralysis, and freeze all improve catch rates significantly.
Save before Alpha encounters – If you fail to catch an Alpha, you can reload rather than waiting for a respawn.
Check different times of day – Besides Meditite’s daytime restriction, some Pokémon may have better spawn rates at different times.
What to Do After Completing Wild Zone 6
Once you’ve caught all seven species (or at least seen them for Pokédex completion), you have several options:
Explore other Wild Zones – Check out Wild Zone 2 or Wild Zone 4 for different species.
Hunt for shinies – Wild Zone 6 is a decent spot to farm for shiny versions of these Pokémon if you’re into that grind.
Level up your Magikarp – Seriously, get that Gyarados. It’s worth it.
Train your team – Use the Pokémon here as experience fodder for leveling up your main team.
Collect crafting materials – While exploring, grab materials like Tiny Mushrooms, Colorful Screws, and Clear Purple Sludge.
Building a Team from Wild Zone 6 Pokémon
If you’re curious whether any of these Pokémon are worth keeping on your main team, here’s my honest assessment:
Definitely worth it:
- Magikarp/Gyarados – One of the best Water-types in the game
- Swablu/Altaria – Solid Dragon-type with Mega Evolution potential
- Flaaffy/Ampharos – Excellent Electric-type, also has Mega Evolution
Situationally useful:
- Houndour/Houndoom – Good Dark/Fire coverage if you need it
- Meditite/Medicham – Unique typing, decent if you lack Fighting-types
Probably just for completion:
- Buneary – Cute but not particularly strong
- Binacle – Takes forever to evolve and there are better Rock/Water options
For more team-building advice, see our guide on the best early Pokémon to catch and our Mega Evolution tier list.
Common Questions and Issues
“I can’t find Meditite!” → Make sure it’s daytime. Rest on a bench if needed.
“The Alpha Pokémon keep defeating my team!” → Come back when you’re higher level, or use type advantages and status conditions.
“Do I need to catch duplicates?” → No, one of each species is enough for completion.
“Can I leave and come back?” → Yes, leaving Lumiose City and Wild Zones is totally fine. Your progress is saved.
Other Useful Resources
As you continue your adventure through Pokémon Legends: Z-A, these guides might help:
- Looking for starter Pokémon? Check our Kanto Starters guide
- Want all Eevee forms? See the Eevee and Eeveelutions guide
- Need specific Pokémon? Check guides for Pansage, Pansear, and Panpour or Big Ol’ Bunnelby
Final Thoughts: Wild Zone 6 Is Worth Your Time
Wild Zone 6 might not have the most diverse selection of Pokémon compared to other zones, but quality beats quantity here. With Gyarados, Altaria, and Ampharos all being catchable (in their pre-evolved forms), this zone offers some genuinely powerful team members.
The vertical design also makes exploration more interesting than just wandering through flat grass. Climbing rooftops, diving into pools, and navigating the multi-level architecture gives Wild Zone 6 a unique feel that breaks up the monotony of typical wild areas.
Plus, those three Alpha Pokémon provide a nice challenge if you’re looking for tougher battles. Even if you don’t plan to use them on your team, hunting Alphas is satisfying in its own right.
For more information about Pokémon Legends: Z-A, visit the official Pokémon Legends website or check out the game on the Nintendo Store.
Happy hunting in Wild Zone 6! 🎯
Quick Reference Checklist:
🌟 Alpha Binacle – Shallow pool with regular Binacle
✅ Buneary – Left from entrance, wooden bridge
✅ Houndour – Main road in front of entrance
✅ Flaaffy – Rooftop via yellow teleporter
✅ Swablu – Higher rooftop via ladder past Flaaffy
✅ Binacle – Pool area, ladder down from teleporter
✅ Magikarp – Deeper water past Binacle
✅ Meditite – Battle arena (north), daytime only
🌟 Alpha Houndoom – Near taxi on main road
🌟 Alpha Pikachu – Northern rooftops