Navigate Hollow Knight Silksong Act 2 with our complete Citadel progression guide. Learn the optimal route, boss fights, and ability locations after defeating The Last Judge.
TL;DR
After entering The Citadel, immediately buy the Grand Gate map (40 Rosaries), then progress through Underworks to Choral Chambers. Defeat the Cogwork Dancers boss, ring the Grand Bell to unlock Songclave, and begin hunting the three pieces of the Threefold Melody. Prioritize getting the Clawline ability to access Mount Fay for the crucial Faydown Cloak upgrade.
The moment you step into The Citadel after conquering The Last Judge, Hollow Knight Silksong’s structure fundamentally shifts. Gone is the relatively linear progression of Act 1 – Act 2 presents a sprawling, interconnected fortress where knowing your priorities makes the difference between efficient progression and hours of aimless wandering.
The Citadel’s imposing architecture and non-linear design can overwhelm newcomers, but understanding the optimal progression sequence transforms this intimidating maze into a manageable challenge. Here’s your strategic roadmap for conquering Act 2’s opening hours and setting yourself up for endgame success.
Understanding Act 2’s Structure: Why Priority Matters
Act 2 operates on fundamentally different principles than the guided progression of Act 1. The Citadel doesn’t funnel you toward obvious objectives – instead, it presents multiple viable paths with varying difficulty and reward structures.
Key structural differences:
- Non-linear progression with multiple simultaneous objectives
- Map acquisition through machines rather than Shakra purchases
- Ventrica stations replace Bellways as the primary fast travel system
- Complex interconnections between areas requiring backtracking
- Endgame objectives that demand exploration across the entire Citadel
This shift means that early decisions significantly impact your overall efficiency. Choosing the wrong initial path can lock you out of crucial upgrades or force expensive detours through dangerous territory.
Priority #1: Secure Your First Citadel Map
The Grand Gate map serves as your foundation for all subsequent exploration. Unlike Act 1’s NPC-based map system, the Citadel uses mysterious machines that dispense cartographic data for Rosary payments.

Map acquisition process:
- Enter the first room of The Citadel after the Last Judge cutscene
- Locate the miniature Citadel display machine
- Interact and pay 40 Rosaries for the Grand Gate map
- Gain immediate orientation for the surrounding area
Why this matters: The Grand Gate map covers the crucial transition zone between Blasted Steps and Choral Chambers. Without it, navigation between these areas becomes guesswork, potentially wasting valuable resources on failed exploration attempts.
Budget consideration: 40 Rosaries represents a significant early investment, but the navigation benefits far outweigh the cost. Plan accordingly by ensuring you have sufficient reserves before entering The Citadel.
Priority #2: Navigate Through Underworks to Choral Chambers
The Underworks serves as your primary route into the Citadel’s main areas while introducing you to Act 2’s environmental hazards and visual storytelling.

Underworks Navigation and Hazards
From the Grand Gate machine, head right and drop down into The Underworks. This sub-area presents a stark contrast to previous regions – enslaved bugs toil under oppressive conditions while dangerous machinery creates constant threats.
Critical hazard awareness:
- Fan mechanisms deal 2 Masks of damage – these aren’t minor environmental obstacles
- Multiple elevation changes require careful platforming
- Worker bugs provide atmospheric context but don’t threaten Hornet directly
Free map opportunity: Look for a sign with lines and shapes during your upward traversal. The room containing this sign holds the Underworks map pinned to a board – completely free, unlike other Citadel maps.
Reaching Choral Chambers: Your Act 2 Hub
Choral Chambers functions as Act 2’s primary hub area, containing multiple progression paths, the first major boss encounter, and crucial infrastructure for future exploration.
Upon entering Choral Chambers:
- Continue through until you reach another map machine
- Purchase the Choral Chambers map for 70 Rosaries
- Go left to discover your first Ventrica station
- Pay 80 Rosaries to unlock the Ventrica station
Ventrica vs. Bellway systems: Ventrica stations represent a significant upgrade over Act 1’s Bellway network, but each station requires individual unlocking fees. Budget accordingly – fast travel becomes expensive in Act 2.
Priority #3: Establish The Slab Shortcut
One of Act 2’s most valuable early discoveries is the alternative entrance to The Slab from Choral Chambers. This shortcut eliminates the need for the capture sequence that defines the traditional Slab entry method.

Shortcut benefits:
- Direct connection to Slab Bench and Bellway station
- Avoids equipment loss from the capture sequence
- Enables efficient Mount Fay access later in progression
- Provides emergency escape route from dangerous Citadel areas
Location: Head to the left side of Choral Chambers to find this alternative Slab entrance. The connection point is near the Bench and Bellway station, making it incredibly convenient for future use.
Strategic importance: This shortcut becomes crucial when you need to access Mount Fay for the Faydown Cloak. Without it, reaching Mount Fay requires the dangerous capture route through Deep Docks.
Priority #4: Confront the Cogwork Dancers
The Cogwork Dancers represent Act 2’s first major boss encounter and one of Silksong’s most emotionally impactful fights. Located at the very top of Choral Chambers, this battle serves multiple progression functions.

Boss Fight Mechanics and Strategy
The encounter features two Cogwork Dancers moving in perfect synchronization with the background music. Their attacks telegraph through visual cues, creating a rhythm-based combat experience.
Fight progression:
- Three escalating phases with increasing tempo
- Directional attack indicators show where damage will occur
- Synchronized movement patterns require timing-based dodging
- Tragic fourth phase after one dancer’s destruction
Emotional design: This boss fight exemplifies Team Cherry’s masterful combination of gameplay and storytelling. The tragic elements aren’t just narrative window dressing – they’re integral to the mechanical experience.
Post-Victory Unlocks
Defeating the Cogwork Dancers triggers multiple progression opportunities:
- Cogworks Core access below the arena
- Eastern Choral Chambers become available
- Three ominous statues reveal the Threefold Melody quest
- Background rotation provides visual confirmation of new content
The victory fundamentally changes Choral Chambers’ layout, opening previously inaccessible areas and revealing your ultimate Act 2 objective.
Priority #5: Ring the Grand Bell and Establish Songclave
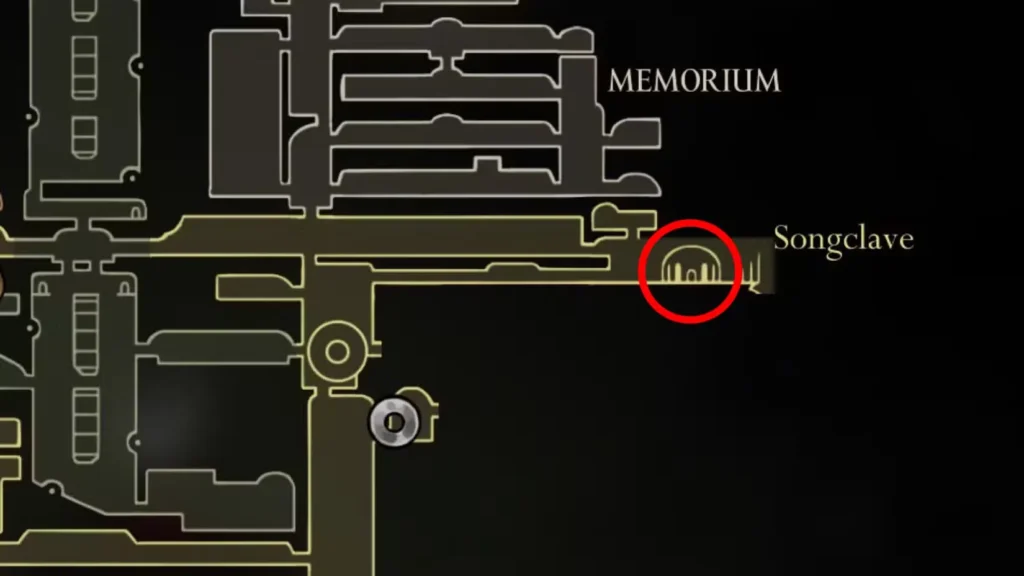
The Grand Bell sequence transforms a static area into a dynamic town hub while introducing important NPCs and quest opportunities.
Grand Bell Location and Activation
Navigate right from the Cogwork Dancers arena, carefully avoiding the two formidable large enemies patrolling the route. These enemies represent significant threats – engage only if absolutely necessary.
Bell activation sequence:
- Enter the strange building on the far top-right of The Citadel
- Ring the bell within to spawn a bench
- Exit to meet the Caretaker – an important NPC
- Listen to the warning about incoming pilgrims
Songclave Development
Return to this location later to discover the fully formed Songclave town. The transformation provides several benefits:
- Wishwall request fulfillment from pilgrim NPCs
- Additional quest opportunities for resource gathering
- Safe resting spot in the upper Citadel regions
- Caretaker interactions for story progression
White Key acquisition: Look to the right of the Grand Bell building to find a White Key – essential for accessing the Whiteward area below Choral Chambers.
Priority #6: Locate the Grand Bellway Station
The Grand Bellway serves as your primary connection between Act 2 content and Act 1 areas you might need to revisit for upgrades, collectibles, or quest completion.
Location: Navigate to the far bottom-right of Choral Chambers to discover this centrally positioned fast travel hub.

Strategic applications:
- Return to Act 1 areas for missed Mask Shards or Spool Fragments
- Complete optional abilities you skipped during initial progression
- Fulfill wishes from NPCs in previous regions
- Gather resources for expensive Citadel upgrades
The Grand Bellway’s central positioning makes it ideal for planning complex backtracking routes without excessive travel costs.
Priority #7: Begin the Threefold Melody Quest
The three ominous statues revealed after the Cogwork Dancers fight present your ultimate Act 2 objective: collecting all pieces of the Threefold Melody to ascend Pharloom’s peak.

Understanding the Quest Scope
This objective requires extensive exploration across virtually every Citadel area, making it the perfect framework for systematic progression.
Melody piece locations:
- Two pieces locked behind challenging gauntlet rooms in opposite corners of The Citadel
- One piece hidden atop the Clockwork Core area
- Extensive exploration required through Cauldron, Whispering Vaults, Bilewater, High Halls, Whiteward, and Memorium
Preparation Strategy: Clawline and Faydown Cloak
Before seriously pursuing melody pieces, prioritize acquiring two crucial abilities that dramatically expand your exploration capabilities.
Clawline acquisition route:
- Explore Underworks and Cauldron areas thoroughly
- Locate the Clawline ability (grappling hook functionality)
- Return to Slab Bellway station via the shortcut established earlier
Faydown Cloak sequence:
- Use Clawline to enter Mount Fay from The Slab
- Complete the demanding platforming challenge
- Reach the top of Mount Fay for the Faydown Cloak
- Gain double-jump capability for enhanced exploration
These abilities transform previously inaccessible areas into manageable challenges, making melody piece collection significantly more efficient.
Strategic Exploration: Whispering Vaults and Pale Oil
The Whispering Vaults present unique navigation challenges while housing important upgrade materials like Pale Oil for your second needle enhancement.

Accessing the Whispering Vaults
The gigantic wheel-gate mechanism controls Whispering Vaults access, but reaching the control lever requires understanding the Cogwork Core’s layout.
Access route:
- Drop down from Cogwork Dancers arena into Cogwork Core
- Navigate three floors down through challenging platforming
- Loop down, right, and up to reach the central column’s opposite side
- Master cog-bouncing techniques for efficient traversal
- Unlock the shortcut halfway up the right side for future access
Wheel-gate operation: Once you reach the control lever, adjust the wheel-gate to face left to right for horizontal entry into the Whispering Vaults.
Pale Oil and Needle Upgrades
Somewhere within the Whispering Vaults, you’ll discover Pale Oil – a crucial material for your second needle upgrade. This enhancement significantly increases Hornet’s damage output, making future encounters more manageable.
The upgrade represents a substantial power increase that justifies the complex route required to obtain it.
Resource Management and Budgeting
Act 2’s progression demands careful resource management due to the high costs associated with maps, Ventrica stations, and various upgrades.
Major expenses to budget for:
- Grand Gate map: 40 Rosaries
- Choral Chambers map: 70 Rosaries
- Ventrica station unlocks: 80 Rosaries each
- Additional area maps: Varies by region
- Equipment upgrades: Costs vary
Resource gathering strategy: Prioritize efficient Rosary farming before major purchasing decisions. The high costs can quickly deplete reserves if you’re not prepared.
Looking Ahead: Act 2’s Scope and Complexity
The priorities outlined here represent just the beginning of Act 2’s extensive content. The Citadel contains numerous additional areas, bosses, and challenges that become accessible as you acquire new abilities and complete quest objectives.
Available across Steam, Nintendo Switch, PlayStation, and Xbox, Silksong’s Act 2 represents the culmination of everything learned in the journey through Pharloom.
The transition from Act 1’s guided progression to Act 2’s open exploration represents a significant shift in how the game challenges players. Success requires not just mechanical skill, but strategic thinking about progression priorities and resource allocation.
Master these early priorities, and The Citadel transforms from an intimidating maze into a playground of interconnected challenges. Every area you unlock, every ability you acquire, and every map you purchase contributes to your growing mastery of Pharloom’s ultimate fortress. The path to the peak begins with these foundational steps – choose your route wisely, and the mysteries of The Citadel will gradually reveal themselves.