Getting your camera dialed in can make or break your skating experience in the new Skate. Whether you’re cruising through San Vansterdam’s streets or attempting complex trick combinations, the right camera setup is crucial for both style and performance. Here’s everything you need to know about customizing your view.
Why Camera Settings Actually Matter
Think of camera angles as your window into San Vansterdam’s skateboarding world. A poorly adjusted camera can turn a perfect kickflip into a frustrating bail, while the right settings help you:
- Land tricks more consistently by giving you better spatial awareness
- Navigate tight spots with improved visibility around obstacles
- Enjoy the city’s details without missing environmental cues
- Reduce motion sickness that some players experience with default settings
- Capture better clips for sharing your best moments
The difference between good and great camera settings often comes down to personal preference, but there are definitely some sweet spots that work for most players.
How to Access Camera Settings
From the Main Menu:
- Hit the Accessibility option (press “1” on keyboard)
- Adjust both on-board and off-board camera angles before jumping in
While Playing:
- Press ESC to open the Hub
- Click the cog icon or press “1”
- Navigate to Gameplay Settings
- Find the camera options under the Gameplay section
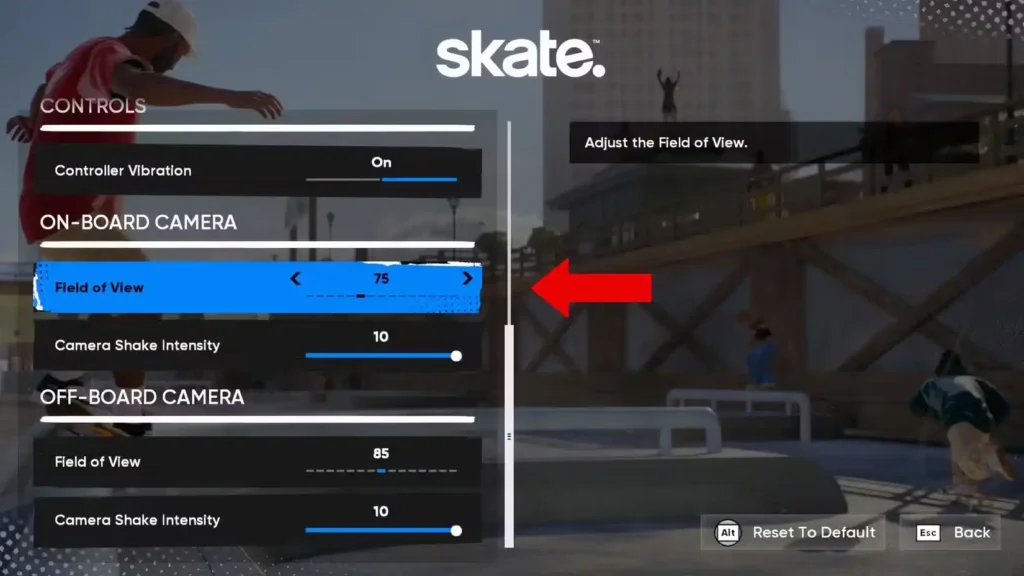
The FOV slider runs from +50 to +120 in increments of 5, giving you plenty of room to find your perfect view. Don’t be afraid to experiment – you can always reset to defaults if things get wonky.
Understanding the Two Camera Types
Skate uses a dual camera system that switches based on what you’re doing:
On-Board Camera: Active when you’re riding your skateboard. This is your primary view for tricks, navigation, and general skating around the city.
Off-Board Camera: Takes over when you’re walking around, adjusting your setup, or exploring on foot. Less critical for actual skating but important for overall comfort.
Optimal Camera Settings for Most Players
After testing various configurations and considering different play styles, here are the settings that work best for the majority of skaters:
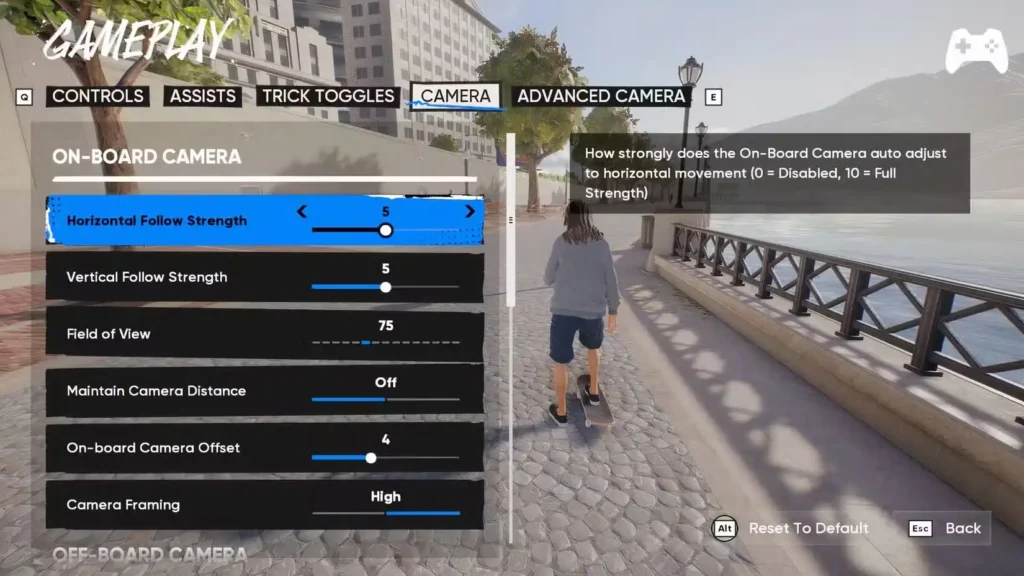
On-Board Camera (Your Main View)
- Field of View: 75-80 (sweet spot for most players)
- Horizontal Follow Strength: 5 (keeps things smooth)
- Vertical Follow Strength: 5 (prevents jarring movements)
- On-board Camera Offset: 4 (gives you better trick visibility)
- Camera Framing: High (shows more of your surroundings)
- Maintain Camera Distance: Off (allows natural zoom adjustments)
Off-Board Camera (Walking Around)
- Field of View: 85 (wider view for exploration)
- Horizontal Sensitivity: 30 (responsive but not twitchy)
- Vertical Sensitivity: 30 (matches horizontal for consistency)
- Off-board Default Pitch: -12 (slightly downward angle)
- Maintain Camera Distance: On (keeps consistent framing)
- Camera Inversion: Both Off (unless you prefer inverted controls)
Fine-Tuning for Your Style
For Technical Street Skating: Consider bumping the FOV down to 70-75. The tighter view helps with precision when threading gaps or hitting specific spots on rails and ledges.
For Cruising and Exploration: Push that FOV up to 85-90. You’ll see more of San Vansterdam’s beautiful architecture and spot interesting skating opportunities from further away.
For Filming Tricks: Experiment with the Camera Framing setting. “High” gives you more environmental context, while lower settings focus more tightly on your skater.
Common Camera Issues and Solutions
Feeling Motion Sick?
- Lower your FOV to 70 or below
- Increase Follow Strength to 7-8 for steadier movement
- Turn off any camera shake effects if available
Can’t See Your Feet for Flip Tricks?
- Increase Camera Offset to 5-6
- Set Camera Framing to High
- Consider a slightly lower FOV around 75
Camera Feels Sluggish?
- Bump up your sensitivity settings to 35-40
- Check that Follow Strength isn’t set too high (keep it at 5 or below)
Pro Tips for Camera Mastery
Test in Different Areas: What works great in open plazas might feel cramped in tight alleyways. Spend time skating different parts of San Vansterdam with your new settings.
Match Your Controller: Console players often prefer slightly different sensitivity settings compared to PC players using mouse and keyboard.
Consider Your Display: Ultrawide monitors might benefit from higher FOV settings, while smaller screens work better with tighter views.
Save Your Backup: Before making major changes, note down your current settings. It’s easy to lose track of what worked when you’re experimenting.
Beyond Basic Settings
Once you’ve got your camera dialed in, you’ll find that other challenges become more manageable. Whether you’re working on complex trick combinations or tackling specific objectives like our Flip Out Challenge guide, having consistent, comfortable camera settings makes everything flow better.
The camera system in Skate is surprisingly deep, and finding your perfect setup might take some time. Don’t rush it – good camera settings are an investment in every session you’ll play going forward.
Quick Setup Checklist
Ready to get rolling? Here’s your fast-track setup:
- Set On-Board FOV to 78 (good starting point)
- Keep Follow Strength at 5 for both axes
- Camera Offset to 4 (better trick visibility)
- Off-Board FOV to 85 (exploration friendly)
- Test in an open area before hitting technical spots
Remember, these settings are suggestions, not rules. The best camera setup is the one that feels natural to you and helps you skate the way you want to skate. Take some time to experiment, and don’t be afraid to adjust as you discover new areas of San Vansterdam or develop new trick preferences.
Now get out there and make those camera settings work for you!
Get Skate on your platform:
- EA Games Official
- PlayStation Store
- Xbox Store
- Steam
- Epic Games Store