Cobalt is your gateway into mid-tier crafting in Hytale. It sits right between the basic metals (Copper and Iron) and the high-end materials (Mithril and beyond), making it essential for progressing through the game’s equipment tiers. You’ll need Cobalt for weapons, armor, tools, and workbench upgrades—basically, you can’t skip this material if you want to advance.
The good news? Cobalt isn’t particularly rare. The catch? You’ll need to venture into snowy biomes to find it, and those regions come with their own hazards. Let me show you exactly where to find Cobalt, how to mine it safely, and what you’ll need it for.
Where to Find Cobalt in Hytale
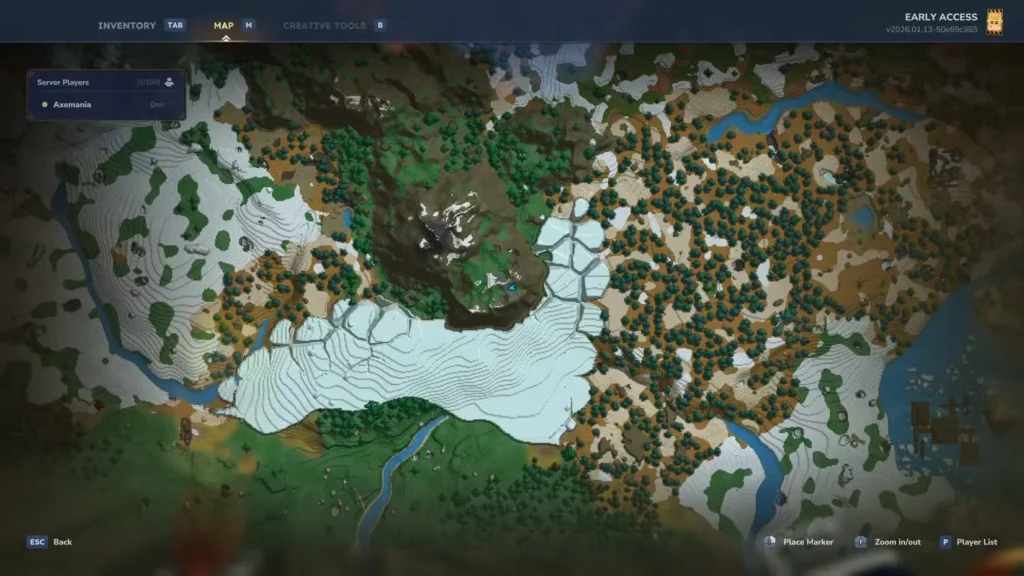
Cobalt spawns exclusively in snowy regions and tundra biomes—those icy, white areas visible on your map. If you’re still hanging around temperate zones near your spawn point, you’ll need to travel to colder climates to start farming Cobalt.
Once you reach a snowy biome, you’ve got two main options for finding Cobalt:
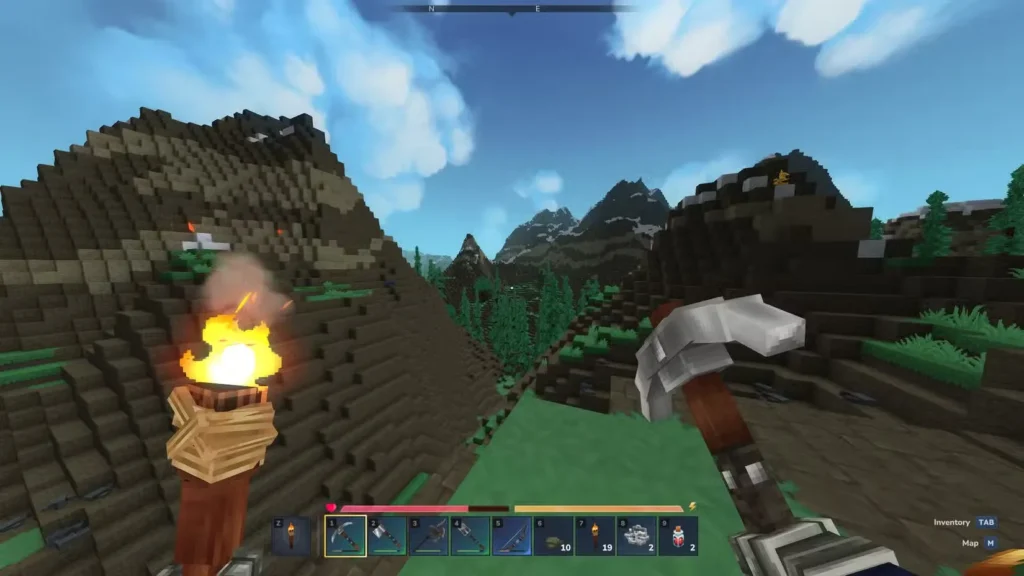
Option 1: Surface Mining on Mountains (Safer)
Cobalt nodes appear frequently along mountain ranges throughout tundra regions. You’ll spot individual ore deposits jutting out from mountainsides and cliff faces—they’re pretty easy to identify once you know what you’re looking for.
Why surface mining is safer:
- No risk of getting lost in cave systems
- Better visibility for spotting threats
- Easier to escape if you get overwhelmed
- No fall hazards from slippery ice surfaces (mostly)
In my experience, surface mining in snowy mountains is the more beginner-friendly approach. There’s usually plenty of Cobalt available above ground, so you can collect decent quantities without diving into dangerous cave systems.
The one major threat: Yetis
Snowy mountain regions are home to Yetis, which are significantly more dangerous than the basic enemies you’ve fought up to this point. These big, aggressive creatures hit hard and can tank a lot of damage. Fighting them is risky, especially if you’re undergeared or unprepared.
If you spot a Yeti while surface mining, you’ve got two choices: fight carefully or flee and mine elsewhere. Don’t underestimate them—they can wreck you fast if you get careless.
Option 2: Underground Mining in Snow Biomes (Higher Yield)
If you want to find entire veins of Cobalt instead of scattered individual nodes, head underground in snowy biomes. Cave systems in tundra regions contain substantial Cobalt deposits, often mixed in with Copper and Iron veins.
Underground mining yields more ore per expedition, but it comes with significant hazards:
Ice Block Hazards: Snow biome caves have tons of ice blocks coating walkable surfaces, and these surfaces are slippery as hell. One wrong step and you can slide right off a ledge and fall to your death. Seriously, the number of times I’ve lost valuable loot to ice-related fall damage is embarrassing.
How to minimize ice hazards:
- Move slowly and deliberately in icy caves
- Break ice blocks and replace them with stone or dirt for safer footing
- Bring plenty of torches to light your path clearly
- Consider placing temporary railings or barriers near dangerous ledges
Underground Enemies: Cave systems in snowy biomes spawn hostile creatures just like caves elsewhere. You’ll be fighting while navigating slippery terrain, which is a recipe for disaster if you’re not careful.
Preparing for Cobalt Mining Expeditions in Hytale
Don’t just wander into snowy biomes unprepared. These regions are legitimately dangerous, and dying far from home means losing inventory items and wasting time.
Essential Gear
Armor & Weapons:
- Full Iron armor minimum (Thorium is better if you have it)
- Iron-tier weapons or higher
- Ranged weapon (bow or crossbow) for dealing with Yetis safely
- Shield if you have one available
Tools:
- Iron Pickaxe or better for efficient mining
- Multiple Repair Kits—your tools will take a beating
- Torches for lighting cave systems
- Building blocks for creating safe paths over ice
Supplies:
- Healing items (food, potions, bandages)
- Upgraded backpack for carrying more ore
- Extra weapons in case yours break
Set Up a Forward Base
Here’s a pro tip that’ll save you tons of frustration: build a temporary camp in or near the snowy biome before you start serious mining.
What to include in your camp:
- Bedroll: Sets your respawn point so you don’t lose all progress if you die
- Campfire: For cooking food and providing light/warmth
- Chests: Store excess ore and loot so you don’t lose everything on death
- Crafting stations: Basic workbench and furnace for emergency repairs or smelting
- Walls/fencing: Protection from wandering enemies
Setting up a forward base takes maybe 10-15 minutes but saves you hours of running back and forth between the snowy biome and your main base. It’s absolutely worth the time investment.
Consider Using Teleporters
If you’ve progressed far enough to craft Teleporters (requires an Arcanist’s Workbench and Azure Kelp), place one at your main base and another at your snowy biome camp.
This lets you instantly warp between locations, making resource runs infinitely more efficient. You can mine for hours, fill your inventory, teleport home to unload, then teleport right back to continue farming.
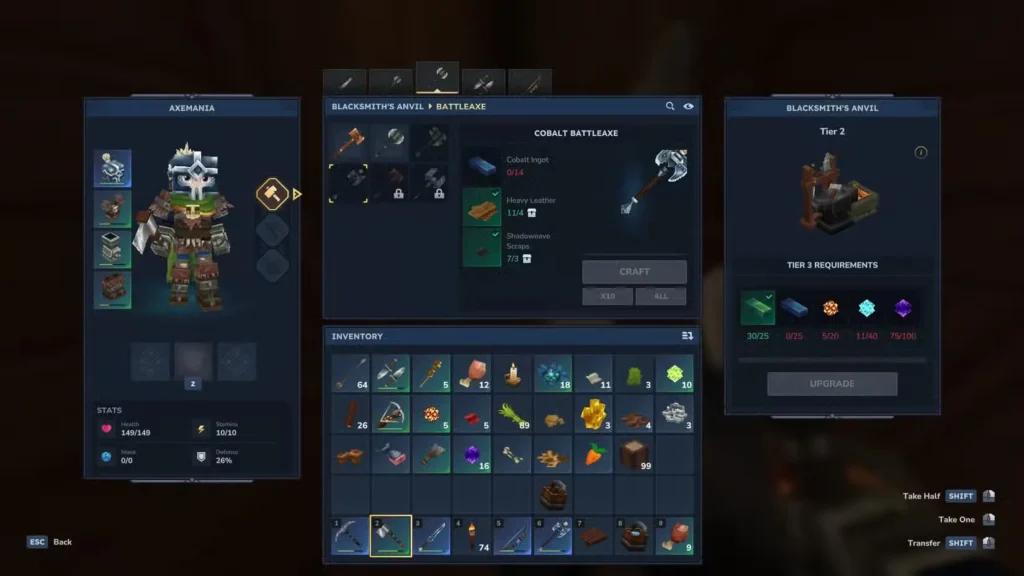
Smelting Cobalt Ore into Cobalt Ingots in Hytale
Like other metal ores, raw Cobalt Ore needs to be smelted into Cobalt Ingots before you can craft with it.
How to smelt Cobalt:
- Place Cobalt Ore in a Furnace (same process as smelting Copper or Iron)
- Add fuel (charcoal, wood, or plant fiber)
- Click “Turn On” to start smelting
- Collect Cobalt Ingots from the output slot
The conversion ratio is 1:1—each Cobalt Ore produces one Cobalt Ingot. Plan your mining trips accordingly based on how many ingots you need for specific crafting projects.
What to Do With Cobalt Ingots
Cobalt is a mid-tier material with multiple important uses:
Crafting Cobalt Gear
The primary use for Cobalt is crafting Cobalt equipment, which represents a significant upgrade over Iron-tier gear:
- Cobalt Armor: Better protection than Iron, essential for surviving tougher enemies
- Cobalt Weapons: Higher damage output for faster combat
- Cobalt Tools: More durable and efficient than Iron tools
Important note: Cobalt equipment doesn’t just require Cobalt Ingots. You’ll also need Shadoweave Scraps, a material similar to Linen Scraps but specific to snowy biomes.
Where to Get Shadoweave Scraps
Shadoweave Scraps drop from Outlanders, a humanoid enemy type found in snow biomes. They’re more aggressive and dangerous than basic enemies like Trorks or Skeletons.
Where to find Outlanders:
- Outlander strongholds (marked on your map)
- Random patrols in snowy regions
- Enemy camps scattered throughout tundra biomes
Important warning: Outlander camps can be brutal. Large strongholds often contain multiple Outlanders who will swarm you if you’re not careful. They hit hard, move fast, and coordinate attacks better than basic mobs.
Tips for fighting Outlanders:
- Lure them out one or two at a time instead of charging in
- Use ranged attacks to thin their numbers before engaging in melee
- Bring plenty of healing items
- Consider fighting them in Cobalt gear once you’ve crafted some
You’ll need to balance Cobalt mining with Outlander farming to craft a full set of Cobalt equipment.
Upgrading Crafting Stations
Cobalt Ingots are required to upgrade several important crafting stations:
- Tier 1 → Tier 2 Workbench: Unlocks advanced crafting recipes
- Blacksmith’s Anvil: Allows crafting better weapons and tools
These upgrades are essential for progression, so stockpile Cobalt even if you’re not immediately crafting gear. You’ll need it eventually for workbench improvements.
Cobalt Farming Tips
Want to maximize your Cobalt farming efficiency? Here are some veteran strategies:
- Mark productive mountain areas: Use in-game markers or the Memories system to track good mining spots
- Bring a horse: Faster travel between your base and snowy biomes
- Farm in groups: Playing with friends makes both mining and Outlander fighting safer
- Mine ice-free areas first: Save icy cave sections for later when you’re more experienced
- Combine resource runs: While in snowy biomes, also gather other unique materials available there
- Use mods: Some mods add ore trackers or highlight veins
While you’re progressing through mid-game content, you might also need materials like Venom Sacs, leather, rope, and Cindercloth Scraps for various crafting recipes.
Progression Path: When to Farm Cobalt
Here’s roughly when Cobalt farming fits into Hytale’s progression:
Early Game (Copper tier): Don’t worry about Cobalt yet—focus on basic materials Early-Mid Game (Iron tier): Start scouting snowy biomes and collecting small amounts Mid Game: Farm Cobalt heavily to craft full Cobalt gear and upgrade workbenches Late Game: Move beyond Cobalt toward high-tier materials like those needed for crafting with Essences of the Void
Cobalt represents a natural progression step between basic Iron equipment and endgame Mithril gear. Don’t skip it—the stat increases are significant and necessary for tackling harder content.
Frequently Asked Questions
What’s the best pickaxe tier for mining Cobalt efficiently?
An Iron Pickaxe is the minimum recommended tool for mining Cobalt efficiently. You can technically mine it with Copper-tier pickaxes, but it’ll be painfully slow and burn through durability quickly. Iron or better gives you reasonable mining speed without excessive durability loss. Bring multiple pickaxes or several Repair Kits on extended mining trips.
Can I find Cobalt outside of snowy biomes?
No, Cobalt is exclusive to snowy and tundra biomes. You won’t find it in temperate forests, deserts, swamps, or any other biome type. If your world spawn is far from snowy regions, you’ll need to travel sometimes quite far to reach Cobalt mining locations. Consider setting up a teleporter network once you unlock that technology.
How much Cobalt do I need for a full armor set and weapon upgrades?
Expect to need several dozen Cobalt Ingots for a complete set of Cobalt gear. Each armor piece, weapon, and tool requires multiple ingots, and workbench upgrades consume additional materials. Plan on multiple mining expeditions—a single trip won’t give you enough for everything. Stock up on 50-100+ ingots if you want to craft a full loadout plus upgrade your crafting stations.
Are Yetis worth fighting for loot, or should I just avoid them?
Yetis are dangerous but do drop valuable loot when defeated. However, whether they’re “worth” fighting depends on your gear level and skill. If you’re in full Iron armor or better with good weapons, Yetis become manageable challenges with worthwhile rewards. If you’re undergeared, avoid them and focus purely on mining—dying to a Yeti and losing your inventory of Cobalt Ore sucks way more than missing out on their drops. Fight them when you’re prepared, not out of necessity.