Where to Go After Volt Forge in Metroid Prime 4 Beyond
You’ve conquered Volt Forge, defeated Xelios, and claimed your shiny new Psychic Boots. Now comes the classic Metroid moment: standing at a crossroads with the entire map open before you, wondering where the heck you’re supposed to go next.
This is where Metroid Prime 4: Beyond really embraces the franchise’s tradition of non-linear exploration. Once you escape Volt Forge’s labyrinthine towers, you’ll emerge into Sol Valley—a sprawling desert wasteland that serves as a hub connecting multiple major dungeons.
But here’s the thing: while the game appears to give you total freedom, there’s actually an optimal path forward. One specific dungeon needs to be tackled first before you can meaningfully progress elsewhere. This guide will walk you through how to exit Volt Forge properly (because the solution isn’t obvious), where to go next, and why the Fire Shot is your immediate priority.
For comprehensive strategies across all areas, visit our Metroid Prime 4: Beyond gameplay guide.
How to Exit Volt Forge in Metroid Prime 4 Beyond
After defeating Xelios and unlocking the Psychic Boots, you might expect a straightforward exit. Nope. Volt Forge has one last puzzle to throw at you, and it’s tripped up plenty of players who weren’t paying attention.
Step 1: Backtrack to the Elevator
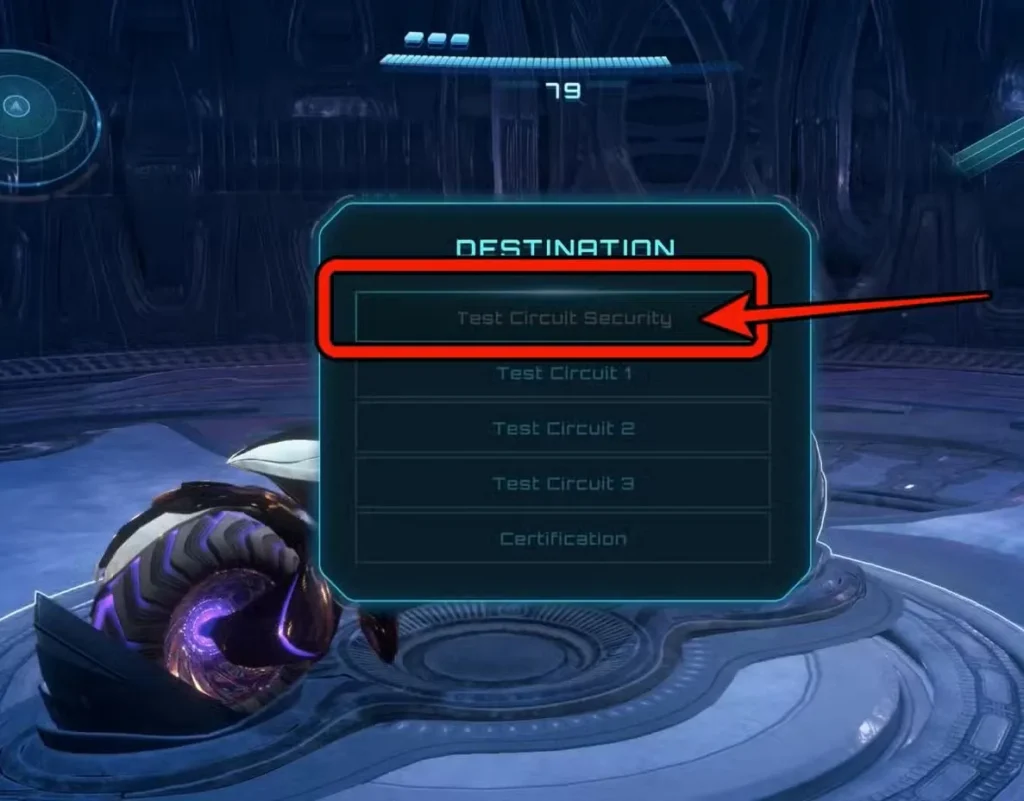
Once the boss fight concludes, you need to retrace your steps back through the tower. Head toward the elevator that originally brought you down through the Test Circuits.
Your destination is the Test Circuit Security level—basically, where you started your descent into the depths of Volt Forge. When you reach the top of the elevator shaft, you should recognize your surroundings from earlier in the dungeon.
Step 2: Navigate the Vi-O-La Path
Now that you’ve got the Vi-O-La motorcycle unlocked, you can use it to navigate the larger areas more efficiently. But first, you need to figure out which path to take.
How to Find the Correct Route:
You’ll notice two different gates you can take with the Vi-O-La. Don’t just pick randomly—use your Scan Visor to read the signs above each gate.
Look for the path that reads: “Tower 3 to Tower 1”
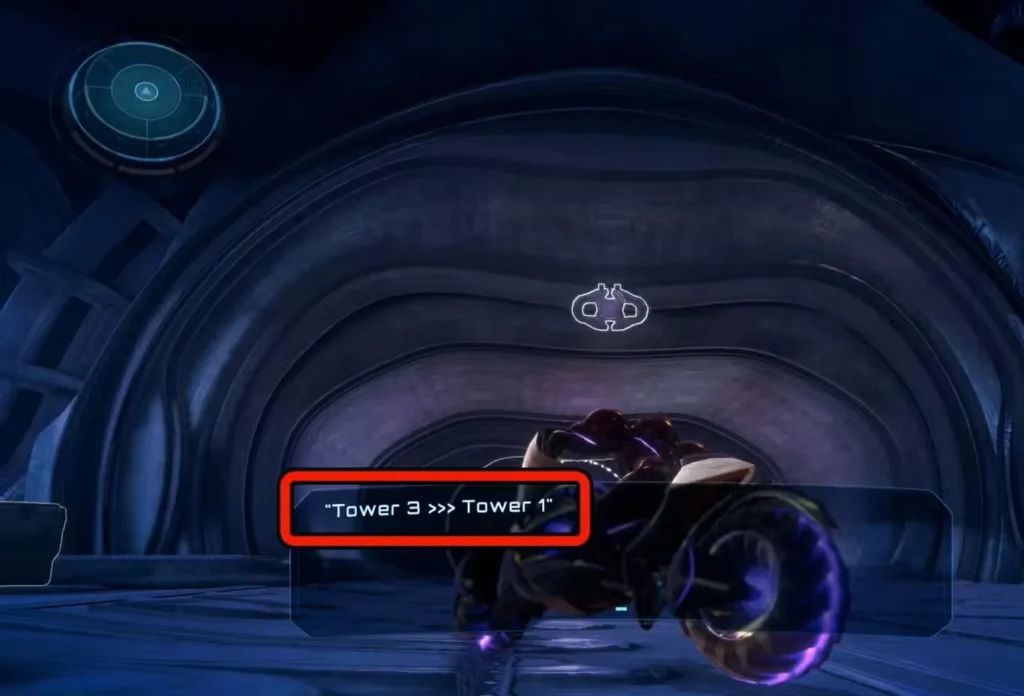
This route leads you back to the first tower you entered when you originally arrived at Volt Forge. Follow this path until you reach the main courtyard area.
Step 3: The Purple Force Field Puzzle (Where People Get Stuck)
Here’s where many players hit a wall—literally. When you reach the main courtyard, you’ll notice the Vi-O-La spinner station is raised and blocked by a purple force field. You can’t lower it with your arm cannon, you can’t shoot it with missiles, and the motorcycle can’t bash through it.
So what gives?
The Solution:
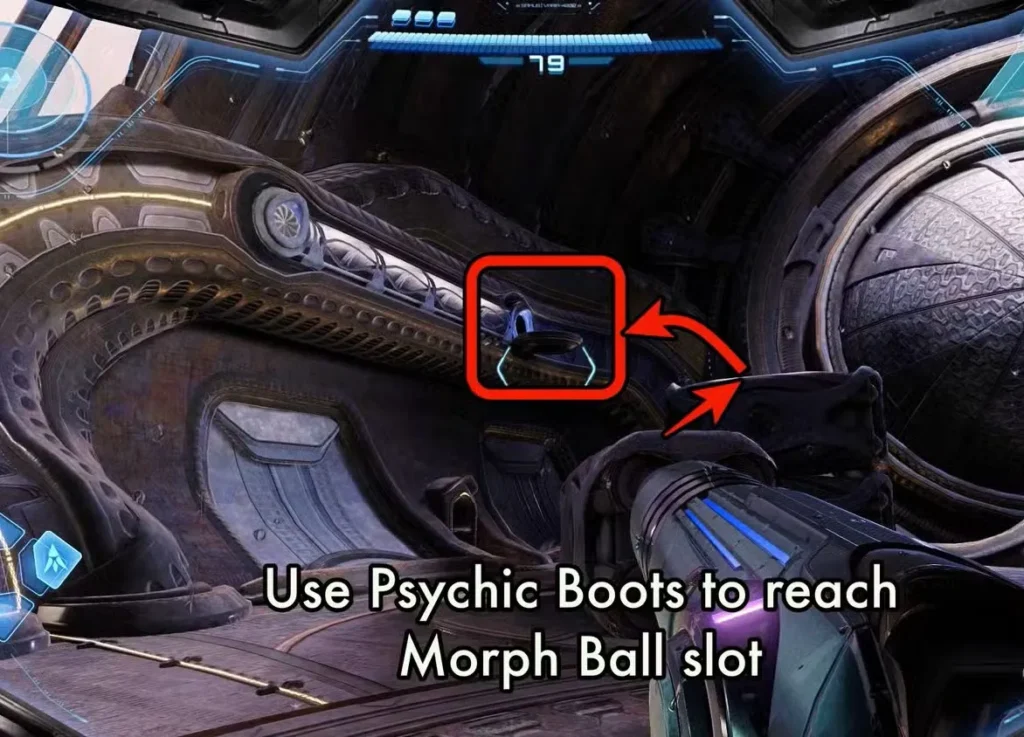
- Position yourself facing the exit gate
- Look up and to the left—you’ll spot a small platform with an opening designed for Morph Ball form
- Use the Psychic Boots to double-jump up to this elevated platform
- Transform into Morph Ball (press Y) and navigate through the opening
- Drop a Psychic Bomb (press A) in the socket at the end of the pathway
- The bomb will disable the force field on the spinner station below
Pro Tip: If you’re struggling with the double jump timing, remember you can press B or L while airborne. The Psychic Boots make this jump much more forgiving than earlier platforming challenges.
Step 4: Activate the Spinner and Exit
With the force field down, hop back down to the Vi-O-La spinner station. Activate it to open the exit gate, then ride your motorcycle through to freedom.
Congratulations—you’ve officially escaped Volt Forge and entered the next phase of the game.
Welcome to Sol Valley: Your New Hub Area
Once you exit Volt Forge, you’ll find yourself in Sol Valley, a vast desert environment that feels significantly different from the enclosed industrial areas you’ve been exploring.
What Makes Sol Valley Special:
- Hub-based design: Multiple dungeon entrances branch off from this central area
- Open exploration: You can theoretically visit several locations, though not all are accessible yet
- Environmental hazards: Desert heat and new enemy types require adaptation
- Interconnected pathways: Sol Valley connects to both old and new areas
At first glance, Sol Valley presents you with what seems like complete freedom. You can see multiple dungeon entrances on your map, different pathways to explore, and various environmental puzzles to solve.
But here’s the reality: there’s one dungeon you absolutely must complete before the others become viable. That dungeon is Flare Pool.
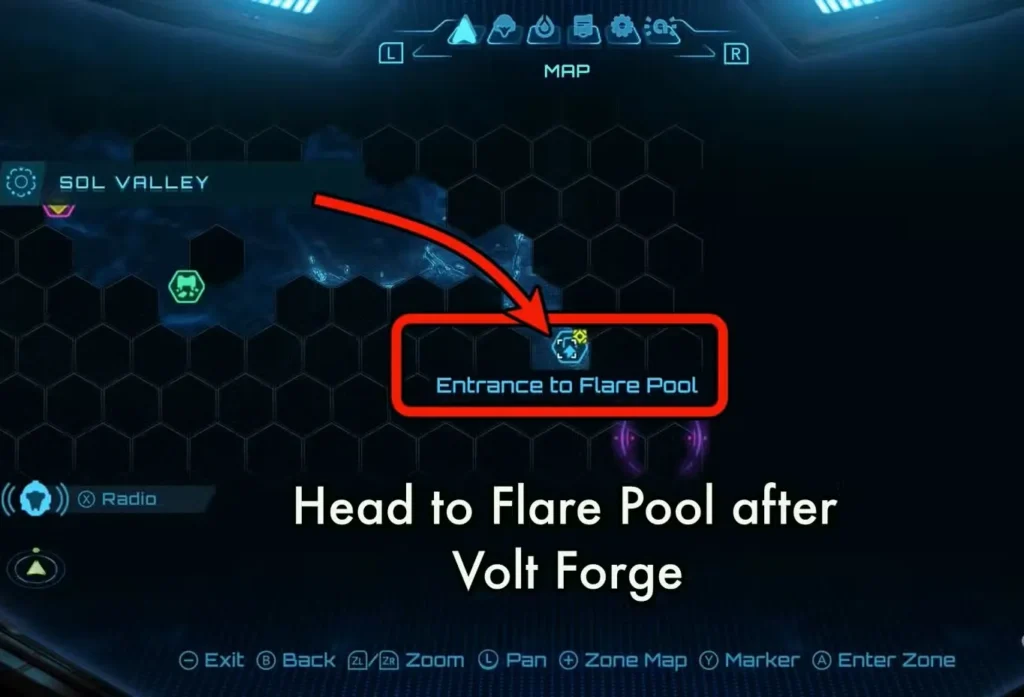
Where to Go After Volt Forge: Flare Pool is Your Priority
When deciding where to go after Volt Forge in Metroid Prime 4, the answer is clear: head to Flare Pool immediately. This flame-based dungeon is located in the southeast corner of Sol Valley and holds the key to your next major ability upgrade.
Why Flare Pool Must Come First
The Fire Shot Upgrade:
Flare Pool contains the Fire Chip, which Myles can convert into the Fire Shot—the first of three elemental weapons you’ll unlock. This weapon is essential for:
- Melting ice barriers that block pathways
- Defeating fire-based enemies more efficiently
- Accessing previously locked areas in Fury Green
- Progressing through other dungeons that require elemental damage
Without the Fire Shot, you’ll hit roadblocks in multiple locations. It’s not just recommended—it’s practically mandatory for forward progress.
Important Note About Flare Pool:
You won’t be able to fully explore this dungeon yet. Later areas contain lava hazards that require a suit upgrade you don’t have. But that’s okay—your objective is specific: get the Fire Chip and get out. You’ll return once you have the proper protection.
Step-by-Step: How to Get the Fire Shot
Part 1: Navigate Flare Pool to the Bridge
- Enter Flare Pool from Sol Valley (southeast corner of the map)
- Follow the main pathway deeper into the dungeon
- Watch for the bridge cutscene—a scripted event will trigger as you approach a major crossing point
- Turn back after the cutscene—the path forward is temporarily blocked
Part 2: The Previously Locked Door
As you backtrack toward the entrance, you’ll notice something different:
- A previously locked door is now open (revealed in a cutscene)
- Enemies will pour out of this newly opened passage
- Defeat them using your standard arsenal—charge shots and missiles from your Missile Launcher work great
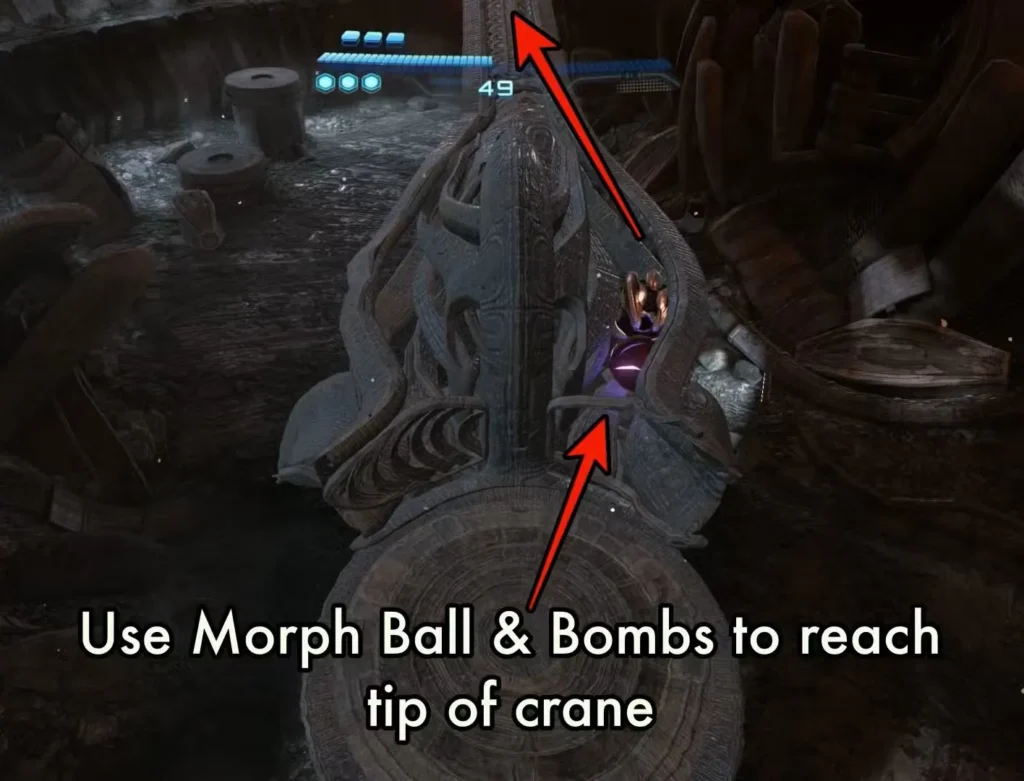
Part 3: The Crane Puzzle
Follow the newly opened path to its end. You’ll find yourself in a room with a large crane that has a glowing red light at its tip.
How to Get the Fire Chip:
- Use the platforms to jump up onto the crane structure
- Transform into Morph Ball (press Y) once you’re on the crane arm
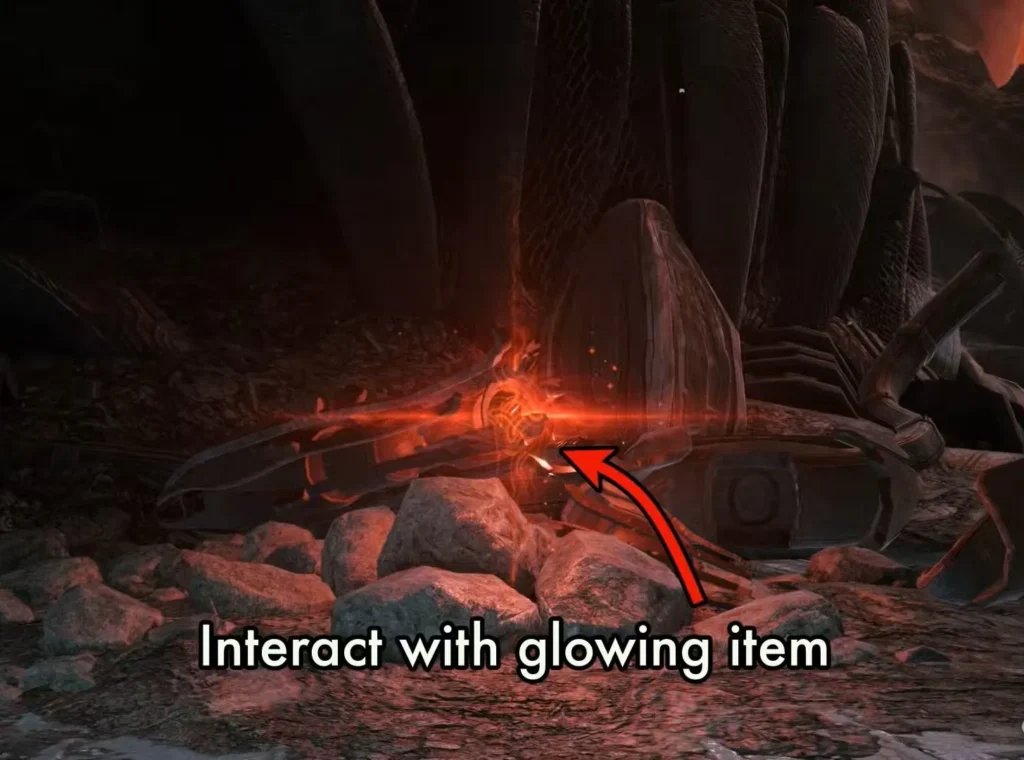
- Navigate to the tip of the crane where the red glow is brightest
- Drop a Psychic Bomb (press A) at the glowing point
- The Fire Chip will fall to the ground below
- Collect the Fire Chip and prepare to exit
Part 4: Return to Fury Green
Exit Flare Pool the same way you entered. Once you’re back in Sol Valley, you’ll receive a communication from Myles asking you to return to home base.
Fast Travel Tip:
- Head back to Fury Green
- Use the Cargo Launcher to fast-travel across the dungeon
- This puts you closest to home base, saving significant travel time
- If you haven’t used the Cargo Launcher system yet, it’s essentially the game’s internal fast-travel network
For more on navigating Fury Green efficiently, check our guide on the Sanctum of Guardians.
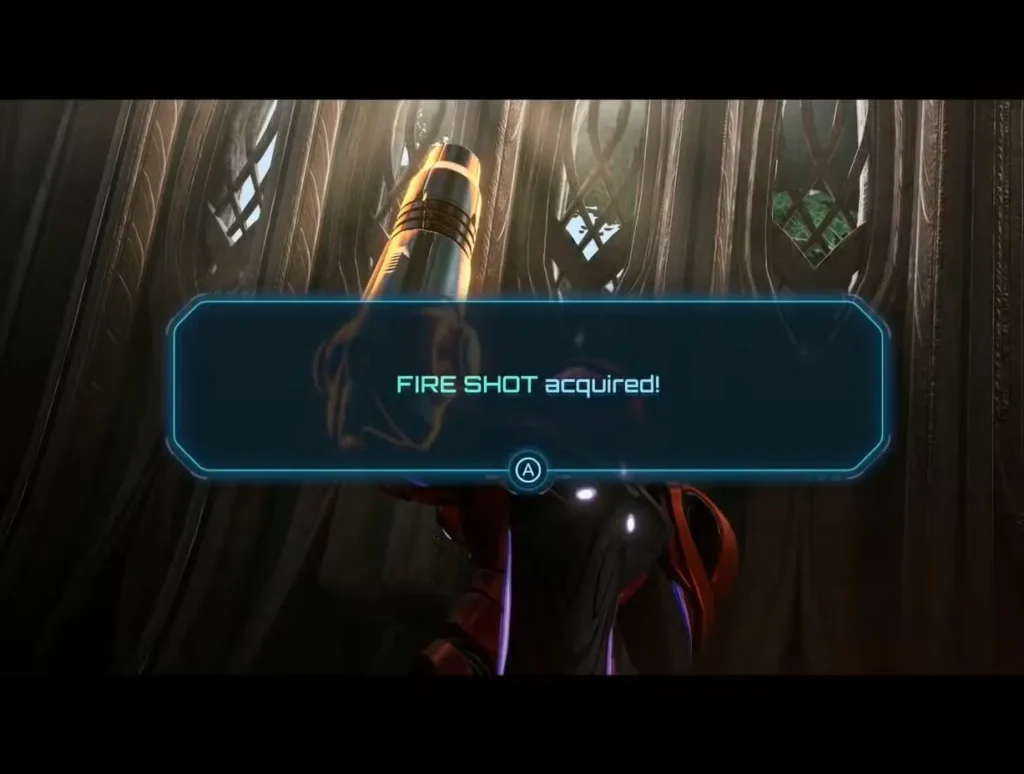
Part 5: Unlock the Fire Shot
When you reach Myles at home base:
- Give him the Fire Chip
- He’ll install it as the Fire Shot upgrade for your arm cannon
- The weapon becomes immediately available—no need to equip it manually
- You can now use fire-based attacks alongside your standard beam
The Fire Shot is the first of three elemental weapons you’ll collect throughout Metroid Prime 4: Beyond. Each one opens up new areas and gameplay possibilities.
What to Do After Getting the Fire Shot
Once you’ve unlocked the Fire Shot, the game truly opens up. Here are your best options:
Option 1: Explore Fury Green (Recommended)
With both the Psychic Boots and Fire Shot, you can now access several previously blocked collectibles in Fury Green:
- Energy Tanks hidden behind ice barriers
- Missile Expansions on Psychic Platforms
- Lore scans in elevated areas
- Hidden rooms that required both double jump and fire attacks
This is the perfect time to backtrack and grab everything you’ve been noting mentally (or marking on your map) since your first pass through the area.
Option 2: Head to Ice Belt (Main Story Path)
The next major dungeon is Ice Belt, located in the northwest corner of Sol Valley. This ice-themed area is now accessible thanks to your Fire Shot, which can melt the frozen barriers blocking the entrance.
Ice Belt continues the main story and provides the next major ability upgrade. If you’re focused on story progression rather than completionism, this is your primary objective.
Option 3: General Sol Valley Exploration
With your expanded toolkit, you can:
- Revisit areas you noticed but couldn’t access during your first pass through Sol Valley
- Hunt for environmental scans and lore entries
- Practice combat against desert enemies to master Fire Shot mechanics
- Test the limits of Psychic Boots double jump in various terrain
Combat Tips for Using Fire Shot
Since this is your first elemental weapon, here’s how to maximize its effectiveness:
Best Uses:
- Melting ice barriers and frozen enemies
- Dealing extra damage to cold-based creatures
- Igniting flammable environmental objects
- Combining with Psychic Boots mobility for aerial fire attacks
Energy Management:
- Fire Shot uses the same energy as your standard beam
- Don’t spam it unnecessarily—save it for situations where fire is specifically needed
- Regular beam shots are still more efficient for standard enemies
Combat Synergies:
- Use Fire Shot to remove ice shields, then finish with missiles
- Combine double jump (Psychic Boots) with Fire Shot for aerial bombardment
- Scan enemies to learn which ones are weak to fire damage
For more advanced combat tactics, including handling tough bosses like Sylux and Carvex, check our specialized boss guides.
Common Mistakes When Exiting Volt Forge
Mistake #1: Missing the Elevated Platform
Many players get stuck at the purple force field because they don’t look up and left. The Morph Ball entrance is easy to miss if you’re focused on ground-level solutions. Always remember: Metroid games love vertical puzzles.
Mistake #2: Taking the Wrong Vi-O-La Path
If you don’t scan the gate signs, you might head the wrong direction and waste time backtracking. Always use your Scan Visor liberally—it’s there for a reason.
Mistake #3: Skipping Flare Pool
Some players try to explore other dungeons first, only to hit elemental barriers they can’t pass. Flare Pool isn’t optional—it’s the critical path to progression.
Mistake #4: Not Using Fast Travel
The Cargo Launcher in Fury Green saves enormous amounts of time. If you’re manually walking back to home base, you’re doing it the hard way.
Frequently Asked Questions (FAQs)
Where should you go after beating Volt Forge in Metroid Prime 4?
After beating Volt Forge, you should head directly to Flare Pool, located in the southeast corner of Sol Valley. This dungeon contains the Fire Chip, which Myles converts into the Fire Shot—your first elemental weapon. You need this upgrade before you can meaningfully progress to other areas like Ice Belt or fully explore Fury Green.
How do you exit Volt Forge in Metroid Prime 4 Beyond?
To exit Volt Forge, backtrack to the elevator that brought you through Test Circuits. Take the path marked “Tower 3 to Tower 1” back to the main courtyard. Look for an elevated Morph Ball entrance up and to the left of the exit gate. Use Psychic Boots to double-jump up, then drop a Psychic Bomb in the socket to disable the purple force field blocking the Vi-O-La spinner station.
What is Sol Valley in Metroid Prime 4?
Sol Valley is a large desert hub area that connects multiple major dungeons in Metroid Prime 4: Beyond. You access it after escaping Volt Forge. While it appears to offer complete freedom, you should prioritize Flare Pool (southeast) first to get the Fire Shot, then proceed to Ice Belt (northwest) for the main story.
Can you return to Fury Green after Volt Forge?
Yes, you can (and should) return to Fury Green after completing Volt Forge. With the Psychic Boots and Fire Shot, you’ll be able to access numerous collectibles that were previously blocked. Use the Cargo Launcher for fast travel to save time. Many players return to Fury Green immediately after getting the Fire Shot to clean up missed Energy Tanks and Missile Expansions.
Follow the Elemental Path
Knowing where to go after Volt Forge in Metroid Prime 4 comes down to understanding the game’s progression structure. While Sol Valley creates the illusion of open-world freedom, the reality is more guided: Flare Pool → Fire Shot → Ice Belt is your critical path forward.
The Fire Shot isn’t just a cool weapon—it’s a key that unlocks the next chapter of the game. Without it, you’ll constantly bump into barriers and obstacles that seem impassable. With it, the world expands dramatically.
Here’s your action plan:
- ✅ Exit Volt Forge using the elevated Morph Ball platform puzzle
- ✅ Head southeast to Flare Pool immediately
- ✅ Navigate to the crane, grab the Fire Chip, and exit
- ✅ Return to Fury Green via Cargo Launcher fast travel
- ✅ Give Myles the Fire Chip to unlock Fire Shot
- ✅ Backtrack through Fury Green to collect missed items (optional but recommended)
- ✅ Head northwest to Ice Belt to continue the main story
With the Vi-O-La motorcycle making travel faster and the Psychic Boots opening vertical exploration, you’re finally equipped for the mid-game challenges ahead.
For more dungeon guides, ability unlocks, and boss strategies, visit our main Metroid Prime 4: Beyond hub. And if you’re ready to experience it yourself, grab the game from Nintendo’s official store.
Now get out there and heat things up with that Fire Shot, bounty hunter. Sol Valley is waiting!