The Blind to the World quest stands out as one of Where Winds Meet‘s most atmospheric early-game experiences. Unlike typical combat-heavy missions, this Qinghe region quest focuses on exploration, puzzle-solving, and a genuinely somber narrative that’ll stick with you long after completion.
You’ll be assisting Uncle Tian with a mysterious request from the Evercare Clinic, which leads to discovering a hidden sanctuary beneath a lake near Moonveil Mountain. The journey involves draining water, solving statue puzzles, navigating trap-filled corridors, and uncovering the tragic story of Li Zhenzhen, the “Lunar Goddess.”
More importantly, this quest rewards you with Blinding Mist, one of the game’s most useful mystic skills for crowd control. Here’s your complete step-by-step guide to conquering this quest without getting lost in the darkness.
Before starting this quest, make sure you’ve progressed enough in the main story and explored the Qinghe region. If you’re still learning the basics, check out our Where Winds Meet tips and tricks for beginners.
Starting the Blind to the World Quest in Where Winds Meet
You’ll find Uncle Tian waiting by the lakeside near Moonveil Mountain in the Qinghe region. Speak with him to accept the quest and learn about his mysterious client’s request. He needs help accessing a hidden sanctuary beneath the lake—a place that requires more than simple diving to reach.
The quest immediately sets an eerie tone. Uncle Tian’s vague explanations and the remote location hint that something unusual awaits below the water’s surface.
Step 1: Drain the Lake – Finding All Three Mechanisms
Objective: Activate three underwater mechanisms to drain the lake
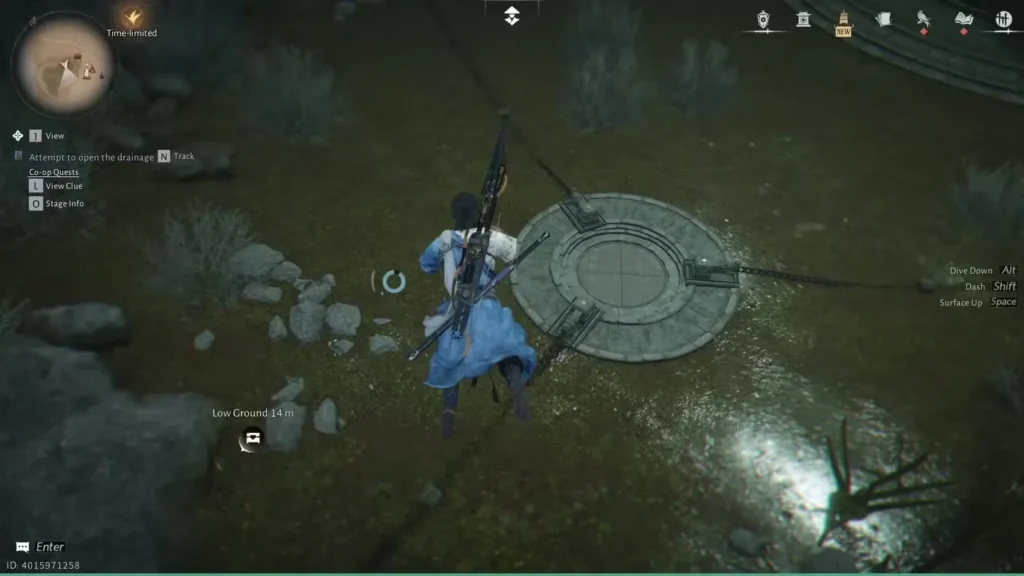
Once you’ve accepted the quest, it’s time to get wet. Jump into the lake and dive to the bottom. You’ll spot a large stone plate with three chains extending from it in different directions—these chains lead to the drainage mechanisms you need to activate.
How to Find Each Mechanism:
- Follow each chain individually from the central stone plate
- Look for lever mechanisms at the end of each chain underwater
- Interact with all three levers to trigger the drainage system
- The water will completely drain once all three are activated
Pro tip: The underwater visibility isn’t great, so take your time exploring. There’s no time limit, and you won’t encounter any enemies during this section. If you lose track of a chain, return to the central stone plate and follow a different direction.
The drainage sequence creates a dramatic shift in the environment—watching the lake disappear reveals the muddy basin floor and the imposing statue at its center.
Step 2: Solve the Blind Girl’s Statue Puzzle
Objective: Step on pressure plates in the correct order to open the sanctuary entrance
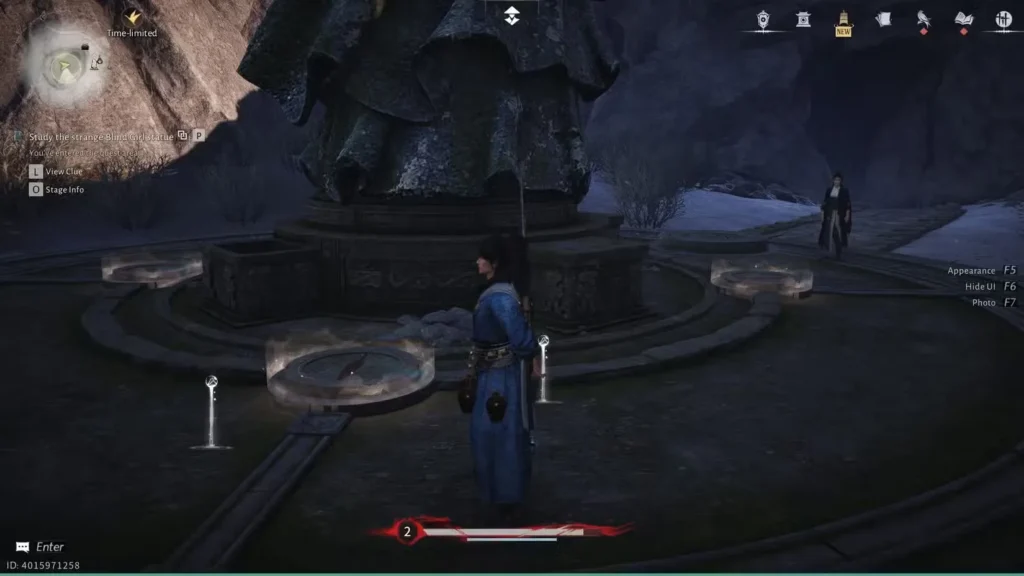
After the water drains, drop down into the muddy basin. You’ll see a massive statue of a blindfolded woman standing at the center—this is the Blind Girl statue referenced in the riddle Uncle Tian received.
Understanding the Riddle:
The puzzle solution is hidden in the riddle text: you need to step on four pressure plates surrounding the statue in a specific directional order: North, East, South, West.
Step-by-Step Solution:
- Open your map to check compass directions and orient yourself properly
- Stand behind the statue (facing its back) at the North plate
- Move clockwise around the statue, stepping on each plate in order:
- Start: North (behind the statue)
- Second: East (right side)
- Third: South (front of statue)
- Fourth: West (left side)
- Glowing indicators appear when you step on the correct plate
- The underground sanctuary door opens after completing the sequence
Important: If you make a mistake, the plates reset. Simply start over from the North position and move clockwise again. This puzzle is significantly more straightforward than some of the game’s other challenges—like the infamous wall puzzle in Echoes of Old Battles.
Once solved, the door to the secret sanctuary opens, revealing the trap-filled passage ahead.
Step 3: Navigate the Arrow Trap Corridor
Objective: Disable traps and reach the broken bridge chamber
The entrance passage immediately tests your awareness. Arrow traps line the corridor, triggered by tripwires marked with red ribbons.
How to Safely Progress:
- Equip fire arrows (you should have some from earlier exploration)
- Shoot the red ribbons blocking your path—burning them disables the corresponding traps
- Move forward carefully after each ribbon is destroyed
- Continue until you reach a large cavern with a broken bridge
The arrow traps aren’t particularly dangerous if you’re paying attention, but rushing through carelessly can drain your health quickly. Take it slow and burn every ribbon you see.
If you’re struggling with bow mechanics, our best starting weapons guide covers basic combat fundamentals that apply here.
Step 4: Find the Alternate Path Around the Broken Bridge
Objective: Navigate cave edges and swim through waterways to reach the other side
The broken bridge presents an obvious obstacle—you can’t cross directly. Instead, you need to find an alternate route along the cave’s perimeter.
Finding the Hidden Path:
- Explore the cave’s edges carefully—look for ledges and walkable paths
- Follow the linear route that hugs the cave wall
- You’ll eventually reach a waterway section that requires swimming
- Swim through the underwater passage to reach the opposite side
Critical Warning – The Blue Flowers:
As you navigate, you’ll notice glowing blue flowers growing throughout the cave. These are Moonlit Flowers, and touching them causes temporary blindness.
Here’s the interesting part: while the blindness effect seems like a hazard, it actually reveals hidden paths underwater. If you go blind while submerged, you’ll see luminescent trails leading to air pockets and the surface. This mechanic becomes crucial later, so remember it.
The waterway section is mostly straightforward—just swim forward and surface when you see the opening ahead. You’ll emerge on the other side of the broken bridge, facing the sealed stone gate.
Step 5: Activate the Stone Gate Contraption (Bell Puzzle)
Objective: Shoot symbols in the correct order based on bell sequences
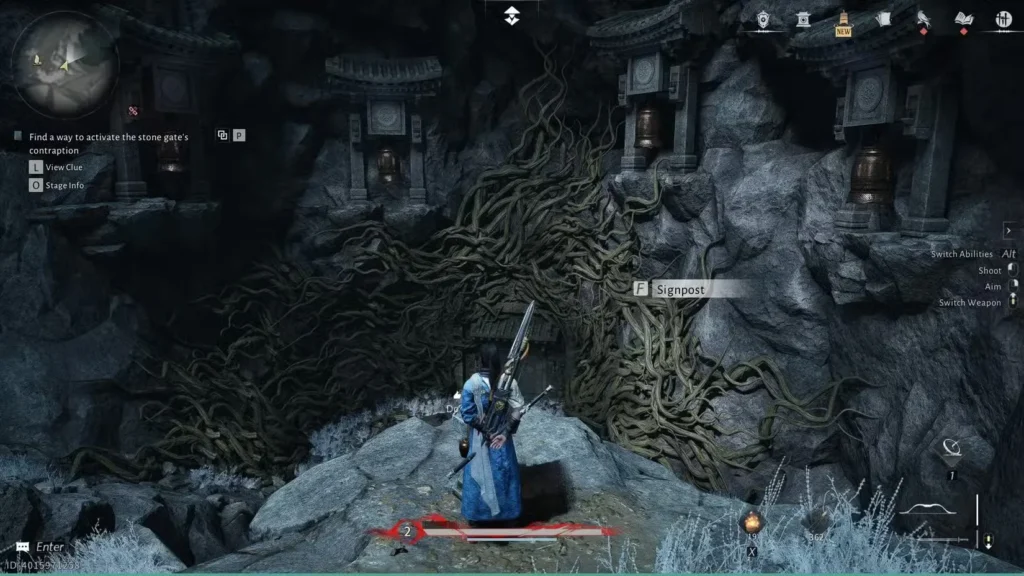
This puzzle requires observation and quick reflexes. You can’t proceed through the stone gate until you solve the bell mechanism—and this one’s more involved than the previous statue puzzle.
Complete Puzzle Solution:
- Locate the pedestal on the high ground opposite the stone gate (look for elevated platforms)
- Interact with the pedestal to trigger the bell sequence
- Several bells above the stone gate will ring in a specific order
- Watch the symbols that light up above each bell as it rings
- Memorize the sequence (or write it down quickly)
- Equip your bow and shoot the symbols in the exact order the bells rang
- Repeat this process twice—the second sequence will be different
Tips for Success:
- The sequences aren’t overly complex, but they happen quickly
- If you miss the order, interact with the pedestal again to replay the sequence
- Take your time aiming—accuracy matters more than speed
- The symbols remain visible even after the bells stop ringing
Successfully completing both sequences opens the stone gate, granting access to the final chamber where the Lunar Goddess awaits.
This puzzle reminded me of similar mechanics in dungeon content like the Echoes in Shrine General’s Statue—Where Winds Meet clearly enjoys testing observation skills alongside combat prowess.
Step 6: Discover Li Zhenzhen’s Sanctuary and Make Your Choice
Objective: Find what the Lunar Goddess truly wants
Passing through the stone gate reveals the quest’s emotional core: a vast underground sanctuary with an ethereal lake, centered around Li Zhenzhen—the woman Uncle Tian calls the Lunar Goddess.
The Sanctuary Layout:
The chamber features a multi-level design with Li Zhenzhen’s statue positioned above and her living quarters below. Uncle Tian explains that his task was to replace the Lunar Goddess’ eyes with new ones, but she refused them. Now you must discover what she actually desires.
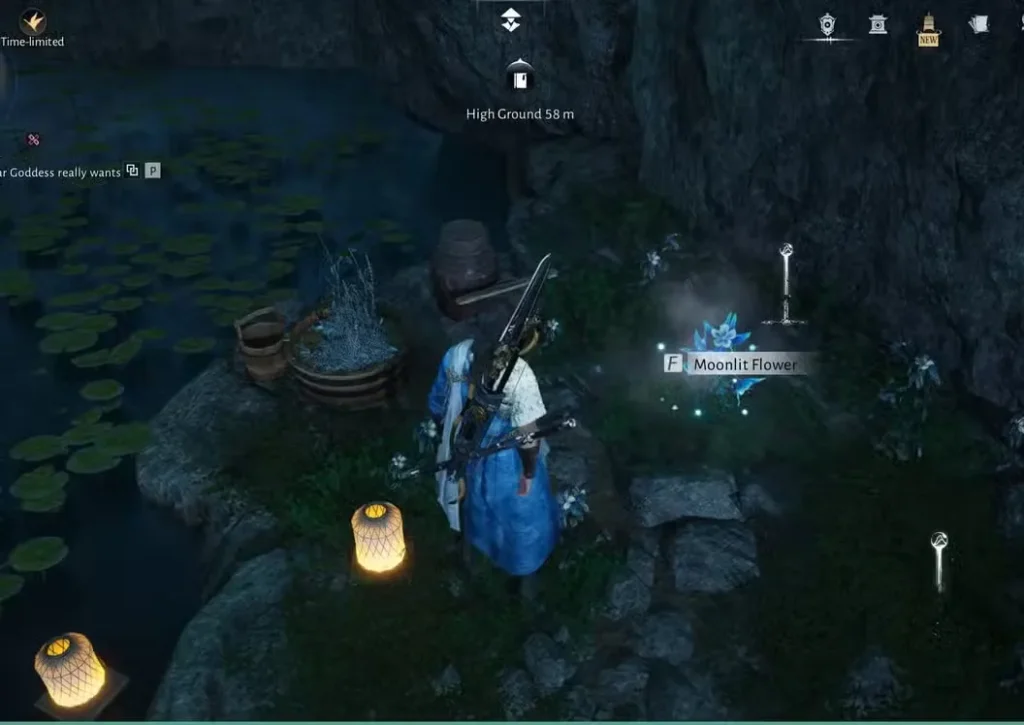
Finding the Quest Items:
- Descend to Li Zhenzhen’s living quarters below the main chamber
- Look for the Moonlit Flower growing in her quarters (the same blue flowers that caused blindness earlier)
- Collect the Small Blade from a nearby table—both items count as quest options
- Return to the Lunar Goddess statue above
The Critical Choice:
When you return, you’ll be given a choice between offering:
- The Moonlit Flower (representing eternal blindness/peace)
- The Small Blade (representing a different resolution)
Based on my playthrough, I chose the Moonlit Flower. This choice feels thematically appropriate given the quest’s emphasis on blindness as both curse and salvation. The flower represents Li Zhenzhen’s desire to remain in her self-imposed darkness rather than face the world that hurt her.
After making your selection, a poignant cutscene plays revealing the full tragedy of Li Zhenzhen’s story. The quest concludes with Uncle Tian gaining closure on his mysterious task.
Exiting the Sanctuary:
Return to Li Zhenzhen’s quarters below and look for a crack in the wall. Squeeze through this opening to exit the sanctuary and return to the surface world.
Blind to the World Quest Rewards – Is It Worth Completing?
Absolutely. This quest offers one of the best mystic skill rewards in the early game, plus valuable progression materials.
Complete Reward List:
Main Rewards:
- ✨ Blinding Mist (Mystic Skill) – The primary reason to complete this quest
- Li Zhenzhen’s Dusty Wedding Dress (Armor)
- 1 Medicinal Tales
Progression Materials:
- 8 Ebon Iron
- 4 Oscillating Jade
- 72 Echo Jade
- 120 Qinghe Exploration Points
- 100 Enlightenment Points
- 33,000 Character EXP
- 33,000 Coin
Why Blinding Mist Is Essential
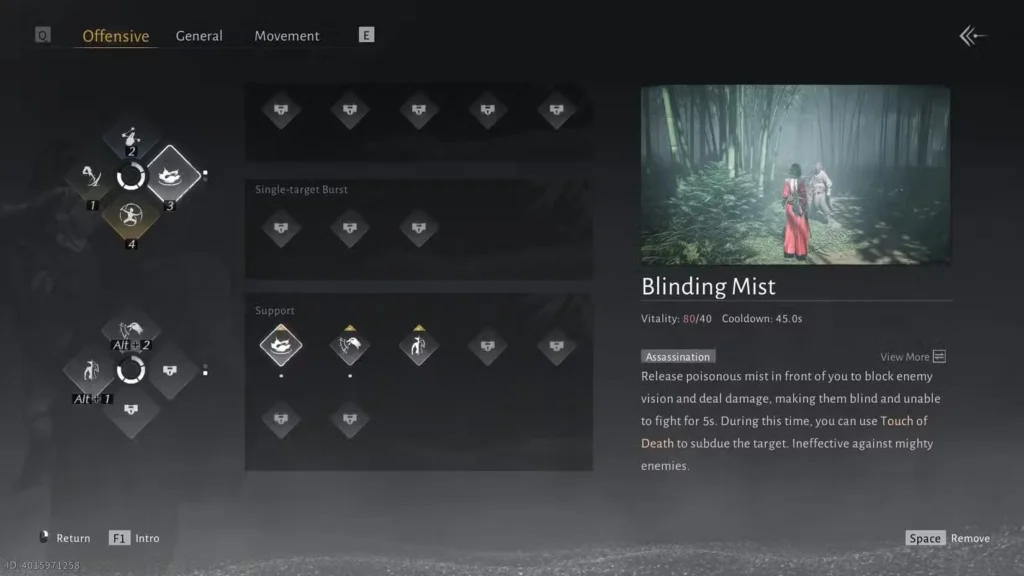
Blinding Mist is arguably the quest’s most valuable reward. This mystic skill releases a poison mist that:
- Damages all enemies within the area of effect
- Incapacitates enemies for 5 seconds (preventing them from attacking or defending)
- Enables Touch of Death takedowns on affected targets
- Requires 80 Vitality to activate
Best Use Cases:
The skill excels against large groups of standard enemies. While it doesn’t affect bosses or elite enemies, it’s perfect for:
- Clearing bandit camps
- Managing overwhelming mob situations
- Setting up instant-kill combos with Touch of Death
- Controlling crowds during exploration
If you’re interested in optimizing your combat approach, combining Blinding Mist with the right sect abilities from our all sects guide creates powerful synergies—especially for Midnight Blades or Nine Mortal Ways members.
Other Notable Rewards
Medicinal Tales shouldn’t be overlooked. These items upgrade your Medicine Chest capacity and effectiveness—you’ll need hundreds throughout your journey, so every one counts. For more on the game’s progression systems, check our gacha system explained guide.
Li Zhenzhen’s Dusty Wedding Dress is unfortunately underwhelming. It’s a basic armor piece without unique cosmetic appearance, easily replaced by boss drops or crafted gear. Still, it’s decent if you haven’t found better equipment yet.
The 120 Qinghe Exploration Points contribute toward unlocking regional bonuses, including the incredibly useful flight ability that transforms navigation throughout the region.
Additional Tips for Blind to the World Quest
Based on my experience completing this quest multiple times, here are some practical tips:
Preparation Tips:
- Bring fire arrows before starting—you’ll need them for the trap corridor
- Ensure you have sufficient health items; while combat is minimal, environmental hazards exist
- Complete this quest during your natural exploration of Qinghe rather than rushing it immediately
Navigation Tips:
- The Moonlit Flowers that cause blindness aren’t entirely negative—embrace the effect underwater to reveal hidden paths
- Take screenshots of the bell puzzle sequences if you struggle with memorization
- The sanctuary has beautiful architecture worth exploring beyond quest objectives
Combat Considerations:
- No major combat encounters occur during this quest, so you can focus on puzzle-solving
- The Blinding Mist reward makes this quest valuable even if you prefer combat-focused content
- Practice using bow emotes and ranged attacks before attempting the bell puzzle
Roleplaying Value: If you’re invested in Where Winds Meet’s narrative, this quest offers genuine emotional weight. The story of Li Zhenzhen adds depth to the world’s lore and connects thematically with several sect philosophies—particularly Silver Needle’s healing focus and Hollow Vale’s life-death balance.
Common Mistakes to Avoid
Statue Puzzle Errors:
- Don’t move counterclockwise—the solution specifically requires clockwise movement starting from North
- Make sure you’re stepping fully onto each plate; partial steps won’t register
Waterway Navigation:
- Don’t panic if you touch Moonlit Flowers—the blindness is temporary and actually helpful underwater
- Surface regularly to maintain oxygen levels; there are multiple air pockets throughout
Bell Puzzle Failures:
- Don’t shoot randomly if you forget the sequence—reset by interacting with the pedestal again
- Take time to aim accurately; rushed shots often miss the symbols entirely
Item Collection:
- Grab both the Moonlit Flower AND the Small Blade before returning upstairs—you might want to experiment with different choices on future playthroughs
Final Thoughts on Blind to the World Quest
Blind to the World exemplifies Where Winds Meet’s ability to blend puzzle mechanics, environmental storytelling, and meaningful rewards into a cohesive experience. The quest takes roughly 30-45 minutes to complete thoroughly, and the Blinding Mist mystic skill alone justifies the time investment.
The sanctuary’s atmosphere creates one of the game’s most memorable moments. From the drained lake revealing ancient secrets to the tragic revelation about Li Zhenzhen, every element reinforces the wuxia genre’s themes of sacrifice, isolation, and the burden of beauty in a harsh world.
Whether you’re pursuing 100% completion, optimizing your mystic skill arsenal, or simply enjoying Where Winds Meet’s narrative depth, this quest deserves your attention. The Blinding Mist skill will serve you well throughout your journey, especially when combined with proper character customization and strategic sect choices.
For more quest guides and gameplay tips, explore our other Where Winds Meet content. You can also grab the game on Steam, PlayStation, or visit the official website for latest updates. Additional information about the game’s development and reception can be found on its Wikipedia page.
Have you completed Blind to the World yet? Which item did you choose to offer the Lunar Goddess? Share your experience in the comments below!Retry