If you’re jumping into Battlefield 6 for the first time, chances are the SGX will be your first real companion in the chaotic world of close-quarters combat. And here’s the good news: unlike most “starter weapons” in shooter games that you’d normally ditch as soon as something better comes along, the SGX is legitimately one of the best SMGs in the entire game.
I’ve spent countless hours testing different loadout combinations with this weapon, and I can confidently say that with the right attachments, the SGX transforms from a decent starter gun into an absolute monster that can laser enemies before they even realize what hit them.
Understanding the SGX: Stats That Matter
Before we dive into the best builds, let’s break down what makes the SGX tick. Understanding these numbers will help you appreciate why certain attachments make such a huge difference.
SGX Base Stats Overview
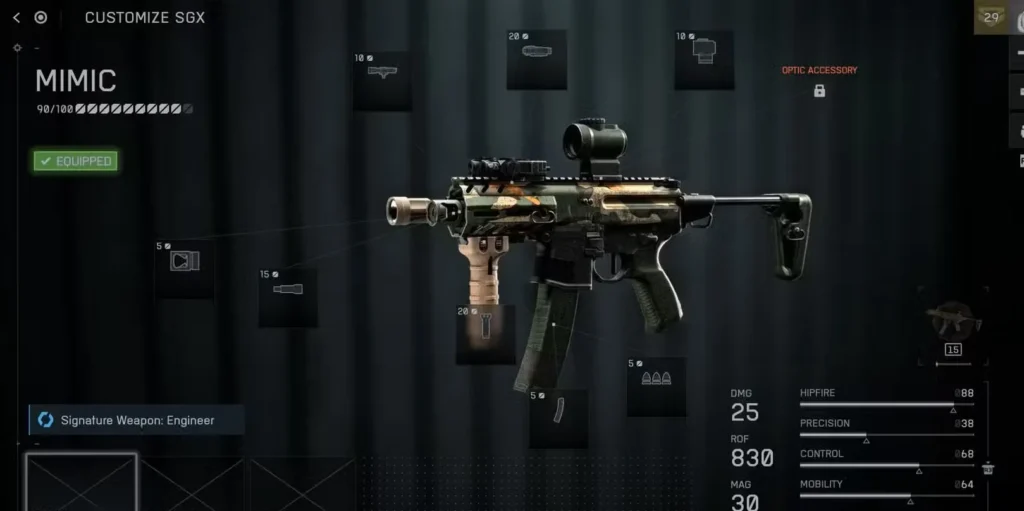
Here’s what you’re working with straight out of the box:
- Damage: 25 per bullet
- Rate of Fire: 830 RPM
- Magazine Capacity: 30 rounds
- Hipfire Accuracy: 46
- Precision: 34
- Control: 57
- Mobility: 68
- ADS Speed: 167ms
- Reload Speed: 2.517 seconds
- Projectile Velocity: 402 m/s
- Headshot Multiplier: x1.34
What These Stats Actually Mean for You
The SGX’s 830 RPM fire rate is sweet spot territory – fast enough to melt enemies in close quarters but not so crazy that you’ll burn through ammo in seconds. The 25 damage per bullet means you’re looking at around 4-5 shots to down an enemy, which is pretty standard for SMG territory.
Where the SGX really shines is in its Control stat of 57. This means the recoil pattern is surprisingly manageable, especially for a starter weapon. You can actually control your bursts without the gun bouncing all over the place like some other SMGs in the game.
The weak points? That Precision score of 34 is telling you this gun wasn’t designed for medium-range duels. Try to laser someone at 50 meters and you’ll watch your bullets draw abstract art in the air above their head. The projectile velocity of 402 m/s is also on the slower side, which we’ll definitely want to address with attachments.
Best SGX Builds: Early Game vs. Late Game
One of the beauties of Battlefield 6’s attachment system is that you can progressively upgrade your weapons as you unlock new parts. Here are two optimized builds – one for when you’re just starting out, and one for when you’ve got everything unlocked.
Low Level Build (Perfect for Beginners)
When you’re first starting out and don’t have access to all attachments yet, this setup will serve you extremely well:
| Attachment Slot | Choice |
|---|---|
| Muzzle | Single-Port Brake |
| Barrel | 6″ Standard |
| Right Accessory | Flashlight |
| Top Accessory | 5MW Red Laser |
| Underbarrel | Ribbed Stubby |
| Magazine | 30RND Magazine |
| Ammunition | Standard |
| Scope | OSA-7 1.00X |
| Optic Accessory | N/A |
Why This Works: This build focuses on what the SGX does best – aggressive close-quarters combat. The Single-Port Brake helps tame that vertical recoil just enough, while the Flashlight and 5MW Red Laser combo significantly boosts your hipfire accuracy. Trust me, in the chaos of capturing objectives, being able to hipfire accurately while moving is a game-changer.
High Level Build (The Complete Package)
Once you’ve put in the hours and unlocked everything, this is the god-tier SGX setup:
| Attachment Slot | Choice |
|---|---|
| Muzzle | Double-Port Brake |
| Barrel | 8″ Extended |
| Right Accessory | Flashlight |
| Top Accessory | 50 MW Green Laser |
| Underbarrel | 6H64 Vertical Grip |
| Magazine | 30RND Fast Mag |
| Ammunition | Standard |
| Scope | RO-M 1.75X |
| Optic Accessory | N/A |
Why This Build Slaps: This is where the SGX truly becomes a different beast. Let me break down the key choices:
Deep Dive: Why These Attachments Make All the Difference
The Laser and Flashlight Combo
Running both the Flashlight and 50 MW Green Laser isn’t just for show. These accessories dramatically improve your hipfire accuracy, letting you engage enemies effectively without always needing to ADS. This is absolutely crucial when you’re:
- Clearing buildings room by room
- Defending objectives with multiple angles
- Fighting in smoke or chaos where quick reactions matter
- Moving and shooting simultaneously
Pro tip: In tight spaces like Operation Gladius interior areas, I often don’t even ADS with this setup. The hipfire is just that good.
The 8″ Extended Barrel – Your Medium Range Solution
Remember that mediocre projectile velocity we talked about? The 8″ Extended barrel fixes this issue completely. It significantly boosts your bullet velocity, which means:
- Your shots reach targets faster
- Less bullet drop at distance
- Easier to track and hit moving targets
- Actually viable for those 30-40 meter engagements
Without this barrel, the SGX really struggles beyond close range. With it, you can confidently challenge enemies at medium distances, which dramatically expands your effective combat range.
Magazine Choice: Size vs. Speed
You might be tempted by the 36-round extended mag, but hear me out on why the 30RND Fast Mag is superior. That improved reload speed of around 2.2 seconds (down from 2.517) might not sound like much on paper, but in the heat of battle, shaving off those crucial milliseconds can be the difference between winning a gunfight and respawning.
Real scenario: You just wiped a squad defending an objective. Your mag is empty. Enemy reinforcements are 3 seconds away. That faster reload gets you back in the fight just in time. Trust me, this happens way more often than you’d think.
The RO-M 1.75X Scope – An Underrated Choice
I know what you’re thinking – “Why would I want magnification on an SMG?” The RO-M 1.75X might not be everyone’s first pick, but it has one massive advantage: the sight picture is incredibly clean. Unlike some optics that feel like they’re blocking half your screen, this scope gives you excellent visibility while still providing enough zoom to accurately engage targets at the SGX’s effective range.
For players coming from other shooters or even other Battlefield 6 weapons, this scope feels intuitive and doesn’t obstruct your peripheral vision during those chaotic objective captures.
Recoil Control: The Double-Port Brake and 6H64 Vertical Grip
This combination is the secret sauce for turning the SGX into a laser beam. Here’s what they do:
- Double-Port Brake: Specifically reduces horizontal recoil, keeping your shots centered
- 6H64 Vertical Grip: Tackles vertical recoil, preventing that upward climb
Together, they create a recoil pattern that’s almost laughably easy to control. Even if you’re not great at managing recoil in shooters, these attachments do most of the heavy lifting for you.
Combat Tips: How to Actually Use the SGX
Having the perfect loadout is one thing, but knowing how to leverage it in actual combat is what separates good players from great ones.
Ideal Engagement Distances
- 0-15 meters: Your absolute comfort zone. Hipfire aggressively while moving to make yourself harder to hit
- 15-30 meters: ADS and use controlled bursts. The recoil control attachments shine here
- 30-50 meters: Doable with the extended barrel, but pick your fights carefully
- 50+ meters: Retreat or reposition. This isn’t what the SGX was built for
Movement and Positioning
The SGX’s high mobility stat of 68 means you can actually use aggressive movement as a weapon. I’ve found the most success:
- Constantly repositioning after kills
- Using the combat roll to break enemy aim
- Pushing through smoke with hipfire ready
- Flanking around objectives rather than challenging long sightlines
Check out our Battlefield 6 combat roll guide to master this essential movement technique.
When to Switch Weapons
Even with the best attachments, the SGX has limitations. Consider switching to your sidearm or picking up a different weapon when:
- Defending a long sightline
- Enemy team is playing at range
- You’re on a map that heavily favors long-range combat
Should You Eventually Replace the SGX?
Here’s my honest take: no, not necessarily. While Battlefield 6 has plenty of other excellent SMGs to try, the SGX remains competitive throughout your entire progression. I’m level 120+ and still regularly return to this weapon because it’s just that reliable.
That said, experimentation is part of the fun. Try other SMGs, find what suits your playstyle, but don’t feel pressured to move on from the SGX just because it’s the starter weapon.
Platform Considerations
Whether you’re playing on PlayStation, Steam, Epic Games Store, or through EA’s platform, these loadouts work equally well. However, controller players might want to bump up the aim assist settings slightly to compensate for the SGX’s faster fire rate.
Check out our controller vs. keyboard/mouse guide for more platform-specific tips.
Final Thoughts
The SGX is proof that Battlefield 6’s developers actually understood what makes a good starter weapon. It’s powerful enough to remain competitive endgame, easy enough to pick up for beginners, and flexible enough to accommodate different playstyles through attachment customization.
My advice? Start with the low-level build, get comfortable with the weapon’s feel, then gradually work toward that high-level setup. By the time you’ve unlocked everything, you’ll have muscle memory for the recoil pattern and know exactly how to position yourself for maximum effectiveness.
Want to discuss your own SGX loadouts or share your experiences? Head over to the Battlefield 6 subreddit where the community is always sharing new strategies and builds.
Now get out there and show everyone why the starter weapon is sometimes the best weapon. See you on the battlefield!
For more Battlefield 6 guides, check out our complete collection of weapon loadouts, class builds, and optimization tips to dominate every match.