Essential Metroid Prime 4 Beyond Tips for New Players
After an 18-year wait, Metroid Prime 4: Beyond is finally here—and whether you’re a series veteran shaking off the rust or a newcomer experiencing the franchise for the first time, you’re probably looking for guidance. This game strikes a balance between respecting Metroid traditions and introducing fresh mechanics that even longtime fans need to learn.
The good news? You don’t need to be a speedrunner or completionist to enjoy Metroid Prime 4: Beyond. But understanding some core systems—saving, scanning, healing, and navigation—will make your journey through Viewros significantly smoother.
This guide focuses on beginner-level tips and tricks that apply throughout the entire game, covering everything from how the save system works to why you should scan literally everything. We’ll keep spoilers minimal while giving you the knowledge you need to avoid common frustrations.
For comprehensive walkthroughs and ability unlocks, check out our Metroid Prime 4: Beyond gameplay guide.
How to Save in Metroid Prime 4 Beyond
Let’s start with the basics: Metroid Prime 4 uses a manual save system through designated Save Stations. There’s no autosave, no quicksave, and no save scumming—so understanding how this works is crucial.
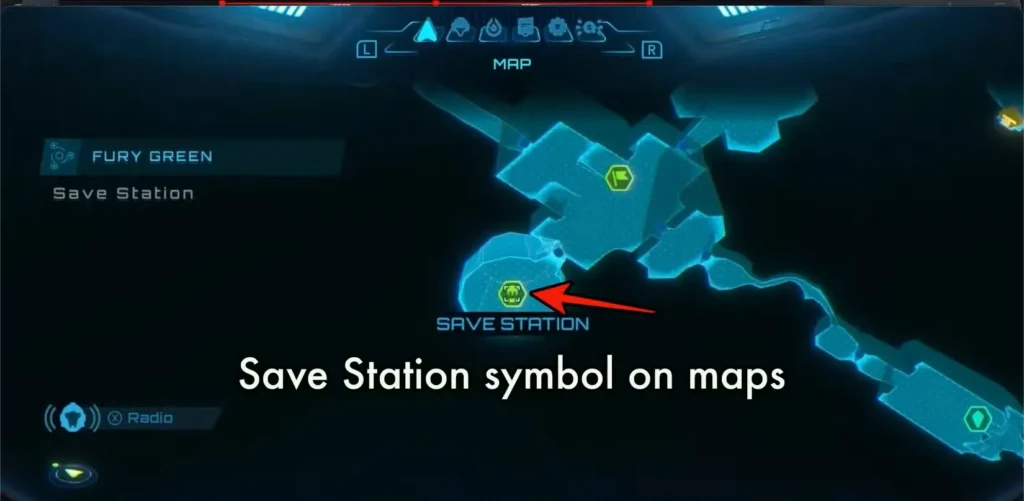
Finding Save Stations
What They Look Like:
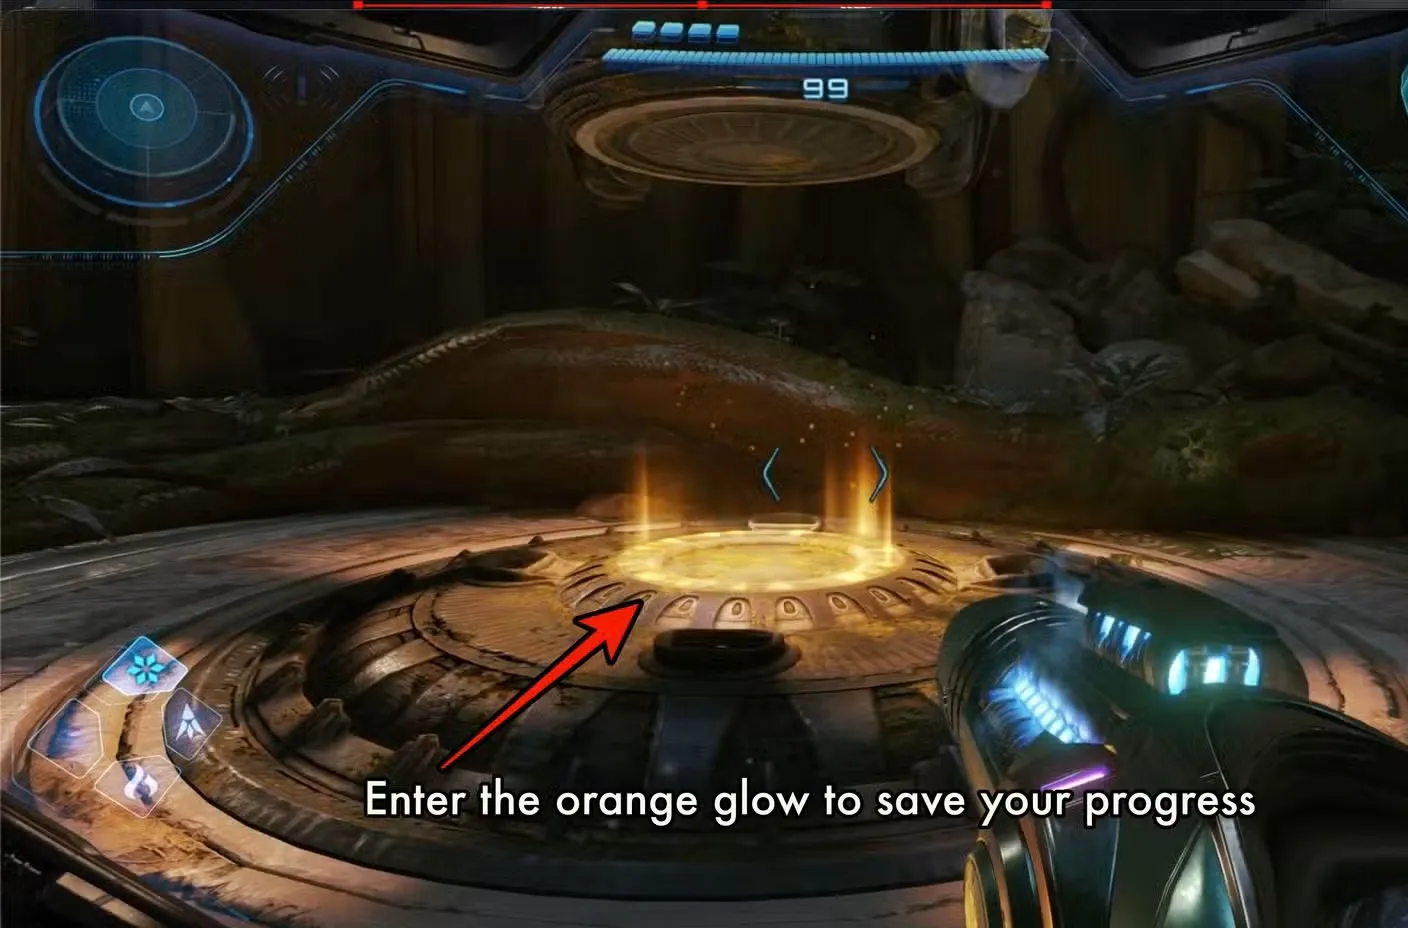
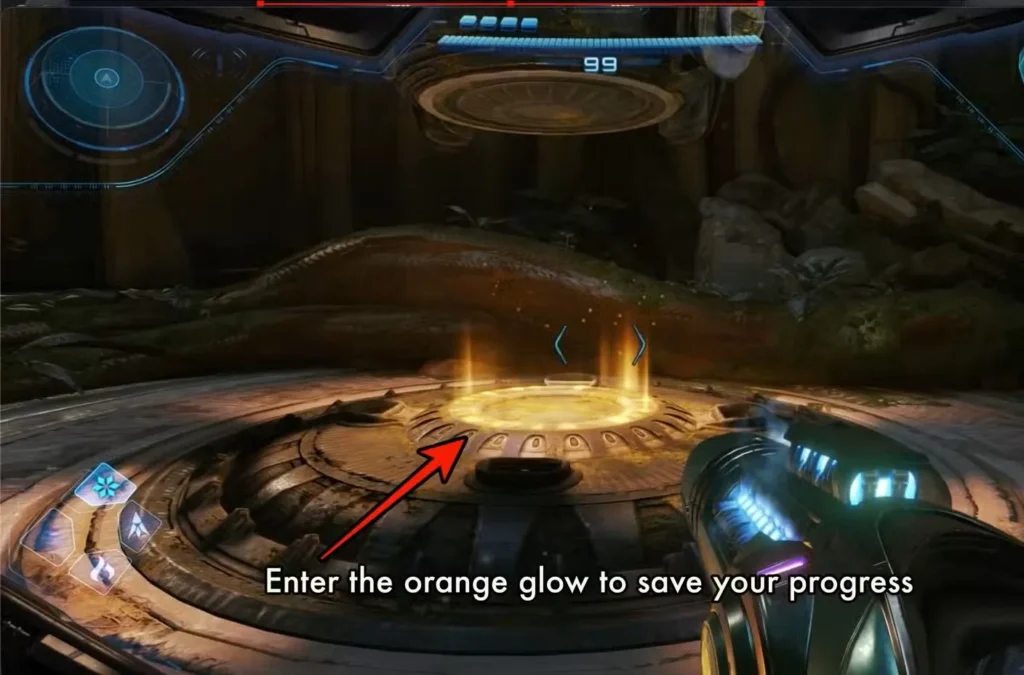
Save Stations are impossible to miss once you know what to look for:
- Round platforms embedded in the ground
- Orange glow emanating from the center
- Distinctive sci-fi aesthetic consistent across all locations
Where They’re Located:
The developers strategically place Save Stations at critical points:
- At the entrance of new dungeons (so you don’t lose progress exploring)
- Just before major boss encounters (so you can attempt fights without fear)
- Throughout dungeon midpoints (for longer areas like Volt Forge)
- In underground stations throughout Sol Valley (the open desert overworld)
How to Save Your Progress
- Approach the Save Station until you’re standing on the platform
- Step into the orange glow at the center
- Your progress is automatically saved
- Your health and ammunition are fully restored
Critical Information:
- If you die, you respawn at your last manual save—not where you died
- There’s no autosave backup system
- You cannot load previous saves or create multiple save files per playthrough
- Save often, especially before attempting difficult sections
Pro Tip: Get in the habit of saving after every significant milestone—boss defeats, ability unlocks, or major collectible discoveries. Five minutes of backtracking to a Save Station beats losing 30 minutes of progress to an unexpected death.
How to Use the Scanner in Metroid Prime 4 Beyond
The scanning mechanic returns in Metroid Prime 4, but with significant changes from previous entries. Understanding the new system is essential because scanning isn’t just for lore—it’s often the key to solving puzzles.

The New Psychic Visor System
In previous Metroid Prime games, the scanner was one of four equippable visors. Beyond changes this by tying scanning to the Psychic Visor, which has its own dedicated button.
How to Activate:
Press X to enter Psychic Visor mode. This does two things:
- Allows you to scan objects in the environment
- Enables you to use psychic-based abilities (which you’ll unlock as you progress)
Visual Feedback
When you activate the Psychic Visor, the environment’s color palette shifts to help you identify scannable objects:
- Green highlights = Objects that can be scanned but you haven’t scanned yet
- White outlines = Objects you’ve already scanned
- No highlight = Objects that aren’t scannable
This color-coding makes it easy to see what you’ve missed in any given area.
How to Scan Objects
Step-by-Step:
- Press X to enter Psychic Visor mode
- Aim at a green-highlighted object
- Hold ZL (the same button used for Lock-On during combat)
- A progress bar appears on-screen
- Wait for the scan to complete
- A text description appears below the object
Why Scanning Matters:
Scans provide three types of valuable information:
1. Enemy Weaknesses
- Reveals which weapons deal bonus damage
- Shows attack patterns and vulnerable phases
- Identifies defensive mechanics you need to counter
2. Environmental Puzzle Solutions
- Explains what abilities or weapons are required
- Example: Fire Blocker locks tell you they need “high-heat weapons”
- Helps you deduce you need the Fire Shot to bypass them
3. Lore and World-Building
- Fleshes out the story of Viewros
- Provides context for the Psychic civilization
- Makes the world feel lived-in and detailed
Pro Tip: Get in the habit of keeping Psychic Visor active while exploring. You’ll naturally scan things as you encounter them, rather than having to backtrack later when you realize you missed important information.
How to Fast-Travel in Metroid Prime 4 Beyond
If you’re expecting a traditional fast-travel system like modern open-world games, prepare for disappointment. Metroid Prime 4: Beyond stays true to the series’ roots with a more limited approach.

The Reality: No True Fast-Travel
There is no system-wide fast-travel that lets you instantly jump between major areas. You cannot teleport from Fury Green to Volt Forge or instantly return to Sol Valley from deep within a dungeon.
What You Do Have: Cargo Launchers
Cargo Launchers provide intra-dungeon fast-travel—meaning they let you quickly traverse long distances within a single area, but not between different regions.
Example: Fury Green
At the end of Fury Green (the first major dungeon), you’ll be launched into Sol Valley via a cargo launcher. When you return to Fury Green later in the game, you can use that same launcher to fast-travel to the opposite end of the dungeon, near where Myles is located at Base Camp.
Other Dungeons:
Most major dungeons have similar systems:
- Launchers that connect distant sections of the same area
- Shortcuts that unlock after progressing through an area once
- One-way paths that become two-way after specific ability unlocks
For detailed navigation of these systems, check our guide on the Manufacturing Floor in Volt Forge.
The Vi-O-La Motorcycle: Your Best Travel Tool
The closest thing to traditional fast-travel is the Vi-O-La motorcycle, which you’ll unlock in Volt Forge.
Where It Works:
- Primarily in Sol Valley (the massive open desert overworld)
- Partially in Volt Forge itself (limited sections)
- Not functional in most enclosed dungeons
Why It’s Important:
The Vi-O-La is the fastest traversal method ever featured in a Metroid game, surpassing even the teleporters and trams from previous entries. Once you have it, backtracking across Sol Valley becomes dramatically less tedious.
For complete details on unlocking and controlling the motorcycle, see our Vi-O-La guide.
How to Heal and Refill Ammo in Metroid Prime 4 Beyond
If you’ve played any previous Metroid game, this system will be instantly familiar. If you’re new to the franchise, don’t worry—it’s simple and intuitive.

Pickups from Defeated Enemies
Primary Source:
Enemies are your main source of health and ammunition replenishment. When you defeat an enemy:
- The enemy’s body disappears
- Floating items appear where they died
- Walk over the items to collect them automatically
Health Orbs (Different Colors):
- Purple orbs = Restore 10 energy
- Yellow orbs = Restore 20 energy
- Orange orbs = Restore 50 energy
- Large energy = Full restoration (rare drops)
Ammunition Refills:
- Yellow-winged rockets = Missile ammo (for your Missile Launcher)
- Blue objects with three pointed tips = Elemental shot ammo (Fire, Ice, Shock)
Destructible Crates
Secondary Source:
Crates are scattered throughout every dungeon and outdoor area. Destroying them has a chance to drop the same health and ammo items that enemies drop.
Why Crates Matter:
- Great for topping off resources before boss fights
- Useful when you’re low on health but no enemies are nearby
- Can be “farmed” by leaving and re-entering areas (crates respawn)
The Charge Beam Collection Trick
Here’s a mechanic the game doesn’t explicitly tell you:
Quick Collection Method:
- Hold the Charge Beam button (don’t release to fire)
- The charging energy pulls nearby pickups toward you
- Works on all visible health and ammo items
- Only effective within a certain range
Why This is Essential:
After hectic combat encounters, pickups can scatter across a wide area. Using the Charge Beam’s magnetic effect lets you vacuum up resources without walking around collecting them individually. This is especially useful when you’re trying to quickly heal before the next enemy wave.
How to Increase Max Health and Ammo in Metroid Prime 4
You start Metroid Prime 4: Beyond with very limited resources—low max health and minimal ammunition capacity. Increasing these caps is one of the primary goals of exploration.
The Three Expansion Types
Each system has a dedicated upgrade item type:
1. Energy Tanks (Health Upgrades)
- Permanently increase maximum energy by 100 points
- Essential for surviving late-game boss fights
- Hidden throughout every major area
- Often require specific abilities to access
2. Missile Expansions (Missile Capacity)
- Increase maximum missile capacity
- Allow for more aggressive combat tactics
- Necessary for certain environmental puzzles requiring multiple missiles
3. Shot Expansions (Elemental Weapon Capacity)
- Increase maximum capacity for elemental weapons
- Apply to Fire Shot, Ice Shot, and Shock Shot
- Less critical early but important for late-game efficiency

How Expansions Are Hidden
Most expansion items are locked behind obstacles that require specific abilities:
Common Obstacles:
- Fire Blockers requiring Fire Shot
- Ice barriers requiring Ice Shot
- Psychic Bomb destructibles requiring Psychic Bombs
- High platforms requiring Psychic Boots (double jump)
- Morph Ball passages requiring navigation skills
The Progression Loop:
- Encounter an expansion you can’t reach
- Note its location (mentally or on the map)
- Progress through the story and unlock new abilities
- Return to that location with the proper tools
- Claim your reward
Pro Tip: Always scan obstacles blocking expansion items. The scan description usually reveals exactly what ability you need to bypass it. For example, scanning a Fire Blocker tells you it needs “high-heat weapons,” pointing you toward the Fire Shot.
General Exploration Tips for Metroid Prime 4 Beyond
These strategic tips will help you navigate Viewros more effectively and avoid common frustrations.
Tip #1: Don’t Over-Explore Too Early
The Mistake:
New players often try to 100% explore early areas immediately, hitting countless roadblocks that make them feel stuck.
The Reality:
Most early-game obstacles require abilities you won’t have for hours. You’re not supposed to access everything in Fury Green on your first pass—the game expects you to return later.
What to Do:
- Explore within the confines of each dungeon naturally
- Note blocked paths and obstacles for future reference
- Don’t bash your head against barriers you clearly can’t bypass
- Progress through the main story to unlock abilities
- Return for collectibles once you’re better equipped
Tip #2: Scan Everything (Seriously, Everything)
Why This Matters:
- Lore enrichment makes the world more immersive
- Puzzle solutions are often hidden in scan descriptions
- Completion tracking is tied to scanning percentages
- Enemy data reveals weaknesses and strategies
How to Make It Habit:
Just keep Psychic Visor active by default while exploring. You’ll naturally scan objects as you encounter them, and the green/white color-coding makes it obvious what you’ve missed.
Pro Tip: If you’re stuck on a puzzle, re-scan everything in the room. The solution is almost always hiding in a scan description you either missed or didn’t read carefully enough.
Tip #3: Try Every Tool You Have
Before Giving Up:
Make sure you’ve tried every ability in your arsenal. Once you have Psychic abilities, Psychic Bombs, and the Missile Launcher, many obstacles that seemed impossible become solvable.
Use Common Sense:
If a scan says “requires icy solution” and you don’t have the Ice Shot, nothing you do will work. Don’t waste 20 minutes trying random things when the game explicitly tells you what’s needed.
Systematic Approach:
When encountering an obstacle:
- Scan it to read the description
- Check if you have the required ability
- If yes, try it; if no, mark the location and move on
- Return later once you’ve progressed
Tip #4: Remember the Psychic Options
For Returning Players:
This is critical. Veterans of the series often forget there’s an entirely new set of tools to work with. The Psychic Visor isn’t just for scanning—it enables interaction with psychic-themed environmental objects.
Check Every Puzzle:
Always view puzzles through the Psychic Visor. Objects that look mundane in normal view might reveal interactive elements when viewed psychically.
Tip #5: Freedom of Choice is (Mostly) an Illusion
The Appearance:
After completing Fury Green and Volt Forge, Sol Valley opens up and looks like you have multiple paths available.
The Reality:
There’s a fairly set progression path you must follow:
- Complete Fury Green and Volt Forge
- Go to Flare Pool to get the Fire Shot (mandatory)
- Return to Fury Green with Fire Shot to unlock more areas
- Progress to Ice Belt for the next elemental weapon
- Continue the pattern
For optimal progression guidance, see our guide on where to go after Volt Forge.
Why This Matters:
Don’t waste time trying to brute-force access to areas that are clearly meant for later. The game looks open, but it’s actually fairly linear in terms of required progression. Accept this and follow the natural flow.
Tip #6: Listen to Myles (When You’re Stuck)
Unpopular Opinion:
Myles, your Federation Engineer companion, catches a lot of flak for being chatty. But here’s the thing: he’s actually helpful.
How to Get Hints:
When you’re genuinely lost, call Myles on the radio. He’ll point you in the right direction without completely spoiling the solution.
Balancing Act:
The Metroid franchise is built on letting players discover solutions independently. That’s still an option—nobody forces you to call Myles. But if frustration is replacing fun, there’s no shame in asking for a nudge in the right direction.
For Guide Users:
If Myles’ hints aren’t specific enough, that’s what our guides are for. We have detailed walkthroughs for major areas like the Sanctum of Guardians and boss fights like Carvex and Sylux.
Combat Tips for Beginners
While this guide focuses on exploration, here are some quick combat fundamentals:
Basics:
- Charge shots deal more damage than rapid fire
- Missiles are for tough enemies and bosses—don’t waste them on weak foes
- Strafing is more effective than jumping for dodge
- Lock-on (ZL) maintains tracking on mobile enemies
Resource Management:
- Kill regular enemies with beam shots to conserve missiles
- Use charged shots against groups for efficiency
- Collect pickups immediately after combat before moving to the next area
- Save missiles and elemental shots for encounters that require them
Boss Preparation:
- Always find the Save Station before boss doors
- Stock up on missiles and health beforehand
- Scan the boss immediately for weakness information
- Use the environment—many bosses have interactive elements
Additional Beginner Tips
Map Awareness:
- Check your map frequently to identify unexplored areas
- The map shows completion percentages by region
- Mark interesting locations mentally or with in-game markers
Ability Synergies:
- Psychic Boots + Psychic Bombs = bomb jumps to reach high areas
- Fire Shot + Psychic Visor = identify fire-vulnerable targets
- Vi-O-La + speed boost = cover massive distances quickly
Collectible Priorities:
- Energy Tanks first (survivability is king)
- Missile Expansions second (versatility in combat)
- Shot Expansions third (nice but not critical early)
Quality of Life:
- Use Cargo Launchers whenever available
- Don’t fight every enemy—sometimes running is smarter
- Rest at Save Stations liberally—they’re free full heals
For additional bonuses and unlocks, check out our guide on Metroid Prime 4 amiibo rewards.
Frequently Asked Questions (FAQs)
How does saving work in Metroid Prime 4 Beyond?
Metroid Prime 4 uses a manual save system through Save Stations—round platforms with orange glowing centers found throughout dungeons and Sol Valley. Step into the glow to save your progress and fully restore health and ammo. There’s no autosave, so save frequently, especially before boss fights. If you die, you respawn at your last manual save.
How do you scan objects in Metroid Prime 4?
Press X to activate Psychic Visor mode, which highlights scannable objects in green (or white if already scanned). Aim at the object and hold ZL (the Lock-On button) until the progress bar completes. Scanning reveals enemy weaknesses, puzzle solutions, and lore information. Keep Psychic Visor active while exploring to scan efficiently.
Can you fast-travel between areas in Metroid Prime 4?
No, there’s no system-wide fast-travel. Instead, Cargo Launchers provide fast-travel within individual dungeons, and the Vi-O-La motorcycle (unlocked in Volt Forge) dramatically speeds up traversal across Sol Valley. The game maintains the series tradition of interconnected exploration rather than instant teleportation between major areas.
How do you increase max health in Metroid Prime 4 Beyond?
Collect Energy Tanks hidden throughout the game world. Each Energy Tank permanently increases maximum health by 100 points. Most are locked behind obstacles requiring specific abilities (Fire Shot, Psychic Bombs, Psychic Boots, etc.). Scan obstacles to learn what ability you need, then return later once you’ve unlocked it during story progression.
Take Your Time and Explore
These Metroid Prime 4 beginner tips should give you a solid foundation for your journey through Viewros. The most important advice? Don’t rush. Metroid Prime 4: Beyond rewards patient exploration, thorough scanning, and thoughtful progression.
Your Essential Checklist:
- ✅ Save at every Save Station you encounter
- ✅ Keep Psychic Visor active and scan everything
- ✅ Note obstacles you can’t bypass for later return
- ✅ Collect Energy Tanks and Missile Expansions when possible
- ✅ Follow the natural progression path through major dungeons
- ✅ Use the Vi-O-La motorcycle to reduce backtracking tedium
As you progress, you’ll unlock abilities that completely change how you interact with the world. That Fire Blocker that seemed impossible in Fury Green? You’ll melt through it with the Fire Shot hours later. That high platform you couldn’t reach? The Psychic Boots make it trivial.
The game is designed around this loop of discovery, progression, and return. Embrace it rather than fighting it, and you’ll have a much better experience.
For detailed walkthroughs of specific areas, boss strategies, and collectible locations, visit our main Metroid Prime 4: Beyond hub. And if you’re ready to start your adventure, grab the game from Nintendo’s official store.
Now get out there and start exploring, bounty hunter. Viewros isn’t going to map itself!