Documenting the ARC’s Destruction
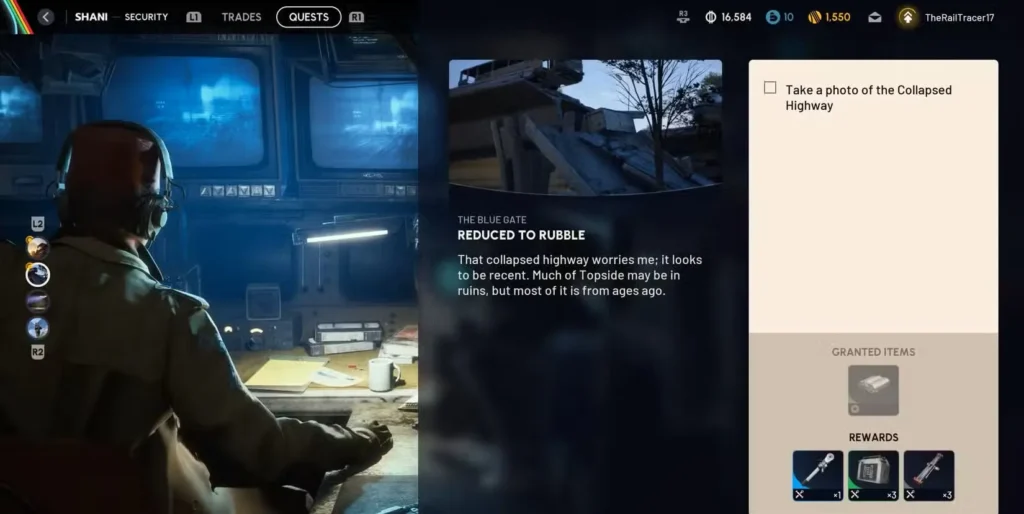
Arc Raiders throws you into a brutal fight for Earth’s survival against the mechanized ARC threat, and sometimes that fight means gathering intelligence. Shani’s Reduced to Rubble quest sends you on a reconnaissance mission to document ARC destruction patterns across the Blue Gate map—no combat required, just investigation and photography.
This is one of the more straightforward vendor quests in Arc Raiders, making it perfect for players who want to complete objectives without the stress of heavy combat encounters. You’re essentially playing war photographer, documenting the aftermath of ARC devastation before extracting with your findings.
Let’s walk through every step of this quest so you can complete it efficiently and claim your rewards.
Quest Overview: Reduced to Rubble
Quest Giver: Shani
Map Required: Blue Gate
Combat Level: Low (optional encounters only)
Difficulty: Easy
Objectives: 4 steps total
Quest Objectives Summary
- Take a photo at Highway Collapse (Southwest Blue Gate)
- Travel to Broken Earth (Northeast from Highway Collapse)
- Follow the trail of destruction (Northeast of Broken Earth)
- Investigate the ARC machine husk (Final objective location)
Total quest time: 10-15 minutes if you go direct without looting
Why This Quest is Worth Doing
Guaranteed Rewards
Zipline x1
- Essential traversal tool for vertical movement
- Permanent utility item (doesn’t consume on use)
- Invaluable for accessing hard-to-reach areas
Barricade Kit x3
- Defensive structure for creating cover
- Great for extraction point defense
- Can block enemy advances during combat
Door Blocker x3
- Tactical equipment for controlling enemy movement
- Seals doors to prevent ARC flanking
- Useful for securing extraction zones
Low Risk, High Value
Why it’s beginner-friendly:
- No mandatory combat encounters
- Clear objective markers
- Straightforward navigation
- Can complete with free loadout (no gear investment risk)
- Quick completion if you skip looting
Perfect for: New players learning the Blue Gate map layout, solo players avoiding combat, or anyone needing utility items.
Pre-Quest Preparation
Recommended Loadout
If completing quest only (no looting/combat):
- Free loadout is perfectly viable
- Saves your equipped gear for actual combat runs
- Zero risk since you’re avoiding fights
If planning to loot during quest:
- Basic weapon for ARC enemy defense
- Med kit or healing items
- Backpack for increased carry capacity
- Standard armor for survivability
Pro tip: This quest doesn’t require combat, so a free loadout run is economically smart. Save your good gear for extraction runs where you’re actively farming resources.
Step 1: Reaching Highway Collapse
Initiating the Quest
1. Accept quest from Shani Talk to Shani at the vendor area and accept “Reduced to Rubble.”
2. Start a Blue Gate run Select Blue Gate from the map selection screen and deploy.
3. Navigate southwest Open your map and locate Highway Collapse in the southwestern section of Blue Gate.
Finding Highway Collapse
Location details:
- Southwest corner of the Blue Gate map
- Identifiable by a collapsed/broken bridge structure
- Easy landmark to spot from a distance
Navigation tip: Follow the main road systems southwest. The Highway Collapse is hard to miss once you’re in the general area—look for the destroyed bridge infrastructure.
Step 2: Taking the Photo
Photo Location Specifics
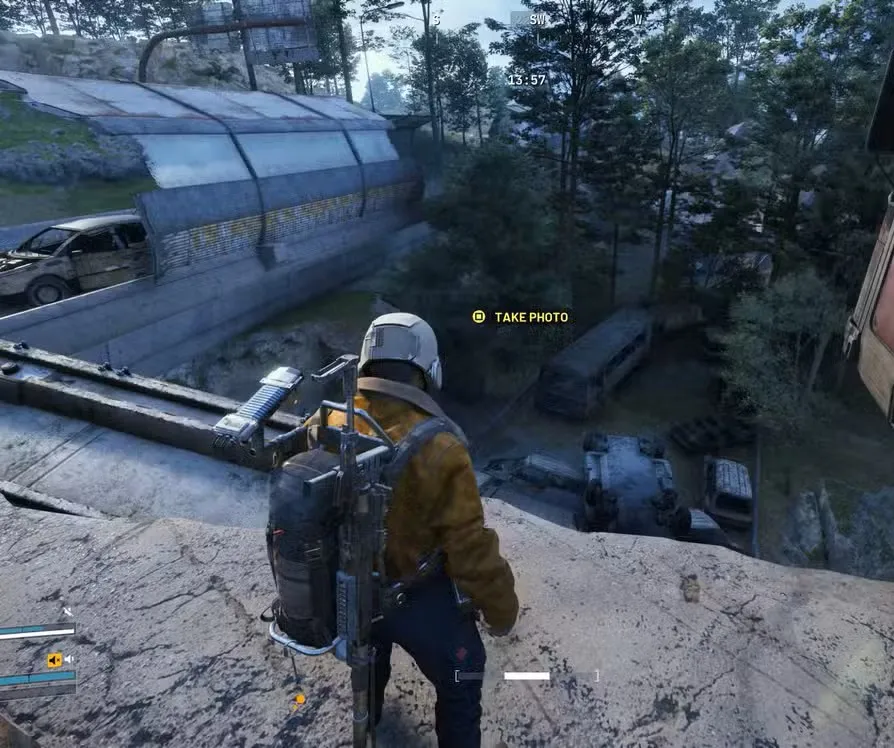
Where to stand: You need to position yourself at the edge of the broken bridge section that slopes downward.
Visual cues:
- Broken concrete and twisted rebar
- Clear drop-off where the bridge collapsed
- Open view of the destruction below
How to Take the Photo
1. Approach the broken edge Walk to the very edge where the bridge structure ends and falls away.
2. Wait for the prompt An interaction prompt will appear: “Take Photo” or similar text.
3. Interact Press the prompted button to capture the photograph.
4. Objective updates Your quest tracker will immediately update to the next step.
Common mistake: Standing too far back from the edge won’t trigger the prompt. You need to be right at the broken section’s edge for the interaction to appear.
Step 3: Traveling to Broken Earth
Navigation from Highway Collapse
Direction: Northeast from Highway Collapse
Distance: Medium trek across the map
How to find it:
- Open your map
- Broken Earth will be marked with a quest objective indicator
- Follow the marker northeast through the terrain
What is Broken Earth?
Location characteristics:
- Area showing significant ARC attack damage
- Scarred landscape with destruction patterns
- Named location on the Blue Gate map
You’ll know you’ve arrived when:
- Quest marker updates
- Visible destruction trails become apparent
- Environmental damage is clearly ARC-inflicted
Travel tip: Stay alert for wandering ARC enemies during the trek. While combat isn’t required, random encounters can happen. Avoid or eliminate based on your loadout choice.
Step 4: Following the Trail of Destruction
From Broken Earth to the ARC Husk
Objective: Follow the visible trail of destruction northeast of Broken Earth
What to look for:
- Scorched earth patterns – ARC weapons leave distinctive burn marks
- Debris trails – Destroyed structures and scattered wreckage
- Impact craters – Where ARC machines have struck
- Damaged vegetation – Clear paths through otherwise natural terrain
Direction: Continue northeast from the Broken Earth area center
The trail leads to: A large ARC machine husk (remnants of a destroyed ARC enemy)
Finding the ARC Machine Husk
Visual identification:
- Massive mechanical wreckage – Significantly larger than standard ARC enemies
- Metallic hull remains – Twisted metal and exposed circuitry
- Quest marker indicator – Will appear directly over the husk
- Interaction prompt vicinity – You’ll see “Investigate” when close
Location specifics: Northeast of Broken Earth’s central area, at the end of the destruction trail.
Step 5: Investigating the ARC Machine Husk
Final Objective Completion
1. Approach the husk Walk up to the large mechanical wreckage.
2. Find the investigation point Look for the interaction prompt: “Investigate ARC Machine” or similar.
3. Interact with the husk Press the prompted button to examine the wreckage.
4. Quest completion
- Investigation completes the quest automatically
- Rewards are added to your inventory
- Quest tracker updates to “Complete”
What Happens During Investigation
Shani wants intelligence on ARC machine composition and destruction patterns. Your character will examine the husk, gathering data for Shani’s research. This information presumably helps the resistance understand ARC weaknesses or predict future attack patterns.
Lore note: These investigations contribute to the broader narrative of humanity fighting back against the ARC threat. You’re not just completing a fetch quest—you’re gathering strategic intelligence.
Quest Rewards Breakdown
After completing the investigation, you’ll receive:
Zipline x1
What it does:
- Creates traversal lines between two points
- Allows rapid vertical and horizontal movement
- Permanent utility item (doesn’t get consumed)
Best uses:
- Escaping combat situations quickly
- Accessing high-ground positions
- Creating extraction route shortcuts
- Reaching otherwise inaccessible loot areas
Why it’s valuable: Mobility is survival in Arc Raiders. Ziplines give you tactical flexibility that can mean the difference between successful extraction and death.
Barricade Kit x3
What it does:
- Deployable cover structure
- Creates defensive positions
- Blocks enemy line of sight
Best uses:
- Defending extraction points while waiting for evac
- Creating cover during prolonged firefights
- Blocking ARC enemy approach routes
- Setting up ambush positions
Strategic value: In a game where positioning determines survival, instant cover is incredibly powerful. These are consumable but highly effective.
Door Blocker x3
What it does:
- Seals doorways and entrances
- Prevents enemy passage through blocked doors
- Forces enemies to find alternate routes
Best uses:
- Securing buildings during looting
- Controlling ARC enemy movement during combat
- Protecting your back during extraction
- Funneling enemies into kill zones
Tactical application: ARC enemies often flank through multiple entry points. Door Blockers let you control the battlefield by limiting enemy access routes.
Efficiency Tips for Speed Completion
Fastest Route Strategy
Time-saving approach:
1. Free loadout run
- No gear to lose if things go wrong
- Faster deployment (no loadout selection time)
- Zero economic risk
2. Ignore all loot
- Go straight to objectives
- Don’t get distracted by resource nodes
- Avoid combat unless absolutely necessary
3. Sprint between objectives
- Use stamina management for faster travel
- Take direct routes rather than cautious approaches
- Utilize terrain shortcuts when possible
4. Extract immediately after completion
- No need to explore further
- Claim rewards and exit
- Minimize time in dangerous areas
Total completion time with this approach: ~10 minutes
Combat Encounter Management
If You Run Into ARC Enemies
Option 1: Avoidance (Recommended for speed runs)
- Keep distance from patrol routes
- Use terrain to break line of sight
- Sprint past slower ARC units
- Don’t engage unless cornered
Option 2: Combat (If necessary)
- Focus on quick eliminations
- Use environment for cover
- Don’t prolong fights
- Retreat if overwhelmed
Remember: This quest doesn’t require killing any ARC enemies. Combat is entirely optional and usually a time waste if you’re just completing the quest objectives.
Common Issues and Solutions
“Can’t find the photo prompt at Highway Collapse”
Solution:
- Stand closer to the broken edge of the bridge
- Look for the section where the bridge drops away
- Try moving along the edge until the prompt appears
- The interaction zone is specific—explore the broken section’s perimeter
“Lost the trail of destruction from Broken Earth”
Solution:
- Look for environmental damage patterns (scorch marks, craters)
- Head generally northeast from Broken Earth’s center
- Watch for the large ARC husk in the distance
- Open map to check quest marker direction
“Can’t interact with the ARC machine husk”
Solution:
- Walk around the entire husk to find the investigation point
- The interaction prompt may be on a specific side
- Try approaching from different angles
- Clear any nearby ARC enemies that might be blocking interaction
Quest Progression Context
Where Reduced to Rubble Fits
This is one of Shani’s vendor quests, part of a larger quest chain that helps you:
- Build reputation with Shani
- Unlock additional vendor inventory
- Access better equipment and utilities
- Progress through vendor-specific storylines
Next steps after completion:
- Return to Shani for additional quests
- Use your rewards in future runs
- Continue building vendor relationships
For similar investigation-style quests, check our With a Trace quest guide.
Solo vs. Group Completion
Solo Play Advantages
✅ Full reward distribution (no sharing)
✅ Faster navigation (no waiting for team)
✅ Quieter approach (less ARC attention)
✅ Personal pace control
Group Play Advantages
✅ Combat security if things go wrong
✅ Shared resource gathering during travel
✅ Multiple extraction options
✅ Social experience
Verdict: This quest is perfectly soloable and arguably easier alone since you can focus purely on objectives without coordinating with teammates.
Post-Quest Strategy
What to Do After Completing Reduced to Rubble
1. Return to Shani Check if new quests have unlocked after completing this one.
2. Use your rewards strategically
- Save Zipline for difficult extraction scenarios
- Deploy Barricade Kits at chokepoints during combat
- Use Door Blockers when securing buildings
3. Continue vendor progression Complete additional Shani quests to unlock better inventory options.
4. Apply learned map knowledge You now know Blue Gate’s Highway Collapse and Broken Earth areas—use this for future runs.
Blue Gate Map Tips
Since you’re already running Blue Gate for this quest:
High-value loot areas:
- Industrial zones near Highway Collapse
- Broken Earth resource nodes
- Building interiors along your route
Extraction points:
- Know where nearest extraction is from Broken Earth
- Plan escape route before engaging objectives
- Zipline can create emergency extraction paths
ARC patrol patterns:
- Southwest areas tend to have lighter ARC presence
- Northeast (where you’re heading) can have heavier patrols
- Stay alert during the trek from Highway Collapse to Broken Earth
Final Thoughts
Reduced to Rubble is one of Arc Raiders’ more relaxing quests—a break from the constant tension of extraction shooter gameplay. You’re documenting destruction rather than causing it, and the rewards (especially that Zipline) make it well worth the 10-15 minute investment.
The quest also serves as a great introduction to Blue Gate’s geography. By the time you complete it, you’ll know the southwest and northeast sections well, giving you strategic knowledge for future loot runs or combat scenarios on this map.
Most importantly, it’s a zero-risk way to earn useful utility items. Free loadout, straightforward objectives, optional combat—this is the kind of quest you complete between high-stakes extraction runs when you just want to build your inventory without risking expensive gear.
Grab your camera (metaphorically), document some ARC destruction, and claim those rewards. Shani’s intel gathering is your gain.
Related Arc Raiders Quest Guides:
Note: Arc Raiders is in active development. Quest locations, rewards, or mechanics may change in future updates. This guide reflects current gameplay as of the latest version.


