If you’ve played Satisfactory, you already know the absolute satisfaction of watching a perfectly automated factory hum along without you lifting a finger. StarRupture captures that same addictive automation loop, letting you build elaborate production chains that mine, refine, and ship resources while you’re off exploring or fighting hostile creatures.
But here’s the thing setting up automation isn’t just slapping down some machines and calling it a day. There’s a lot to consider: base placement, power management, rail connections, and material flow. Get it wrong, and you’ll have bottlenecks, inefficiencies, and a factory that barely produces anything. Get it right, and you’ll be swimming in resources for those corporation contracts.
Let me walk you through exactly how to automate your ore extraction operation from the ground up.
Step 1: Choose Your Base Location Wisely
This is where a lot of new players mess up. You can’t just plop your Base Core down anywhere and expect good results. Location is everything when you’re planning an automated mining operation.
What to look for:
- Areas rich in Wolfram ore
- Nearby Titanium deposits
- Accessible Calcium nodes
Ideally, you want all three of these resources within a reasonable distance of your base. Why? Because these are the core materials you’ll be shipping to corporations throughout the game. Having them close together means shorter rail lines, less infrastructure to manage, and faster production cycles.
Before you commit to a location, explore the area thoroughly. Make sure you’ve unlocked the map so you can scout resource nodes efficiently. It’s worth spending extra time finding the perfect spot rather than rebuilding everything later when you realize you’re missing a critical resource nearby.

Step 2: Build Your Power Infrastructure First
Here’s a rookie mistake I see all the time: building production machines before securing enough power. Then everything shuts down because your energy grid can’t handle the load.
Power requirements for automation are serious. Each Ore Excavator, Smelter, and Fabricator needs constant energy to run. If your power dips, your entire production line grinds to a halt.
The solution? Solar Generators.
Start by building 2-3 Solar Generators right away. This gives you a baseline power supply to work with. As you expand your operation and add more machines, keep building additional Solar Generators to match your growing energy demands.
Pro tip: Build more generators than you think you need. It’s better to have excess power capacity than to constantly troubleshoot brownouts in your factory. If you’re unsure about how to connect power efficiently, check out our dedicated guide on power systems.
Step 3: Place Your Ore Excavators on Resource Nodes
Now we’re getting to the fun part—actually mining stuff automatically.
Ore Excavators are the foundation of your automation. These machines continuously extract ore from the ground without any input from you, as long as they’re:
- Placed directly on top of a resource node (Wolfram, Titanium, or Calcium)
- Powered with sufficient energy
- Connected to your production chain via Rails
Find those rich ore deposits you scouted earlier and place an Ore Excavator on each one. You’ll see the machine start working immediately, pulling ore out of the ground and storing it internally.
But here’s where beginners get stuck—those ores just sit there in the excavator unless you transport them somewhere. That’s where Rails come in.
Step 4: Connect Excavators to Smelters With Rails
This is the core mechanic of automation in StarRupture: Rails transport materials between machines.
Your Ore Excavators are pulling raw ore out of the ground, but that ore needs to reach a Smelter to be converted into usable Titanium Bars, Wolfram Bars, or Calcium Blocks.
Basic rail connection:
- Place a Smelter somewhere central to your excavators
- Build Rails from each Ore Excavator to the Smelter
- The rails will automatically transport ore to the Smelter for processing
Dealing with obstacles:
Rails need a clear path between machines. If there’s terrain blocking your rail line (and there usually is), use Rail Supports to elevate the rails over obstacles. You can stack supports as high as needed to create bridges or elevated pathways.
Connecting multiple excavators:
Use Rail Connectors to merge multiple excavator outputs into a single Smelter. This is super useful when you have several Titanium excavators feeding into one Smelter, for example. Just connect each excavator’s rail to the connector, then run one main rail line from the connector to the Smelter.
Once everything’s connected and powered, you’ll see ore automatically flowing from excavators to the Smelter, where it gets refined into bars. That’s your first automated production chain—congrats!
If you need help gathering basic building materials to construct all this infrastructure, we’ve got a guide for that too.
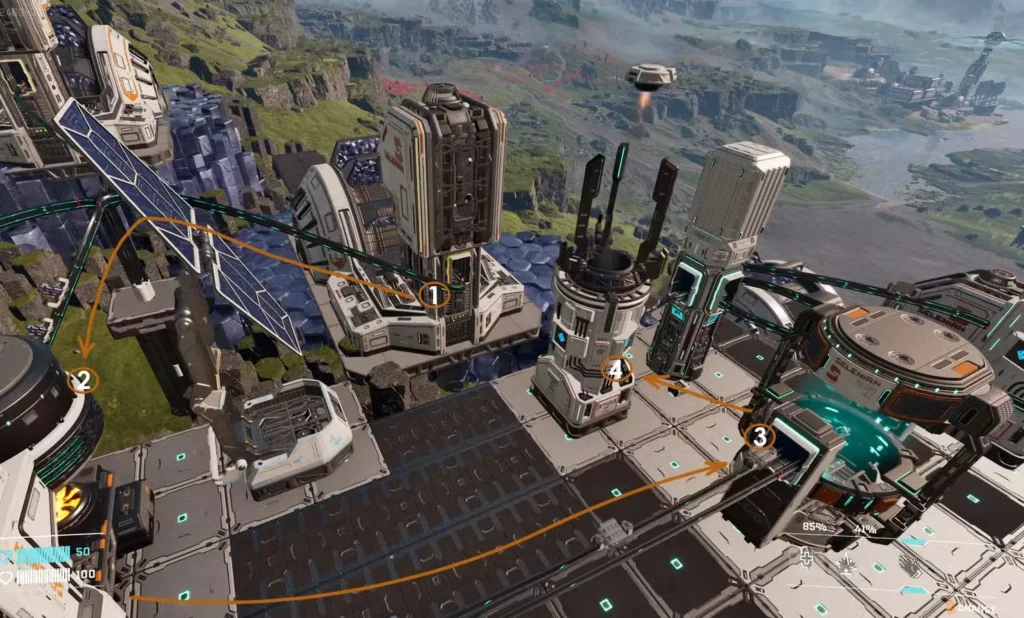
Step 5: Connect Smelters to the Orbital Cargo Launcher
Early in the game, your automation can be pretty simple: Excavators → Smelter → Orbital Cargo Launcher.
The Orbital Cargo Launcher is how you ship materials to the corporations for contracts and reputation points. Many early-game orders just require raw bars (Titanium Bars, Wolfram Bars), which your Smelter produces.
Simple automation flow:
- Ore Excavators mine raw ore
- Rails transport ore to Smelter
- Smelter refines ore into bars
- Rails transport bars to Orbital Cargo Launcher
- Launcher ships bars to corporations automatically
Set this up correctly, and you’ll have a steady stream of materials being mined, refined, and shipped without touching a single button. You can go explore, unlock weapons, or work on other projects while your factory churns away.
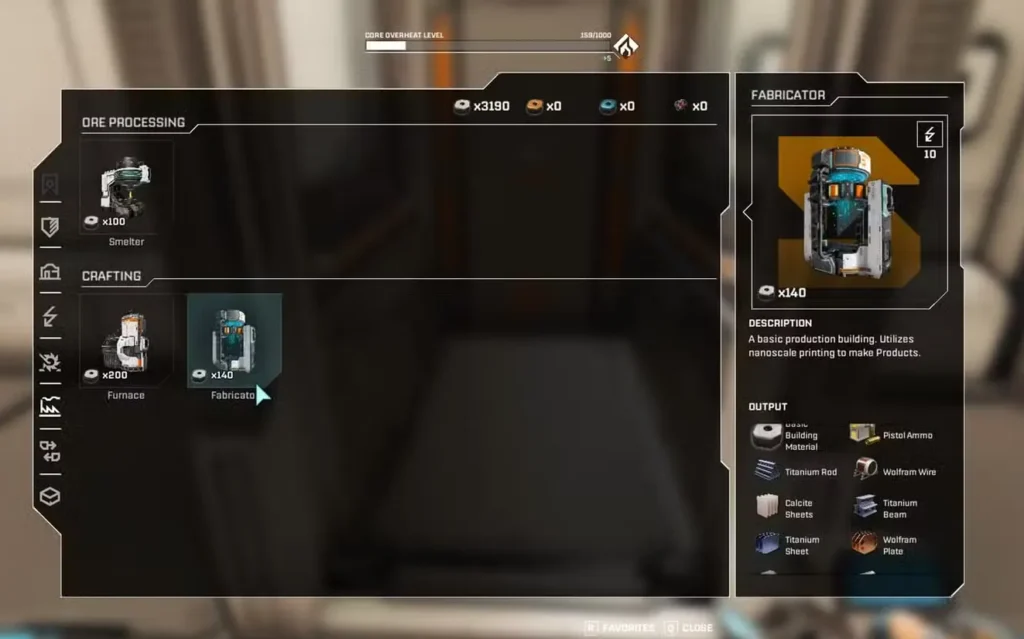
Step 6: Scale Up With Fabricators and Complex Chains
Here’s where things get interesting (and more complicated).
As you progress through corporation levels, they’ll start requesting more advanced materials like Titanium Sheets or Wolfram Plates instead of basic bars. These require additional processing steps, which means adding more machines to your production chain.
Advanced automation example: Titanium Sheets
Let’s say you need to automatically produce and ship Titanium Sheets:
- Ore Excavator mines Titanium ore
- Rails transport ore to Smelter
- Smelter refines ore into Titanium Bars
- Rails transport bars to Fabricator
- Fabricator processes bars into Titanium Sheets
- Rails transport sheets to Orbital Cargo Launcher
- Launcher ships sheets to corporations
Each additional production step adds complexity to your factory. You’ll need more Rails, more power, and careful planning to prevent bottlenecks.
The Furnace enters the picture:
Some recipes also require the Furnace for different processing steps. You might have production chains that split—some materials going to the Fabricator, others to the Furnace, then merging back together for final assembly.
This is where StarRupture’s automation really shines. You can create incredibly intricate production networks with multiple parallel chains all feeding into final products.
Managing Your Automated Base: Tips and Tricks
Color-code or organize your rail lines:
As your base grows, it becomes harder to track which rails are carrying what. Consider organizing your layout so similar production chains are grouped together.
Build vertically when space is tight:
Don’t be afraid to use Rail Supports to create multi-level factories. Stacking production chains vertically saves ground space and can actually make material flow easier to visualize.
Monitor your power consumption:
Every new machine increases your energy draw. Keep an eye on your power levels and add Solar Generators before you run out of juice. A power failure means your entire operation stops.
Start simple, then expand:
Don’t try to automate everything at once. Get basic bar production running smoothly first, then gradually add more complex manufacturing chains as you unlock new recipes and machines.
Check for bottlenecks:
If production seems slow, check whether one machine is backing up the entire chain. You might need multiple Smelters to handle the output from several Ore Excavators, for example.
Remember to stock up on essentials while your factory runs—make sure you’ve got plenty of water and know how to heal when you’re out exploring.
Automation Workflow Summary
Here’s the complete process at a glance:
✓ Scout and choose a base location near Wolfram, Titanium, and Calcium
✓ Build 2-3 Solar Generators (add more as needed)
✓ Place Ore Excavators on resource nodes
✓ Connect power to all Excavators
✓ Build Rails from Excavators to Smelter
✓ Use Rail Supports to overcome terrain obstacles
✓ Use Rail Connectors to merge multiple Excavator outputs
✓ Connect Smelter to Orbital Cargo Launcher for basic materials
✓ Add Fabricators and Furnaces for advanced materials
✓ Expand your Solar Generator array as you scale up
Frequently Asked Questions
How many Ore Excavators can I connect to one Smelter?
You can connect multiple Ore Excavators to a single Smelter using Rail Connectors, but watch for bottlenecks. If your excavators are producing ore faster than the Smelter can process it, you’ll need to add a second Smelter to keep up with production. A good rule of thumb is 2-3 excavators per Smelter, depending on the ore type.
Do I need to manually refuel or maintain automated machines?
No, automated machines in StarRupture don’t require fuel or maintenance—they just need constant electrical power. As long as your Solar Generators are providing enough energy and your power lines are connected properly, your Ore Excavators, Smelters, and Fabricators will run indefinitely.
Can I move or relocate machines after placing them?
Yes, you can destroy buildings and rails and rebuild them elsewhere if you need to reorganize your base. This is useful when you realize your initial layout isn’t efficient or when you want to optimize production flow. Just be prepared to rebuild the rail connections.
What happens to my automation when I’m offline or exploring far away?
Your automated production continues running as long as the machines have power and the rail connections are intact. You can leave your base and explore other areas, work on unlocking grenades, or hunt for Meteorite Hearts, and return to find your Orbital Cargo Launcher has been steadily shipping materials to the corporations.
Building an automated ore extraction system is one of the most rewarding parts of StarRupture. There’s something deeply satisfying about watching your factory come to life, with ores flowing through rail networks and materials being processed without your constant intervention.
For more helpful guides on surviving and thriving on Arcadia-7, check out the official StarRupture Steam page, learn about all the characters, and explore our beginner’s guide for essential starting tips. You’ll also want to know how to get Data Points efficiently, as they’re crucial for unlocking advanced recipes.