
ARC Raiders features an extensive skill tree system that can feel overwhelming when you’re first starting out. With three distinct branches and 48 total skills to choose from, making the wrong early investments can set your progression back significantly — and unlike the game’s launch version, you now can’t unlock everything.
Updated for the Frozen Trail 2.0 patch (October 8, 2026). The Frozen Trail update was the biggest skill tree overhaul since launch: 13 old skills were removed, 16 new ones were added, 11 skills moved between branches, and the entire unlock structure was redesigned with meaningful binary choice nodes. If you’ve been playing since launch, a free respec was issued with the update — use it wisely.
This guide identifies the most impactful early-game skills that provide immediate benefits, helping you survive longer raids, loot more efficiently, and establish a solid foundation for whatever specialized build you eventually pursue.
Understanding the Skill Tree System
Before diving into specific recommendations, here’s how skill progression works in ARC Raiders after Frozen Trail 2.0:
Earning Skill Points: You gain skill points by leveling up your Raider through various activities — looting, combat, extraction, and survival. A max-level Raider (level 75) earns 76 total skill points, plus up to 15 bonus points from Expedition rewards.
You Can’t Unlock Everything: With 48 skills across the tree and only 76 points available, specialization is mandatory. Choose your branches carefully based on your playstyle.
Skill Point Investment: Most skills cost one point to unlock initially, but you can invest up to 5 additional points into many skills to increase their effectiveness.
Choice Nodes (Diamonds): Each branch now features binary choice diamonds at the 10-point and 30-point thresholds. At 10 points, you choose one of two skills. At 30 points, two diamond slots open sharing a pool of three skills — you can take two of the three, but never all three. These choices shape your build identity.
Skill Tree Reset: Respecs are available from the Skill Tree menu for 2,000 Coins per allocated skill point. It resets the entire tree (no partial resets) and lets you re-pick your choice node selections. If you received the free respec from the Frozen Trail update, now is the ideal time to plan your new build before spending it.
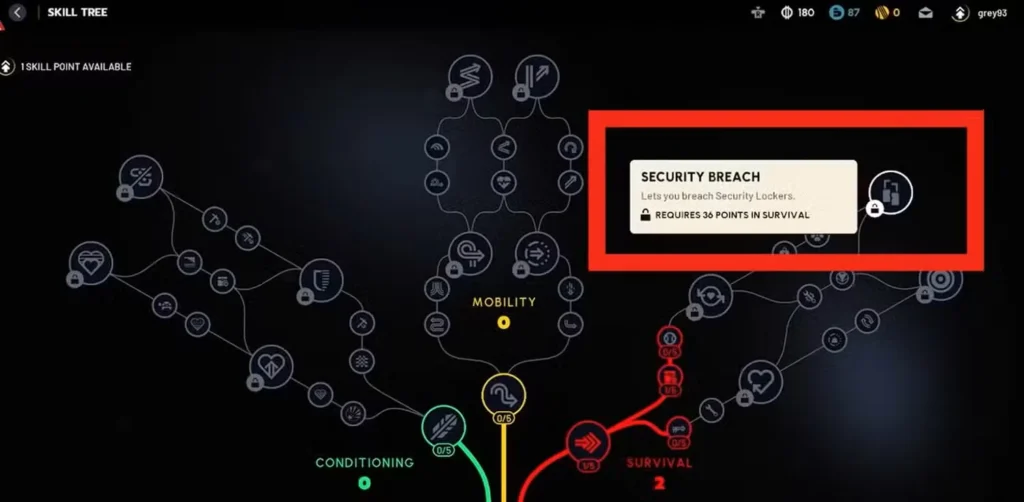
Accessing Skills: Navigate to the Raider section from the main menu (using RB/R1), then select the leftmost icon beneath your character to open the Skill Tree interface.
The Three Skill Branches Explained
Conditioning Branch: Carrying and Combat
Primary focus: Weight management, encumbrance, combat survivability, and traversal while carrying loot
Best for: Players who haul heavy loads, PvP-focused Raiders, and those who want Security Breach or melee combat options
Philosophy: After Frozen Trail 2.0, Conditioning is the dedicated carrying branch. Skills like Stubborn Mule, Broad Shoulders, and the new Speedy Mule all address the speed and stamina penalties of moving while over-encumbered. At the end of the branch, you choose between Security Breach (Security Locker access), Weapon Bash (melee with your equipped weapon), and Bull Rush (knockback sprint). Combat and carry now share a home.
Mobility Branch: Movement and Stamina
Primary focus: Stamina capacity, sprinting efficiency, vaulting, and advanced movement techniques
Best for: Speedrunners, players prioritizing evasion, and those who want Wall Run or Sprinting on Fumes
Philosophy: Mobility now starts with Youthful Lungs (max stamina) and culminates in three of the most exciting skills in the game: Sprinting on Fumes (stamina never fully empties while sprinting), Wall Run (run a few steps up walls), and In the Flow (chaining movement actions grants 65% reduced stamina costs and 25% faster vaults). Note that Calming Stroll was removed in Frozen Trail — the new stamina tricks are Swift Start and Sprinting on Fumes.
Survival Branch: Looting, Crafting, and Stealth
Primary focus: Quiet movement, looting efficiency, field crafting, and self-sufficiency
Best for: Solo players, farmers, and self-sufficient Raiders who want to reduce reliance on base supplies
Philosophy: Survival is now the dedicated looting and crafting branch. In-Round Crafting is literally the starting skill (no prerequisite needed), and the branch culminates in three powerful late-game utilities: Road Warrior (more loot from ARC machines, full-efficiency recycling), Nomadic Crafting (expanded field craft options), and Field Repair (repair weapons and shields up to 30% mid-raid). Breaching skills Gentle Pressure and Proficient Pryer also now live here after moving from Conditioning.
Best Early Game Skills: Priority Unlocks
Here are the essential skills to prioritize in your first 10–20 hours, organized by branch, based on the post-Frozen Trail tree.
Survival Branch: Start Here
In-Round Crafting ⭐ UNLOCK FIRST
What it does: Unlocks the ability to craft items during a raid using materials collected in the field
Why it’s essential: This is the starting skill of the Survival branch and costs a single point. It now costs nothing to access — no prerequisites, no path to unlock. This makes it one of the most efficient investments in the entire tree:
- Emergency shield restoration: Ran out of Shield Rechargers mid-raid? Craft more on the spot if you have components
- Medical supply creation: Same principle applies to health items
- Resource efficiency: Convert raw materials into finished products without returning to Speranza
- Reduced loadout dependency: Carry fewer consumables from base since you can craft replacements topside
Investment recommendation: Unlock immediately as your very first skill point. No additional investment needed — the unlock provides full functionality. This single point justifies dipping into Survival regardless of your primary branch focus.
For players who frequently forget to stock up on shield recharge items, In-Round Crafting is an absolute lifesaver.
Gentle Pressure (now in Survival — moved from Conditioning)
What it does: Reduces the noise your character makes while breaching doors and containers
Why it’s essential: Breaching creates audio cues that alert nearby players to your location. With Gentle Pressure, you become significantly harder to track by sound alone — this is especially valuable in contested loot areas. Note: this skill moved to the Survival branch in Frozen Trail 2.0, so plan your point investment accordingly.
Investment recommendation: Unlock early and invest 2–3 additional points to maximize noise reduction. The difference between being heard from 50 meters versus 20 meters is life-or-death in contested areas.
Silent Scavenger
What it does: Reduces the noise you make when looting containers
Why it’s essential: Combined with Gentle Pressure, this makes your entire loot cycle — from breaching to picking up items — nearly silent. Solo players will find this particularly valuable for avoiding detection. Pairs well on the same Survival path as Looter’s Instincts.
Investment recommendation: 2–3 points for meaningful noise reduction. Invest alongside Gentle Pressure for a complete stealth looting setup.
Conditioning Branch: Key Early Skills
Proficient Pryer (now in Conditioning — also serves looting builds)
What it does: Decreases the time required to breach doors and containers (up to -30% at max rank)
Why it’s essential: Time is your most valuable resource in ARC Raiders. Every second spent breaching is a second you’re vulnerable and stationary. Proficient Pryer lets you clear buildings faster, loot more efficiently, and minimize exposure during breaching animations. If you’re following coin farming routes, this skill directly increases your coins-per-hour.
Investment recommendation: Unlock early and invest 3–4 points. Combined with Gentle Pressure and Silent Scavenger, you become a looting machine that operates quickly and quietly.
Used to the Weight
What it does: Wearing a shield slows you down less
Why it’s essential: This is Conditioning’s starting skill and costs a single point. Shields are a core part of your survival toolkit, and this eliminates the movement penalty you’d otherwise suffer just for wearing one. There’s no reason not to grab this immediately if you invest in Conditioning at all.
Investment recommendation: Unlock immediately (1 point, no additional investment needed).
Mobility Branch: Stamina and Movement
Youthful Lungs
What it does: Increases your maximum stamina bar capacity
Why it’s essential: Youthful Lungs is now Mobility’s starting skill — the first thing you unlock. A larger stamina pool means more consecutive sprints, more climbing before exhaustion, and greater overall mobility. In Frozen Trail’s new stamina system, this is the foundation everything else builds on.
Investment recommendation: Unlock as your first or second Mobility investment, then add 3–5 points as your build develops.
Marathon Runner
What it does: Reduces stamina cost for movement actions — sprinting, climbing, and so on (up to -15% at max rank)
Why it’s essential: Stamina depletion is one of the most common causes of death in ARC Raiders. Running out of stamina mid-escape or while chasing enemies leaves you completely vulnerable. Marathon Runner extends how long you can sprint before exhaustion.
Investment recommendation: Invest 4–5 points. It now sits in Mobility’s middle columns alongside the new Swift Start, and together they give you sustained sprint speed and endurance.
Fight or Flight (now in Mobility — moved from Conditioning)
What it does: Grants a fixed amount of stamina when you take damage in combat (buffed in Frozen Trail: +25% stamina per level)
Why it’s essential: This moved to the Mobility branch in Frozen Trail — which makes thematic sense, since its purpose is enabling movement after taking a hit. When ambushed by enemies, Fight or Flight gives you the stamina burst needed to sprint to cover or reposition aggressively. The Frozen Trail buff makes it significantly stronger than at launch.
Investment recommendation: Unlock within your first 5–10 Mobility skill points, then invest 2 additional points. This is now found on the path to the Mobility branch’s 10-point choice node.
The 10-Point Choice Nodes: Make These Count
At 10 points in each branch, you’ll hit your first diamond pick — a binary choice between two skills. These decisions have real weight, so here’s what each offers:
Conditioning (10-point pick)
Mule’s Gallop — Lets you sprint while over-encumbered (52.5% sprint speed)
vs.
Back on Your Feet — When critically low on health, regenerates health to a threshold
Recommendation: For farmers carrying heavy loads, Mule’s Gallop is transformative. For PvP-focused players or those who take damage frequently, Back on Your Feet is the stronger survival pick. This is the hardest choice in Conditioning.
Mobility (10-point pick)
Vault Spring — Lets you jump at the end of a vault
vs.
Vaults on Vaults on Vaults — Vaulting costs zero stamina
Recommendation: Vaults on Vaults on Vaults is the better all-around pick for most players — free vaults mean you never hesitate before going over obstacles. Vault Spring is more useful for movement tech players who want to extend aerial momentum.
Survival (10-point pick)
Quick Roll — A faster Dodge Roll at reduced stamina cost (shorter distance)
vs.
Minesweeper — Lets you defuse mines and explosive deployables up close
Recommendation: Quick Roll is the better general pick — faster dodge rolls with lower stamina cost provide broad combat utility. Minesweeper is a situational pick that shines in specific PvP scenarios but otherwise goes unused. Note that Minesweeper used to require 36 Survival points; it’s now far more accessible.
Recommended Skill Progression Path (First 20 Points)
Here’s an optimized unlock sequence based on the post-Frozen Trail tree that provides immediate benefits while building toward stronger late-game skills:
Points 1–5:
- In-Round Crafting (Survival start) — Immediate utility, zero prerequisites
- Youthful Lungs (Mobility start) — Stamina capacity foundation
- Used to the Weight (Conditioning start) — Free shield movement
- Fight or Flight (Mobility early) — Combat escape stamina burst
- Silent Scavenger or Looter’s Instincts (Survival early) — Quiet/faster looting
Points 6–10:
- Gentle Pressure (Survival) — Quieter breaching
- Proficient Pryer (Conditioning) — Faster breaching
- Marathon Runner (Mobility middle) — Stamina cost reduction
- +1 more point to reach Mobility’s 10-point diamond
- Vaults on Vaults on Vaults (Mobility 10-point pick)
Points 11–20:
- Invest 2–3 more points into Fight or Flight
- Invest 3 points into Proficient Pryer
- Invest 2 points into Gentle Pressure
- Reach Survival’s 10-point diamond → Quick Roll
- Continue toward Marathon Runner max or Survival middle skills based on playstyle
This progression gives you:
- Field crafting from point 1
- Efficient and quiet looting
- Strong stamina management through Youthful Lungs + Marathon Runner
- Emergency combat escape via Fight or Flight
- Free vaulting via the Mobility choice node
The 30-Point Endgame Picks: Late-Game Power
Once you reach 30 points in a branch, two diamond slots unlock that share a pool of three skills. You can take two — choose carefully.
Conditioning Finals: Security Breach, Weapon Bash, Bull Rush
For access to Security Lockers, you’ll need Security Breach — but it now only costs 30 Conditioning points instead of 36 Survival points as before. That said, it now competes with Weapon Bash (a melee attack with your equipped gun) and Bull Rush (sprint knockback). Most players will pair Security Breach with one of the two melee options. Bull Rush has notable PvP potential for disruption, while Weapon Bash offers a close-quarters alternative to wasting ammo.
Mobility Finals: Sprinting on Fumes, Wall Run, In the Flow
The standout here is Sprinting on Fumes — your stamina will never fully drain while sprinting, with a recovery penalty that scales with how long it ran. For anyone who’s ever died because their stamina bar hit zero mid-chase, this is transformative. Wall Run is a fun mobility tool for map traversal and surprise angles. In the Flow rewards skilled players who chain movement actions with 65% reduced stamina costs and 25% faster vaults at full flow. Most players will want Sprinting on Fumes plus either Wall Run or In the Flow based on whether you prioritize raw survival or aggressive movement skill.
Survival Finals: Road Warrior, Nomadic Crafting, Field Repair
These three are a solo player’s dream. Field Repair lets you restore weapons, shields, and gadgets up to 30% durability mid-raid — a broken shield used to end runs; now it doesn’t. Nomadic Crafting vastly expands your in-round crafting recipe list, and combined with Road Warrior‘s full-efficiency recycling and increased ARC loot drops, you can sustain yourself entirely on what you collect topside. Taking Field Repair plus either Road Warrior or Nomadic Crafting is the recommended approach for self-sufficient solo builds.
Skills to Avoid Early
Not all skills provide equal early-game value. Here are some common pitfall investments:
Dumping all 5 points into one skill immediately: Spreading points across multiple foundational skills in your first 10 points provides more total value than maxing a single one right away.
Minesweeper over Quick Roll at the Survival 10-point pick: Unless you’re playing in a specific PvP-heavy mode or environment, Quick Roll’s general utility far outpaces the situational nature of Minesweeper.
Deep Conditioning without a carry build: Beyond Used to the Weight and Proficient Pryer, many Conditioning skills revolve around over-encumbrance and heavy load movement. These are wasted points if you travel light.
Rushing Security Breach: It now requires 30 Conditioning points — still a significant investment. Build your stamina and looting foundation first, then work toward it in the mid-game once you’ve established a reliable farming rhythm.
Playstyle-Specific Recommendations
For PvP-Focused Players
Priority order:
- Fight or Flight (combat escape stamina)
- Marathon Runner (chase/flee endurance)
- Youthful Lungs (stamina pool)
- Back on Your Feet (Conditioning 10-point pick)
- Sprinting on Fumes (Mobility 30-point pick) — never run out of stamina mid-fight
For Solo Farmers
Priority order:
- In-Round Crafting (self-sufficiency from point 1)
- Proficient Pryer (breach speed = more loot)
- Gentle Pressure + Silent Scavenger (avoid detection)
- Marathon Runner (cover farming routes efficiently)
- Field Repair + Nomadic Crafting (Survival 30-point picks — complete self-sufficiency)
For Squad Support Players
Priority order:
- In-Round Crafting (craft consumables for teammates)
- Youthful Lungs (keep pace with the squad)
- Fight or Flight (stay alive to support)
- Marathon Runner (repositioning for support)
- Road Warrior (Survival 30-point pick — supply the team with ammo and crafting materials)
For Heavy Carry / Loot Mule Builds
Priority order:
- Used to the Weight (start of Conditioning)
- Stubborn Mule (stamina regen while over-encumbered)
- Broad Shoulders (increased carry limit)
- Mule’s Gallop (Conditioning 10-point pick — sprint while over-encumbered)
- Speedy Mule (reduces speed penalty when severely over-encumbered)
Maximizing Your Overall Progression
Skills work best when combined with proper gear and knowledge:
- Storage management: Ensure you have adequate stash and backpack space to hold the extra loot your efficient looting skills help you gather — Frozen Trail 2.0 also added two additional Stash upgrade tiers
- Performance: Keep your game running smoothly with our PC optimization settings
- Team coordination: Skills like In-Round Crafting and Road Warrior become even more valuable when playing with friends who can share resources
- Free bonuses: Supplement your progression with Twitch Drops rewards
Long-Term Skill Planning
After establishing your foundation with the recommended early skills, plan your mid-to-late game progression:
Points 20–30: Begin specializing based on your preferred playstyle. Work toward the 30-point diamond picks in your primary branch — these are the skills that define your build. Use the Skill Tree Reset (2,000 Coins per point) if your early investment doesn’t feel right.
Points 30–50: Unlock your primary branch’s endgame picks and begin investing in a secondary branch. A typical build at this range might be 30+ points in Survival for Field Repair and Nomadic Crafting, with remaining points split between Mobility stamina skills and Conditioning carry skills.
Level 75 (76 points): At max level you can invest deeply into two branches while getting key utilities from the third. Decide early whether you want Security Breach (30 Conditioning points) or prefer to spend those points on Mobility or Survival’s endgame instead. You likely can’t do both at a high level.
Respec and Build Mistakes
Unlike at launch, ARC Raiders now fully supports skill respecs. From the Skill Tree menu, spend 2,000 Coins per allocated skill point to reset your entire tree, including re-picking your diamond choice nodes. There’s no single-branch or single-skill reset — it’s all or nothing.
If you played before Frozen Trail 2.0, you received a free respec with the update. If you haven’t used it yet, do so before banking additional skill points — some skills you may have maxed no longer exist (Calming Stroll, Revitalizing Squat, Flyswatter, and others were removed), so your old build almost certainly needs adjustment.
The core early recommendations in this guide — In-Round Crafting, Youthful Lungs, Marathon Runner, Fight or Flight, Proficient Pryer, and Gentle Pressure — provide broad enough utility that they benefit virtually any playstyle if you later shift focus.
Final Thoughts
The Frozen Trail 2.0 skill tree is a significant improvement over launch — it forces meaningful choices and creates genuinely different build identities. The binary diamond nodes make every branch feel like a commitment rather than a checklist.
For new players: start with In-Round Crafting, build out your stamina foundation through the Mobility branch, and grab Gentle Pressure and Proficient Pryer early to maximize looting efficiency. That core setup works in every situation and every playstyle.
For returning players: use your free respec (or purchase one if you haven’t received it), revisit which removed skills you relied on, and plan your new build around the endgame diamond picks you want to reach. The Survival finals — Field Repair, Nomadic Crafting, Road Warrior — are some of the best skills ever added to the game.
External Resources:
Invest wisely, level smartly, and dominate the battlefield!


