How to Find Baron Husks in ARC Raiders (Complete Walkthrough)
Baron Husks are among the most intimidating sights in ARC Raiders—massive, destroyed war machines that tower over the landscape like fallen giants. These dormant mechanical behemoths hold valuable salvage, but extracting it isn’t as simple as walking up and pressing a button. The Dormant Barons quest challenges you to locate these wrecks and successfully breach them, all while avoiding the attention of hostile machines and rival raiders.
This guide covers everything you need to know about finding Baron Husks, the safest looting approach, and how to complete the Dormant Barons quest without getting barbecued in the process.
What Are Baron Husks in ARC Raiders? (Quest Overview)
Before we dive into locations, let’s talk about what you’re actually looking for. Baron Husks are the remains of destroyed Baron-class ARC machines—think of them as the heavyweight champions of the robot apocalypse that didn’t quite make it. These colossal wrecks are scattered across the game’s maps, and while they’re no longer operational, they still contain valuable components worth salvaging.
Key Characteristics:
- Emit a distinctive low mechanical rumbling when you’re nearby
- Require climbing their mechanical appendages to reach the loot
- Trigger a breaching sequence that attracts enemy attention
- Set the surrounding area on fire after being breached (yes, really)
The quest itself is relatively straightforward in concept: find Baron Husks, breach them, loot them, and extract. The execution? That’s where things get spicy.
All 3 Baron Husk Locations on Dam Battlegrounds Map
While Baron Husks can spawn across multiple maps in ARC Raiders, Dam Battlegrounds is your best bet for consistent spawns. Three specific locations on this map reliably have Baron Husks available, making it the ideal hunting ground for completing this quest efficiently.
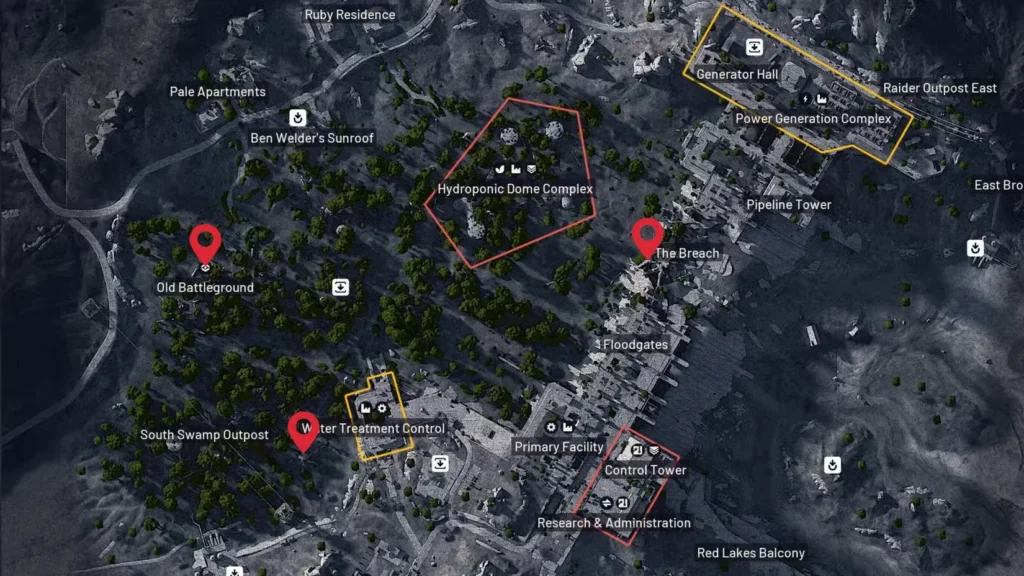
Baron Husk Location #1: Old Battleground (West Side)
Position: Westernmost section of Dam Battlegrounds
Difficulty: Easy
Enemy Threat: Low to moderate
Old Battleground is your safest starting point. The Baron Husk here sits in relatively open terrain with decent cover options nearby. This location typically has fewer ARC machine patrols compared to other areas, giving you breathing room to complete the breach without constant interruptions.
Strategic Tips:
- Approach from the west for better visibility
- Scout for Wasps or Hornets before committing to the breach
- Position yourself near cover before starting the looting process
Baron Husk Location #2: Water Treatment Control (Southwest)
Position: Southwestern section of Dam Battlegrounds
Difficulty: Easy to moderate
Enemy Threat: Moderate
Water Treatment Control’s Baron Husk is another accessible option. The industrial structures surrounding this wreck provide excellent hiding spots if things go sideways during your breach. However, this area sees moderate foot traffic from both AI enemies and other players, especially if you’re in a populated server.
What to Watch For:
- Other raiders competing for the same loot
- Snitch scanners in the vicinity (grab some if you need them for Trifecta quest)
- Arc Surveyors that might complicate your Mixed Signals objectives
Baron Husk Location #3: The Breach (East Side)
Position: Eastern section of Dam Battlegrounds
Difficulty: Hard
Enemy Threat: High
Now we’re talking dangerous territory. The Breach lives up to its name—this Baron Husk is actively guarded by a Sentinel, one of the most lethal ARC machines in the game. That sniper will absolutely ruin your day if you’re not prepared.
Critical Survival Strategy:
- Save this location for last when completing the quest
- Bring proper gear—no free loadouts here
- Consider taking out the Sentinel first (requires Sentinel Firing Core farming knowledge)
- Use terrain and structures to break line of sight
- Have an escape route planned before starting the breach
Honestly, if you only need to loot one or two Baron Husks for the quest, skip The Breach entirely. The risk-reward ratio isn’t worth it unless you’re specifically hunting Sentinel components or feeling particularly brave.

How to Safely Breach and Loot Baron Husks (6-Step Guide)
Once you’ve located a Baron Husk, here’s the exact process for safely looting it. This mechanic has a learning curve, and messing it up can cost you valuable time—or your life.
Step 1: Approach Baron Husk and Confirm Availability
Get close to the Baron Husk until you hear that distinctive low mechanical rumbling sound. This audio cue confirms the husk is ready for breaching. No sound? Either it’s already been looted by another player, or you’re not close enough yet.
Step 2: Climb the Mechanical Appendages (No Fall Damage)
The loot point is the Baron Husk’s head, which sits way up high. You’ll need to use its legs and other mechanical appendages as makeshift ladders. Look for climbable surfaces indicated by the standard climbing prompts.
Climbing Tips:
- The route isn’t always obvious—experiment with different angles
- Take your time positioning yourself correctly
- Don’t rush this part or you’ll fall and waste time
Step 3: Initiate the Breach Process
Once you’re at the head, interact with it to start the breaching sequence. Here’s where things get loud and dangerous.
What Happens During Breach:
- The process takes approximately 10-15 seconds (feels longer when enemies show up)
- The Baron Husk emits loud periodic sounds that alert nearby machines
- Hostile ARC units will investigate the noise
- Other raiders may converge on your position
- You’re vulnerable during the breach—can’t cancel or defend easily
This is why location choice matters. Old Battleground and Water Treatment Control give you more time before enemies arrive. The Breach? You’ll have company almost immediately.
Step 4: Jump Off Immediately to Avoid Fire Damage
CRITICAL: As soon as the breach completes, jump off the Baron Husk immediately. Don’t try to loot it yet. The entire area around the husk will ignite in flames, and standing there will kill you faster than any Sentinel.
This caught me off guard the first time—I completed the breach, tried to collect my loot, and got roasted alive. Learn from my mistakes.
Step 5: Wait for Flames to Extinguish (Safety Check)
Find cover nearby and wait for the fire to die down. This takes roughly 20-30 seconds, though it feels eternal when you’re watching your loot timer tick down.
While Waiting:
- Stay in cover—don’t assume you’re safe
- Watch for approaching enemies attracted by the breach noise
- Prepare your escape route to the nearest extraction point
- Consider popping a shield recharge if needed
Step 6: Climb Back Up and Collect Your Loot
Once the flames clear, climb back up to the Baron Husk’s head and collect your hard-earned loot. The breached husk will contain various components useful for crafting and upgrades.
Pro Tip: If you have Safe Pockets unlocked, immediately secure the most valuable items to prevent loss if you get ambushed during extraction.

Dormant Barons Quest Rewards in ARC Raiders
After successfully looting Baron Husks and extracting back to Speranza, head to the quest giver to claim your rewards:
- Door Blockers x3 – Tactical equipment for controlling enemy movement and securing areas
- Li’l Smoke Grenade x3 – Essential for survival tactics and safe extractions
While these aren’t the flashiest rewards in the game, Door Blockers are genuinely useful for later-game content where you need to funnel enemies or block off dangerous approach angles. The smoke grenades are clutch for escaping sticky situations, especially around contested extraction points.
Advanced Baron Husk Farming Strategy (Maximize Efficiency)
If you’re looking to farm Baron Husks efficiently beyond just completing the quest, here’s a strategy that maximizes your haul:
Optimal Baron Husk Farming Route
- Spawn into Dam Battlegrounds with a balanced loadout
- Hit Old Battleground first (safest)
- Move to Water Treatment Control second
- Only attempt The Breach if you’re confident and well-equipped
- Combine with nearby objectives like Dam Control Tower or Dam Surveillance Key locations
Best Loadout for Baron Husk Farming
- Primary Weapon: Mid-range rifle for dealing with Wasps/Hornets
- Secondary: Close-quarters option for surprise encounters
- Utility: Smoke grenades, healing items, and a Raider Hatch Key for emergency extractions
- Backpack: Maximum storage space to carry all loot
Baron Husk Respawn Timers and Timing Considerations
Baron Husks respawn between matches, but within a single raid, once they’re looted, they’re done. If you find empty husks, another raider beat you to them. Consider switching servers or focusing on other quests in that run.
Common Baron Husk Looting Mistakes to Avoid
1. Breaching Without Scouting
Always clear the immediate area of enemies before starting the breach. That 10-15 second window is enough for a Wasp to shred you if you’re caught unaware.
2. Staying on the Husk After Breach
Seriously, jump off immediately. The fire doesn’t care about your bravery—it will kill you.
3. Going to The Breach Too Early
If you’re undergeared or new to the game, The Breach’s Sentinel will make you regret your life choices. Start with easier locations and build confidence first.
4. Forgetting to Extract
Looting Baron Husks means nothing if you die before extraction. Always have a clear path to the nearest Testing Annex or Raider Hatch.
5. Ignoring Audio Cues
The rumbling sound tells you if a husk is available. If you don’t hear it, don’t waste time climbing up—the loot’s already gone.
How to Combine Dormant Barons with Other ARC Raiders Quests
Since you’re already in Dam Battlegrounds, consider stacking multiple objectives to maximize efficiency:
Quest Synergies:
- Water Troubles – Quick water sampling quest nearby
- Straight Record – Victory Ridge EMP objectives in the same zone
- After Rain Comes – Celeste’s Sonar Panel quest
- Hidden Bunker Event – If the event spawns, it’s worth checking
Resource farming while completing Dormant Barons:
- Grab Mechanical Components from nearby structures
- Collect Rusted Gears and Rusted Tools
- Check buildings for blueprint farming opportunities
Platform Information & Getting Started
Download ARC Raiders:
- Official Website: ARC Raiders
- PlayStation: PS Store
- Xbox: Xbox Store
New to the Game? Check out these essential guides:
Final Tips for Dormant Barons Quest Success
The Dormant Barons quest is one of those missions that looks intimidating but becomes routine once you understand the mechanics. Those massive Baron Husks might seem like dangerous puzzle boxes, but they’re really just timed loot containers with a fire hazard.
The key is preparation: know your locations, scout before breaching, and always—always—jump off before the fire starts. Start with Old Battleground or Water Treatment Control to get comfortable with the process, and only tackle The Breach when you’re ready for a real fight.
Most importantly, remember that this quest is about risk management. You don’t need to loot every Baron Husk in one run. Take your time, play smart, and extract with your loot intact. Those Door Blockers and smoke grenades are nice, but they’re worthless if you die before turning in the quest.
Now get out there and show those dormant giants who’s boss. Just watch out for the flames.
Looking for more quest guides? Browse our complete ARC Raiders quest list for walkthroughs and expert strategies.