What Is the Hidden Bunker Event?
ARC Raiders Hidden Bunker represents one of ARC Raiders’ most dynamic Hidden Bunker events —a limited-time occurrence that fundamentally transforms the Spaceport map and creates intense player competition for premium underground loot. When this event activates, the entire lobby dynamics shift as players race to unlock access to a massive subterranean complex filled with valuable resources.
Unlike static locations you can visit anytime, the Hidden Bunker only becomes accessible during specific event windows, and unlocking it requires coordinated effort across multiple rooftop locations. This creates a fascinating tension: do you cooperate with other players to unlock the bunker faster, or do you eliminate the competition before they can claim the rewards?
When Does ARC Raiders Hidden Bunker Event Start? (Schedule)
The Hidden Bunker event triggers on Spaceport map deployments when specific conditions are met. You’ll know the event is active when you see rooftop antenna symbols appear on your map at the start of a raid.
Event Indicators:
- Four antenna icons appear on the map (locations vary each time)
- Reduced number of active Return Points
- All Raider Hatches are disabled during the event
- Map notification announces Hidden Bunker event status
Critical Warning: The disabled Raider Hatches mean your safe extraction options are severely limited. You’ll need to rely on standard Return Points, which are also reduced in number. This dramatically increases extraction risk, especially after looting the bunker when you’re carrying valuable items.
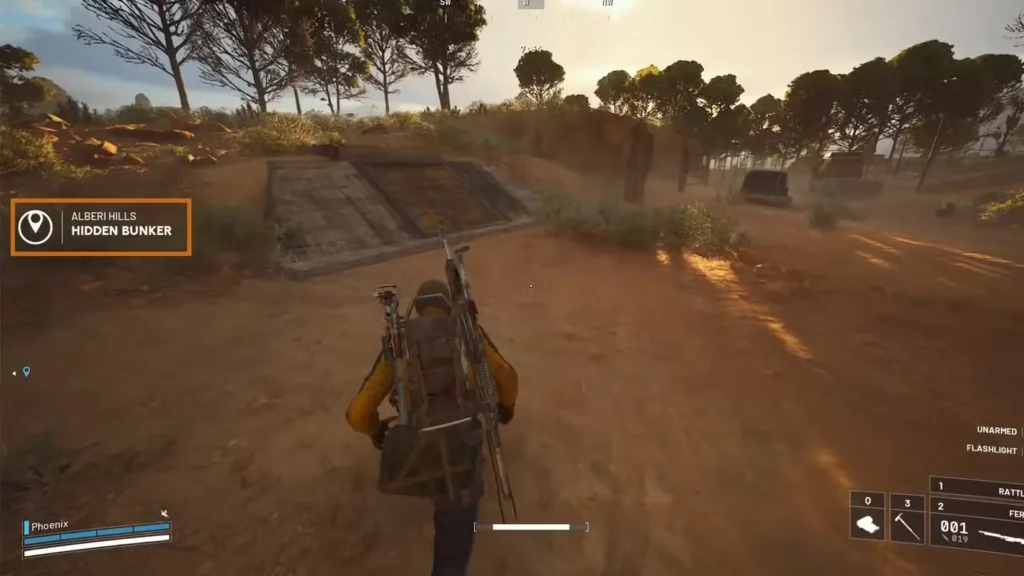
ARC Raiders Hidden Bunker Location on Spaceport Map
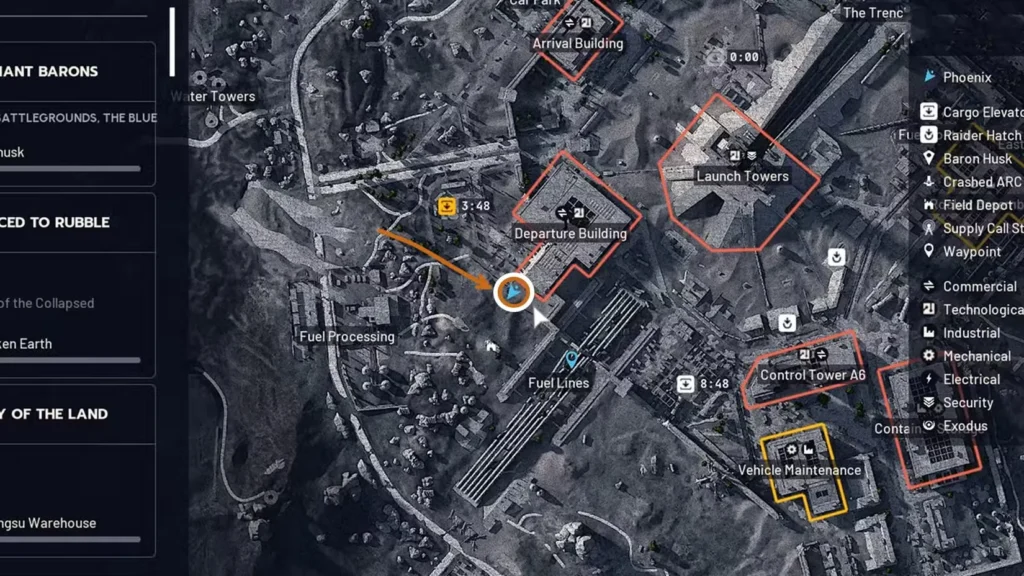
Primary Location
The Hidden Bunker entrance sits near the Departure Building in Spaceport—one of the map’s most contested and dangerous areas even during normal raids. When the event is active, this location becomes an absolute warzone.
Map Position: Near Departure Building POI
Danger Level: Extreme (High ARC density + maximum player competition)
Underground Coverage: Spans from Fuel Processing to Fuel Lines areas
Multiple Access Points
One of the Hidden Bunker’s clever design elements is its multiple entrance points scattered across the Fuel Processing and Fuel Lines zones. All entrances connect to the same underground network, meaning:
- You can enter from different locations to avoid chokepoints
- If one entrance is camped by hostile players, alternatives exist
- The underground area is larger than most players expect
- Navigation inside requires attention to avoid getting disoriented
Proximity Notification: When you approach any entrance (once unlocked), a notification will appear confirming you’ve reached the Hidden Bunker. This helps prevent confusion about whether you’re at the right location.
How to Unlock Hidden Bunker: 4 Antenna Locations Guide
Unlocking the bunker isn’t a single-player sprint—it’s a map-wide scavenger hunt that pits you against both ARCs and rival players racing for the same objective.
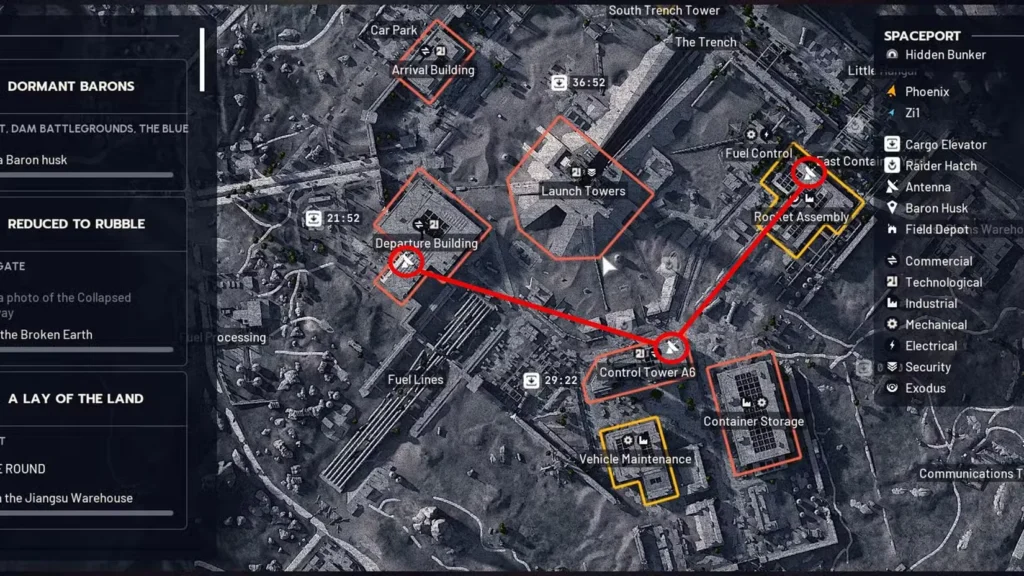
Understanding the Antenna System
At the raid’s start, four rooftop antenna locations spawn randomly across Spaceport. These aren’t in fixed positions, so each event plays out differently. The antennas only appear during Hidden Bunker events, making them your primary navigation targets.
Key Characteristics:
- Located exclusively on building rooftops
- Require vertical navigation to reach
- Each antenna must be activated in a two-step process
- All four antennas must be activated to unlock the bunker
Step-by-Step Antenna Activation Process
1. Identify Antenna Locations
Open your map and locate the four antenna icons. They’ll be scattered across different areas of Spaceport, often separated by significant distance.
Strategic Consideration: Decide whether to:
- Solo clear all four – Maximizes your potential bunker rewards but takes longer
- Split with squad – Faster unlocking but requires coordination
- Follow other players – Let them do the work, then contest the bunker entrance
2. Navigate to Rooftop Positions
Since antennas are exclusively on rooftops, you’ll need vertical mobility:
Essential Equipment:
- Ziplines – Most reliable method for rooftop access (bring 2-3 minimum)
- Grappling Hook – Provides flexible climbing options
- Parkour routes – Some buildings have accessible climbing paths
Pro Tip: Scout your route before committing. Some rooftops have easier access points than others, and taking a few extra seconds to find the optimal path beats getting stuck mid-climb while exposed to sniper fire.
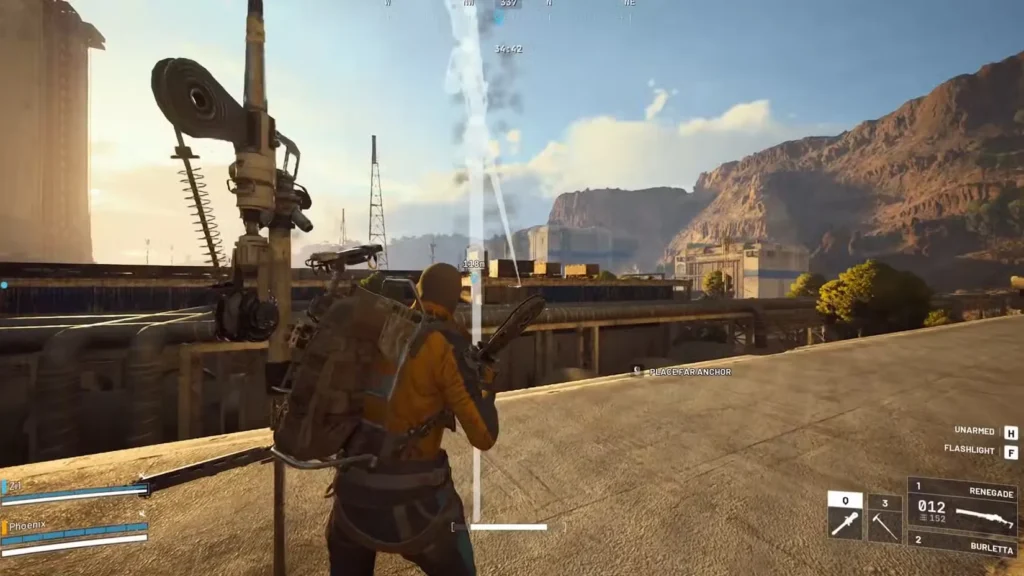
3. Initial Antenna Interaction
When you reach an antenna, you’ll see an interaction prompt. Activate it to establish connection.
What Happens Next:
- The antenna begins transmitting
- ARC enemies immediately spawn nearby (typically 2-4 units)
- Combat becomes mandatory—there’s no stealth option here
4. Defend and Eliminate ARCs
The spawned ARCs will aggressively engage you. These aren’t passive patrols—they know where you are and will attack immediately.
Combat Tips:
- Position yourself with cover before activating the antenna
- Use upgraded weapons for quick elimination
- Watch for additional ARC reinforcements from nearby areas
- Keep an eye out for opportunistic players attacking during the fight
Enemy Types: Expect standard ARC units like Pops, Fireballs, and occasionally Sentinels depending on the rooftop location.
5. Complete Activation
After eliminating all spawned ARCs, return to the antenna. A new interaction prompt appears, allowing you to send the unlock signal to the Hidden Bunker.
This final interaction completes that antenna’s activation. The bunker won’t open until all four antennas are fully activated.
6. Repeat for Remaining Antennas
Navigate to the next antenna location and repeat the process. Each antenna follows the same pattern: initial activation → defend against ARCs → final activation.
Progress Tracking: The game provides feedback when antennas are activated. Pay attention to map notifications or visual cues indicating how many antennas remain.
Cooperative vs. Competitive Approaches
The antenna system creates interesting strategic decisions:
Full Cooperation:
- Multiple players/squads split up to activate antennas simultaneously
- Bunker unlocks faster, but more competitors share the loot
- Lower individual risk but shared rewards
Competitive Racing:
- Each player/squad tries to activate antennas while preventing others
- Higher risk but potential for exclusive bunker access
- Creates dynamic PvP encounters at antenna locations
Hybrid Strategy:
- Cooperate to unlock quickly, then compete at the bunker entrance
- Most common approach in practice
- Requires quick positioning after final antenna activation
What Happens When ARC Raiders Bunker Opens
Once all four antennas are activated, the Hidden Bunker entrance becomes accessible. A map-wide notification typically announces the unlock, alerting all players that the race to the bunker is on.
Immediate Aftermath:
- Rush to the nearest entrance point
- Expect heavy player convergence at main entrances
- ARC defenders guard the interior
- First arrivals get first pick of loot
The Golden Window: There’s approximately a 30-60 second window between unlock notification and when most players arrive at entrances. If you’re positioned near the Departure Building area when the final antenna activates, you gain a crucial head start.
Inside ARC Raiders Hidden Bunker: Loot, Enemies & Layout
The bunker’s underground network is more extensive than most players anticipate on their first visit.
Layout & Navigation
Coverage Area: Spans from Fuel Processing to Fuel Lines
Structure: Multi-room complex with connecting tunnels
Multiple Levels: Some areas have vertical elements
Navigation Challenges:
- Limited lighting in certain sections
- Multiple pathways can cause disorientation
- Easy to lose track of which entrance you used
- Some areas have bottleneck chokepoints perfect for ambushes
Safety Tip: Remember your entry point and plan your extraction route before getting deep into looting. Getting turned around underground with valuable loot and hostile players nearby is a recipe for disaster.
Loot Quality & Distribution
While specific loot tables aren’t confirmed, the Hidden Bunker typically contains:
Expected High-Value Items:
- Rare weapon blueprints
- Advanced crafting materials like Advanced Mechanical Components
- Premium weapon attachments
- High-tier shields and healing items
- Potentially legendary items from secured containers
Loot Distribution Strategy:
- High-value items concentrated in deeper bunker sections
- Security rooms may require breaching or keys
- Multiple loot rooms mean you don’t need to clear everything
- Grab and go often beats thorough clearing
Enemy Presence Underground
The bunker isn’t empty when you arrive. Expect:
ARC Defenders:
- Stationary turrets guarding key corridors
- Patrolling ARC units
- Potentially elite enemy types in deeper sections
Hostile Players:
- Other squads competing for loot
- Solo players attempting ambushes
- Teams controlling chokepoints
Combat Environment: Tight corridors favor close-quarters weapons like shotguns and SMGs. Long sightlines in some areas make rifles viable. The confined space makes explosives risky—you might damage yourself.
Survival Strategies for the Hidden Bunker Event
Pre-Event Preparation
Loadout Recommendations:
Essential Gear:
- 2-3 Ziplines for antenna access
- Medium to Heavy Shield (bunker is extremely dangerous)
- Upgraded weapons with good close-quarters performance
- Multiple healing items (Defibrillators, Vita Shots)
- Grenades for ARC turrets and player encounters
Augment Choices:
- Safe Pocket augments to protect high-value bunker loot
- Combat-focused augments for PvP encounters
- Healing augments for sustained fights
What NOT to Bring:
- Raider Hatch Keys (completely useless during this event)
- Long-range sniper rifles (limited use in tight bunker corridors)
- Excessive non-combat items
During Antenna Activation
Solo Player Strategy:
- Activate the nearest antenna first
- Move to the next closest (minimize travel time)
- Stay unpredictable—don’t follow the obvious shortest path
- If you encounter another player at an antenna, assess: fight or move to a different one?
- Save some healing items for the bunker itself
Squad Strategy:
- Split up to activate multiple antennas simultaneously
- Designate one player to position near the bunker entrance
- Call out when antennas are complete
- Regroup before entering the bunker (safety in numbers underground)
Dealing with PvP at Antennas:
- The rooftop environment favors positioning and cover use
- Use the ARC spawns as a distraction if attacked by players
- Smoke grenades can cover your escape if overwhelmed
- Sometimes abandoning a contested antenna for a clear one is smarter
Inside the Bunker
Entry Protocol:
- Don’t rush blindly through the entrance—check for campers
- Clear the immediate entrance area before advancing
- Use audio cues to detect other players deeper inside
- Move methodically—speed gets you killed in tight spaces
Looting Efficiency:
- Prioritize secured rooms and high-value containers
- Don’t overstay—grab quality items and extract
- Check your backpack space before entering
- Leave common items—only take premium loot worth the risk
Extraction Planning:
- Know where the nearest Return Point is before entering
- Account for the reduced number of extraction points
- Plan an alternate route if your primary extraction looks contested
- Extract slightly early rather than wait until you’re fully loaded
Common Mistakes to Avoid
❌ Bringing Raider Hatch Keys – They don’t work during this event
❌ Going solo without proper gear – The bunker punishes undergeared players
❌ Activating antennas without ziplines – Some rooftops are nearly impossible without them
❌ Staying too long in the bunker – Greed gets you killed, extract with valuable items
❌ Ignoring audio cues – Other players and ARCs make noise—listen carefully
❌ Using the same entrance everyone else uses – Avoid the obvious chokepoint
❌ Forgetting about limited extraction points – Plan your exit before entering
Hidden Bunker Risk vs Reward: Should You Participate?
Why Participate?
Potential Rewards:
- Access to rare loot not commonly available elsewhere
- Significant XP gains from ARC eliminations
- Exclusive items that accelerate progression
- Exciting gameplay different from standard raids
Risks to Consider:
- Highest player competition on the entire map
- No Raider Hatch safety net
- High gear investment with potential loss
- Time investment (antenna activation + bunker exploration)
- Limited extraction options create bottlenecks
When to Skip the Event
The Hidden Bunker isn’t always worth pursuing:
Skip If:
- You’re running a low-value loadout and can’t compete effectively
- The map is extremely hot with multiple aggressive squads
- You’re working on other quests that don’t involve the bunker
- You’re low on resources for proper loadout preparation
- Your squad composition isn’t suited for intense close-quarters PvP
Participate If:
- You have a well-equipped loadout you’re willing to risk
- Your squad has good coordination and communication
- You need specific high-tier items the bunker provides
- You’re confident in your PvP skills
- You enjoy high-risk, high-reward gameplay
Integration with Other Gameplay Systems
The Hidden Bunker event connects to broader game mechanics:
Skill Synergy: Early game skills focused on combat and survivability pay off here
Crafting Materials: Bunker loot contributes to workbench upgrades and weapon modifications
Currency Generation: High-value items can be sold for coin farming
Blueprint Collection: Rare blueprints found here expand your crafting options
Quest Progression: Some high-tier trader quests may eventually require bunker access or materials
Advanced Hidden Bunker Tactics & Strategies
The Antenna Manipulation Strategy
If you activate three antennas but intentionally leave the fourth inactive, you control when the bunker opens. This allows you to:
- Position yourself optimally near the entrance
- Eliminate competing players before unlocking
- Clear the path to your preferred entrance
- Time the unlock for when reinforcements arrive
Ethical Note: This strategy is time-consuming and potentially frustrating for other players, but it’s tactically sound in competitive environments.
The Ambush Approach
Instead of activating antennas yourself:
- Let other players do the work
- Position near the bunker entrance
- Ambush players as they try to enter
- Take their loot after elimination
Risk: Other players may use the same strategy, creating a Mexican standoff at the entrance.
The Quick Hit Strategy
For risk-averse players:
- Wait for the bunker to unlock (don’t participate in antenna activation)
- Use a less popular entrance point
- Rush to one specific high-value area
- Grab premium items quickly
- Extract immediately via the nearest Return Point
Advantage: Minimizes time in the danger zone while still accessing valuable loot.
Final Thoughts on the Hidden Bunker Event
The Hidden Bunker represents ARC Raiders at its most intense—combining PvE challenges, PvP competition, map-wide coordination requirements, and high-stakes loot into one dynamic event. It’s not for the faint of heart, but successfully navigating the antenna activation and bunker exploration can yield some of the best rewards in the game.
The event’s genius lies in its forced player interaction. Unlike standard raids where you can avoid others if you’re careful, the Hidden Bunker creates inevitable confrontation points: at antennas during activation, at entrance chokepoints, and inside the bunker’s corridors. This makes every event unique and unpredictable.
Whether you choose to participate depends on your risk tolerance, gear availability, and gameplay preferences. Some players will chase every Hidden Bunker event for the premium loot and excitement. Others will avoid it entirely, preferring the more controlled risk of standard loot routes and quest completion.
If you do decide to dive in, remember: preparation matters more than luck, positioning beats raw firepower, and knowing when to extract is just as important as knowing when to push deeper.
Available Now: PlayStation | Xbox | Official Site
What’s your Hidden Bunker strategy? Do you compete for antennas or ambush at the entrance? Share your most intense bunker experience in the comments!