The Medical Lab Bottleneck
Cracked Bioscanners represent one of ARC Raiders‘ most frustrating progression barriers. You need these rare devices to upgrade your Medical Lab to tier two, which unlocks critical healing capabilities and better recovery options. But unlike common materials you’ll stumble upon constantly, Cracked Bioscanners spawn infrequently and only in specific locations.
The randomized loot distribution system that makes ARC Raiders exciting also creates situations where you’ll search the same medical facility five times before finally seeing a Bioscanner. This isn’t a quest with guaranteed spawns or clear objectives—it’s pure RNG-based farming that tests your patience and map knowledge.
Understanding where these devices spawn and how to farm them efficiently can save you hours of frustration. Let’s break down exactly where to look and how to maximize your chances of finding Cracked Bioscanners without wasting raids.
Cracked Bioscanner Uses – ARC Raiders Medical Lab Upgrades
Before diving into farming strategies, let’s clarify why you need these devices:
Primary purpose:
- Medical Lab upgrade from tier 1 to tier 2
- Essential component for Workshop progression
- Unlocks better healing crafting recipes
- Improves recovery capabilities for sustained raids
Why the Medical Lab matters:
Upgrading your Medical Lab allows you to craft better healing items, process medical supplies more efficiently, and generally survive longer during expeditions. It’s one of the core Workshop upgrades that directly impacts your combat effectiveness.
Other potential uses:
- Training Scrappy, your dog companion
- Future quest requirements (some missions may need these)
- Trading with other players if that becomes available
The Medical Lab upgrade is significant enough that Cracked Bioscanners become a legitimate progression gate for mid-game players.
Cracked Bioscanner Spawn Mechanics and RNG System
Cracked Bioscanners operate on a frustrating spawn system:
Key characteristics:
- Medical building exclusive – Only spawn in designated medical facilities
- Random spawn chance – Not guaranteed on every raid
- Rare rarity tier – Lower spawn probability than common items
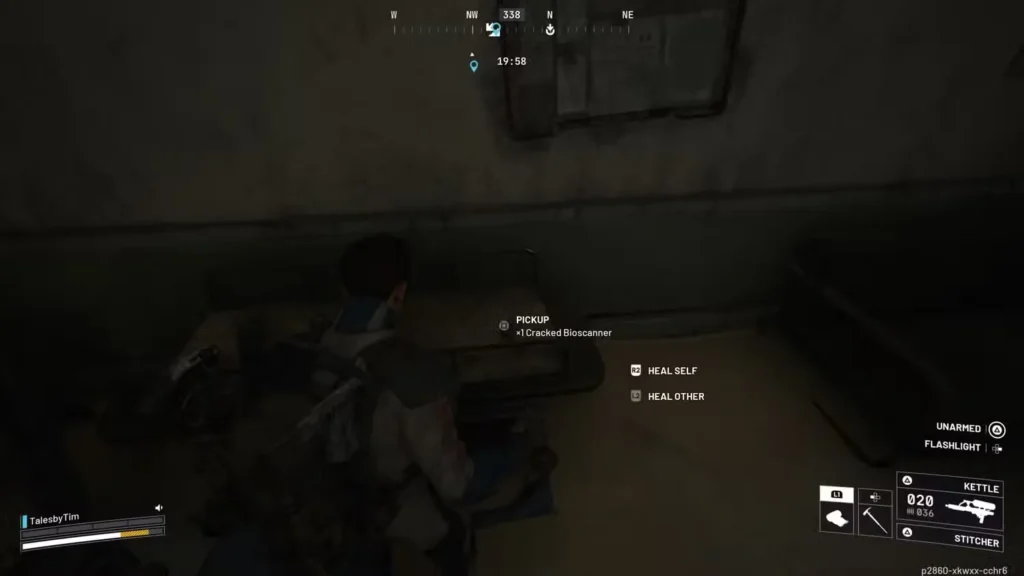
- Container-based – Found inside lootable objects, not lying around
- No respawn timer visibility – You can’t tell if a building was recently looted
What this means practically:
You might check the Hospital in Buried City ten times and find nothing, then discover three Bioscanners in three consecutive raids. The randomness is real, and there’s no trick to “force” spawns—it’s pure persistence and volume of attempts.
Comparison to other rare items:
If you’ve hunted ARC Surveyors or farmed Sentinel Firing Cores, you’ll recognize this pattern. Rare items require dedicated farming sessions, not casual discovery.
ARC Raiders Bioscanner Maps – Only Buried City & Dam Battlegrounds
Unlike resources that spawn everywhere, Cracked Bioscanners have strict map limitations:
Maps WITH Medical Buildings
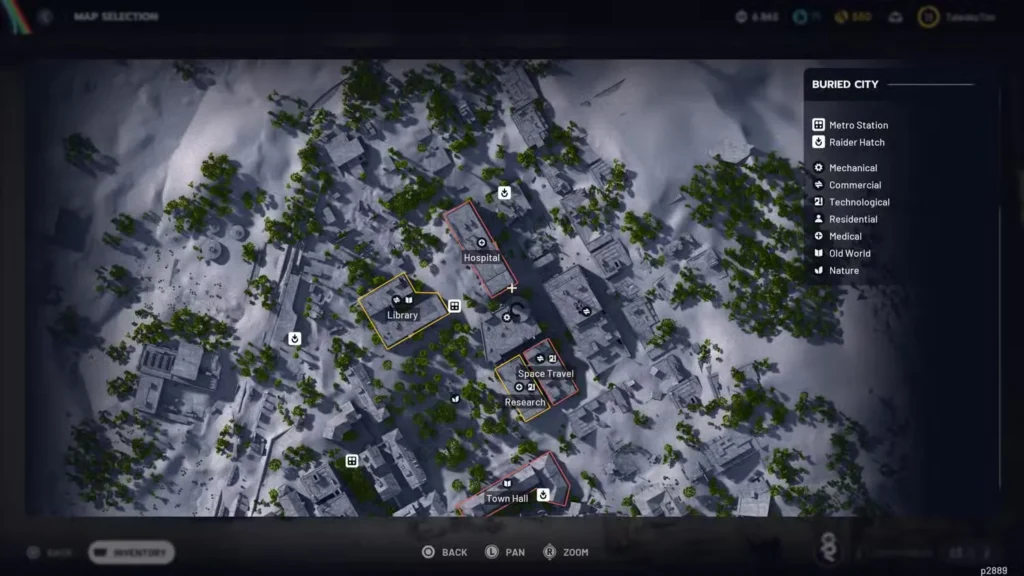
Buried City ✓
- Hospital (best location)
- Research facility
- Piazza Arbusto
- Plaza Rosa
Dam Battlegrounds ✓
- Testing Annex
Maps WITHOUT Medical Buildings
The Blue Gate ✗
Spaceport ✗
If you’re farming Bioscanners, completely ignore The Blue Gate and Spaceport. They don’t have medical facilities, meaning zero chance of Bioscanner spawns. Focus exclusively on Buried City and Dam Battlegrounds.
Strategic implication:
This limited map pool actually helps efficiency. Instead of checking four maps, you only need to rotate between two. If you’re comfortable navigating Buried City, you can farm there exclusively without missing opportunities.
Best Location: Buried City Hospital
The Hospital in Buried City is unquestionably your primary farming target:
Why Hospital Is Superior
Loot tier advantage:
- High loot value designation – Uncommon and rare items spawn more frequently
- Multiple lootable containers – More spawn chances per visit
- Larger building – More rooms to search means more opportunities
Spawn rate comparison:
While exact percentages aren’t public, players consistently report better Bioscanner discovery rates at Hospital compared to other medical locations. The high loot value tag makes a noticeable difference.
Navigating the Hospital
If you’ve completed Medical Merchandise quest, you already know this location. Here’s the farming-specific approach:
Entry strategy:
- Use scaffolding entrance on building exterior
- Enter through upper floors to avoid ground-level congestion
- Clear ARCs first if you’re running a free loadout
- Watch for other players – Hospital is a known farming spot
Systematic search pattern:
- Pick a floor and clear it completely
- Check every lootable container:
- Medical cabinets
- Drawers in examination rooms
- Storage lockers
- Wardrobes in patient rooms
- Don’t skip surfaces – Bioscanners can spawn on tables and hospital beds
- Move to next floor and repeat
Time investment:
A thorough Hospital search takes 3-5 minutes if you’re not interrupted. Factor in potential PvP and ARC encounters—realistic raid time is 10-15 minutes per attempt.
PvP Considerations at Hospital
The Hospital’s high loot value attracts players constantly. Expect company:
Risk management:
- Bring defensive gear – At minimum a Ferro shield
- Use Safe Pockets for any Bioscanners you find
- Listen for audio cues – Footsteps and gunfire indicate nearby threats
- Have extraction planned – Know your nearest hatch location
When to fight vs. flee:
If you’ve already found a Bioscanner, extraction becomes priority #1. Don’t risk losing it over additional loot or pride. If you haven’t found one yet and encounter hostiles, assess whether fighting or repositioning makes more sense.
Buried City Cracked Bioscanner Locations – Research Facility & Piazzas
If Hospital is too contested or you want variety, Buried City offers three other medical spots:
Research Facility
Loot tier: Medium
Container density: Moderate
PvP risk: Medium to high
The Research facility contains medical equipment and has decent spawn chances. It’s smaller than Hospital but sees less player traffic, making it a safer alternative.
When to choose Research:
- Hospital is too hot with PvP activity
- You’re combining Bioscanner farming with other Buried City objectives
- You prefer medium-risk, medium-reward farming
Search strategy:
Focus on laboratory areas and storage rooms. Medical equipment tends to cluster in research sections rather than administrative spaces.
Piazza Arbusto
Loot tier: Low to medium
Container density: Low
PvP risk: Low
Piazza Arbusto is a smaller medical site with fewer containers, meaning lower spawn probability. However, its low traffic makes it safe for casual farming.
When to choose Piazza Arbusto:
- You’re risk-averse and running expensive gear
- Learning Buried City navigation
- Combining with nearby objectives
Realistic expectations:
Don’t expect frequent Bioscanner spawns here. This is a “might as well check while I’m nearby” location rather than dedicated farming spot.
Plaza Rosa
Loot tier: Low to medium
Container density: Low
PvP risk: Low to medium
Similar to Piazza Arbusto—smaller facility with fewer spawn opportunities but correspondingly lower risk.
Strategic use:
Include Plaza Rosa in a Buried City farming route where you hit multiple medical locations per raid. Alone, it’s not worth dedicated trips.
Dam Battlegrounds: Testing Annex
The Testing Annex represents your only medical location option on Dam Battlegrounds:
Testing Annex Overview
Loot tier: Medium
Container density: Moderate
PvP risk: High
Location context:
Testing Annex sits in a relatively central position on Dam Battlegrounds, making it accessible but also contested. Players farming blueprint locations or completing Control Tower objectives often pass through this area.
Why Testing Annex Is Less Popular
Compared to Hospital:
- Smaller building with fewer containers
- Medium loot tier vs. Hospital’s high tier
- More ARC presence in surrounding areas
- Higher player traffic relative to spawn chances
When to farm Testing Annex:
- You’re already on Dam Battlegrounds for other reasons
- Buried City servers are full or too laggy
- You want to mix up your farming routine
- Completing quests like A First Foothold simultaneously
Testing Annex Search Strategy
Efficient approach:
- Enter from the safest available entrance
- Clear immediate threats (ARCs or hostile players)
- Systematically loot all medical containers
- Exit quickly – Don’t linger in contested areas
Container priorities:
- Medical storage units (highest priority)
- Laboratory drawers and cabinets
- Supply closets
- Surface spawns on medical equipment
The smaller building size means faster searches, but lower spawn rates balance the time efficiency.
Optimal Farming Route Strategy
Maximize Bioscanner discovery by creating efficient farming circuits:
Route 1: Hospital Focus (Highest Efficiency)
For dedicated Bioscanner farming:
- Deploy to Buried City – Spawn near Hospital
- Enter Hospital via scaffolding
- Thoroughly search all floors
- Extract immediately if you find a Bioscanner
- Repeat – Deploy again for another attempt
Why this works:
- Targets the highest spawn probability location
- Minimizes time between attempts
- Reduces death risk by avoiding exploration
When to use: When you specifically need Bioscanners and nothing else matters.
Route 2: Buried City Medical Circuit
For mixed farming efficiency:
- Spawn Buried City near Hospital
- Search Hospital thoroughly
- Move to Research facility if nothing found
- Check Piazza Arbusto if still empty
- Hit Plaza Rosa as final attempt
- Extract with findings
Why this works:
- Checks multiple spawn locations per raid
- Increases overall probability of finding Bioscanners
- Collects bonus loot along the route
When to use: When you have time for longer raids and want to maximize each expedition.
Route 3: Two-Map Rotation
For variety and patience:
- Raid 1: Buried City Hospital
- Raid 2: Dam Battlegrounds Testing Annex
- Raid 3: Buried City Hospital
- Repeat cycle
Why this works:
- Prevents burnout from farming same location
- Potentially allows spawn reset time (unconfirmed but possible)
- Lets you farm other Dam Battlegrounds resources
When to use: When you’re farming multiple resources across maps and can afford slower Bioscanner accumulation.
Loadout Recommendations for Bioscanner Farming
Your gear choices should reflect the farming environment:
Budget Farming Loadout
For low-risk Hospital runs:
- Weapon: Basic assault rifle for self-defense
- Shield: Ferro or equivalent
- Healing: Mushrooms or prickly pears
- Safe Pockets: Critical for protecting Bioscanners
Total cost: Minimal, acceptable loss risk
Free Loadout Consideration
Pros:
- Zero financial risk
- Fast respawn if you die
- No gear anxiety while looting
Cons:
- No Safe Pocket access
- Vulnerable to PvP
- Limited ARC combat capability
Verdict: Only use free loadouts at lower-traffic locations like Piazza Arbusto or Plaza Rosa. Hospital’s PvP risk makes minimal gear investment worthwhile.
Premium Farming Loadout
For serious farming sessions:
- Upgraded weapons with decent mods
- Better shield for sustained fights
- Tactical grenades for ARC clearing
- Full Safe Pocket access
When to use: If you’re also farming blueprints or other high-value items simultaneously.
Safe Pocket Strategy for Cracked Bioscanners – Critical Tip
This cannot be stressed enough—ALWAYS use Safe Pockets when farming Cracked Bioscanners:
Why Safe Pockets Are Mandatory
The problem:
- Bioscanners are rare (hard to find)
- Medical buildings are contested (high death risk)
- They’re essential for progression (can’t just “find another”)
The solution:
Safe Pockets guarantee you keep Bioscanners even if you die. Given the time investment in finding one, losing it to death would be devastating.
How to use properly:
- Equip gear with Safe Pocket slots before deploying
- Immediately transfer any Bioscanner you find to Safe Pocket
- Prioritize extraction once you have one
- Don’t risk unnecessary fights while carrying valuable items
Review our complete Safe Pockets guide if you’re unclear on how this system works.
Cracked Bioscanner Surface Spawns – Tables and Bed Locations
One commonly overlooked aspect of Bioscanner farming:
Container vs. Surface Spawns
Traditional container locations:
- Drawers
- Cabinets
- Lockers
- Wardrobes
Surface spawn locations:
- Medical examination tables
- Hospital beds
- Equipment carts
- Countertops and desks
Why this matters:
Many players systematically check containers but ignore surfaces. Bioscanners can spawn on top of furniture, ready to be grabbed without opening anything.
Adjustment to search pattern:
As you clear each room, visually scan all surfaces before moving to the next area. That extra two seconds per room might save you an entire additional raid.
Time Efficiency: How Long Does This Take?
Setting realistic expectations for Bioscanner farming:
Average Discovery Time
Optimistic scenario:
- 3-5 raids to find your first Bioscanner
- ~30-60 minutes total time investment
Realistic scenario:
- 10-15 raids for consistent Bioscanner discovery
- 2-3 hours of farming
Pessimistic scenario (unlucky RNG):
- 20+ raids before finding one
- 4+ hours of dedicated farming
Factors affecting your results:
- Location choice (Hospital vs. lesser sites)
- Thoroughness of searches (missing containers)
- Competition from other players (shared loot pools)
- Pure RNG luck
Patience Management
Psychological tips:
- Set session limits – “I’ll do 5 Hospital runs then take a break”
- Combine with other objectives – Don’t farm Bioscanners exclusively
- Track your attempts – Knowing you’ve done 12 runs makes 13 feel closer to success
- Remember the reward – Medical Lab upgrade is worth the grind
If you’re getting frustrated, switch to other activities like leveling up or coin farming, then return to Bioscanner hunting fresh.
Common Mistakes to Avoid
Mistake #1: Farming Wrong Maps
The error: Checking Spaceport or The Blue Gate hoping for Bioscanners
The fix: Only Buried City and Dam Battlegrounds have medical buildings—ignore other maps entirely for this purpose.
Mistake #2: Rushing Through Searches
The error: Quickly checking obvious containers then leaving
The fix: Methodically search EVERY drawer, cabinet, and surface. The one you skip might contain your Bioscanner.
Mistake #3: Not Using Safe Pockets
The error: Finding a Bioscanner, dying before extraction, losing it
The fix: Always—ALWAYS—use gear with Safe Pocket slots when farming rare items.
Mistake #4: Fighting Unnecessarily
The error: Engaging every player and ARC you encounter
The fix: You’re farming Bioscanners, not hunting players. Avoid combat when possible, especially after finding what you need.
Mistake #5: Solo Farming High-Risk Locations
The error: Running Hospital solo with free gear repeatedly and dying
The fix: Either bring friends for security or farm lower-risk locations alone.
Other Ways to Get Cracked Bioscanners in ARC Raiders
Currently, the only confirmed method of obtaining Cracked Bioscanners is looting them from medical buildings. However, keep an eye on:
Potential Future Sources
Vendor purchases: Some rare items eventually become purchasable—check vendors periodically
Quest rewards: Future quests might offer Bioscanners as rewards (like Surveyor Vaults from Mixed Signals)
Trading systems: If player trading launches, Bioscanners might become tradeable
Event rewards: Seasonal events could offer alternative acquisition paths
For now, though, farming is your only option. Stay persistent.
What to Do After Finding Cracked Bioscanners – Next Steps
Once you successfully loot a Cracked Bioscanner:
Immediate Actions
Step 1: Safe Pocket transfer – Move it to protected slot IMMEDIATELY
Step 2: Navigate to extraction – Don’t explore more or get greedy
Step 3: Extract successfully – Use nearest Raider Hatch
Step 4: Store or use – Either upgrade Medical Lab or save in stash
How Many Do You Need?
For Medical Lab upgrade: Check your Workshop requirements (usually 1-2)
For future needs: Consider farming extras if you have time
For trading: If trading becomes available, extras hold value
Most players need 1-2 Bioscanners for their immediate progression needs. Farm accordingly.
Additional Medical Building Loot – Bonus Items to Collect
While farming Bioscanners, you’ll encounter other valuable medical supplies:
Bonus Loot to Collect
Healing items:
- Medical supplies
- Prickly pears
- Bandages and stims
Crafting materials:
- Mechanical components
- Rusted tools
- Electronic components
Quest items:
- If you haven’t completed Medical Merchandise, grab those containers too
Strategic approach:
Since you’re already in medical buildings searching for Bioscanners, grab everything valuable. Efficient raiders never leave loot behind.
Squad Farming Strategies
Farming with teammates changes the approach:
Team Composition for Bioscanner Farming
Optimal 3-person setup:
- 1 dedicated looter – Systematically searches containers
- 1 overwatch – Watches for threats from defensive position
- 1 roamer – Clears ARCs and scouts for hostiles
Communication priorities:
- “Bioscanner found” – Immediate extraction protocol
- “Hostiles incoming” – Coordinate defense or retreat
- “Area clear” – Continue systematic search
Loot distribution:
Decide beforehand who keeps any Bioscanners found to avoid disputes. Alternatively, each player searches different buildings.
Solo vs. Squad Efficiency
Solo advantages:
- All Bioscanners go to you
- Faster movement and searches
- Quieter profile (less detectable)
Squad advantages:
- Security during vulnerable looting
- Can farm multiple buildings simultaneously
- Better survival rate if ambushed
- Morale support during unlucky RNG streaks
Choose based on your available friends and preferred playstyle.
ARC Raiders Medical Lab Benefits – Why You Need Bioscanners
Understanding the bigger picture helps motivation during frustrating RNG:
Medical Lab Benefits
Tier 2 unlock capabilities:
- Better healing item crafting
- More efficient resource processing
- Advanced medical recipes
- Improved recovery options
Competitive advantage:
Players with upgraded Medical Labs can sustain longer raids, heal more efficiently, and survive situations that would kill others. It’s a significant competitive edge.
Other Workshop synergies:
Medical Lab progression ties into overall Workshop upgrades, contributing to your base’s total capability.
This isn’t just about finding one rare item—it’s about unlocking an entire tier of progression that affects every future raid.
Cracked Bioscanner Farming Summary – Key Takeaways
Finding Cracked Bioscanners tests your patience more than your skill. This isn’t a challenging combat encounter or complex puzzle—it’s pure persistence against RNG while navigating contested PvP zones.
Key takeaways:
- Focus on Hospital in Buried City – Best spawn rates
- Always use Safe Pockets – Never risk losing rare finds
- Check every container AND surface – Don’t rush searches
- Extract immediately after finding one – Don’t get greedy
- Set realistic expectations – This might take multiple sessions
The Medical Lab upgrade is absolutely worth the farming investment. Better healing capabilities mean longer raids, more successful extractions, and better overall survival rates—all of which accelerate your progression dramatically.
Pro tip: Once you’ve found enough Bioscanners for your immediate needs, remember these medical building locations. They’re excellent for farming healing supplies and other medical resources even after you’re done hunting Bioscanners.
Ready to start your medical supply hunt? Download ARC Raiders on PlayStation or Xbox and begin your scavenging journey.
Good luck with the RNG, and may your first Hospital run yield a Bioscanner!