The Elusive Rolling Menace
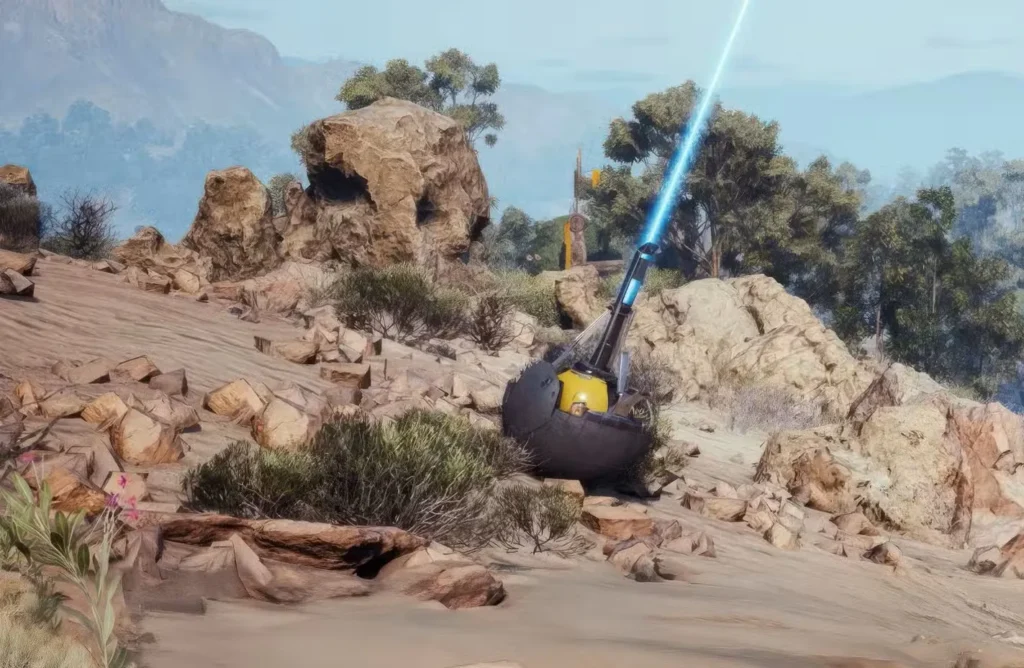
ARC Surveyors are among the most frustrating enemies you’ll encounter in ARC Raiders—not because they’re dangerous, but because they’re maddeningly difficult to find and even harder to kill. Shani’s Mixed Signals quest sends you hunting for these sphere-shaped reconnaissance drones, and if you’re reading this guide, you’ve probably already spent at least one raid wandering around aimlessly hoping to stumble upon one.
Unlike stationary enemies or predictable patrol routes, Surveyors spawn randomly across all maps with disappointingly low frequency. They don’t attack you, but they absolutely will not stand still long enough for you to shoot them either. The moment you open fire, these mechanical balls activate their escape protocol and roll away at surprising speed.
So how do you track down something that spawns rarely, appears anywhere, and immediately flees when threatened? Let’s break down the complete strategy for locating, immobilizing, and destroying these rolling reconnaissance units.
ARC Surveyors Explained – Mixed Signals Quest Enemy
Before we dive into hunting strategies, let’s understand what you’re actually looking for:
Physical characteristics:
- Spherical shape – Ball-like machines that roll along terrain
- Armored exterior – Protective shell that breaks apart as they take damage
- No offensive capabilities – Completely non-aggressive toward players
- Evasion programming – Programmed to flee immediately when damaged
Behavioral patterns:
- Reconnaissance function – Survey terrain and transmit data
- Periodic beacons – Emit blue light beams into the sky
- Escape response – Roll away rapidly when under attack
- No combat protocols – Will never fight back, only evade
Think of Surveyors as the ARC’s scout drones—their job is information gathering, not combat. This makes them less immediately threatening than Sentinels or other combat units, but their evasion capabilities make them uniquely challenging to destroy.

Blue Beacon Tracking – How to Spot ARC Surveyors
The key to finding Surveyors lies in understanding their beacon behavior. These reconnaissance units periodically emit blue light beams that shoot straight up into the sky—visible from considerable distances.
How to Spot Blue Beacons from Distance
Immediately after spawning:
- Exit your spawn building quickly – Don’t loot or organize gear yet
- Scan the horizon in all directions – Look for vertical blue beams
- Check repeatedly – Beacons pulse on and off, not constant
- Mark the direction – Use landmarks to remember where you saw it
Beacon characteristics:
- Color: Bright blue, distinctive from other light sources
- Direction: Vertical beam shooting skyward
- Duration: Intermittent, not persistent
- Visibility: Can be seen from long distances across maps
The intermittent nature of the beacon is both blessing and curse. It means you can spot Surveyors from far away, but you need to be actively watching or you’ll miss the brief transmission windows.
Pro tip: If you’re playing with friends, coordinate beacon watching. Have each player scan different sectors of the map to maximize coverage.
No Blue Beacon Visible – Alternative Detection Methods
Not seeing a beacon doesn’t necessarily mean no Surveyor spawned—it might mean:
- You missed the pulse – They don’t broadcast constantly
- The Surveyor is behind terrain – Hills and buildings block line of sight
- None spawned this raid – Their spawn rate is genuinely low
- Another player already destroyed it – Someone beat you to it
If you don’t spot a beacon within the first minute or two of spawning, you have two options:
- Explore high-traffic areas systematically and hope to stumble upon one
- Extract and try again – Sometimes the fastest method is simply redeploying
ARC Surveyor Spawn Locations – Best Maps to Search
ARC Surveyors can technically spawn on any map, which makes targeted farming difficult. However, understanding spawn tendencies helps:
ARC Surveyor Spawn Maps – Confirmed Locations
- Dam Battlegrounds – Open areas near Control Tower
- Buried City – Outskirts and less-developed zones
- The Blue Gate – Village areas and open terrain
- Spaceport – Perimeter regions away from main facilities
Terrain preferences:
Surveyors seem to favor open or semi-open areas where they have room to maneuver. You’re less likely to find them inside buildings or tight corridors—they need space to roll.

Efficient Search Patterns
If you’re actively hunting without a beacon sighting:
High-probability zones:
- Map perimeters – Edges away from central hotspots
- Open fields – Areas with minimal obstruction
- Between major landmarks – Transitional spaces connecting POIs
- Lower-traffic areas – Places players rarely visit
Search methodology:
- Start from your spawn and move outward in expanding circles
- Prioritize elevated positions – Better visibility from hills
- Listen for mechanical sounds – Surveyors make distinctive rolling noises
- Check your minimap – They may appear as hostile markers
Combining this with efficient map navigation learned from other quests improves your search effectiveness.
Best Loadout for Hunting ARC Surveyors
Unlike quests such as Medical Merchandise where free loadouts work fine, hunting Surveyors requires specific equipment:
Essential Weapons for Destroying Surveyors
1. Showstopper Grenades (Priority #1)
- Effect: Electric pulse that temporarily immobilizes mechanical enemies
- Duration: ~10 seconds of paralysis
- Strategy: Throw one, damage Surveyor, throw another when effect wears off
- Quantity needed: Bring 3-5 minimum for safety
Alternative: Snap Blast Grenades
- Effect: Quick-detonating explosives that stick to targets
- Strategy: Sneak close, stick three grenades to the Surveyor’s body
- Result: Usually enough to destroy it outright without prolonged chase
- Risk: Requires getting close before it detects you
2. Ranged Weapon with Good Accuracy
Since Surveyors flee constantly, you need weapons effective at medium range:
- Assault rifles – Good balance of accuracy and damage
- DMRs – Excellent for maintaining damage while it rolls away
- Avoid shotguns – Too short-range for mobile targets
Check our weapon upgrade guide to optimize whatever weapons you choose.
3. Safe Pockets for Loot Protection
Surveyors drop valuable materials including:
- ARC Motion Cores (substantial quantity)
- Surveyor Vault (quest objective)
- Armor pieces that break off during combat
- Miscellaneous crafting materials
Use Safe Pockets to guarantee you keep the Surveyor Vault even if you die before extracting.
Budget-Friendly Surveyor Hunting Loadout
Minimum viable gear:
- 3x Showstopper Grenades (critical)
- Basic assault rifle (any tier)
- Ferro shield for personal protection
- No expensive mods or attachments needed
The grenades matter far more than gear quality for this quest. You can succeed with budget weapons as long as you have immobilization tools.
How to Destroy ARC Surveyors – Combat Strategies
Found a Surveyor? Great! Now comes the tricky part—actually destroying it before it escapes.
Method 1: Showstopper Immobilization (Recommended)
This is the most reliable approach for most players:
Step-by-step execution:
- Approach within grenade range (~15-20 meters)
- Throw Showstopper Grenade at or near the Surveyor
- Immediately start shooting – You have ~10 seconds of immobilization
- Focus fire on center mass – Don’t waste time aiming precisely
- When it starts moving again, throw another Showstopper
- Repeat until destroyed – Usually takes 2-3 grenade cycles
Why this works:
- Predictable timing gives you damage windows
- Multiple grenades prevent extended chase sequences
- Works reliably even if your aim isn’t perfect
- Minimal risk of losing the target
Common mistakes:
- Waiting too long between grenades – Throw the next one before the current effect expires
- Poor positioning – Make sure you have clear shots during immobilization
- Running out of grenades – Always bring extras
Method 2: Snap Blast Ambush (High-Skill Alternative)
If you can get close before being detected:
Execution:
- Approach stealthily – Don’t shoot or make loud noises
- Get within attachment range – Much closer than normal combat
- Stick three Snap Blast Grenades rapidly to its body
- Back away immediately – Explosions are powerful
- Watch it explode – Three grenades usually destroy it instantly
Advantages:
- Potentially fastest kill method
- Uses no bullets, just grenades
- Extremely satisfying when successful
Disadvantages:
- Requires perfect stealth approach
- High risk if Surveyor detects you early
- No second chance if you miss grenade throws
When to use: If you spot a Surveyor before it detects you and you’re confident in your grenade accuracy.
Method 3: Chase and Shoot (Last Resort)
If you have no grenades or they’re not working:
Desperate measures:
- Chase the Surveyor while shooting – Fire constantly as you pursue
- Predict its path – Lead your shots where it’s rolling
- Use terrain to your advantage – Corner it against obstacles
- Don’t give up – Persistence sometimes works
Why this usually fails:
- Surveyors are surprisingly fast
- Hitting moving targets while running is hard
- They can roll indefinitely, you have limited stamina
- Other enemies or players may interrupt
Only attempt this if you absolutely have no other options. It’s far better to extract, resupply grenades, and try again.
ARC Surveyor Armor Break Mechanics – Damage Guide
As you damage a Surveyor, visible changes occur:
Damage Stages
Stage 1: Intact Armor (100-70% HP)
- Full spherical shell visible
- All armor plates intact
- Normal rolling speed
Stage 2: Armor Degradation (70-40% HP)
- Pieces start breaking off – Armor plates fall away
- Lootable debris – Dropped pieces contain materials
- Exposed internal structure – More vulnerable to damage
Stage 3: Critical Damage (40-0% HP)
- Most armor removed – Core systems visible
- Slower movement – Damaged locomotion
- Imminent destruction – Just a few more hits
Important: The armor pieces that fall off during combat are lootable! Don’t forget to collect them after destroying the Surveyor—they contain valuable mechanical components and other crafting materials.
Loot Collection Strategy
After killing the Surveyor:
- Secure the Surveyor Vault first – Quest objective priority
- Collect the main loot drop – Directly from the destroyed unit
- Search the surrounding area – Armor pieces scattered nearby
- Check for ARC Motion Cores – Surveyors drop multiple
- Extract quickly – You’re vulnerable while looting
What you’ll typically receive:
- 1x Surveyor Vault (quest item)
- 3-5x ARC Motion Cores (valuable crafting material)
- Various armor fragments and tech components
- Random crafting materials (rusted gears, tools, etc.)
The ARC Motion Core yield alone makes Surveyor hunting worthwhile beyond just quest completion.
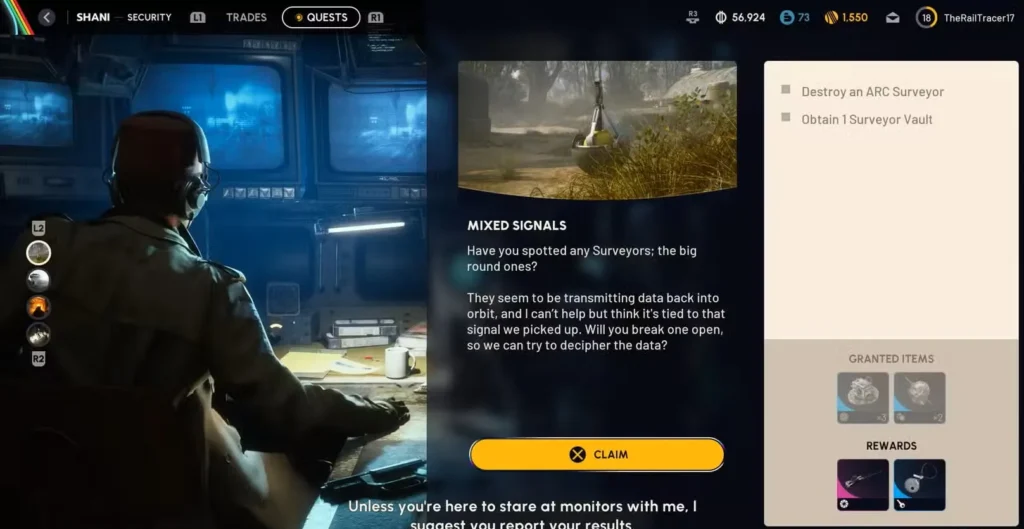
Mixed Signals Quest: Complete Walkthrough
Now that you understand Surveyor mechanics, let’s cover the complete quest flow:
Quest Overview
Quest giver: Shani
Objective: Destroy an ARC Surveyor and obtain a Surveyor Vault
Difficulty: High (due to spawn rarity and target evasion)
Recommended level: Mid-game (requires specific grenades and decent gear)
Step-by-Step Completion
Phase 1: Preparation
- Accept quest from Shani at vendor menu
- Acquire Showstopper Grenades – Buy from vendors or craft them
- Prepare appropriate loadout – Medium-range weapon + grenades
- Choose your map – Any map works, but consider your familiarity
Phase 2: The Hunt
- Deploy to your chosen map – Any spawn point works
- Immediately scan for blue beacons upon spawning
- Navigate toward beacon location if spotted
- Search systematically if no beacon visible
- Stay alert – Other players may also be hunting Surveyors
Phase 3: Engagement
- Approach the Surveyor once located
- Use Showstopper Grenade to immobilize it
- Deal damage during immobilization – Maximum DPS
- Repeat grenade usage until destroyed
- Collect all loot – Especially the Surveyor Vault
Phase 4: Extraction
- Secure Surveyor Vault in Safe Pocket immediately
- Navigate to nearest extraction point
- Extract successfully – Quest only counts after extraction
- Return to Shani at vendor menu to turn in
What Happens If You Die Before Extracting Surveyor Vault
Without Safe Pockets: You lose the Surveyor Vault and must hunt another one
With Safe Pockets: Your Surveyor Vault is protected—just extract on your next raid
This is why Safe Pocket usage is non-negotiable for this quest. The time investment in finding and killing a Surveyor is too high to risk losing progress.
Quest Rewards: Are They Worth It?
After successfully completing Mixed Signals, Shani rewards you with:
Mixed Signals Quest Rewards Breakdown
1. Photoelectric Cloak
- Function: Stealth/camouflage device
- Usage: Helps avoid detection by ARCs and players
- Tactical value: Extremely useful for sneaking through contested areas
- Best for: Solo players who prefer stealth over combat
Why this matters: The Photoelectric Cloak is genuinely valuable equipment. Unlike consumables that you’ll use up quickly, this is a tool you’ll keep returning to for stealth-dependent missions and high-value loot runs.
2. Raider Hatch Key
- Function: Guaranteed safe extraction
- Usage: Single-use key for priority hatch access
- Tactical value: Insurance policy for raids where you’re carrying valuable loot
- Best for: Securing expensive gear or quest items
Why this matters: Extraction is everything in ARC Raiders. A guaranteed escape route can save thousands of coins worth of gear and irreplaceable quest items.
Overall value assessment:
These rewards are significantly better than typical quest rewards. The Photoelectric Cloak becomes a permanent tool in your arsenal, while the Raider Hatch Key provides concrete security for future raids. The difficulty of finding and killing a Surveyor is appropriately rewarded.
Common Problems and Solutions
Problem #1: Can’t Find ARC Surveyor Spawns
Solutions:
- Try different maps – Spawn RNG varies between locations
- Deploy during different times – Server conditions affect spawns
- Be patient with beacon watching – Don’t rush past spawn
- Consider multiple short raids rather than long searches
- Check community resources for current high-spawn maps
Some players report better luck on specific maps, though this may be confirmation bias. Try each major map at least 2-3 times.
Problem #2: ARC Surveyor Escapes Before You Destroy It
Solutions:
- Bring more Showstopper Grenades – You probably ran out
- Use higher-damage weapons – Maximize damage during immobilization
- Upgrade your weapon – Better stats mean faster kills
- Coordinate with teammates – Focused fire drops it faster
- Try the Snap Blast ambush method – Instant kill potential
Problem #3: Died and Lost Your Surveyor Vault Loot
Solutions:
- Always use Safe Pockets going forward – Non-negotiable
- Extract immediately after getting the vault – Don’t get greedy
- Avoid unnecessary fights while carrying quest items
- Have teammates cover your extraction if playing in a group
Losing a Surveyor Vault after the work of finding and killing one is devastating. Learn from the mistake and never go without Safe Pockets on quest runs.
Problem #4: PvP – Players Stealing Your ARC Surveyor Kill
Solutions:
- Engage quickly when you spot one – Hesitation costs opportunities
- Play during off-peak hours – Fewer competitors
- Use stealth – Let others pass by while you hunt
- Be prepared for PvP – Defend your target if necessary
Remember that if another player damages the Surveyor significantly, they might get kill credit even if you finish it. Race conditions happen—just stay persistent.
Advanced Tips for Efficient Surveyor Farming
Farming Multiple ARC Surveyors Per Run
Even after completing Mixed Signals, you might want to farm Surveyors for their valuable loot drops:
Optimization strategies:
- Dedicated Surveyor loadout – Optimized specifically for this enemy type
- Map rotation – Cycle through different maps to reset spawns
- Quick extraction protocol – Get loot and leave immediately
- Grenade stockpiling – Always keep surplus Showstoppers in stash
Why farm Surveyors:
- Excellent source of ARC Motion Cores
- Decent coin value on loot drops
- Practice for rare enemy engagement
- Materials for Workshop upgrades
Solo vs Squad Surveyor Hunting – Which Is Better
Solo advantages:
- All loot goes to you
- Faster, more agile searching
- Quieter approach for stealth ambushes
- No loot distribution debates
Squad advantages:
- Multiple people scanning for beacons
- Coordinated fire during immobilization
- Security against hostile players
- Can split grenade costs
Choose based on your preferred playstyle and available friends. Both approaches work.
Integration with Other Quests
If you’re working through multiple objectives, consider stacking:
Compatible quest combinations:
- A First Foothold – Already exploring maps systematically
- Trash into Treasure – Resource gathering while hunting
- Supply Drop objectives – Check drops while searching for beacons
Resource farming synergy:
While hunting Surveyors, you’ll cover significant map territory. Use this travel time to:
- Collect mushrooms and prickly pears
- Loot snitch scanners from defeated ARCs
- Farm rusted tools from containers you pass
Efficient players never make single-objective raids.
Progression Context: Why This Quest Matters
Mixed Signals represents a significant difficulty spike in Shani’s quest line:
What this quest teaches:
- Rare enemy tracking – Skills transfer to finding other elusive targets
- Resource prioritization – Learning which grenades to always keep stocked
- Persistence – Sometimes progression requires multiple attempts
- Safe Pocket discipline – Protecting valuable items becomes habit
How it fits progression:
This mid-game quest bridges the gap between simple fetch missions and more complex objectives. It requires:
- Moderate gear investment
- Map knowledge from earlier quests
- Combat competency against non-standard enemies
- Resource management skills
Completing Mixed Signals demonstrates you’re ready for harder content. The rewards (especially Photoelectric Cloak) enable more advanced strategies going forward.
ARC Surveyor Hunting Summary – Key Takeaways
Finding and destroying your first ARC Surveyor feels like a genuine accomplishment—and it should. These enemies aren’t difficult because they’re strong; they’re challenging because they’re rare and evasive.
Key takeaways:
- Watch for blue beacons immediately after spawning
- Always bring Showstopper Grenades – This is non-negotiable
- Use Safe Pockets to protect the Surveyor Vault
- Be patient – Spawn RNG means some raids won’t have Surveyors
- Extract immediately after obtaining the quest item
The rewards are worth the effort. The Photoelectric Cloak becomes an essential tool for advanced players, and the Raider Hatch Key provides peace of mind for high-stakes raids.
Pro tip: After completing this quest, consider keeping 2-3 Showstopper Grenades in your stash permanently. You never know when you’ll encounter another Surveyor and want to capitalize on the rare spawn.
Ready to start hunting? Download ARC Raiders on PlayStation or Xbox and begin your reconnaissance drone elimination mission.
Good luck tracking those blue beacons, and may your grenades always land true!