Extraction points in ARC Raiders are notoriously dangerous. Standard elevator extractions broadcast your location to every nearby player, turning what should be your moment of triumph into a desperate last stand against extraction campers. You’ve survived the surface, collected valuable loot, and fought off ARC machines—only to get eliminated by ambushers waiting at the obvious extraction zone.
There’s a better way: Raider Hatches. These hidden extraction points offer silent, nearly risk-free escapes from the surface, but they require a special consumable item to access. This guide explains everything you need to know about obtaining and using Raider Hatch Keys for safer extractions.
What Are Raider Hatches?
Raider Hatches are alternative extraction points scattered across ARC Raiders maps. Unlike the standard elevator extractions that announce your presence to everyone nearby, hatches provide:
Silent activation: No audio or visual alerts broadcast to other players when you use a hatch
Faster extraction: The process completes more quickly than elevator extractions
Reduced camping: Since hatches are less obvious and don’t announce themselves, far fewer players camp these locations
Strategic positioning: Multiple hatch locations per map give you extraction options closer to wherever you end up
The trade-off? You need a Raider Hatch Key to access them, and the XP bonus is slightly lower than elevator extractions. For most players—especially those carrying valuable loot—this trade-off is absolutely worth it.
How to Identify Raider Hatches on the Map
Finding Raider Hatches is straightforward once you know what to look for:
Open your map: Standard extraction points and hatches both appear as markers
Look for the down arrow symbol: While regular extractions use different markers, Raider Hatches are specifically marked with a downward-pointing arrow
Multiple locations: Most maps feature several hatch options, giving you flexibility in route planning
Proximity consideration: Plan your looting routes to end near hatch locations rather than distant from any extraction option
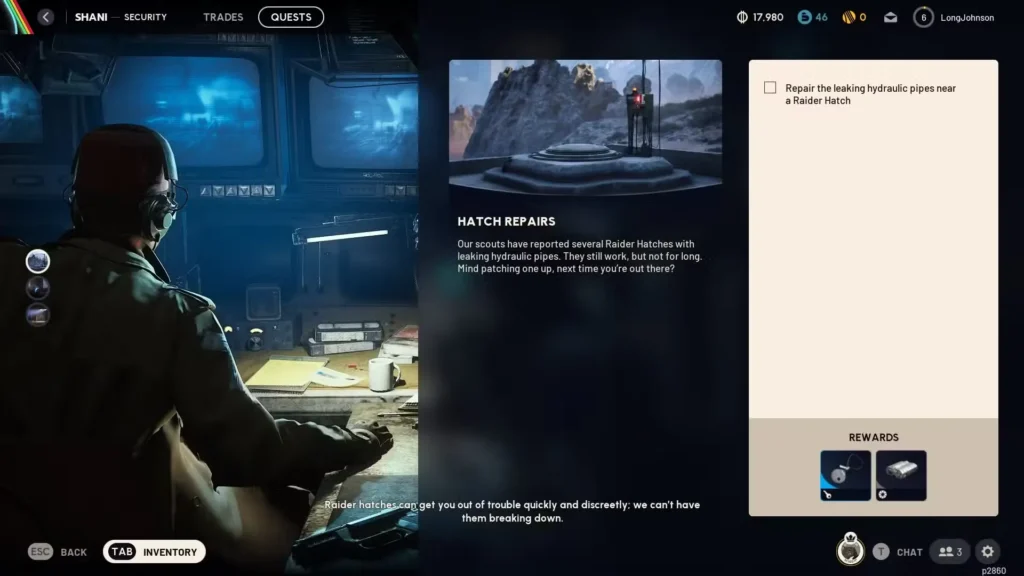
You’ll naturally learn hatch locations through the Hatch Repairs Quest for Shani (Security vendor), which serves as the game’s tutorial for this extraction method. However, understanding the full acquisition and usage system requires deeper knowledge.
Where to Get Raider Hatch Keys
There are four primary methods to obtain Raider Hatch Keys, each with distinct advantages and use cases:
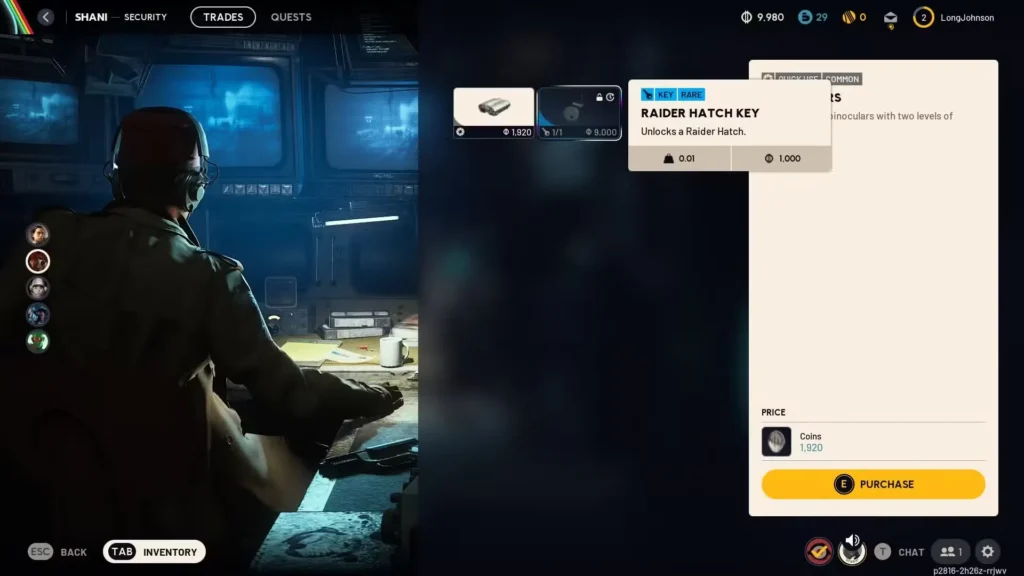
Method 1: Purchase from Shani (Security Vendor)
Cost: 9,000 coins
Availability: Unlocks at Level 12
Location: Shani’s shop in Speranza (Security section)
Pros:
- Guaranteed availability whenever you have coins
- No RNG dependency
- Can stock up before important raids
Cons:
- Significant coin investment (9,000 per key)
- Level-gated behind Level 12 requirement
- Ongoing expense for regular use
Best for: Players with established coin farming routines who want reliable access to safe extractions.
At 9,000 coins per key, these aren’t casual purchases for new players. However, if you’re running high-value farming routes where a single successful extraction nets 15,000-40,000 coins, spending 9,000 for guaranteed safe extraction becomes excellent insurance. Think of it as protecting your investment—the loot you’re carrying is worth far more than the key cost.
Method 2: Craft at Workbench Utility Station
Requirements:
- 50 Plastic Parts
- 6 ARC Alloy
- Access to Workbench with Utility Station
Material sources:
- Plastic Parts: Found throughout surface maps in containers, or obtained by salvaging certain components
- ARC Alloy: Crafted by salvaging ARC Motion Cores (dropped by destroyed ARC machines)
Pros:
- No coin cost if you have materials
- Self-sufficient approach for resource-rich players
- Can craft multiple keys if you stockpile materials
Cons:
- Requires farming specific materials
- Takes time to accumulate necessary components
- Workshop upgrade investment needed
Best for: Players who prefer crafting economies over purchasing, and those who regularly fight ARC machines (providing natural Motion Core supplies).
Crafting becomes increasingly efficient as you progress. If you’re already farming ARC machines for other reasons, you’ll naturally accumulate Motion Cores. Convert these to ARC Alloy, combine with relatively common Plastic Parts, and you’ve got free hatch keys.
Method 3: Loot from Raider Stashes
Location: Scattered across all surface maps in various buildings and hidden spots
Pros:
- Completely free when found
- Adds extra value to exploration
- Can be stored in Secure Pockets for guaranteed retention
Cons:
- RNG-dependent spawns
- Inconsistent availability
- Requires knowing stash locations or extensive exploration
Best for: Opportunistic players who explore thoroughly and want occasional free keys without investment.
Raider Stashes contain various valuable items, with Hatch Keys being one possible spawn. While you shouldn’t rely on this method as your primary source, finding a key during a raid is always a pleasant bonus. If you spot one, grab it immediately and place it in your Secure Pocket to guarantee you keep it even if eliminated.
Method 4: Loot from Eliminated Players
How it works: Kill rival players and search their corpses for Hatch Keys
Important caveat: If the enemy player stored their key in a Secure Pocket (they should have), it won’t be lootable
Pros:
- Free acquisition
- Denies enemies their safe extraction option
- Adds extra value to PvP victories
Cons:
- Most experienced players protect keys in Secure Pockets
- Requires successful PvP combat
- Unreliable as primary acquisition method
Best for: Aggressive players who engage in frequent PvP and want to capitalize on less experienced opponents’ mistakes.
This method is essentially a bonus rather than a strategy. Don’t hunt players specifically for their Hatch Keys, but if you win a fight, always check the body—you might get lucky.
How to Use Raider Hatch Keys
Using a Raider Hatch Key is simple once you’ve located a hatch and have a key in your inventory:
Step-by-step process:
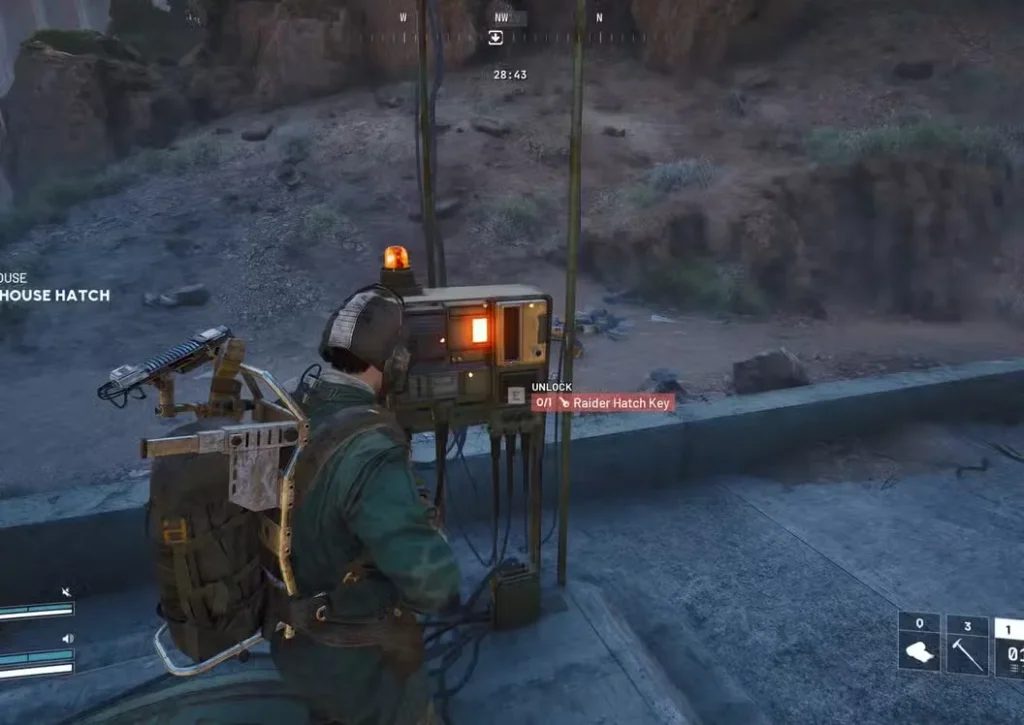
- Navigate to a Raider Hatch location – Use your map to find the nearest hatch (marked with down arrow symbol)
- Approach the hatch – Get close enough to see the interaction prompt
- Ensure you have a key – Check your inventory to confirm you’re carrying at least one Raider Hatch Key
- Interact with the hatch – Press the interaction button when prompted
- Complete the extraction – The process initiates silently and completes quickly
Critical restrictions:
Downed condition: You cannot use hatches while in downed/injured state. If you’re crawling, you must be revived first or use a different extraction method.
Key requirement: Only players with Hatch Keys can use hatches. Your squadmates each need their own keys; you can’t share or open it for them.
One-time use: Each extraction consumes one Hatch Key from your inventory
Strategic Use of Raider Hatches
Knowing when and how to use hatch extractions separates smart players from those who unnecessarily risk their loot:
When to Prioritize Hatch Extraction
High-value loot runs: If you’ve had exceptional RNG and your inventory is worth 30,000+ coins, spend the 9,000-coin key cost for safe extraction
Contested zones: When you hear nearby gunfights or spot multiple players, silent hatch extraction avoids drawing attention
Low health/resources: If you’re injured, low on ammunition, or depleted shields, avoid the predictable elevator where campers wait
Time pressure: Hatches extract faster than elevators, helping you leave before rivals converge
Solo play: Without squadmates to cover you during elevator extraction, hatches provide solo-friendly alternatives
When Elevator Extraction Is Fine
Low-value runs: If you’re carrying mostly common materials worth 3,000-5,000 coins, save your Hatch Key
Dominant position: If you’ve cleared the area and have full resources, elevator extraction’s higher XP bonus matters more
Squad backup: With teammates providing security, elevator camping becomes manageable
Key scarcity: If you’re out of Hatch Keys and can’t afford more, obviously use standard extraction
The decision comes down to risk assessment: Is the extra XP bonus from elevator extraction worth the increased ambush risk given your current loot value?
Economic Analysis: Are Hatch Keys Worth It?
Let’s break down the economics:
Hatch Key cost: 9,000 coins
Typical high-value extraction: 15,000-40,000 coins
Risk of elevator camping death: Losing everything
Scenario 1 – Using Hatch Key:
- Spend: 9,000 coins (key)
- Extract safely with: 25,000 coins (example loot)
- Net profit: 16,000 coins
Scenario 2 – Using Elevator:
- Spend: 0 coins
- Get ambushed and lose: 25,000 coins (loot value)
- Net profit: -25,000 coins (complete loss)
Even if elevator camping only kills you 20% of the time, the expected value heavily favors using Hatch Keys on high-value runs. One successful extraction with a key pays for itself; one death to campers loses everything.
Recommendation: Use Hatch Keys whenever your inventory value exceeds 15,000 coins. Below that threshold, elevator extraction becomes acceptable risk.
Secure Pocket Strategy
Here’s a pro tip many players miss:
Always store Raider Hatch Keys in Secure Pockets when you find or craft them during raids.
Why? Secure Pockets protect specific items even if you die. If you’re carrying a Hatch Key in regular inventory and get eliminated, enemies can loot it. If it’s in your Secure Pocket, you retain it even in death, allowing you to use it in your next raid.
This same principle applies to other high-value items you want guaranteed retention of. Learn more about maximizing inventory management in our storage expansion guide.
Skill Synergies for Hatch Extraction
Certain skills enhance your hatch extraction strategy:
Mobility skills: Faster movement gets you to distant hatches more quickly when escaping danger
Stamina management: Skills like Marathon Runner and Calming Stroll ensure you reach hatches without being exhausted and vulnerable
Stealth skills: Gentle Pressure and other noise-reduction abilities help you approach hatches undetected
Check our best skills guide for detailed skill recommendations that complement safe extraction strategies.
Common Mistakes to Avoid
Not carrying keys: Always have at least one Hatch Key available. Finding yourself with valuable loot but no key forces risky elevator extraction.
Storing keys in regular inventory: Use Secure Pockets to protect keys from being looted if you die.
Ignoring hatch locations: Learn where hatches spawn on each map. Wandering around looking for them while carrying loot wastes time and increases danger.
Using keys on low-value runs: Don’t waste 9,000-coin keys when you’re only carrying 5,000 coins worth of loot.
Approaching hatches carelessly: Even though hatches are safer, some smart players do camp them. Approach cautiously, check surroundings, and be ready to fight.
Attempting use while downed: Remember the restriction—you need to be fully mobile to use hatches.
Integration with Overall Strategy
Raider Hatch Keys fit into a comprehensive survival approach:
- Route planning: Structure your raids to end near hatch locations when carrying valuables
- Economic management: Budget for regular key purchases as part of your loadout costs
- Risk assessment: Constantly evaluate whether your current loot justifies key usage
- Backup planning: Always have multiple extraction options identified before you need them
Combine hatch extraction knowledge with our other survival guides for maximum effectiveness:
- Essential tips and tricks covering all survival fundamentals
- Shield management to survive until you reach extraction
- Coin farming methods to afford regular key purchases
Final Thoughts
Raider Hatch Keys represent one of ARC Raiders’ most valuable consumables—a direct counter to the frustrating extraction camping meta that plagues extraction shooters. The 9,000-coin cost seems expensive initially, but experienced players quickly realize that protecting a 25,000+ coin haul makes that investment trivial.
As you progress through ARC Raiders, develop the habit of always carrying at least one Hatch Key in your Secure Pocket. Structure your raids to end near hatch locations when possible. Budget key purchases as routine loadout costs rather than optional luxuries.
The players who consistently succeed in ARC Raiders aren’t necessarily the ones with the best aim—they’re the ones who make smart strategic decisions about risk management. Using Raider Hatches is one of the smartest decisions you can make.
External Resources:
Extract smart, protect your loot, and never trust elevators!