Celeste’s Switching the Supply quest sends you deep into the Spaceport tunnels, and honestly, it’s one of those missions that sounds simple on paper but can get messy fast. The Spaceport map is absolutely brutal for newcomers wide open sightlines, sniper nests everywhere, and tunnels that feel like a maze until you know where you’re going.
Let me walk you through exactly how to tackle this quest without getting picked off by sweaty PvP players or losing your best gear in the process.
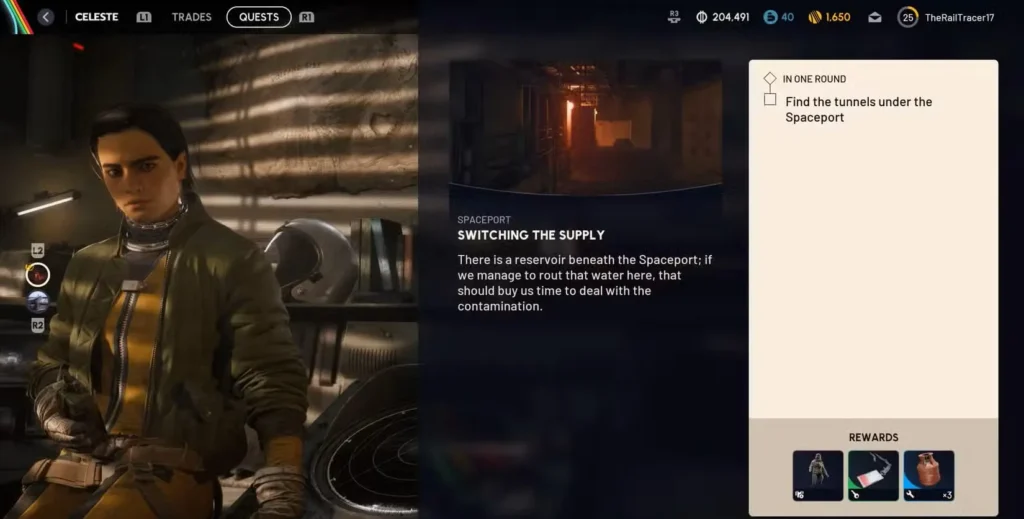
What is the Switching the Supply Quest in Arc Raiders?
Before we dive in, here’s what makes Switching the Supply worth your time. Unlike some of the grindier quests in Arc Raiders, this one offers solid rewards for relatively minimal effort once you know the route. Plus, it introduces you to the Spaceport tunnel system, which becomes crucial for several other quests and loot runs later in the game.
Quick rewards preview:
- Blue (Radio Renegade Color) for customization fans
- Spaceport Trench Tower Key (opens premium loot areas)
- 3x Synthesized Fuel (always useful for crafting and upgrades)
Where to Find the Spaceport Underground Tunnels
Best Spaceport Spawn Location
After accepting the quest from Celeste at your base, you’ll need to launch an expedition into Spaceport. Here’s where your first big decision comes in—what loadout should you bring?
My recommendation: If this is your first time attempting the quest, consider running a budget loadout or even the free starter kit. Spaceport is notoriously dangerous, especially around the center where you need to go. Enemy raiders love posting up on rooftops with sniper rifles, and two shots is all it takes to send you back to the lobby minus your hard-earned gear.
Pro survival tips for Spaceport:
- Bring smoke grenades if you have them—they’re lifesavers when you need to heal or reposition
- Stick to the edges of buildings and use every bit of cover available
- Listen for footsteps and gunfire—Spaceport attracts PvP players like moths to a flame
- Consider going in with a squad if you’re struggling solo
Navigate to the Center of the Map
Once you’re in the match, your destination is the central area of Spaceport. You’ll see multiple large buildings with high-tier loot scattered around, but don’t get distracted. Your goal is finding the tunnel entrance.
The tunnels have multiple access points, which is actually helpful. Look for:
- Rectangular gaps or openings in the ground
- Metal ladders leading downward
- Industrial-looking grates or hatches
Don’t stress too much about finding the “perfect” entrance—the tunnel system connects underground, so any entry point works. Just pick whichever seems safest based on where enemy players are positioned.
Find the Tunnel Entrance
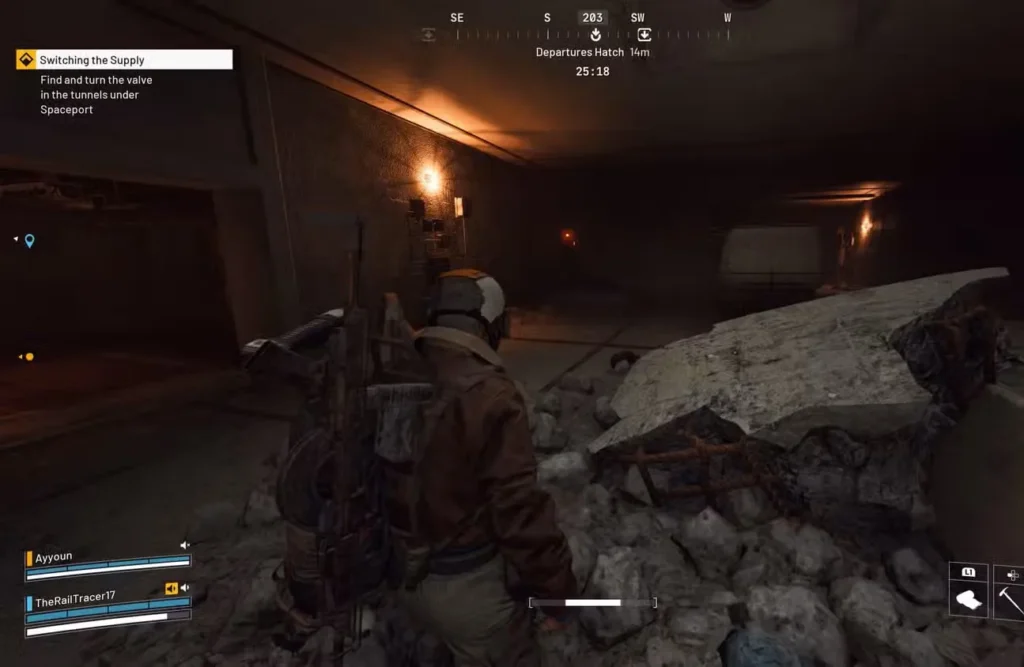
Once you’re underground, things get a bit claustrophobic but also safer from long-range threats. The tunnels stretch quite a bit in different directions, creating a mini-maze effect. Other raiders sometimes take refuge down here too, so keep your weapon ready and check corners.
Important navigation tip: Head toward the west side of the tunnel network. As you move through the middle section, you’ll encounter some collapsed debris blocking part of the path. This is your landmark—you’re close.
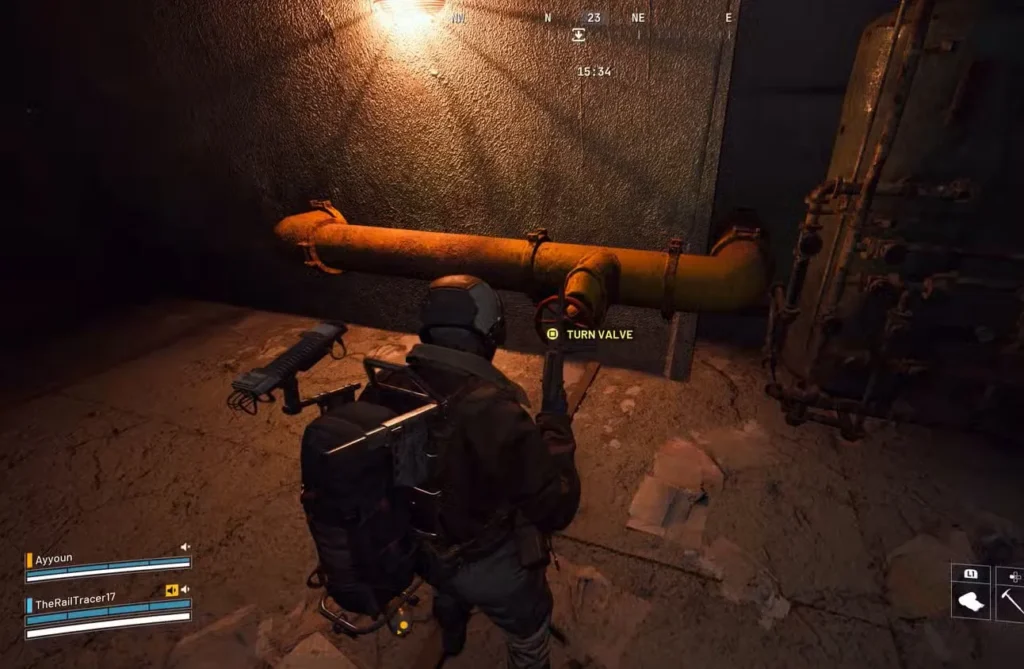
Locate and Interact with the Valve
Don’t try to move the debris blocking the main tunnel. Instead, look for a gap or opening on the right side of the collapsed area. Squeeze through there, and you should spot the valve mechanism almost immediately.
The valve itself is pretty obvious once you’re in the right spot—it looks like a standard industrial wheel valve. Walk up to it and hold the interact button. The quest should complete instantly.
Known bug alert: Some players are currently experiencing an issue where the valve won’t activate. If you encounter this, you’re not alone—the developers have acknowledged the problem and are working on a patch. Try again after the next update if you’re affected.
Safe Extraction After Switching the Supply Quest
After turning the valve, your objective updates to extraction. The nearest extraction points should be marked on your map. Don’t get greedy trying to loot more—just make your way topside and get to safety.
If you brought a Raider Hatch Key, this is the perfect time to use it for guaranteed extraction. Otherwise, head to the closest public extraction zone and stay alert.
Switching the Supply Quest Rewards Breakdown
Back at base, turn in the quest to Celeste for:
- Blue (Radio Renegade Color) – A cosmetic color option for your gear
- Spaceport Trench Tower Key – Unlocks a specific tower with valuable loot on future runs
- Synthesized Fuel x3 – Essential crafting material (check out our Synthesized Fuel farming guide for more)
That Spaceport Trench Tower Key is particularly valuable if you’re working on other quests in the area. It opens up an entirely new loot location that most players overlook.
Additional Tips for Spaceport Tunnel Navigation
Since you’ll likely be returning to Spaceport for other quests and loot runs, here are some bonus insights:
Map knowledge pays dividends: Spaceport is one of the larger maps in Arc Raiders, and learning the layout helps tremendously. Familiarize yourself with building interiors, rooftop access points, and alternate routes through the tunnels.
Timing matters: Try launching expeditions during off-peak hours if possible. Fewer players means less PvP chaos and safer quest completion.
Complete multiple objectives: If you’re comfortable with the risk, stack up multiple Spaceport quests before launching. Check out our complete quests list to see what else you can knock out in one run.
Invest in movement skills: The best skills to unlock early include anything that improves your sprint speed or stamina. Spaceport’s open areas demand good mobility.
Related Celeste Quests in Arc Raiders
If you enjoyed this quest, Celeste has several other missions worth checking out:
- Water Troubles Quest – Another tunnel-focused mission
- After Rain Comes Quest – Involves finding sonar panels in Celeste’s territory
Both offer similar straightforward objectives with decent rewards.
Is Switching the Supply Quest Worth Completing?
Switching the Supply is a solid mid-tier quest that teaches you how to navigate Spaceport’s dangerous tunnel system. The rewards are useful, especially that tower key, and the quest itself only takes 10-15 minutes once you know the route.
The biggest challenge isn’t the quest itself—it’s surviving Spaceport’s hostile environment. Take your time, use cover effectively, and don’t be afraid to disengage from fights when necessary. Remember, completing the quest and extracting safely is worth way more than a few extra kills.
Platform availability: Arc Raiders is available on PlayStation and Xbox, with full crossplay support between platforms.
For more survival strategies and quest guides, check out our Arc Raiders tips and tricks guide and our comprehensive loot table resource.
Good hunting, Raider!