Prerequisite Quest
You must complete “Dormant Barons” first before “What We Left Behind” appears from Tian Wen.
Dormant Barons is given by Shani (not Tian Wen) and requires you to loot one Baron Husk on Dam Battlegrounds, Spaceport, or Blue Gate. Baron Husks are large, inactive robot remains – climb on top and interact to loot them. Rewards are 3x Doorblocker and 3x Li’l Smoke Grenade.
Quest chain progression: Dormant Barons → What We Left Behind → Broken Monument
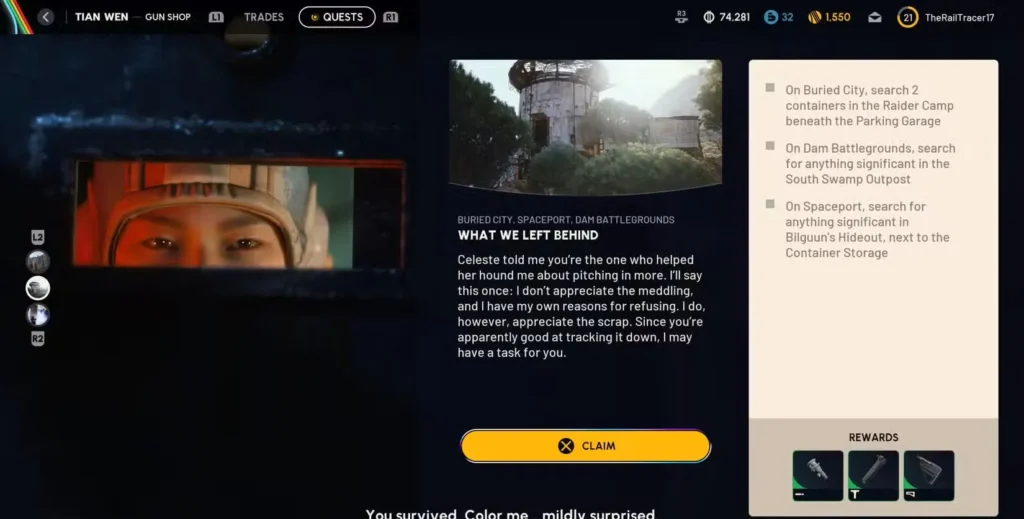
What We Left Behind Quest Overview: Tian Wen Requirements
“What We Left Behind” is one of Tian Wen’s early-tier missions in ARC Raiders, and it’s designed to get you comfortable with exploring multiple maps while learning key landmark locations. While the objectives themselves aren’t mechanically challenging, the quest can trip up players who don’t know exactly where to look or how to approach each area safely.
This three-part mission sends you across Dam Battlegrounds, Buried City, and Spaceport—making it one of the more travel-intensive early quests. The good news? You don’t need to bring any special equipment or resources, which means you can run completely free loadouts if you’re worried about losing gear.
What We Left Behind Quest Rewards: Weapon Attachments
Before we dive into the walkthrough, let’s talk about why this quest is worth completing:
Tian Wen’s Rewards:
- Muzzle Brake II – Reduces vertical recoil for better accuracy
- Vertical Grip II – Improves weapon handling and stability
- Stable Stock II – Enhanced overall weapon control
These three weapon attachments represent a solid upgrade package for mid-tier weapons, especially if you’re still using basic guns from earlier quests. The attachments work particularly well on automatic weapons where recoil control makes a significant difference in firefights.
Best Loadout for What We Left Behind Quest (Free Loadout)
What to Bring (or Not Bring)
Since none of the objectives require collecting items or killing specific enemies, this is a perfect quest for free loadout runs:
Minimum Gear:
- Basic pistol or melee weapon for self-defense
- 1-2 healing items (bandages or adrenaline shots)
- Light Shield if you have extras lying around
- Safe Pocket augment if you’re carrying other valuables
Optional Additions:
- Zipline for faster navigation
- Smoke grenades for escaping encounters
- Binoculars to scout objectives before approaching
The real danger isn’t the objectives themselves—it’s other players hunting for kills or competing for the same quest locations. Running lean means you risk less if things go sideways.
Why You Should Use a Free Loadout (Highly Recommended)
Good news: You don’t need ANY gear to complete this quest.
Key facts about quest mechanics:
- Quest progress saves instantly when you interact with yellow markers
- You don’t need to extract successfully
- Progress counts even if you die after completing objectives
- No items required to bring or extract
Recommended approach: Use a completely free loadout – basic pistol, no armor, zero cost.
Why? Each objective can be done across separate raids. If you die, you lose nothing because quest progress is already saved to your profile.
Optional: Bring smoke grenades and basic healing if you want extra safety, but it’s not necessary.
Time investment: Each objective takes 10-15 minutes if you know where to go. Total completion time is 30-50 minutes across 3 separate matches.
Buried City Parking Garage Location (Objective 1)

Location Details
The Parking Garage sits in the heart of Buried City, positioned near the Hospital in the central area of the map. If you’re familiar with the urban exploration missions, you’ve probably passed this location during other quests.
Map Position: Center of Buried City, adjacent to Hospital POI
Danger Level: Medium-High (popular player traffic area)
ARC Threat: Low on ground floor, moderate on upper levels
Step-by-Step Walkthrough
1. Navigate to the Parking Garage
From your spawn point, head toward the center of Buried City. The Parking Garage is a multi-story structure that’s hard to miss once you’re in the vicinity. Look for the distinctive concrete ramps and open parking levels.
2. Locate the Elevator Breach Point
Inside the garage, find the elevator shaft. You’ll notice a breach interaction prompt when you approach. Here’s an important detail many players miss: all floors have the same objective layout, so you don’t need to search specific levels.
Pro Tip: The ground floor is your safest bet. It has fewer ARC enemies (no Pops or Fireballs spawn here) and offers better escape routes if hostile players show up.
3. Breach and Descend
Activate the breach and prepare to zipline down the elevator shaft. This is where tactical awareness matters:
- Close all doors behind you as you move through—this creates obstacles for pursuing players
- Keep your weapon ready during the descent
- Listen for footsteps or gunfire indicating other players nearby
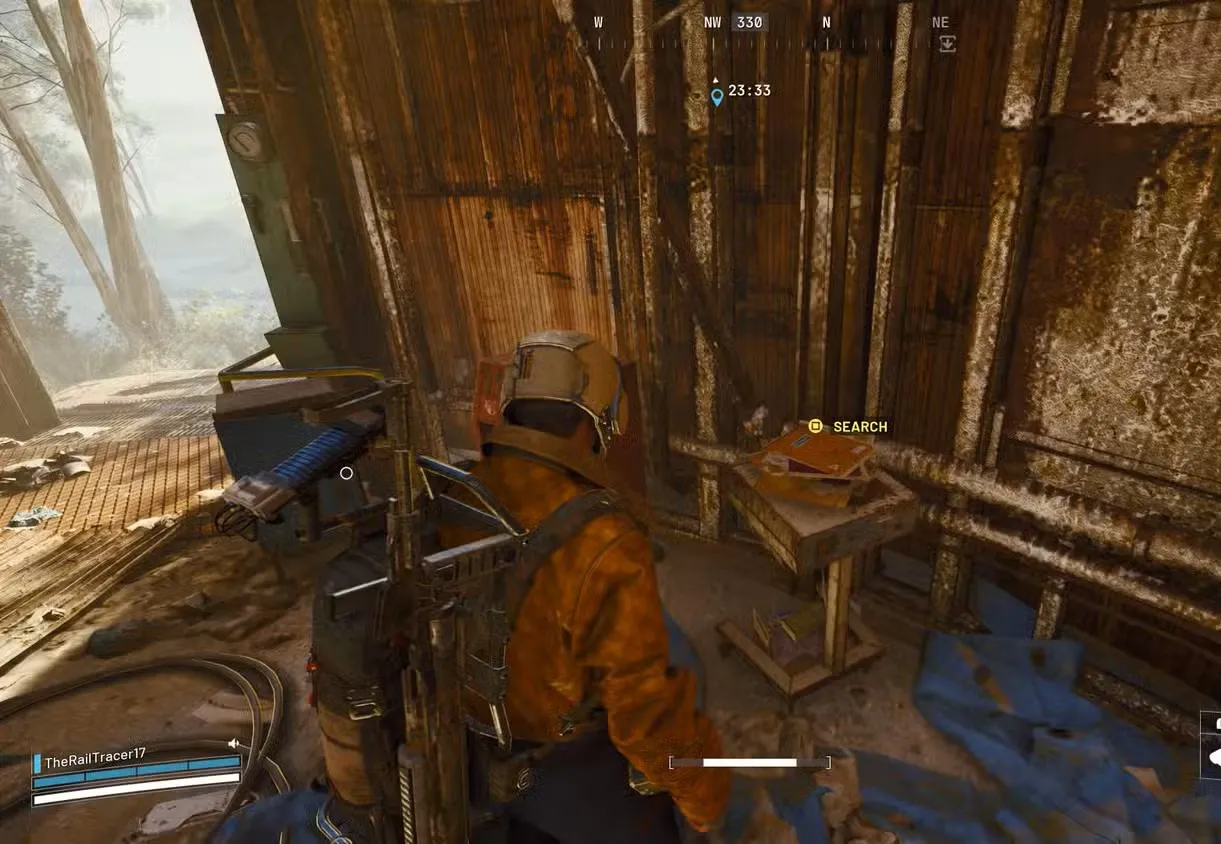
4. Search the Raider Camp
At the bottom of the shaft, you’ll find a small Raider Camp with two searchable containers. Interact with both to complete this objective segment.
Bonus Opportunity: There’s a chance for a weapon crate to spawn at this camp, potentially dropping Purple Rarity weapons. Always check for this crate—it’s one of the better loot opportunities in Buried City and could significantly upgrade your arsenal.
5. Extract Safely
Once you’ve searched the containers, don’t backtrack the way you came. Instead:
- Jump through the window ahead of the camp
- Turn right twice
- Head down into the metro station
- Use the extraction point to safely exit
This route minimizes your exposure time and avoids potential ambush points near the garage entrance.
Critical details:
The breach door is labeled “01” on the ground floor, southeast side. Ground floor is safest because there are no Pops or Fireballs there. Breaching takes 3-5 seconds and makes noise – check for other players first.
After breaching, take the zipline DOWN (not up) to the underground Raider Camp. Close doors behind you to slow down any pursuers.
In the sandy buried room below, you’ll find 2 containers with yellow quest markers:
- Metal Raider case in the center of the camp
- Bag behind the corrugated metal wall
You must interact with BOTH containers for the objective to complete.
Quick escape route: After looting, jump through the window ahead, turn right twice, head to the metro station for extraction.
Common Mistakes to Avoid
❌ Searching upper floors unnecessarily – Wastes time and exposes you to more ARCs
❌ Leaving doors open – Makes it easier for enemies to track you
❌ Taking the same exit route – Predictable paths are ambush magnets
❌ Ignoring the weapon crate spawn – Free purple weapon potential
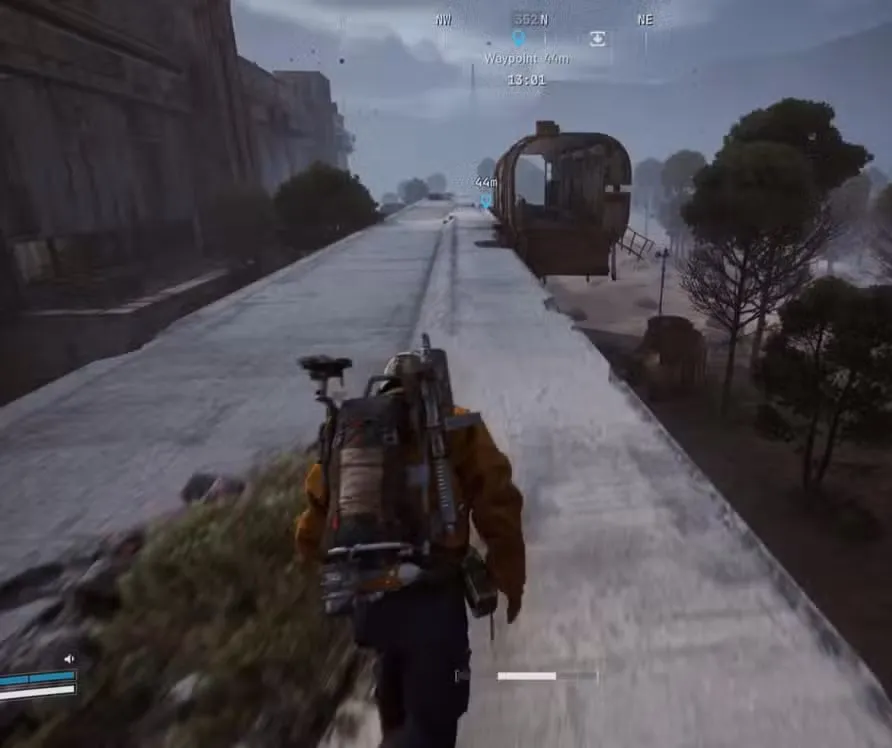
Dam Battlegrounds South Swamp Outpost Location (Objective 2)
Location Details
South Swamp Outpost represents the quieter objective of this quest—it’s in a less-trafficked area of Dam Battlegrounds, making it relatively safe to complete.
Map Position: South side of Dam Battlegrounds
Danger Level: Low-Medium
ARC Threat: Minimal
Step-by-Step Walkthrough
1. Deploy to Dam Battlegrounds
Start a fresh raid on Dam Battlegrounds. If you’re continuing from Buried City, extract and redeploy—you can’t travel between maps within a single raid.
2. Navigate to South Swamp Outpost
Head toward the southern portion of the map. The outpost isn’t one of the major POIs, so it won’t be marked prominently on your map initially. Look for the distinctive silo-shaped building—it’s the only structure of its type in this area.
3. Enter the Silo Building
The building has multiple entry points through open gaps in the walls. Don’t waste time looking for a “main entrance”—just pick whichever opening is closest to your approach angle.
Safe Approach Tips:
- Scout the area with binoculars before entering
- Check for player activity (open doors, recent combat sounds)
- Position yourself near an exit before interacting with the objective
4. Locate the Interactive Object
Once inside, scan the corners of the building. In one corner, you’ll find an interactive object (likely documents or supplies left by previous Raiders). The exact corner can vary, so check systematically if you don’t see it immediately.
Interact with the object to complete this objective segment.
5. Decide Your Next Move
Since South Swamp Outpost is relatively isolated, you have options:
- Extract immediately if you’re playing it safe
- Explore nearby areas for additional loot opportunities
- Complete other Dam Battlegrounds quests like A Lay of the Land or A First Foothold
Why This Objective Is Easier
The South Swamp Outpost tends to be less contested because:
- It’s not on major loot routes
- No valuable containers spawn consistently nearby
- The isolated location means fewer player encounters
- Limited ARC patrols in the immediate area
This makes it ideal for completing quickly between other activities or as a confidence builder if the Buried City segment felt intense.
Critical details:
South Swamp Outpost is on the western part of the map, near Water Treatment Control. Look for a large cylindrical building that looks like a silo – it’s made of corrugated metal and stands taller than surrounding structures.
The building has multiple open gaps in the walls – no breach required, just walk in through any gap.
Inside the main round room, you’ll find documents on a table with a yellow quest marker (sometimes near a red cabinet). This is the only item you need to interact with.
Why this is the easiest objective: It’s a low-traffic area, easy to find, no breach required, and only needs one interaction. Many players recommend doing this location first.
Spaceport Bilguun’s Hideout Location (Objective 3)
Location Details
The final objective takes you to Spaceport, specifically to an area near Container Storage that holds Bilgunn’s Hideout—a named location that suggests story significance for Tian Wen’s questline.
Map Position: Near Container Storage POI, eastern side
Danger Level: Medium-High (Spaceport tends to be hot)
ARC Threat: Moderate
Step-by-Step Walkthrough
1. Deploy to Spaceport
Exit your previous raid and deploy to Spaceport. This map typically sees decent player activity, so prepare for potential encounters.
2. Navigate to Container Storage Area
Head toward the Container Storage POI. Once you’re in the general vicinity, look for the area to the right of the main Container Storage zone.
3. Locate the Broken Wall Section
Here’s where many players get confused. You need to find a broken wall section that allows passage to the adjacent area. There are two approach options:
Option A: Ground Level Approach (Safer)
- Find the wall breach at ground level
- Pass through to the other side
- Provides better cover from snipers
Option B: Wall Climb Approach (Faster but Riskier)
- Climb directly up the exterior wall
- Reaches the objective faster
- Warning: Leaves you extremely exposed to sniper fire from enemy Raiders
Recommendation: Unless you’re in a squad with overwatch support, use the ground-level approach. The time saved by climbing isn’t worth the sniper risk.
4. Find the Metal Container on the Wall
Once you’re on the correct side of the broken wall, look for a metal container mounted on the wall structure. You’ll see a ladder leading up to it.
5. Climb and Collect the Notes
Scale the ladder to reach the container entrance. Inside, you’ll find notes or documents that you need to grab. Interact with them to complete the final objective.
6. Extract to Complete the Quest
With all three objectives completed, make your way to an extraction point. Consider using a Raider Hatch if you have a key for guaranteed safe extraction.
Spaceport-Specific Hazards
Sniper Positions: Multiple elevated positions overlook Container Storage
Open Sightlines: Less natural cover compared to urban maps
Player Hotspot: Spaceport attracts players hunting for high-tier loot
Counter-Strategies:
- Move during off-peak times if possible
- Use smoke grenades to obscure sniper angles
- Sprint unpredictably when crossing open areas
- Keep a shield equipped to absorb initial hits
Critical details – this is the trickiest location:
The key issue: Bilguun’s Hideout is NOT at ground level – it’s ON TOP of a wall behind Container Storage.
Go to Container Storage (center of map), then look at the eastern wall behind the building. You’ll see a large yellow metal structure sitting on top of this wall – that’s Bilguun’s Hideout.
How to reach it:
- Approach from the south side of the wall
- Look for broken/crumbled sections of the wall
- Climb up the rubble to reach the top
- Walk along the wall to the yellow structure
- Use the yellow ladder to access the hideout entrance
Alternative: Some players find a yellow ladder at the base of the wall that leads directly up.
Inside the hideout: The notes you need are on the left side of the small room, marked with a yellow quest icon.
Warning: Container Storage is a high-PvP area. Many players camp on rooftops as snipers. Move quickly, grab the notes, and leave immediately. Don’t linger or try to loot extra items.
The good news: Even if you get killed after grabbing the notes, the quest progress is already saved.
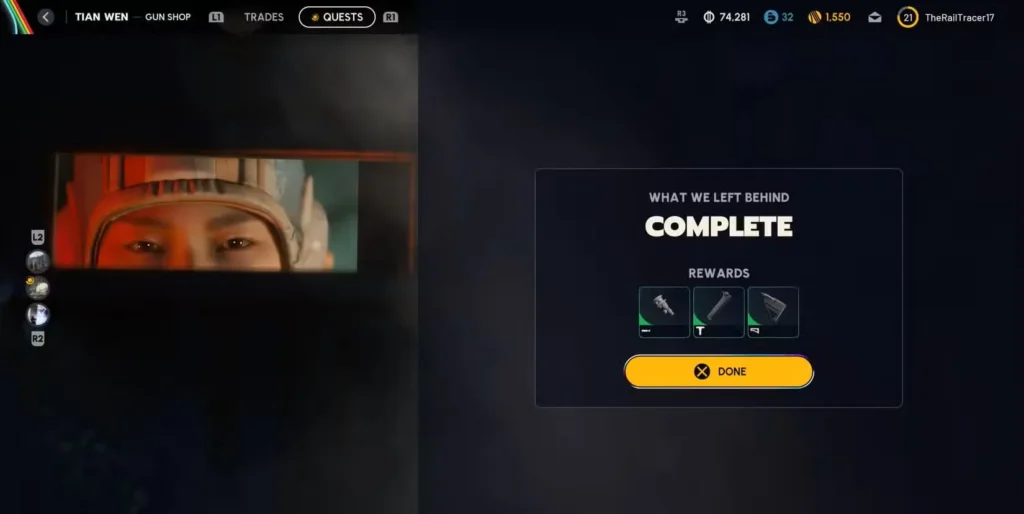
What We Left Behind Quest Completion Checklist
Once you’ve returned to Tian Wen after collecting all three objectives, she’ll reward you with the weapon attachment package mentioned earlier. These attachments immediately improve your weapon performance and can be equipped on most primary weapons.
Quest Completion Checklist
✅ Buried City: Search Raider Camp containers in Parking Garage elevator shaft
✅ Dam Battlegrounds: Interact with object in silo building at South Swamp Outpost
✅ Spaceport: Collect notes from metal container near Container Storage
✅ Return to Tian Wen: Claim your three weapon attachments
Multi-Map Quest Tips for ARC Raiders
“What We Left Behind” teaches valuable lessons applicable to other multi-location quests:
Session Planning: Complete objectives in order of difficulty or danger level based on your comfort. If you’re nervous about Spaceport PvP, save it for when you’re feeling confident or have squad backup.
Resource Management: Since you’re deploying three separate times, manage your stash space carefully. Don’t fill your inventory with loot from earlier objectives if you need space for quest items.
Quest Stacking: Check if you have other missions in these same areas:
- Buried City quests: With a Trace, Reduced to Rubble
- Dam Battlegrounds quests: Eyes in the Sky, Hatch Repairs
- Spaceport quests: Marked for Death
Completing multiple objectives per deployment maximizes efficiency.
Learning Map Knowledge: Pay attention to landmarks and navigation routes during this quest. The areas you visit—especially the Parking Garage and Container Storage—are important for other missions and general loot farming routes.
Tian Wen Quest Chain Progression Guide
Tian Wen specializes in combat-focused rewards, making her questline essential for players who want to optimize their weapon loadouts. “What We Left Behind” is just one entry in her broader mission chain, which includes other valuable quests like:
- Marked for Death – More weapon attachments
- The Right Tool – Starter weapon package
- Mixed Signals – Photoelectric Cloak reward
- The Major’s Footlocker – Exclusive Hullcracker blueprint
Completing her full questline provides a comprehensive weapon modification library that significantly improves your combat effectiveness across all weapon types.
What We Left Behind Quest FAQ
Q: Can I complete all three objectives in one raid?
A: No. Each objective is on a different map, requiring separate deployments.
Q: Do I lose progress if I die during an objective?
A: No. Once you interact with an objective location, that segment is complete even if you die before extracting. However, you won’t get rewards until you return to Tian Wen.
Q: What if another player completes an objective before me?
A: Objectives are instanced per player. Multiple people can complete the same objective in one raid session.
Q: Should I bring upgraded weapons?
A: Not necessary. Free loadouts work fine since combat isn’t mandatory for any objective.
Q: Can I use the weapon attachments on any gun?
A: The attachments work on compatible weapon types. Muzzle brakes and stocks typically fit most primary weapons, while grips have specific compatibility.
Next Quest After What We Left Behind: Broken Monument
With “What We Left Behind” complete, consider these progression paths:
Continue Tian Wen’s Questline: Progress through her remaining missions to unlock more combat-focused rewards and weapon blueprints.
Optimize Your Loadout: Use your new attachments to upgrade weapons and test them in raids. The recoil reduction makes a noticeable difference in medium to long-range engagements.
Explore Other Traders: Balance combat quests with support missions from Lance for healing items or Celeste for crafting materials.
Master These Locations: Return to the Parking Garage and Container Storage during regular raids. Both areas offer solid loot potential beyond quest objectives.
Final Thoughts
“What We Left Behind” might seem straightforward on paper, but it’s really a masterclass in multi-map navigation and risk management. The quest teaches you to operate across different environments while making smart decisions about when to engage enemies versus when to slip past them.
The weapon attachment rewards provide immediate, tangible benefits that improve your combat performance—making this one of the more practical early-game quests from a pure progression standpoint. Unlike quests that reward cosmetics or consumables, these attachments become permanent upgrades to your arsenal.
Whether you rush through all three objectives back-to-back or space them out across multiple play sessions, take time to learn each location. The map knowledge you gain here will serve you well in future quests and general survival gameplay.
Available Now: PlayStation | Xbox | Official Site
What was your experience with “What We Left Behind”? Did you encounter heavy player resistance at any objectives? Share your strategies in the comments!