The Stats Screen That Tells You Nothing
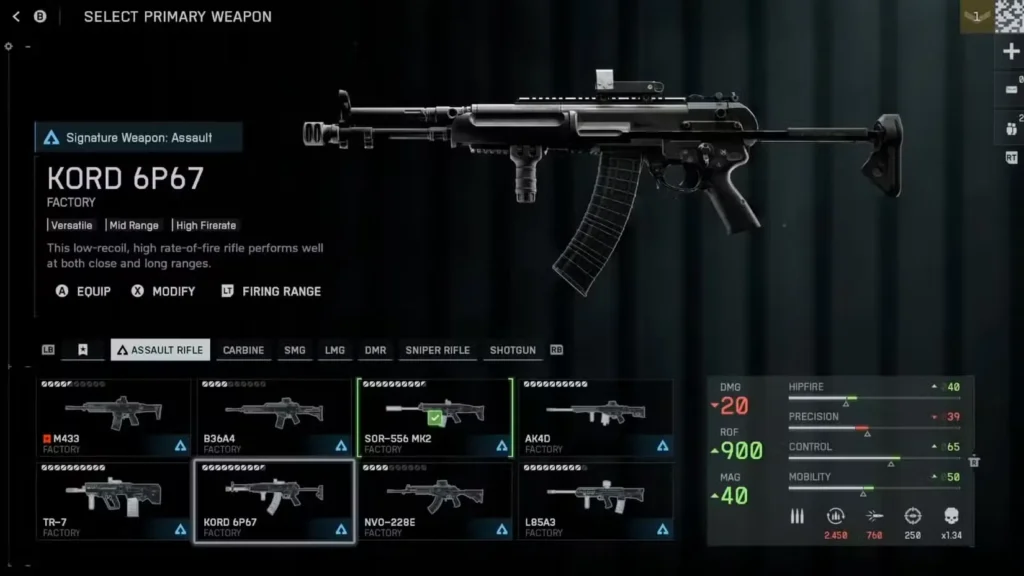
You’re in Battlefield 6’s weapon customization screen, staring at bars, numbers, and cryptic labels like “Precision” and “Control.” You hover over an attachment that says it improves Control by +5, and you think: “Okay… but what does that actually mean for my gunfights?”
If this sounds familiar, you’re not alone. Battlefield 6 throws nine different weapon statistics at you with minimal explanation, leaving players to figure out through trial and error what actually matters for their playstyle.
Some stats are obvious—reload speed is reload speed. But what’s the practical difference between high Mobility versus high Precision? How does Control interact with recoil patterns? And why should you care about any of this when you’re just trying to shoot people?
Let’s decode the entire system so you can make informed attachment decisions and build loadouts that actually complement how you play.
The Nine Core Weapon Stats Breakdown
Battlefield 6 displays weapon statistics in two distinct locations: four major stats with visual meters front and center, plus five additional stats tucked away in the bottom-right corner. Here’s what each one actually does in practice.

Hipfire: Your Run-And-Gun Accuracy
What It Controls: How accurately your weapon shoots when you’re not aiming down sights (ADS). This stat governs both your initial shot spread and how quickly your accuracy degrades during sustained hipfire.
The Practical Impact:
High Hipfire Stats:
- Tighter bullet grouping from the first shot
- Less bloom accumulation during hipfire bursts
- More reliable kills without ADSing in close quarters
- Better performance during combat rolls and evasive movement
Low Hipfire Stats:
- Bullets spray unpredictably from the hip
- Only reliable for point-blank engagements
- Forces you to ADS even in close quarters
- Poor performance in surprise encounters
Best For: SMGs, shotguns, and aggressive carbines built for close-quarters combat.
Strategic Consideration: If you play aggressively, push buildings, or frequently get surprised at close range, Hipfire becomes one of your most important stats. Players who primarily engage at medium-long range can safely ignore it.

Precision: Keeping Bullets Where You Aim
What It Controls: Your weapon’s bloom (accuracy spread) while aiming down sights. This determines how much your bullets deviate from your crosshair during sustained fire.
The Practical Impact:
High Precision Stats:
- Extended accurate fire before bloom kicks in
- Tighter bullet grouping during full-auto bursts
- More forgiving at medium-long ranges
- Better sustained fire in prolonged engagements
Low Precision Stats:
- Bloom accumulates quickly, spreading bullets wildly
- Forces burst-fire discipline at range
- Full-auto becomes unreliable beyond close range
- Requires frequent firing pauses to reset accuracy
The Critical Detail: Precision doesn’t reduce your weapon’s recoil—it controls how much random spread gets added to your shots while firing. Even with perfect recoil control, low Precision means bullets randomly deviate from your aim point.
Best For: Assault rifles, LMGs, and any weapon used for sustained medium-range engagements.
Strategic Consideration: Precision is arguably the most important stat for consistency. Low Precision weapons feel “random” because even when you control recoil perfectly, bullets don’t land where you’re aiming. High Precision weapons reward skilled mouse control and trigger discipline.
Control: Taming the Recoil Beast
What It Controls: The intensity and violence of your weapon’s recoil kick, but not the direction or pattern of that recoil.
The Practical Impact:
High Control Stats:
- Smoother, less jarring recoil animation
- Easier to maintain sight picture on target
- Less visual disruption during sustained fire
- More comfortable shooting experience
Low Control Stats:
- Aggressive weapon shake and muzzle climb
- Harder to track targets during full-auto
- Visual recoil makes follow-up shots challenging
- Requires more effort to compensate
The Critical Distinction: Control affects how intense recoil feels, not its pattern. A weapon might kick straight up (vertical recoil) or side-to-side (horizontal recoil)—Control determines how violently it does either.
Example: Two weapons might both have vertical recoil patterns, but the high-Control weapon climbs smoothly while the low-Control weapon violently jerks upward.
Best For: Every weapon benefits from Control, but it’s particularly valuable on high-recoil platforms like carbines and certain assault rifles.
Strategic Consideration: Control is about comfort and tracking. Skilled players can compensate for low Control through mouse movement, but high Control makes everyone’s life easier. It’s especially valuable on controllers where analog stick compensation is less precise.
Mobility: Moving Like You Mean It
What It Controls: Your movement speed while aiming and your accuracy during movement. This is a composite stat affecting multiple movement-related mechanics.
The Practical Impact:
High Mobility Stats:
- Faster movement while ADSing
- Better accuracy while shooting on the move (strafing)
- Quicker transitions between positions
- More effective peeking and angle-holding
Low Mobility Stats:
- Sluggish movement while aiming
- Significantly reduced accuracy when moving
- Forces static positioning during engagements
- Poor performance in mobile gunfights
The Playstyle Implications: Mobility defines whether you can effectively “ADAD strafe” during gunfights (rapidly moving left-right while shooting) or whether you need to plant yourself in position before firing.
Best For: Aggressive players, SMG users, and anyone who prefers movement-based gunplay over static positioning.
Strategic Consideration: High Mobility lets you play dynamically, repositioning during fights and making yourself harder to hit. Low Mobility forces you to commit to positions before engagements. Neither is inherently better—it’s about matching your playstyle.

Fire Mode: Versatility Options
What It Controls: Available firing modes for your weapon—typically some combination of Semi-Auto, Burst, and Full-Auto.
The Practical Impact:
Available Modes:
- Full-Auto: Hold trigger for continuous fire
- Burst: 3-round bursts per trigger pull
- Semi-Auto: One shot per trigger pull
Why It Matters: Different fire modes excel at different ranges. Many players ignore this feature, but smart fire mode selection significantly impacts effectiveness:
Full-Auto: Best for close quarters and panic situations Burst: Optimal for medium range where controlled bursts outperform spray Semi-Auto: Maximum accuracy at long range, forces trigger discipline
Pro Tip: Some weapons perform dramatically better in specific fire modes. The M4A1, for instance, becomes significantly more controllable in burst mode for medium-range fights.
ADS Time In: The Speed Advantage
What It Controls: How quickly your weapon transitions from hip position to aimed-down-sights, measured in milliseconds.
The Practical Impact:
Fast ADS Times (300-400ms):
- Win “quick-draw” situations
- Better reaction time in sudden encounters
- More forgiving when caught off-guard
- Competitive advantage in peeking duels
Slow ADS Times (500-700ms):
- Lose fights to faster-ADSing opponents
- Require pre-aiming common angles
- Punishing when surprised
- Need better positioning to compensate
The Math: A 200ms difference in ADS time literally determines who shoots first in surprise encounters. Against equally skilled opponents, faster ADS wins the fight.
Strategic Consideration: ADS speed is critical for aggressive players and irrelevant for dedicated snipers holding angles. Most assault rifle and SMG users should prioritize reasonable ADS times.
Reload Speed: The Vulnerability Window
What It Controls: Time required to complete a reload, measured in seconds.
The Practical Impact:
Fast Reload (1.5-2.5 seconds):
- Less downtime between engagements
- Can reload more aggressively in combat
- Better sustained pressure on objectives
- More forgiving magazine management
Slow Reload (3.5-5+ seconds):
- Extended vulnerability periods
- Requires careful reload timing
- Forces tactical retreats for magazine changes
- Punishing in multi-enemy situations
The Tactical Element: Reload speed affects when and where you can safely reload. Fast reloads let you refresh magazines between kills in the same engagement. Slow reloads require you to find cover or risk death mid-animation.
Pro Tip: Learn to recognize when you have 10-15 rounds remaining and make tactical reload decisions. Running dry mid-fight is far worse than proactively reloading during safe moments.

Muzzle Velocity: Bullet Speed Matters
What It Controls: How fast your bullets travel toward targets, measured in meters per second (m/s).
The Practical Impact:
High Muzzle Velocity (700-900+ m/s):
- Less bullet drop at range
- Less leading required on moving targets
- Nearly hitscan feeling at medium range
- Easier long-range precision
Low Muzzle Velocity (300-500 m/s):
- Significant bullet drop compensation needed
- Must lead moving targets substantially
- “Travel time” feels noticeable
- Challenging long-range engagements
The Practical Example: At 200 meters with 800 m/s velocity, your bullet arrives in 0.25 seconds. At 400 m/s, it takes 0.5 seconds—the target has twice as long to move.
Best For: Precision weapons, sniper rifles, and DMRs where long-range accuracy is critical.
Strategic Consideration: Most players underestimate how much muzzle velocity affects feel. High velocity weapons feel responsive and accurate; low velocity weapons feel “floaty” and imprecise, even when you’re aiming correctly.
Headshot Multiplier: Damage Amplification
What It Controls: How much extra damage headshots deal compared to body shots.
The Practical Impact:
Standard Multipliers:
- Most weapons: 1.34x damage (34% increase)
- DMRs: 1.50x damage (50% increase)
- Sniper rifles: 1.75x damage (75% increase)
Why It Matters: Headshot multipliers determine time-to-kill (TTK) for skilled players. A weapon requiring 5 body shots might only need 3-4 with consistent headshots.
The Skill Ceiling: Higher headshot multipliers reward accurate aim more heavily. Sniper rifles can one-shot kill to the head at any range, while assault rifles need multiple headshots to match optimal TTK.
Strategic Consideration: If you consistently land headshots, high-multiplier weapons offer competitive advantages. If your aim is average, body-shot TTK matters more than headshot potential.
How Attachments Modify Stats
Understanding stats is only half the battle—knowing which attachments affect which stats lets you build purposeful weapon loadouts.
Muzzle Devices: Control Specialists
Primary Effect: Control (reduces recoil intensity)
Common Options:
- Compensators: Reduce vertical recoil climb
- Muzzle Brakes: Reduce horizontal recoil shake
- Flash Hiders: Reduce muzzle flash visibility while offering minor recoil benefits
- Suppressors: Reduce noise and minimap signature, often at Mobility or Velocity cost
Strategic Choice: Pick compensators for weapons with aggressive vertical kick, muzzle brakes for horizontal shake, and flash hiders for balanced stealth-control compromise.
Note: Suppressors are tempting for stealth, but muzzle velocity penalties significantly impact long-range performance. Use cautiously.
Underbarrel Grips: Multi-Stat Modulators
Primary Effect: Control, with secondary effects on Mobility and Precision
Common Options:
- Vertical Grips: Improve vertical recoil control (Control stat)
- Angled Grips: Improve horizontal recoil control and ADS speed
- Bipods: Massive Control and Precision boost when deployed, Mobility penalty otherwise
- Laser Modules: (See Laser section below)
The Trade-Offs: Some grips improve Control at the expense of Mobility. Others enhance Precision but slow ADS time. Read the stat changes carefully—not all grips are straight upgrades.
Strategic Choice: Match grip to your weapon’s weakness. Vertical-kicking rifles need vertical grips; horizontal-shaking weapons need angled grips. Learn more about bipod deployment for specialized setups.
Magazines: Capacity vs. Handling
Primary Effect: Ammo capacity and Reload Speed, often with Mobility penalties
Common Options:
- Extended Mags: More rounds, slightly slower reload and mobility
- Fast Mags: Faster reload speed
- Drum Mags: Massive capacity, significant Mobility and reload penalties
The Calculation: Extended magazines let you sustain fire longer but make you slower and reload more slowly. Fast mags keep you in the fight but don’t increase capacity.
Strategic Choice: Extended mags for support players providing suppression; fast mags for aggressive players who reload frequently between kills.
Pro Tip: On high fire-rate SMGs, extended mags are nearly mandatory. On slow-firing DMRs, fast mags offer more value.
Laser Accessories: Hipfire Dominance
Primary Effect: Hipfire (dramatically improved)
The Trade-Off: Lasers make your position visible to enemies who see the beam. It’s a permanent giveaway of your location.
Common Options:
- Standard Lasers: Moderate Hipfire improvement, visible beam
- IR Lasers: Strong Hipfire improvement, only visible with night vision
Strategic Choice: Essential for SMG and shotgun builds focused on close-quarters dominance. Questionable for mid-range weapons where you’ll ADS most engagements.
Pro Tip: Turn lasers OFF (if the game allows toggling) when holding angles or playing stealthily. Activate only when pushing aggressively.
Ergonomics: Handling Refinement
Primary Effect: Reload Speed and Control improvements
Common Options:
- Lightweight triggers: Faster fire rate (some weapons)
- Improved grips: Better handling characteristics
- Stock modifications: ADS speed and recoil improvements
Weapon-Specific: Not all weapons have access to the same ergonomic attachments. Some weapons have deep customization options; others are limited.
Strategic Choice: Ergonomic attachments are “quality of life” improvements rather than dramatic game-changers. Prioritize them after addressing major stat deficiencies.
Ammo Types: Specialized Performance
Primary Effect: Control, Mobility, or Headshot Multiplier adjustments
Common Options:
- High-Velocity Rounds: Increased muzzle velocity, reduced Control
- Armor-Piercing: Better penetration and damage, often reduced fire rate
- Subsonic: Better Control, reduced muzzle velocity (pairs with suppressors)
- Hollow Point: Increased close-range damage, worse penetration
The Strategic Layer: Ammo type is often the most impactful attachment choice because it fundamentally changes weapon performance.
Example: High-velocity rounds on a sniper dramatically improve long-range effectiveness but make recoil harder to manage. On a slow-firing DMR, this trade-off is worthwhile. On a high-recoil carbine, it’s disastrous.
Building Stat-Focused Loadouts
Now that you understand what stats do and how attachments affect them, let’s discuss purposeful loadout construction.
The “Laser Beam” Build: Prioritizing Precision and Control
Goal: Maximum accuracy and recoil management for consistent medium-long range performance
Stat Priorities:
- Precision (most important)
- Control (second priority)
- Muzzle Velocity (helpful but not critical)
Recommended Attachments:
- Compensator (Control boost)
- Vertical grip (Control boost)
- Standard or fast mags
- High-magnification optic (2-4x)
- High-velocity ammo if Control remains manageable
Best For: Assault class players holding medium-range angles, support gunners providing suppression.
Example Weapons: M433 AR, various LMGs with bipods deployed
The “Rusher” Build: Maximizing Hipfire and Mobility
Goal: Extreme close-quarters performance with fast movement and hipfire lethality
Stat Priorities:
- Hipfire (most important)
- Mobility (second priority)
- ADS Time (tertiary concern)
Recommended Attachments:
- Laser sight (Hipfire boost)
- Lightweight grip or angled grip
- Fast mags or extended mags (preference-dependent)
- Red dot or reflex sight (fast acquisition)
- Lightweight stock/ergonomics
Best For: SMG users, aggressive Engineer players, building-clearance specialists.
Example Weapons: PW5A3 SMG, M4A1 Carbine in CQB configuration
The “Sniper” Build: Precision and Velocity
Goal: Maximum long-range lethality with one-shot-kill potential
Stat Priorities:
- Muzzle Velocity (most important for long-range)
- Precision (keeping follow-ups on target)
- ADS Time (less critical, but helpful)
Recommended Attachments:
- High-velocity ammo (critical)
- Bipod for deployed accuracy
- Extended barrel if available
- High-magnification scope (6-8x)
- Canted sight for close-range defense
Best For: Recon players holding long sightlines, overwatch positions.
Example Weapons: M2010 ESR, other bolt-action platforms
The “Balanced” Build: Jack-of-All-Trades
Goal: Versatility across engagement ranges with no glaring weaknesses
Stat Priorities:
- Control (manageable recoil across ranges)
- Precision (consistent medium-range accuracy)
- Mobility (adequate movement)
- ADS Time (competitive draw speed)
Recommended Attachments:
- Compensator or flash hider
- Vertical or angled grip
- Standard mags (balanced capacity/handling)
- 2x or 3x optic (versatile magnification)
- Balanced ammo type
Best For: Players still finding their playstyle, versatile loadouts for varied maps.
Example Weapons: M433 AR, balanced carbine configurations
Common Stat Misconceptions
“High Control Means No Recoil” False. Control affects recoil intensity, not pattern or total climb. A high-Control weapon still kicks upward or sideways—it just does so less violently.
“Precision Only Matters at Long Range” False. Precision affects accuracy at ALL ranges while ADS. Even at 30 meters, low Precision causes bullets to randomly miss despite perfect aim.
“Mobility Doesn’t Matter for Defensive Players” Partially false. Even defensive players benefit from adequate Mobility for repositioning and peeking. Glacial Mobility makes you a sitting duck.
“Hipfire Is Only for SMGs” False. Every weapon benefits from acceptable Hipfire for panic situations. Even sniper rifles occasionally need emergency close-range defense.
“Stats Don’t Matter, Skill Overcomes Everything” Dangerously false. Skill absolutely matters, but fighting with poorly-configured weapons creates unnecessary handicaps. Optimize your stats, THEN worry about skill development.
Platform-Specific Stat Considerations
Controller Players
Prioritize:
- Control: Analog stick compensation is less precise than mouse movements
- Hipfire: Aim assist helps hipfire consistency on controllers
- ADS Time: Slower physical controller movement makes quick-draw situations harder
De-emphasize:
- Precision: Aim assist helps manage bloom somewhat
- Extreme Muzzle Velocity: Harder to capitalize on minor velocity advantages
Mouse & Keyboard Players
Prioritize:
- Precision: Mouse aim capitalizes on tight accuracy
- Muzzle Velocity: Easier to lead shots and compensate for drop
- ADS Time: Fast mouse movement makes quick-scoping viable
De-emphasize:
- Hipfire: Less aim assist means ADS is usually better anyway
- Control: Raw mouse control can compensate for violent recoil
Check our controller vs. keyboard comparison for detailed input method analysis.
Testing Your Builds
Understanding stats theoretically is one thing—feeling their impact is another. Here’s how to validate your loadout choices:
Step 1: Practice in Bot Lobbies Use bot lobbies to test weapons in controlled environments. Shoot at walls from various ranges to see bloom and recoil patterns.
Step 2: Portal Testing Grounds Utilize Portal custom modes designed for weapon testing. Some creators build “shooting range” experiences specifically for attachment comparison.
Step 3: Real Match Validation Take builds into actual multiplayer modes and track performance. If you consistently lose gunfights you feel you should win, stat adjustments might help.
Step 4: Iterative Refinement Change ONE attachment at a time and evaluate its impact. Changing multiple attachments simultaneously makes it impossible to identify what actually improved performance.
Advanced Stat Synergies
Control + Precision Synergy High Control makes it easier to keep your crosshair on target, which maximizes Precision’s benefit. Low Control negates Precision because you can’t maintain aim anyway.
Mobility + Hipfire Synergy High Mobility lets you move aggressively, which pairs perfectly with high Hipfire for run-and-gun playstyles. One without the other feels incomplete.
Muzzle Velocity + Precision Synergy Fast bullets arrive before bloom accumulates significantly, making Precision more impactful. Slow bullets give bloom time to spread your shots.
ADS Time + Mobility Synergy Fast ADS lets you snap to targets quickly while moving, making high Mobility even more effective. Slow ADS negates Mobility advantages.
Stat Priorities by Weapon Category
Assault Rifles
- Precision
- Control
- Muzzle Velocity
- Mobility
SMGs
- Hipfire
- Mobility
- Control
- ADS Time
LMGs
- Control
- Precision
- Reload Speed
- (Everything else is secondary)
Sniper Rifles
- Muzzle Velocity
- Precision
- Headshot Multiplier
- (Others matter less)
DMRs
- Precision
- Muzzle Velocity
- Headshot Multiplier
- Reload Speed
Shotguns
- Hipfire
- Mobility
- ADS Time
- (Others irrelevant)
Final Thoughts: Stats Inform, Practice Perfects
Understanding Battlefield 6’s weapon stats transforms attachment selection from random guessing to purposeful optimization. You now know that “Control” isn’t just a vague concept—it’s the difference between smooth recoil you can manage and violent shake you can’t.
But here’s the reality: stats provide the foundation, but practice builds mastery. A perfectly-optimized weapon in untrained hands loses to a mediocre loadout wielded by someone with 500 kills of experience.
Your Action Plan:
- Choose weapons that match your playstyle
- Optimize their stats through smart attachment choices
- Practice until the weapon feels like an extension of your hands
- Adjust based on performance, not theory
Whether you’re playing on PlayStation, Epic Games Store, or anywhere else, these stats work the same way. Learn them, respect them, and use them to build loadouts that let your skill shine.
Now get into the loadout screen, start experimenting, and feel the difference stats make.
Ready to optimize your entire Battlefield experience? Check out our guides on best tips and tricks, XP farming strategies, challenge completion methods, and camo unlocks