Always Forward is the ninth and final mission of Battlefield 6‘s single-player campaign, and it delivers the climactic conclusion you’d expect from a franchise finale. Playing as GSgt Dylan Murphy, you’ll join a NATO task force for a full-scale assault on Pax Armata’s stronghold—and trust me, DICE doesn’t hold back on the spectacle.
But beyond just experiencing the campaign’s ending, there are 4 Dog Tag collectibles hidden throughout Always Forward that unlock some genuinely worthwhile rewards. Unlike earlier missions where collectibles are purely for completion percentage, this final mission ties directly to three major challenges that award exclusive gear you can’t get anywhere else.
Here’s what’s at stake: exclusive melee weapons, unique character skins, and a special dog tag—all cosmetics that show you’ve actually finished the campaign. If you care about completionism or just want the bragging rights, you need to grab all four collectibles in this mission.
I’ll walk you through every Dog Tag location with crystal-clear directions so you don’t miss any during your playthrough. Let’s make sure your campaign completion is 100% before you dive into multiplayer domination.
Always Forward Challenge Rewards Breakdown
Before we hunt collectibles, let’s talk about what you’re actually earning:
Challenge 1: Mission Complete 4
Requirement: Complete the Always Forward mission on any difficulty
Rewards:
- Bighorn HK-16 (Melee Weapon) – Exclusive melee option for multiplayer
- Carnivore (Weapon Package) – Weapon cosmetic bundle
This challenge requires only mission completion—no collectibles necessary. But since you’re playing through anyway, might as well grab the Dog Tags simultaneously.
Challenge 2: Campaign – Always Forward
Requirement: Find all Dog Tags in the Always Forward mission
Reward:
- Urban Sprawl (Pax Armata Character Skin) – Exclusive character cosmetic
This is where collectible hunting becomes mandatory. All four Dog Tags must be collected to unlock this challenge and receive the character skin.
Challenge 3: Campaign
Requirement: Complete ALL campaign missions and collect ALL Dog Tags across the entire campaign
Reward:
- Winner Takes All (Dog Tag) – Special dog tag cosmetic showing campaign completion
This is the ultimate completionist challenge. You need every collectible from every mission, not just Always Forward. If you’ve been following our guides for Moving Mountains, Nile Guard, Night Raid, Operation Gladius, No Sleep, The Rock, and Operation Ember Strike, you’re almost there.
Bottom line: Collecting all four Dog Tags in Always Forward is essential for two of the three challenges, making it absolutely worth doing on your first playthrough.
How Dog Tags Work in Always Forward
Same system as previous missions, but here’s a quick refresher:
Pickup controls:
- PC: Press E
- Xbox: Press X
- PlayStation: Press Square
Visual identification: Dog Tags have a distinctive metallic shine that catches light. In darker interior sections of Always Forward, this glint becomes even more noticeable. Each collected Dog Tag displays the soldier’s name and date of birth.
Progress saving: Collectibles save automatically upon pickup. If you die or quit after collecting a Dog Tag, it remains collected when you reload or replay the mission.
Mission select replay: If you miss collectibles, you can use mission select to replay Always Forward and grab only what you’re missing. Already-collected Dog Tags won’t respawn, so you only need to find the ones you missed.
For comprehensive achievement and trophy tracking, make sure you’re keeping tabs on your overall campaign progress across all missions.
Dog Tag #1: Lachen El Idrissi
Soldier Info: Pax Armata Air Force – Born 7 February 1999
When You’ll Find It
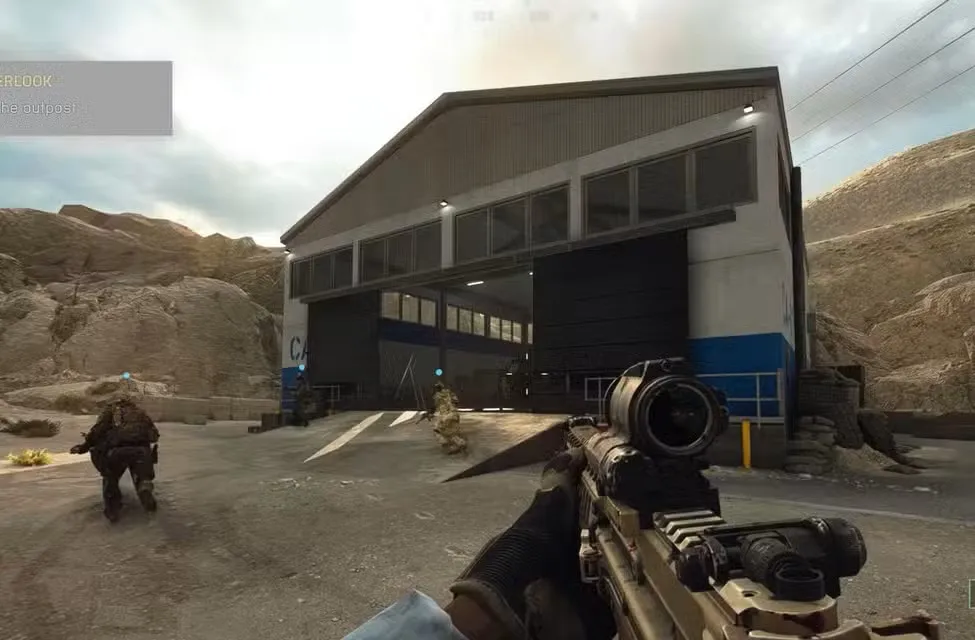
This is the earliest collectible in Always Forward, appearing during the opening combat sequence as you push through the outpost.
Exact Location
The objective at this point is “Get through the outpost (Reach the Overlook)”—basically, you’re fighting through the initial enemy positions at the start of the mission.
Step-by-step directions:
- Progress through the first enemy encounter (clear the initial Pax soldiers)
- As you advance, look for a garage on your right side
- The garage will be obvious—it’s a vehicle storage structure with open doors
- Head inside the garage
- The Dog Tag is on the floor next to the vehicles parked inside
Visual landmark: The garage typically has military vehicles inside (trucks, jeeps, or similar), making it impossible to miss once you’re looking for it. The Dog Tag is lying on the ground near these vehicles, not hidden inside or on them.
Combat consideration: This area usually has light enemy resistance, but clear the immediate vicinity before stopping to search. You don’t want to get shot while looking at the ground for collectibles.
Why it’s missable: Players focused on pushing forward toward the objective marker often run right past this garage without thinking to explore it. The main path doesn’t require entering the garage, so you need to consciously detour.
Timing tip: Grab this immediately after clearing the first group of enemies. Don’t wait until you’re further into the objective—it’s easy to forget to backtrack once you’re engaged with the next wave of combat.
Dog Tag #2: Iruza Rahmani
Soldier Info: Pax Armata Special Operations – Born 6 September 1997
When You’ll Find It
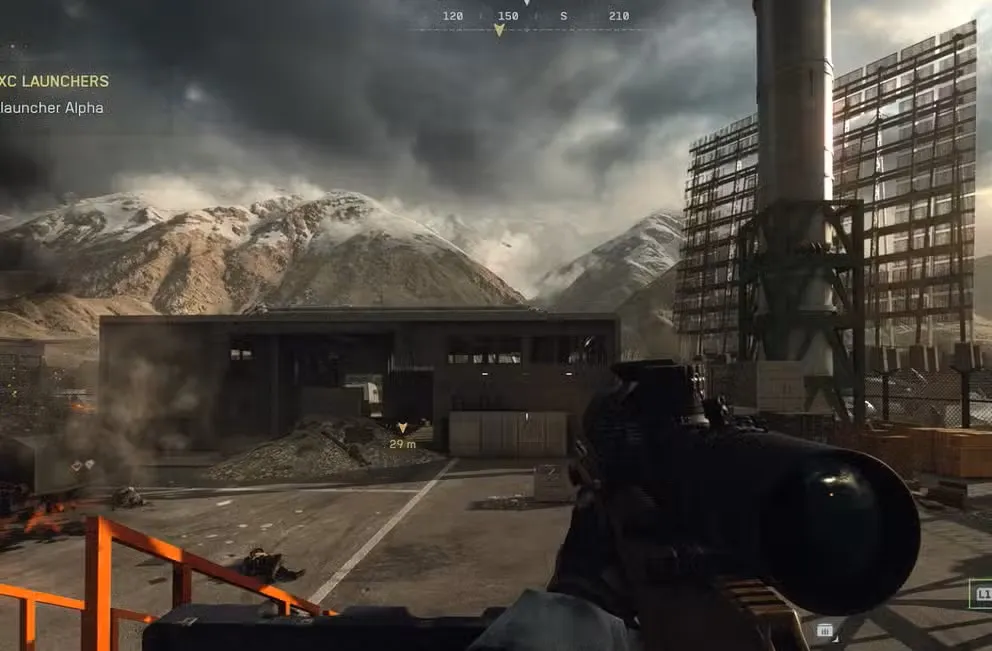
This collectible appears during the “Disable NXC launcher Alpha (Disable the NXC Launchers)” objective—a major story beat where you’re infiltrating the base and moving through multiple structures.
Exact Location
The mission design has you moving through the base in a relatively linear path, entering and exiting several buildings as you advance toward the launcher.
Step-by-step directions:
- Progress through the base as directed by objectives
- Enter and clear buildings as required (you’ll go through multiple structures)
- Count the buildings you exit—you need to reach the third building
- After exiting the third building, stop immediately
- Look to your right side
- The Dog Tag is on top of concrete (likely a concrete barrier, wall, or platform)
Counting buildings: This is the tricky part—make sure you’re actually counting correctly. The “buildings” are substantial structures you enter and clear, not just small sheds or outbuildings. If you’re unsure whether something counts as a building, it probably does.
Visual cue: The concrete surface the Dog Tag sits on should be at roughly eye level or slightly elevated. You’re not looking at ground level for this one—check surfaces at chest/shoulder height.
Combat situation: This section typically has moderate to heavy enemy presence. I recommend clearing the immediate area after exiting the third building before hunting for the collectible. Once enemies are dealt with, you can search without pressure.
Common mistake: Players exit the third building, immediately continue toward the next objective, and completely miss this because they’re not looking right. The Dog Tag is RIGHT there when you exit—don’t move forward without checking right first.
Navigation help: If you’re struggling to find it, just explore all concrete surfaces to the right of the third building’s exit. The Dog Tag’s shine will catch your eye once you’re in the right area.
Dog Tag #3: Bakhodur Rahmani
Soldier Info: Pax Armata Special Operations – Born 6 September 1997
When You’ll Find It
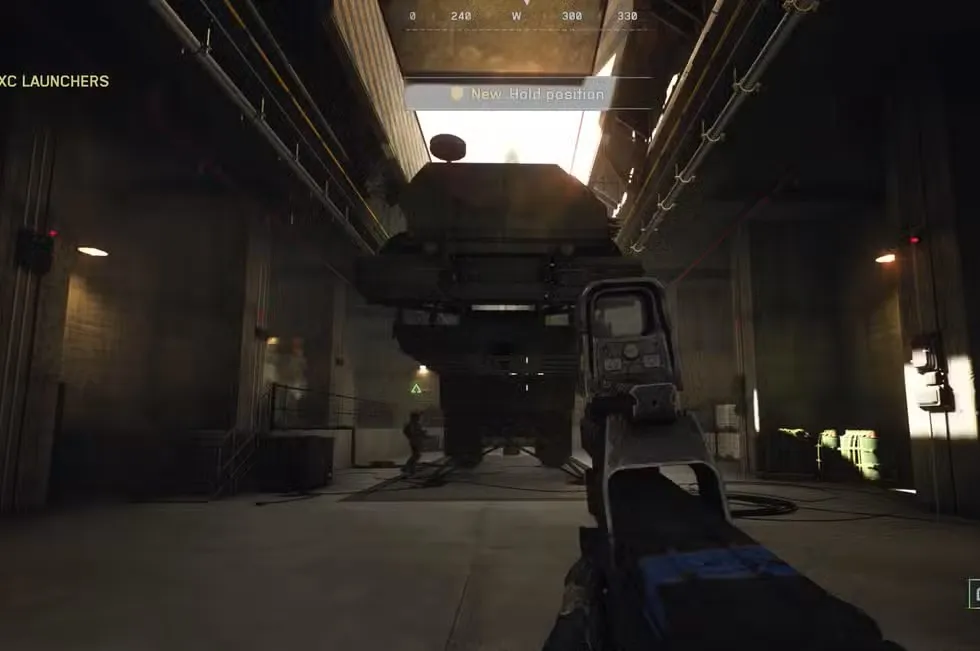
This collectible becomes accessible during the “Hold Position (Disable the NXC Launchers)” objective, specifically when you reach the first missile.
Exact Location
The first missile is a major visual landmark—a massive piece of military hardware that’s impossible to miss. You’ll know you’re in the right place.
Step-by-step directions:
- Progress to the first missile (objective marker will guide you)
- Stand at the missile and orient yourself
- Move to the right side of the missile
- Look for stairs/steps going up (just a few steps, not a full staircase)
- Climb up these few steps
- Turn left
- The Dog Tag is on top of a box/crate
Spatial awareness: Think of this as a small elevated platform area to the right of the missile. You go up slightly, then turn left to access the box where the collectible sits.
Visual reference: The box/crate should be fairly obvious once you’re on the elevated section. Check all surfaces at about waist-to-chest height.
Combat timing: The “Hold Position” objective implies defensive combat. Depending on difficulty, you might be under significant pressure during this sequence. Options:
- Easy/Normal difficulty: Grab the collectible immediately upon reaching the missile, before the defense sequence intensifies
- Hard/Veteran difficulty: Clear the immediate wave of enemies, then quickly grab it during a lull
Why players miss this: The combat intensity during “Hold Position” makes players focus entirely on fighting. The collectible area is slightly off to the side, not in the main fighting zone, so people simply don’t explore while under fire.
Pro tip: If you’re replaying specifically for collectibles, you can grab this and immediately die/restart if needed—the collectible save is permanent once picked up.
Dog Tag #4: Eric Macleod
Soldier Info: Pax Armata Special Operations – Born 30 April 1994
When You’ll Find It
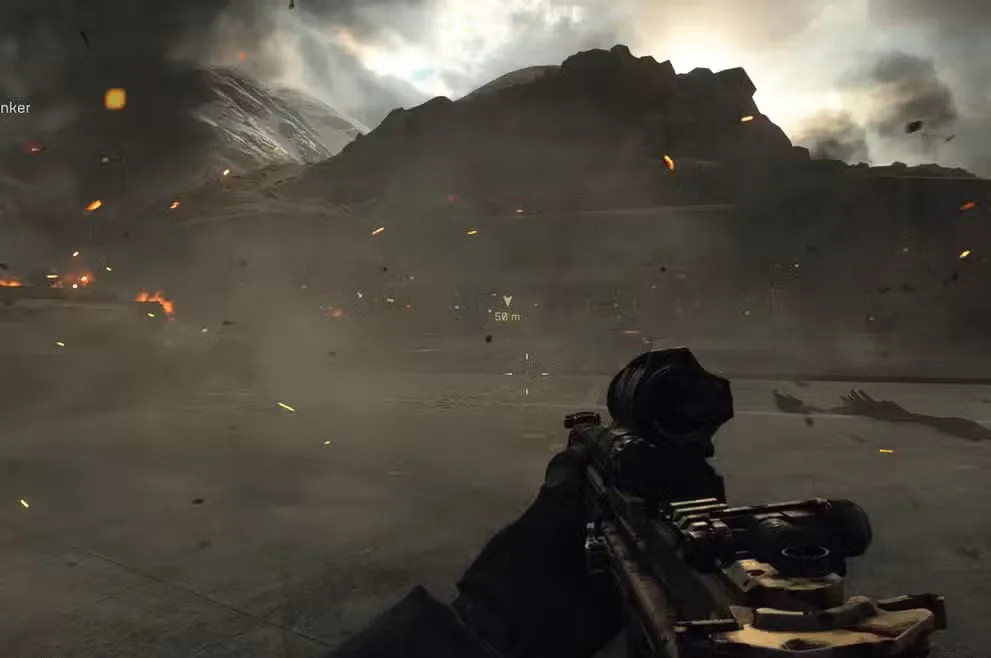
This is the final collectible in the campaign, appearing during the climactic finale sequence after a major setpiece moment.
Exact Location
You need to progress substantially through the mission to reach this point. The game will give you a dramatic cutscene where a missile explodes, creating a massive shockwave.
Step-by-step directions:
- Experience the missile explosion cutscene (you can’t miss this—it’s a major story moment)
- After the cutscene, make your way to the Bunker
- Enter the bunker interior
- Another cutscene will play automatically
- After this second cutscene ends, you regain control
- Immediately look to your left
- The Dog Tag is beside a laptop (on a desk/table surface)
Cutscene sequence: Two cutscenes happen in relatively quick succession:
- Missile explosion (outdoors)
- Bunker interior moment (indoors)
The collectible is accessible only after BOTH cutscenes complete.
Visual landmark: The laptop is a clear indicator—military or tactical computer equipment on a desk. The Dog Tag sits right next to it, so scanning the desk area will reveal it immediately.
Mission timing: This is late in the mission, during the final act. You’re very close to completing the campaign entirely at this point.
Don’t rush: After the dramatic cutscenes, players are often so focused on seeing the ending that they sprint toward the final objectives without exploring. Take 10 seconds to look left and grab this collectible before proceeding.
Final collectible stress: Since this is the last Dog Tag in the entire campaign (if you’ve been following along), missing it would be especially frustrating. Double-check before moving forward that you’ve picked it up.
Mission Overview: Always Forward
For context on what makes this mission special:
Mission objectives:
- Join NATO task force assault
- Push through Pax Armata’s stronghold defenses
- Disable NXC missile launchers
- Infiltrate multiple base sectors
- Experience climactic story conclusion
Playable character: GSgt Dylan Murphy
Mission themes: This is the campaign’s grand finale—full-scale combined arms warfare with high production value setpieces. Expect heavy combat, dramatic story beats, and the culmination of narrative threads from previous missions.
Difficulty scaling: As the final mission, Always Forward assumes you’re comfortable with the game’s mechanics. Enemy density and aggression are high even on Normal difficulty. If you’re purely collectible hunting and don’t care about challenge, consider playing on Easy for your first completion.
Emotional weight: This mission provides closure to the campaign’s story. Don’t skip cutscenes on your first playthrough—DICE put significant effort into the narrative payoff.
Efficient Challenge Completion Strategy
Here’s how to maximize efficiency when completing Always Forward challenges:
First Playthrough Approach
Goal: Complete mission + collect all Dog Tags simultaneously
- Play on Easy or Normal difficulty to reduce combat stress
- Follow this guide step-by-step for Dog Tag locations
- Take your time—there’s no rush
- Watch all cutscenes (you earned the story conclusion)
- Complete the mission naturally
Result: Unlocks Challenges 1 and 2, plus progresses Challenge 3
Collectible-Only Replay (If Needed)
Goal: Grab only missed Dog Tags without full mission replay
- Use mission select to load Always Forward
- Skip cutscenes to save time
- Rush to the specific Dog Tag location you missed
- Collect it—progress saves automatically
- No need to finish the mission
Result: Unlocks any challenges you were missing collectibles for
Full Campaign Completion
If Always Forward is your last mission for Challenge 3 completion:
- Verify you’ve collected all Dog Tags from ALL previous missions
- Complete Always Forward with all four Dog Tags
- Check your challenges menu to confirm “Campaign” challenge completion
- Claim your Winner Takes All dog tag reward
For comprehensive guides on other campaign challenges, see our Assault Class Challenges, Recon Class Challenges, Deadeye Challenges, Close Quarters Challenges, Danger Close Challenges, and Bullet Storm Challenges.
Using Campaign Rewards in Multiplayer
The rewards from Always Forward challenges carry over to multiplayer, so let’s discuss their value:
Bighorn HK-16 (Melee Weapon)
Exclusive melee option that:
- Changes your melee attack visuals
- Provides cosmetic uniqueness
- Shows campaign completion
- Has no gameplay advantage (purely cosmetic)
Use it to flex on players who haven’t finished the campaign.
Carnivore (Weapon Package)
Weapon cosmetic bundle that likely includes:
- Weapon skins
- Potentially attachments or variants
- Visual customization options
Apply these to your favorite weapons to stand out. Check our guides for M4A1 loadouts, M277 loadouts, and the complete weapons list.
Urban Sprawl (Pax Armata Character Skin)
Exclusive character cosmetic:
- Makes your soldier look unique
- Thematically tied to Pax Armata faction
- Unavailable through any other method
- Shows you collected all Always Forward Dog Tags
This is one of the more distinctive character skins in the game.
Winner Takes All (Dog Tag)
Special cosmetic that proves:
- You completed the entire campaign
- You collected every single collectible
- You’re a completionist
Equip this to show off your dedication. It’s the ultimate campaign completion badge.
Common Collectible Hunting Mistakes
Based on player struggles with Always Forward:
Mistake #1: Not counting buildings correctly for Dog Tag #2 The “third building” causes confusion. Make sure you’re counting substantial structures you actually enter and clear, not peripheral buildings you just pass by.
Mistake #2: Getting tunnel-vision during “Hold Position” Dog Tag #3 appears during intense defensive combat. Players get so focused on survival that they forget to explore the missile area. Clear enemies, then search.
Mistake #3: Rushing through the finale Dog Tag #4 is right before the campaign’s conclusion. Players eager to see the ending often sprint past it. Pause, look left, grab the collectible, THEN finish.
Mistake #4: Not exploring the garage Dog Tag #1’s garage isn’t on the main path. You have to consciously detour right to enter it. Don’t just follow objective markers blindly.
Mistake #5: Playing on too high difficulty for collectible hunting If your primary goal is finding Dog Tags, play on Easy. You can always replay on Veteran later for difficulty-specific achievements. Don’t make collectible hunting harder than necessary.
After Campaign Completion: Transitioning to Multiplayer
Congratulations—you’ve finished the Battlefield 6 campaign! Here’s what to focus on next:
Apply Campaign Lessons to Multiplayer
The campaign teaches mechanics and weapon handling in controlled environments. Now apply those skills:
Core gameplay guides:
Master Each Class
Choose your preferred playstyle:
Weapon Optimization
Build your perfect loadouts:
Advanced Mechanics
Learn the systems that separate good players from great ones:
- Combat roll mastery
- Spotting and pinging
- Laser designator usage
- Range finder guide
- Field Specs explained
Progression Optimization
Level up efficiently:
Completionist Checklist
If you’re going for 100% completion, verify you’ve done everything:
Campaign completion:
- ✅ All missions completed on desired difficulty
- ✅ All Dog Tags collected from every mission
- ✅ All campaign challenges completed
- ✅ All three Always Forward challenges unlocked
Multiplayer progression:
- Class mastery and challenge completion
- Weapon unlocks and camo grinds
- Map familiarity and mode understanding
- Achievement/trophy hunting
Cosmetic collection:
- Campaign reward cosmetics equipped
- Multiplayer cosmetics being unlocked
- Character skins and weapon packages collected
For the full achievement roadmap, consult our complete achievements and trophies guide.
Conclusion: Finishing Strong with Always Forward
Always Forward represents the culmination of Battlefield 6’s campaign—a final mission that delivers on spectacle, intensity, and narrative payoff. The four Dog Tag collectibles scattered throughout aren’t just arbitrary pickups; they’re tied to meaningful rewards that enhance your multiplayer experience.
Quick location recap:
- Dog Tag #1 (Lachen El Idrissi): Garage on right after first enemy encounter, on floor by vehicles
- Dog Tag #2 (Iruza Rahmani): On concrete to the right after exiting third building during NXC launcher objective
- Dog Tag #3 (Bakhodur Rahmani): Right side of first missile, up stairs, left on box during Hold Position objective
- Dog Tag #4 (Eric Macleod): Inside bunker after explosion cutscene, on left beside laptop
Collecting all four unlocks the Urban Sprawl character skin and contributes toward the ultimate Winner Takes All dog tag for full campaign completion. These aren’t rewards you can purchase or unlock through multiplayer—they’re exclusive to players who actually finish the campaign.
Take your time with this mission. Experience the story, grab the collectibles, and complete all three challenges in one efficient playthrough. You’ve come this far through the campaign—finish strong and claim your rewards.
Welcome to the post-campaign grind. Now the real Battlefield begins.
Official Battlefield 6 Resources: