Become an Unstoppable Aerial Threat in Battlefield 6
Let’s be real—a skilled pilot in an attack helicopter can completely flip a match in Battlefield 6. I’m talking about the kind of player who makes entire enemy teams rage-quit, the one who single-handedly locks down objectives and turns tanks into scrap metal.
But here’s the catch: there’s a massive skill gap between “that guy who keeps crashing helicopters 10 seconds after takeoff” and “the ace pilot farming 50+ kills per match.” The good news? With proper settings, the right loadout, and some dedicated practice, anyone can learn to fly effectively.
I’ve spent countless hours mastering helicopter gameplay, and I’m going to share everything I’ve learned—from basic control settings that make flying dramatically easier, to advanced combat maneuvers that’ll have enemies scrambling for cover. Whether you’re a complete beginner or looking to refine your skills, this guide has you covered.
Shoutout: The firing range examples in this guide come from x8Reaps’ excellent Portal map (code: YH1FC). It’s perfect for practice without the pressure of live combat.
Game-Changing Control Settings for Helicopters
Before we talk tactics, let’s fix your controls. Trust me, this section alone will transform your helicopter experience.

The Control Assist Secret
Here’s something most players don’t realize: Helicopter Control Assist is an absolute game-changer, and it’s not enabled by default.
Without Control Assist:
- Flying feels like piloting an actual helicopter (realistic but difficult)
- Requires constant input adjustments to maintain stability
- Easy to over-correct and lose control
- Steep learning curve that frustrates most players
With Control Assist:
- Movement works like infantry controls (WASD/Left Stick)
- Camera/aiming with mouse/Right Stick
- Game automatically prevents tipping and maintains hover
- You can focus on combat instead of fighting physics
How to enable it:
- Open Settings
- Go to Gameplay tab
- Navigate to Vehicles section
- Toggle Helicopter Control Assist: ON
I’m not exaggerating when I say this setting makes helicopter gameplay feel like easy mode. It completely eliminates the frustration of trying to maintain stable flight while engaging enemies. Some veteran pilots might call it “cheating,” but honestly? It levels the playing field and lets you actually enjoy the vehicle instead of fighting with it.
Additional Recommended Settings
Helicopter Sensitivity:
- Increase this significantly for more responsive controls
- Allows faster target tracking and evasive maneuvers
- Start at 60-70% and adjust based on comfort
- Higher sensitivity = better combat effectiveness
Field of View:
- Wider FOV helps track threats around you
- Particularly important when checking for missiles
- See our best settings and optimization guide for full details
Audio Settings:
- Use War Tapes audio mix to hear missile locks clearly
- Sound cues are critical for survival
Button Mapping Considerations
The default button mappings work fine with Control Assist enabled, but here are some considerations:
- Mouse/Keyboard: Keep defaults—they’re actually well-designed
- Controller: Some pilots prefer swapping certain functions for thumb comfort
- Personal preference matters: Experiment to find what feels natural
For more control optimization, check out our controller vs keyboard/mouse comparison.
Where to Practice Safely
Don’t jump straight into competitive matches—you’ll just feed the enemy team kills and frustrate your squad.
Best Practice Options:
Portal Mode (Recommended):
- Create custom lobbies with no enemies
- Use x8Reaps’ firing range (code: YH1FC)
- Practice landings, movements, and weapons without pressure
- Learn how to create Portal matches for custom training
Closed Weapons All-Out Warfare:
- Lower player counts than standard playlists
- Matches fill with bots instead of full human teams
- Less competitive pressure while learning
- Check open vs closed weapons playlists for details
Low-Traffic Conquest/Escalation:
- Play during off-peak hours (early morning/late night)
- Choose large maps like Liberation Peak
- Learn in real combat conditions but with fewer skilled opponents
- See all maps ranked to pick best practice locations
Pro Tip: You can also practice in bot lobbies for risk-free training.
Optimal Attack Helicopter Loadout
Once you start unlocking equipment, here’s the meta loadout that’ll maximize your effectiveness:

Primary Weapons (Prioritized)
Light Rockets:
- Best for: Infantry elimination and area saturation
- High ammo capacity for sustained attacks
- Excellent for attacking clustered objectives
- Perfect for beginners learning rocket trajectory
- Can fire rapidly to cover large areas
Heavy Rockets:
- Best for: Tank hunting and armored vehicle destruction
- High damage per shot against vehicles
- Limited ammo—must make shots count
- Also effective for precision infantry kills
- Use against priority targets only
Default PGM Rockets:
- Act like mini-guided missiles
- Follow your crosshair placement
- Great for mid-range precision shots
- Fire one or two at a time for best accuracy
- Decent all-around option before unlocks
Secondary Weapon
TOW Missile:
- Essential for vehicle destruction
- Can one-shot enemy helicopters
- Requires manual guidance but devastatingly effective
- Much easier to use with Control Assist enabled
- Save for high-value targets (tanks, choppers, IFVs)
Learning Curve: TOW missiles feel weird at first, but after 10-15 successful hits, they become second nature. The satisfaction of sniping another helicopter out of the sky is absolutely worth the practice.
Equipment Loadout
Ground Target Detection System:
- Highlights enemies on your HUD
- Makes target identification dramatically easier
- Essential for spotting threats and opportunities
- Pairs perfectly with next item
Radar System:
- Works synergistically with Target Detection
- Provides enhanced enemy information
- Shows enemy positions on minimap
- Critical for situational awareness
Important Trade-off: When Target Detection is active, enemies with anti-air weapons can lock onto you faster. This seems scary, but proper positioning (covered next) completely negates this downside. The benefits far outweigh the risks.
For more loadout optimization, see our best vehicle loadouts guide.
Master Class: Positioning and Cover Usage
This is where average pilots separate from great ones. Attack helicopters are extremely fragile—one good RPG hit or a few seconds of concentrated fire will end you.
The Golden Rules of Helicopter Positioning
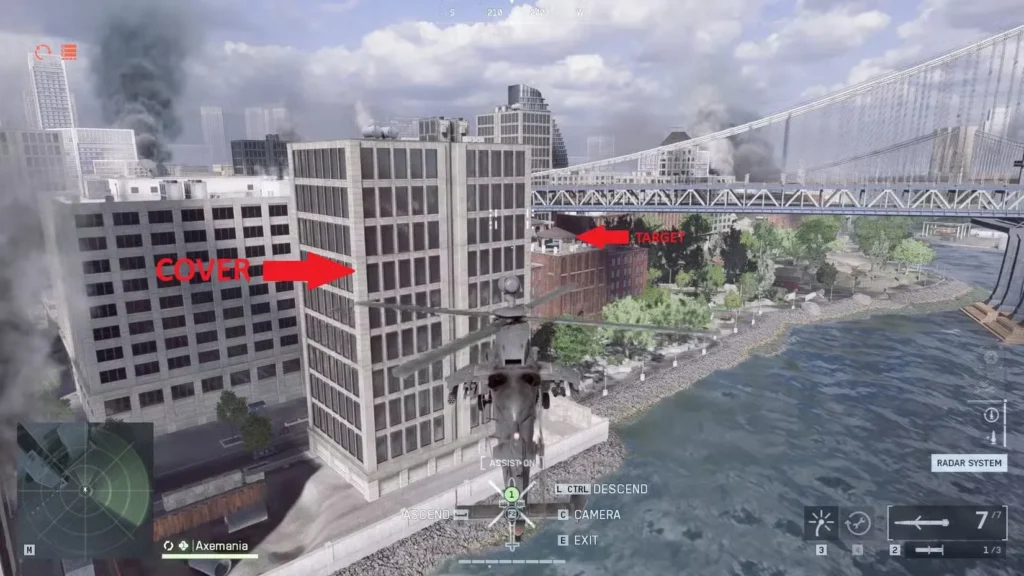
Rule #1: Always Stay Near Cover
- Stick close to tall buildings, mountains, and terrain features
- These provide escape routes when missiles lock on
- Use them to break line-of-sight with threats
- Maps like Manhattan Bridge and Liberation Peak are perfect examples
Rule #2: Never Fly Over Enemy-Controlled Areas
- Assume every infantry soldier has an RPG aimed at your chopper
- Being directly overhead = death sentence
- Attack from angles and distances instead
- If you must fly over, make it brief and have flares ready
Rule #3: Track the Enemy AA Tank
- This is your #1 threat at all times
- Know where it spawns and where it’s patrolling
- Avoid its effective range entirely
- If it’s destroyed, that’s your window to dominate
Rule #4: Don’t Overstay Your Welcome
- Hit enemies from the side or rear
- Deliver your payload and retreat immediately
- Resupply at base between attack runs
- Greed kills more helicopters than skill
Rule #5: Check Below Before Hovering
- Always scan for infantry and vehicles beneath you
- A stationary helicopter is an easy target
- Keep moving unless in completely safe zones
- Use your motion to make yourself harder to hit
Terrain Exploitation Techniques
Canyon Flying:
- Use valleys and ravines as highways
- Stay below ridgeline to avoid detection
- Pop up, attack, disappear back down
- Incredibly effective on Liberation Peak
Urban Weaving:
- Thread between buildings for cover
- Makes missile tracking extremely difficult
- Requires practice but provides amazing protection
- Manhattan Bridge is perfect for this technique
Mountain Masking:
- Keep mountains between you and known threats
- Attack from unexpected angles using terrain
- Forces enemies to reposition to engage you
- Buys time for your flares to recharge
Advanced Missile Evasion Tactics
Flare management is literally the difference between life and death. Here’s the complete breakdown:
Understanding the Missile System
Lock-On Warnings:
- Beeping sound = Enemy is attempting to lock onto you
- Continuous tone + “PAINTED” warning = Lock achieved, missile incoming
- You have 1-2 seconds from lock to missile launch
- React immediately when you hear/see warnings
Flare Mechanics:
- Duration: 3-5 seconds of protection
- Cooldown: Significant—don’t waste them
- Effect: Redirects incoming missiles away from your helicopter
- Critical: Only deploy when missile is confirmed incoming
Core Evasion Strategies
Strategy #1: Terrain Masking
- Fly extremely close to the ground to break lock-on attempts
- The lock-on system struggles with ground clutter
- Excellent counter against enemy attack helicopters
- Weakness: Vulnerable to ground infantry and vehicle fire
- Use this when flares are on cooldown
Strategy #2: Structural Cover
- Put solid objects (buildings, mountains) between you and the threat
- Only works if you know enemy position
- Sometimes missiles will hit obstacles instead of you
- Not 100% reliable but better than nothing
- Can save your flares for emergencies
Strategy #3: Base CIWS Protection
- Each faction base has an automated gatling gun system
- Automatically shoots down incoming missiles
- Also targets enemy aircraft
- Retreat to base when overwhelmed
- Great for emergency resupply and protection
Strategy #4: Perfect Flare Timing
- Wait for missile launch before deploying flares
- Don’t let enemies bait early flare usage
- Listen for the distinct missile launch sound
- Deploy immediately after launch confirmation
- Never waste flares on just lock warnings
Strategy #5: Never Fight Without Flares
- If flares are on cooldown, retreat immediately
- Don’t engage enemies until they’re available again
- One locked missile without flares = death
- Patience saves helicopters
What NOT to Do
❌ Panic-deploying flares the moment you hear beeping ❌ Staying in the open when painted by missiles ❌ Continuing attacks with flares on cooldown ❌ Flying predictably—vary altitude and direction constantly ❌ Ignoring audio cues—sound is your best warning system
Executing Devastating Strafing Runs
Strafing runs are your primary attack method. Here’s how to execute them like a professional:
Pre-Attack Planning Phase
Step 1: Intelligence Gathering
- Open your map and identify high-value targets
- Look for clustered infantry on objectives
- Note vehicle positions and AA threats
- Check if your flares are available
Step 2: Approach Vector Selection
- Attack from flanks or rear—NEVER head-on
- Choose approach paths outside AA range
- Ensure you have cover along your route
- Plan your escape route before starting
Step 3: Altitude and Angle Setup
- Level your helicopter relative to the target
- Too high = missed shots and wasted ammo
- Too low = easy target for infantry fire
- Sweet spot is usually medium altitude with slight downward angle
Combat Execution Phase
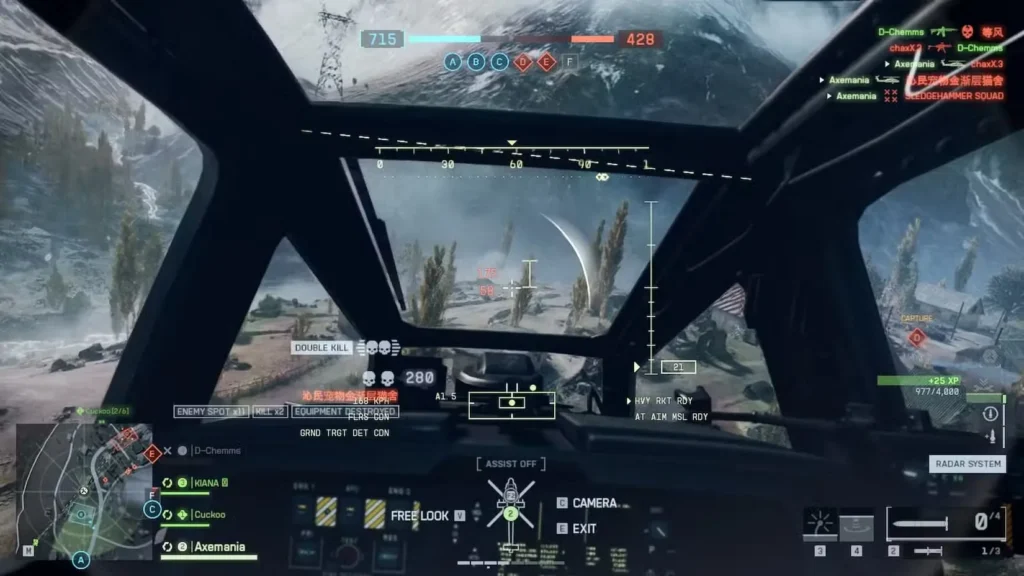
Step 4: Target Acquisition
- Activate Target Detection System as you approach
- Enemies will appear highlighted on your HUD
- Prioritize targets based on threat level:
- Enemy AA vehicles
- Tanks and IFVs
- Infantry clusters
- Isolated infantry
Step 5: Weapon Deployment
- Light Rockets: Saturate the area, fire multiple salvos
- Heavy Rockets: One or two shots per vehicle
- TOW Missile: Single precision shot on high-value targets
- Don’t use all ammo—save some for escape defense
Step 6: Immediate Retreat
- The moment you’ve delivered your payload, get out
- Pop flares if you hear lock warnings
- Return to base cover immediately
- Resupply and prepare next attack
Making It Easier with a Gunner
Everything becomes significantly easier with a competent gunner:
- They handle sustained fire with the autocannon
- You focus entirely on piloting and rockets
- Combined firepower is devastating
- Coordination makes you nearly unstoppable
Communicate with your gunner about targets and threats. A good pilot-gunner duo can dominate entire matches.
Advanced Helicopter Combat Techniques
Ready for pro-level tactics? Here’s the advanced stuff:
Movement and Physics Mastery
Understanding Tilt-Based Movement:
- Helicopters move based on nose tilt direction, not just throttle
- Throttle Up/Down primarily controls altitude and acceleration
- Forward tilt + throttle = fast forward movement
- This is how helicopters work in real life too
Horizontal Strafing:
- You can strafe sideways without changing facing direction
- Incredibly powerful for sustained objective bombardment
- Perfect for attacking rooftop objectives (like Manhattan Bridge)
- Keeps weapons on target while maintaining evasive movement
- Many players don’t realize this is possible
Altitude Management:
- Higher altitude = safer from infantry, better overview
- Lower altitude = harder for missiles to track, more vulnerable to ground fire
- Constantly vary altitude during combat
- Use altitude advantage in helicopter duels
Gunner Seat Exploitation
Quick-Switch Tactic:
- At high altitude, switch to gunner seat briefly
- Fire autocannon burst at targets below
- Switch back to pilot seat immediately
- Only do this at safe altitude—very risky otherwise
- Useful when solo and you have a perfect firing opportunity
This takes practice and situational awareness. Don’t try it in combat zones or without sufficient height.
Ammunition Conservation
Smart Rocket Usage:
- Don’t dump entire payload in one pass (except Heavy Rockets on vehicles)
- Spread attacks across multiple runs
- Conserve ammo for defensive situations
- Always keep reserve for escape scenarios
- Frequent resupply runs are part of effective play
Target Priority System:
- Enemy AA vehicles (highest priority)
- Enemy attack helicopters
- Friendly-targeted tanks
- Infantry on objectives
- Isolated enemies (lowest priority)
Helicopter-vs-Helicopter Combat
Altitude Advantage is Everything:
- Always seek higher altitude than enemy choppers
- They can’t shoot you without tilting up and losing altitude
- You can rain fire down on them easily
- Forces them into defensive positioning
- This tactic wins most aerial duels
Combat Execution:
- Use TOW missiles for one-shot kills
- Heavy Rockets work if TOW is unavailable
- Maintain altitude superiority throughout fight
- Watch for their missile locks—evade and counter
- Coordinate with gunner for combined firepower
Common Mistakes and How to Fix Them
Beginner Errors
❌ Flying without Control Assist enabled
- Fix: Turn it on immediately—no reason to make life harder
❌ Staying too long in enemy territory
- Fix: Hit and run tactics only—never linger
❌ Ignoring flare cooldown timers
- Fix: Track cooldown mentally, retreat when unavailable
❌ Attacking without escape plan
- Fix: Always know your retreat route before engaging
Intermediate Mistakes
❌ Poor ammunition management
- Fix: Be selective with targets, conserve for priority threats
❌ Neglecting minimap awareness
- Fix: Constantly check minimap for threats and opportunities
❌ Predictable attack patterns
- Fix: Vary approach angles, altitudes, and timing
❌ Fighting without gunner coordination
- Fix: Use voice chat or squad commands for teamwork
Synergies with Other Challenges and Progression
While mastering helicopters, you’ll naturally progress through several challenges:
- Vehicle Mastery: Helicopters count for vehicle repair challenges
- Class Progression: Use Engineer class for vehicle repairs
- XP Farming: Helicopter kills provide massive XP—see fast leveling guide
- Challenges: Complete Engineer class challenges while flying
Understanding the max level rank system helps you track progression as you master aerial combat.
Map-Specific Helicopter Tactics
Different maps require different approaches:
Liberation Peak:
- Use valley terrain for cover
- Attack from behind mountain ridges
- Best sniper spots guide shows key locations to bomb
Manhattan Bridge:
- Weave between buildings for protection
- Perfect for practicing urban strafing
- High-altitude attacks on rooftop objectives
Open Maps:
- Rely more heavily on flares and speed
- Stay near map edges where cover exists
- Quick hit-and-run tactics essential
Pro Tips for Dominating Matches
Loadout Timing:
- Start with Light Rockets for easy infantry kills and practice
- Switch to Heavy Rockets when enemy vehicles become threatening
- TOW Missiles once you’re comfortable with aiming
Team Coordination:
- Communicate with ground forces about AA locations
- Support Assault class pushes with aerial fire
- Coordinate with Recon for spotted targets
Psychological Warfare:
- A good helicopter forces enemies to constantly look up
- Disrupts their ground game and creates openings for your team
- Even if not getting tons of kills, you’re providing massive value
Know When to Abandon:
- If multiple AA threats lock down airspace, switch to ground combat
- Don’t feed the enemy team kills stubbornly trying to fly
- Adapt to match conditions—flexibility wins games
Additional Resources and Learning
Essential Guides:
- Best tips, tricks, and settings for overall improvement
- Complete weapons list for understanding armament options
- Field Specs guide for enhancing capabilities
Platform-Specific:
- Get the game: Steam | PlayStation | Epic Games
- Join the community: r/Battlefield6
Final Thoughts: From Novice to Ace Pilot
Mastering attack helicopters in Battlefield 6 is genuinely one of the most rewarding skill progressions in the game. There’s something incredibly satisfying about transforming from “that person who crashes immediately” to “the pilot that makes enemy teams quit.”
The learning curve looks steep from the outside, but with Control Assist enabled and these strategies implemented, you’ll be amazed how quickly you improve. Start with Portal practice, move to bot lobbies, then graduate to competitive matches as your confidence builds.
Remember: every ace pilot you see in matches was once a beginner who kept crashing. The difference is they persisted, practiced, and learned from mistakes. With this guide, you’re already ahead of where most players start.
Now get out there and own the skies. Your team is counting on you.
Related Guides:
- How to fly jets alongside helicopters
- How to perform takedowns when you’re on foot
- Crossplay and playing with friends to find reliable gunners
Master the air, control the battlefield.