Light machine guns in Battlefield 6 occupy a unique space in the weapon meta. They’re not as nimble as SMGs, not as versatile as assault rifles, and they definitely won’t win you any quickdraw contests. But what they lack in agility, they more than make up for in sustained firepower, suppression capability, and the sheer psychological impact of hearing 100 rounds of continuous fire tearing through the air.
Here’s the truth about LMGs in BF6: they’re cumbersome. They’re slow to aim, sluggish to reload, and unforgiving if you get caught off-guard. But in the right hands, positioned correctly with a bipod deployed, an LMG user becomes an absolute nightmare for the enemy team. You can lock down entire lanes, suppress enemies preventing them from regenerating health naturally, and maintain fire superiority for far longer than any other weapon class.
I’ve spent extensive time with every LMG in Battlefield 6, testing them across different maps, modes, and playstyles. This tier list reflects not just raw stats, but real-world effectiveness across Battlefield 6’s diverse map pool and various engagement scenarios you’ll encounter whether you’re playing Conquest, Breakthrough, or other modes.
Complete LMG Tier List Rankings
Here’s how every light machine gun in Battlefield 6 stacks up:
S-Tier: The Elite
- M250 – The King of Consistency
A-Tier: Excellent Choices
- M240L – High-Caliber Firepower
- M60 – The Ol’ Reliable
B-Tier: Solid Performers
- DRS-IAR – The Assault Rifle in Disguise
- RPKM – High Accuracy, Low Recoil
C-Tier: Situational Options
- M123K – The Cheesemaker
- L110 – General Purpose Support Weapon
D-Tier: Needs Work
- KTS100 MK8 – Extreme Accuracy, Minimal Impact
Ranking Methodology: This list considers weapon performance across the full spectrum of Battlefield 6 combat scenarios. Most maps contain a mix of engagement ranges – from tight corridors to open fields – so the best LMGs need versatility. Specialized weapons that excel in one area but struggle elsewhere rank lower, even if they dominate their niche.
Now let’s break down why each weapon earned its placement, with detailed analysis of stats, strengths, weaknesses, and ideal use cases.
S-Tier: The Undisputed Champion
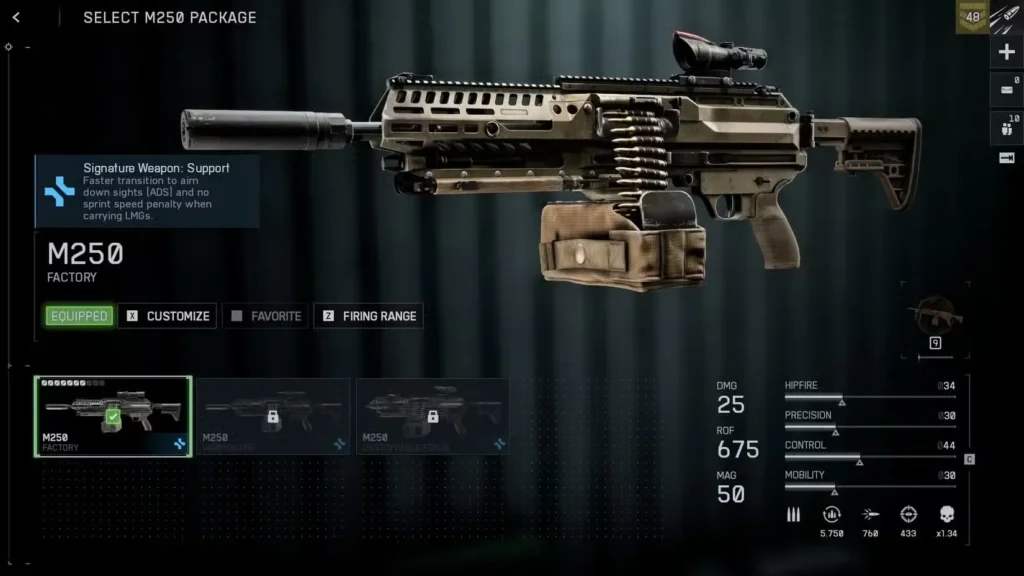
1. M250 – The King of Consistency
Why it’s #1: The M250 is what happens when developers get weapon balancing exactly right. It doesn’t have a single glaring weakness, and its strengths cover virtually every scenario you’ll encounter in Battlefield 6.
Key Statistics:
- Damage: 25 per bullet (body shots)
- Effective range: Consistent up to 80+ meters
- Fire rate: 675 RPM
- Default magazine: 50 rounds
- Upgraded magazine: 100 rounds (Rank 22, 55 attachment points)
What makes it special: The M250 shares a damage profile with the M277 assault rifle, which means you’re getting assault rifle-level damage per shot with the magazine capacity and sustained fire of an LMG. That 25 damage consistent out to 80+ meters is absolutely bonkers for an LMG.
Performance breakdown:
Long-range dominance: This is where the M250 was designed to excel, and it doesn’t disappoint. Mount this weapon on a surface, deploy your bipod, and you become a force of nature. Enemies trying to cross open areas simply melt under sustained M250 fire.
Medium-range versatility: At 30-50 meters, the M250 competes directly with assault rifles and even outperforms many of them thanks to its high damage output and manageable recoil.
Close-range capability: Here’s where the M250 surprises people. That 675 RPM fire rate means it’s not a slouch in close quarters either. You won’t beat an SMG user in a straight hipfire duel, but if you get the first shots on target, the 25 damage per bullet ends fights quickly.
The magazine situation: The elephant in the room is that default 50-round capacity. For an LMG, 50 rounds feels… wrong. You’ll find yourself reloading more than you’d like, especially if you’re engaging multiple targets.
The 100-round box magazine fixes this completely, but getting there requires:
- Reaching weapon Rank 22 (substantial time investment)
- Spending 55 attachment points (extremely expensive)
Is it worth the grind? Absolutely. Once you unlock that 100-round mag, the M250 transforms into the ultimate sustained fire weapon. But until then, be disciplined with your ammo management.
Best for: Support class players who want an LMG that performs well in any situation. Perfect for defending objectives, locking down lanes, and maintaining fire superiority.
Loadout tip: Check out our complete M250 loadout guide for optimal attachment recommendations.
A-Tier: Exceptional Alternatives
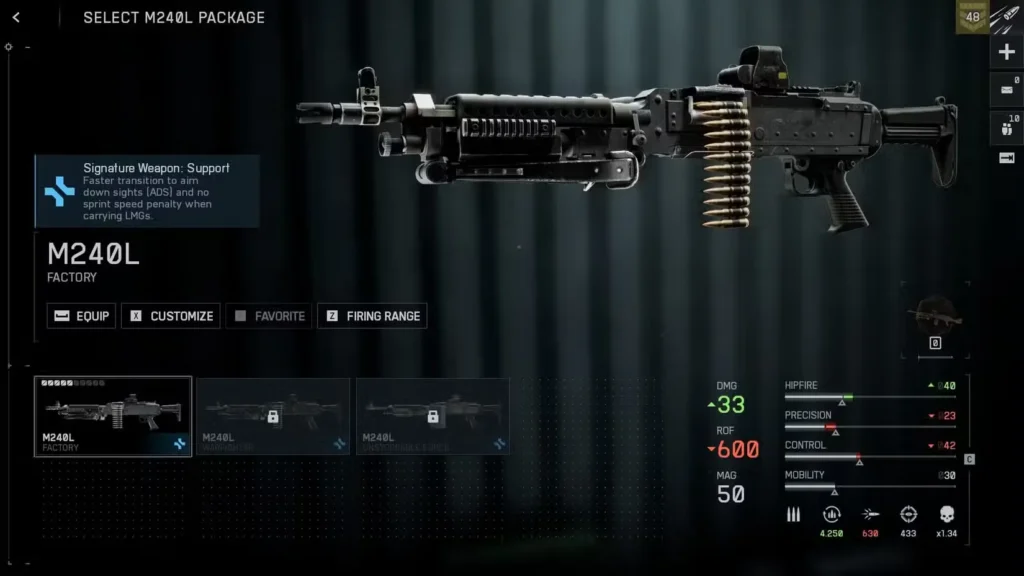
2. M240L – High-Caliber Firepower
Why it’s A-tier: Think of the M240L as the M250’s more aggressive little brother. It sacrifices some sustained fire capability for absolutely devastating close-range lethality.
Key Statistics:
- Damage: 25 per bullet at range
- Close-range damage: 3-shot kill potential (up to 10 meters)
- Fire rate: 600 RPM
- Effective range: Up to 80+ meters
- Default magazine: 50 rounds
- Upgraded magazine: 100 rounds (25 attachment points)
The 3-shot kill factor: This is what sets the M240L apart. Within 10 meters, this weapon kills in just 3 body shots. For an LMG, that’s incredibly powerful and makes the M240L surprisingly viable in close-quarters situations where most LMGs struggle.
Performance analysis:
Close-range punch: Those 3-shot kills mean you can actually challenge SMG and shotgun users in tight spaces – something most LMGs can’t do. You’re still at a disadvantage due to slower handling, but the raw damage output gives you a fighting chance.
Medium-range effectiveness: This is where the lower fire rate (600 RPM vs M250’s 675 RPM) becomes noticeable. The M240L is still lethal here, but it feels less oppressive than the M250 in sustained firefights.
Long-range with caveat: At range, you’ll want a bipod deployed or solid surface to mount on. The 600 RPM fire rate makes each shot count more, so accuracy is crucial. It works, but requires more precision than the M250.
Magazine upgrade advantage: The 100-round box mag only costs 25 attachment points compared to the M250’s 55. This is huge – you can unlock sustained fire capability much earlier in your mastery progression.
Best for: Aggressive support players who want to push objectives and engage in closer-range combat while maintaining LMG suppression capabilities. Excellent for Breakthrough mode where you’re constantly advancing or defending choke points.
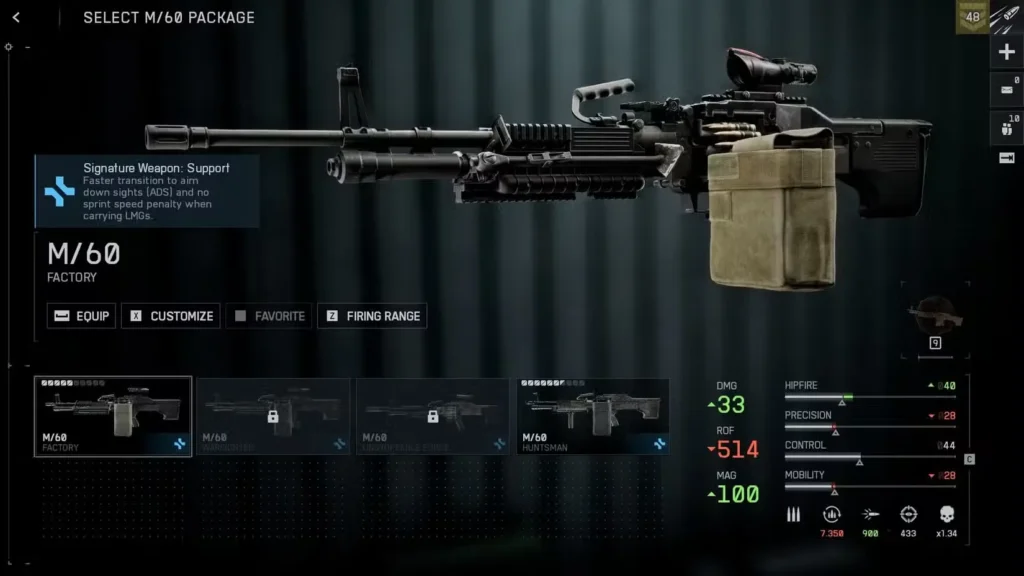
3. M60 – The Ol’ Reliable
Why it’s A-tier: The M60 is a Battlefield legend, and in BF6 it maintains its reputation as a dependable, hard-hitting machine gun that rewards patient, positional play.
Key Statistics:
- Damage: 3-shot kills up close, 4-shot kills at 80+ meters
- Fire rate: 513 RPM (one of the slowest in the game)
- Default magazine: 100 rounds (no upgrade needed!)
- Recoil: Very manageable
- Accuracy: Excellent
The slow-and-steady philosophy: At 513 RPM, the M60 is methodical. Each trigger pull feels deliberate, weighty, and impactful. This isn’t a weapon for spray-and-pray – it’s for calculated, controlled fire.
Performance breakdown:
Long-range excellence: This is the M60’s home. The slow fire rate combined with excellent accuracy means you’re landing shots consistently at distances where other LMGs struggle with bloom and recoil. Deploy that bipod and you’re a sniper’s worst nightmare.
Medium-range competence: The M60 performs well here, though the slow fire rate means you need to be accurate. Miss your shots and faster-firing weapons will punish you.
Close-range weakness: This is where the M60 struggles hard. If an SMG or assault rifle user catches you in close quarters, that slow 513 RPM fire rate means you’re probably dead before your third shot leaves the barrel. The damage per bullet is there (3-shot kill), but you simply won’t get those shots off fast enough.
The 100-round blessing: Starting with a 100-round magazine is incredible. No grinding, no attachment point investment – you get full LMG suppression capability from Rank 1. This alone makes the M60 appealing for new players.
Best for: Defensive support players who prefer holding positions and controlling lanes. Perfect for defending objectives in Conquest or covering your team’s advance with suppressive fire. Avoid close-quarters maps.
Survival tip: Position is everything with the M60. Never push into buildings or tight spaces. Find good angles with cover, deploy your bipod, and make enemies regret crossing your sightline.
B-Tier: Solid but Specialized
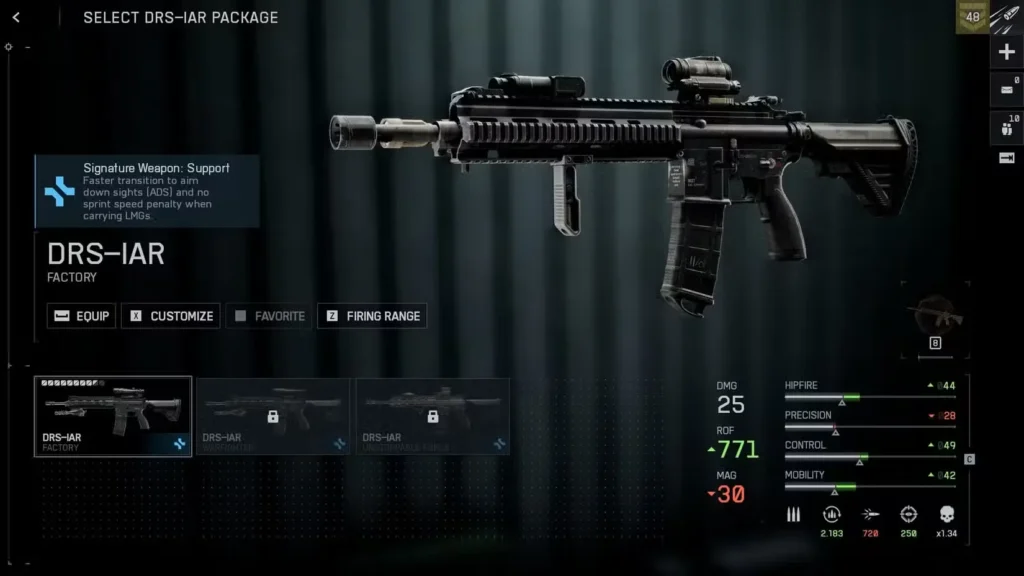
4. DRS-IAR – The Assault Rifle in Disguise
Why it’s B-tier: Based on the real-life M27 Infantry Automatic Rifle, the DRS-IAR sits in an awkward middle ground – too slow to be an assault rifle, too limiting to be a proper LMG.
Key Statistics:
- Damage: Competitive across ranges
- Fire rate: Moderate
- Handling: Better than most LMGs
- Magazine: Standard LMG capacity
- ADS speed: Noticeably slower than actual assault rifles
The identity crisis: The DRS-IAR wants to be versatile, and in many ways it succeeds. It’s more agile than traditional LMGs and can hold its own in closer engagements. But it’s also not quite fast enough to truly compete with assault rifles where they excel.
Performance analysis:
Versatility is the name: The DRS-IAR performs adequately at all ranges. It doesn’t dominate anywhere, but it also doesn’t have major blind spots. This makes it perfect for players still learning their preferred engagement style.
Suppressive capability: You can suppress enemies effectively and maintain fire longer than assault rifle users, which fulfills the support role nicely.
The sluggish feel: By default, the DRS-IAR feels heavy. Reload times are long, ADS is slow compared to actual assault rifles, and weapon swap speed leaves you vulnerable when transitioning to your sidearm.
Building it right matters: With proper attachments, you can push the DRS-IAR toward either heavy support weapon or lighter combat rifle. This flexibility is both a strength and weakness – it requires more investment to excel.
Best for: Players transitioning from assault rifles to LMGs, or those who want LMG firepower with slightly better handling. Works well on mixed maps where engagement ranges vary dramatically.
Important note: If you’re choosing between learning the DRS-IAR or the M250/M240L, go with one of the top-tier options. They’re more effective once you master them.
5. RPKM – High Accuracy, Low Recoil
Why it’s B-tier: The RPKM is the precise, controlled option for players who value accuracy over raw killing power. It’s excellent at its intended range but gets outclassed by higher-tier LMGs in most scenarios.
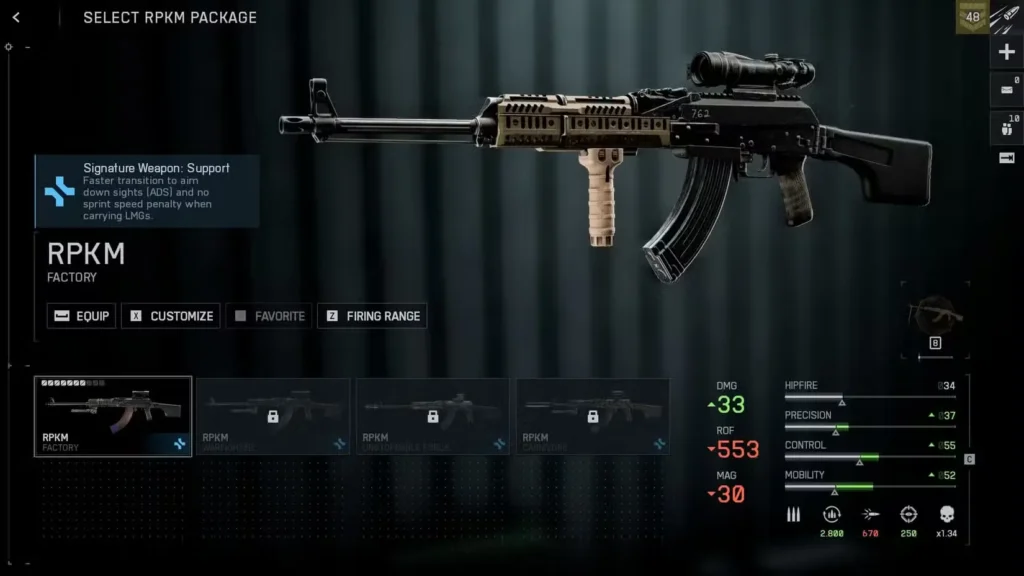
Key Statistics:
- Fire rate: 553 RPM
- Bullets to kill: Average of 5 from 15-80+ meters
- Recoil: Very low and manageable
- Magazine type: AK-style (faster reloads)
- TTK: Slower than top-tier options
The precision instrument: If you value landing shots over raw firepower, the RPKM delivers. The recoil is incredibly manageable, making it easy to keep your crosshair on target even during extended bursts.
Performance breakdown:
Medium-range sweet spot: This is where the RPKM shines. At 30-50 meters, the combination of accuracy, manageable recoil, and decent fire rate makes it a reliable option.
Long-range capability: The RPKM can reach out and touch targets at distance, but the 5-shot-to-kill average means your TTK suffers compared to harder-hitting LMGs.
Close-range struggles: With 553 RPM and requiring 5 hits to kill, you’re severely disadvantaged in close quarters. Avoid these fights whenever possible.
The reload advantage: Using AK-style magazines means significantly faster reload times than belt-fed LMGs. This is genuinely useful when you need to get back in the fight quickly.
The overshadowed problem: Everything the RPKM does well, the M250, M240L, or M60 do better. The RPKM is a comfortable, accurate weapon, but it lacks the raw power to compete with top-tier options.
Best for: Players who struggle with recoil control and want a laser-accurate LMG. Good for newer players learning support class mechanics.
C-Tier: Niche Performers
6. M123K – The Cheesemaker
Why it’s C-tier: The M123K is pure chaos incarnate – the fastest-firing LMG in BF6 at 830 RPM. It’s incredibly fun but lacks the consistency needed for higher ranking.
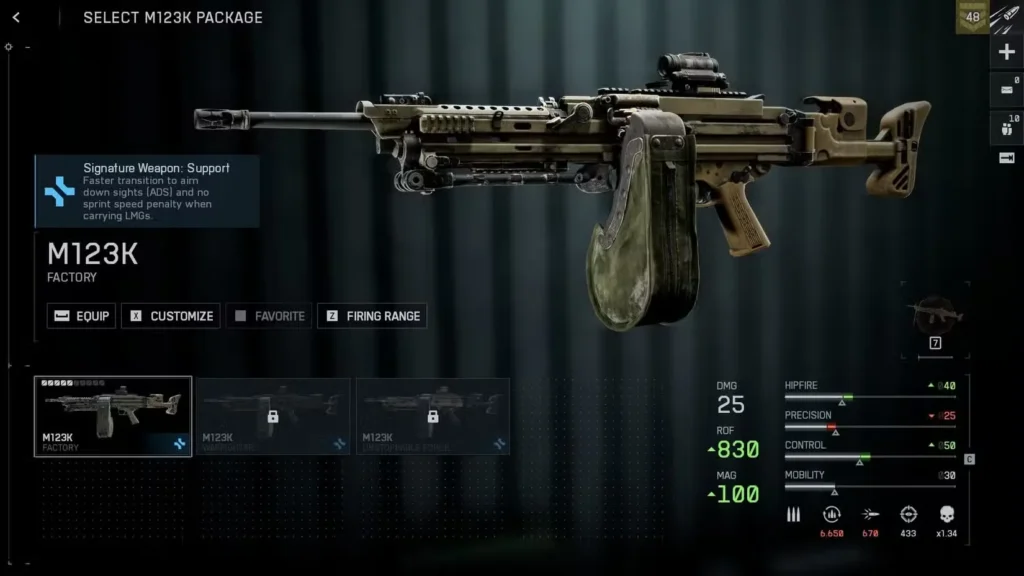
Key Statistics:
- Fire rate: 830 RPM (fastest LMG)
- Max damage: 25 per bullet
- Recoil: Manageable considering fire rate
- Classification: Close Range (misleading)
- Effective range: Surprisingly capable beyond 80 meters with setup
The bullet hose: If your fantasy is pointing your gun in a general direction and watching everything die, the M123K delivers. This thing shreds targets so fast it’s almost comical.
Performance analysis:
Close-range chaos: This is where the M123K earns its nickname “The Cheesemaker.” Get this weapon spooled up and pointed at enemies within 30 meters and they simply melt. It’s absurdly lethal.
Medium-range with effort: The M123K can work at medium range, but you need to burst fire and manage that recoil. It’s doable but requires discipline.
Long-range with setup: Deploy a bipod and the M123K becomes a laser beam even at 80+ meters. The sheer volume of fire compensates for individual bullet inaccuracy.
The reliability issue: Without proper setup (bipod, correct attachments, good positioning), the M123K can feel inconsistent. Some matches you dominate, others you struggle. This inconsistency keeps it out of higher tiers.
Support class synergy: The M123K performs significantly better with Support class’s LMG handling bonus. If you main Support, bump this weapon up a tier mentally.
Best for: Aggressive support players on close-quarters maps or those who prioritize fun over optimal meta choices. Absolutely incredible on maps like Siege of Cairo where you can post up and hose down lanes.
Fair warning: This weapon is addictive. The satisfaction of hearing 830 RPM tear through enemies is hard to resist, even when other options might be more effective.
7. L110 – General Purpose Support Weapon
Why it’s C-tier: The L110 is your starter LMG, and it’s… fine. Perfectly adequate, entirely forgettable, and completely outclassed by the M123K which is essentially the same gun but better.
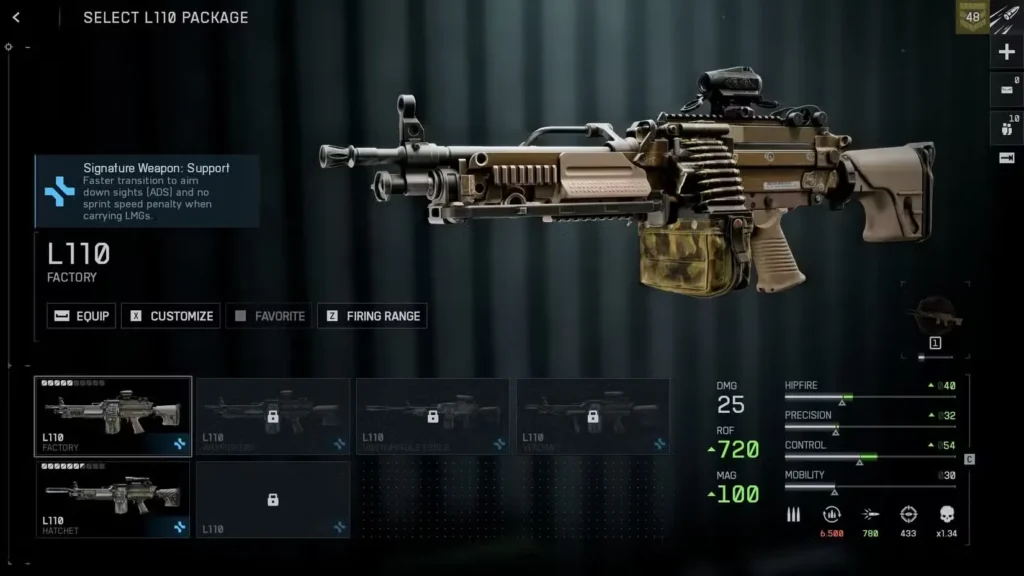
Key Statistics:
- Fire rate: 720 RPM
- Damage: Same as M123K at same ranges
- Performance: Good right out of the box
- Effective range: 10-80 meters
- Distinction: None really
The “starter weapon” problem: The L110 performs well enough that you won’t feel handicapped using it. But it also doesn’t do anything better than other options, which begs the question: why use it?
Performance analysis:
All-around adequacy: At 10 meters? It works. At 50 meters? It works. At 80 meters? Still works. The L110 doesn’t fail anywhere, but it doesn’t excel anywhere either.
The M123K comparison: Both guns deal identical damage at identical ranges. The M123K fires at 830 RPM while the L110 fires at 720 RPM. That’s 110 more rounds per minute, which mathematically makes the M123K superior in virtually every scenario.
The only argument for the L110 is if you find the M123K’s faster fire rate harder to control. But even then, the difference is minimal.
Attachment flexibility: The L110 doesn’t need much investment to be effective, which is… something? It’s ready to go from Rank 1, but so what when better options exist?
Best for: Absolute beginners learning LMG mechanics before unlocking better options. There’s no reason to keep using the L110 once you have alternatives.
Honest take: Unless you have strong personal preference for the L110, switch to the M250, M240L, M60, or even M123K as soon as possible. They’re just better weapons.
D-Tier: The Underperformer
8. KTS100 MK8 (Ultimax) – Extreme Accuracy, Minimal Impact
Why it’s D-tier: The KTS100 is a weapon designed by someone who valued accuracy and controllability above all else – including lethality. It’s the most accurate LMG in Battlefield 6, and also the least effective.
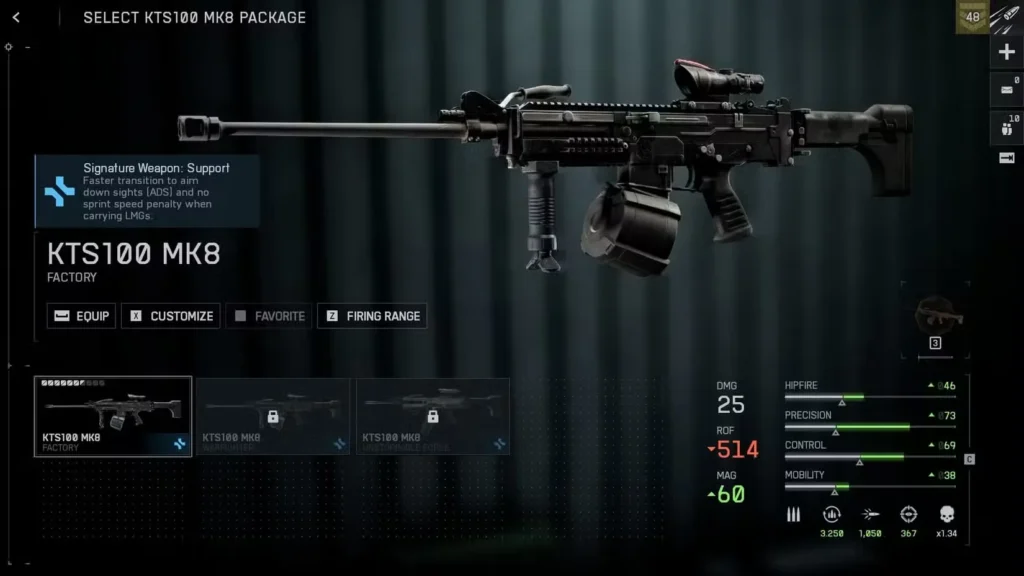
Key Statistics:
- Fire rate: 513 RPM (tied with M60)
- Damage at 80m: 17 (lowest among all LMGs)
- Recoil: Virtually nonexistent
- Bloom: Minimal even after 20+ shots
- TTK: Painfully slow
The accuracy paradox: The KTS100 remains laser-accurate even during sustained fire. Weapon bloom – which normally causes bullets to spread during continuous shooting – barely affects this LMG. After 20 consecutive rounds, it’s still hitting exactly where you’re aiming.
This sounds amazing until you realize: what good is accuracy if your bullets don’t do enough damage to matter?
Performance analysis:
Long-range precision shooting: This is the KTS100’s only real niche. If you need to consistently hit targets at extreme range with minimal recoil compensation, this weapon delivers. For long-range sniping challenges, it’s actually usable.
Medium-range inadequacy: At medium range, the slow 513 RPM fire rate combined with lower damage means you’re consistently losing gunfights to assault rifles, DMRs, and better LMGs.
Close-range catastrophe: Avoid close combat with this weapon at all costs. You will die. Repeatedly.
The damage drop-off killer: That 17 damage at 80 meters is abysmal. You’re hitting 6-7 shots to kill at range compared to 4 shots with the M250 or M240L. The TTK difference is massive and consistently gets you killed.
When you might use it: Honestly? Bot lobbies where accuracy matters more than TTK, or very specific long-range defense scenarios where you’re bipodded and firing at stationary or slow-moving targets.
Best for: Masochists, collectors trying to master every weapon, or players who heavily prioritize accuracy over effectiveness. Also potentially useful for completing specific accuracy-based challenges.
Real talk: There’s almost no situation where the KTS100 is the right choice. The M60 has similar fire rate with WAY better damage. The M250 is accurate enough while being far more lethal. Even the RPKM outperforms it.
If you enjoy using the KTS100, more power to you. But objectively, it’s the weakest LMG in Battlefield 6’s current meta.
LMG Playstyle Tips: How to Actually Use Machine Guns
Having the right weapon is only half the equation. LMGs require a different mindset and playstyle than other weapon classes. Here’s how to maximize your effectiveness:
Positioning is Everything
Golden rule: Never be caught running in the open with an LMG. Your slow handling and long reload times make you vulnerable. Always move from cover to cover with an escape route planned.
High ground advantage: LMGs benefit more from elevation than any other weapon class. Height + bipod deployment = domination.
Sightline control: Identify the key lanes enemies use and lock them down. One well-positioned LMG user can force entire squads to find alternate routes.
Master the Bipod
The bipod transforms LMGs from awkward bullet hoses into precision death machines. Learn to deploy your bipod effectively:
- Drastically reduces recoil making accurate sustained fire possible
- Extends effective range significantly
- Improves accuracy even on lower-tier LMGs
Find cover, deploy, and become a stationary fortress of firepower.
Suppression Mechanics
LMGs uniquely excel at suppression – keeping enemies pinned and unable to return effective fire:
- Suppressed enemies can’t regenerate health naturally
- Their aim is affected, making them less accurate
- They’re forced into cover, allowing your team to advance
- You gain points and support your team even without kills
Don’t underestimate the value of suppressive fire in objective-based modes.
Pre-Fire and Prediction
LMG TTK is slower than SMGs and assault rifles, so you need to start shooting before enemies appear:
- Pre-fire corners where you expect enemies
- Lead your shots on moving targets
- Maintain fire on positions even if you don’t see enemies (suppression)
- Predict enemy movement based on objective locations
Reload Discipline
LMG reloads are painfully long. Develop these habits:
- Never reload in the open – find cover first
- Don’t automatically reload after small engagements
- Track your ammo count and reload during natural lulls
- Switch to sidearm for immediate defense during reloads
Class Synergy
Pair your LMG with appropriate gadgets and support class loadouts:
- Ammo crates for sustained fire
- Repair tools when running vehicle support
- Anti-vehicle weapons to deal with armor threats
- Spawn beacons for tactical positioning
Map Considerations: Where Each LMG Shines
Different Battlefield 6 maps favor different LMG choices:
Open, Long-Range Maps
Best choices: M250, M240L, M60 These maps feature long sightlines where sustained accurate fire dominates. Deploy bipods, control lanes, and suppress advancing enemies.
Mixed Engagement Maps
Best choices: M250, M240L, DRS-IAR Versatility matters here. You need weapons that can adapt to varying engagement ranges as the battle shifts between objectives.
Close-Quarters Maps
Best choices: M123K, M240L Tighter spaces favor higher fire rates. The M123K’s 830 RPM becomes incredibly valuable, and the M240L’s 3-shot kill potential shines.
Consider switching: Honestly, on extremely close-quarters maps, consider using an SMG or assault rifle instead. LMGs are at their worst here.
Attachment Priorities for LMGs
While we have specific guides for individual weapons, here are general attachment priorities:
Essential:
- Bipod (if not default) – Mandatory for effective LMG use
- Extended magazine – Priority #1 for guns with 50-round defaults
- Recoil control attachments – Grips and muzzle devices
Valuable:
- Optics suitable for your engagement range
- Barrel attachments improving accuracy or range
Situational:
- Lasers for hipfire (generally not recommended for LMGs)
- Suppressors (useful but you lose damage/range typically)
For complete attachment breakdowns, see our attachments guide.
LMG vs Other Weapon Classes
Understanding where LMGs fit in the weapon meta:
vs Assault Rifles: ARs are more versatile and mobile. LMGs have superior sustained fire and suppression. Assault rifles win in adaptability; LMGs win in defensive power.
vs SMGs: SMGs dominate close quarters. LMGs dominate everything else. Never challenge an SMG user in tight spaces.
vs DMRs/Snipers: LMGs provide suppression and sustained fire. DMRs/snipers provide precision elimination. Different roles entirely.
vs Carbines: Carbines are jacks-of-all-trades. LMGs are specialists. Choose based on your intended playstyle.
Common LMG Mistakes to Avoid
Rambo syndrome: Running around like action hero will get you killed constantly. LMGs require positional play.
Reloading too often: Don’t reload after every engagement. Magazine capacity is your advantage – use it.
Fighting in close quarters: Avoid tight spaces. Let teammates with appropriate weapons clear buildings while you cover exterior approaches.
Neglecting the bipod: If you’re not regularly deploying your bipod, you’re not using LMGs correctly.
Standing in the open: LMGs make you a priority target. Use cover religiously.
Ignoring the minimap: Position is everything. Use your minimap to find optimal firing positions.
Platform Performance
LMGs work across all platforms (PlayStation, PC via Steam, Epic Games, Xbox), but input method matters:
Mouse and keyboard: Superior for precise bipod shooting and long-range accuracy. Recoil control is easier.
Controller: Consider lowering sensitivity for LMG use. The aim assist helps but precise recoil control requires practice.
For more input discussion, see our controller vs keyboard/mouse guide.
Final Thoughts: Mastering the Machine Gun
Light machine guns in Battlefield 6 aren’t for everyone. They demand patience, positioning sense, and a fundamental understanding that you’re not the star player making highlight-reel plays – you’re the backbone that enables your team to make those plays.
Choose the M250 if you want the most well-rounded, effective LMG in the game. Once you get that 100-round magazine, it’s arguably the best support weapon available.
Choose the M240L if you want more aggressive play while maintaining LMG advantages. The 3-shot kill potential makes it surprisingly versatile.
Choose the M60 if you’re a patient, defensive player who values controlled fire and doesn’t mind the slower pace. That default 100-round capacity is beautiful.
Avoid the KTS100 unless you have specific reasons to use it. It’s just not competitive in the current meta.
Regardless of which LMG you choose, master the fundamentals: positioning, bipod deployment, reload discipline, and suppression tactics. Do this and you’ll become the player enemies fear – the one holding down entire sections of the map, racking up kills and assists, and enabling your team’s victory.
Want to discuss LMG strategies or share your own tier list opinions? Head to the Battlefield 6 subreddit where the community is always debating weapon meta and sharing tips.
Now get out there, find a good position, deploy that bipod, and show everyone why machine guns are still relevant in modern warfare. See you on the battlefield!
Looking for more weapon guides? Check out our complete weapons list, class loadout guides, and optimization settings to improve your Battlefield 6 gameplay