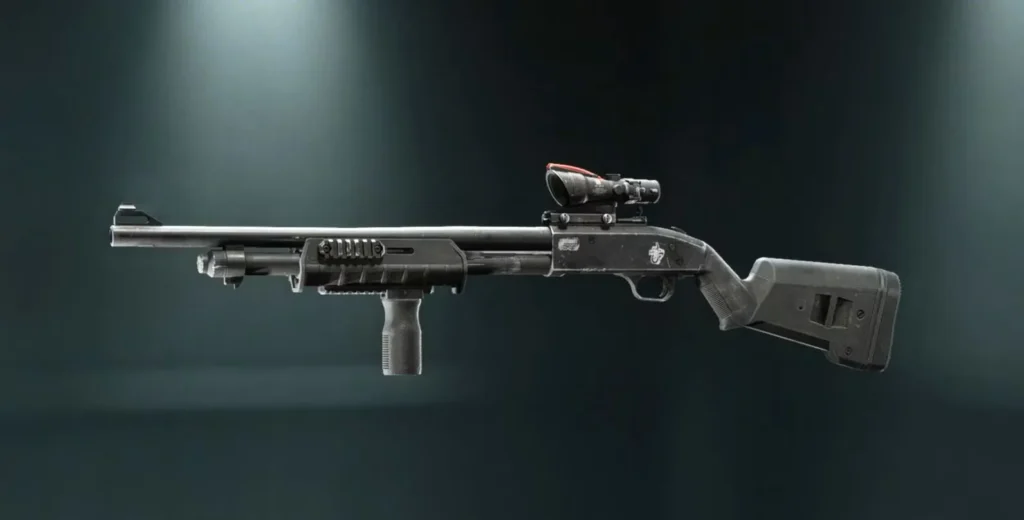
The M87A1 pump-action shotgun is your first introduction to close-quarters devastation in Battlefield 6. As the starting shotgun, it’s often underestimated – but with the right attachments, this beast becomes one of the most versatile and powerful weapons in the game.
Unlike other shotguns that lock you into pure CQB gameplay, the M87A1 offers something unique: genuine build flexibility. Want to clear buildings in Team Deathmatch? There’s a loadout for that. Want to snipe people at 50 meters with a shotgun? Yeah, you can do that too. Let’s break down everything you need to turn this starter weapon into an absolute monster.
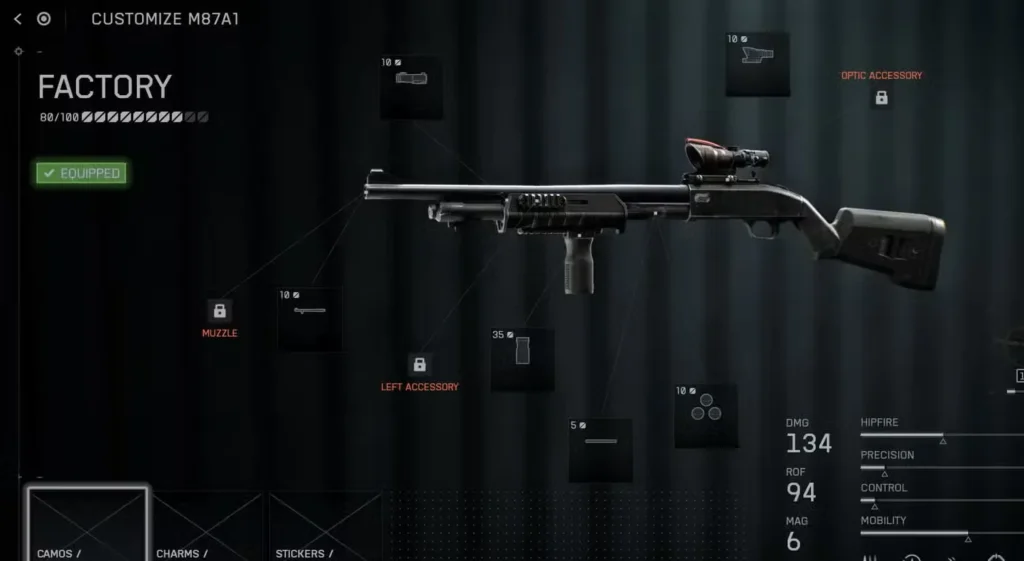
M87A1 Stats Breakdown: What You’re Working With
Before we dive into builds, let’s understand what makes this shotgun tick:
| Stat | Value | What It Means |
|---|---|---|
| Damage | 134 | Highest damage of any shotgun in BF6 |
| Rate of Fire | 94 RPM | Slow – you need to make shots count |
| Magazine | 8 rounds | Standard capacity for pump shotguns |
| Hipfire | 40 | Decent base hipfire accuracy |
| Precision | 12 | Very low – relies on spread pattern |
| Control | 6 | Terrible – recoil management is tough |
| Mobility | 52 | Average movement speed |
| ADS Speed | 250 ms | Reasonably fast for a shotgun |
| Reload Speed | 1.167 s | Fastest shotgun reload in the game |
| Projectile Velocity | 400 m/s | Slow – buckshot drops significantly |
| Headshot Multiplier | x1.00 | No bonus damage for headshots with buckshot |
Understanding the M87A1’s Strengths and Weaknesses
What Makes It Great:
Ridiculous Damage Output: The M87A1 has the highest base damage of any shotgun in Battlefield 6. Within its effective range (0-15 meters with buckshot), it’s a reliable one-shot kill machine. Land a clean center-mass shot, and enemies disintegrate.
Lightning-Fast Reloads: That 1.167-second reload speed is a game-changer. Other shotguns leave you vulnerable for extended periods, but the M87A1 gets you back in the fight almost instantly. This matters enormously when you’re holding objectives in close-quarters modes.
Versatility Through Ammunition: This is the big one: Slug ammunition transforms the M87A1 into a completely different weapon. You go from pellet-spraying CQB monster to a precision long-range threat that can challenge snipers. No other starting weapon offers this level of adaptability.
Accessible Early: Being the starter shotgun means you don’t need to grind weapon unlocks. You can start experimenting with builds immediately and level it up through normal play.
Where It Struggles:
Abysmal Rate of Fire: At 94 RPM, missing your first shot can be a death sentence. Against multiple enemies or in situations where you don’t get the one-shot kill, the slow follow-up time leaves you exposed. This isn’t a forgiving weapon.
Low Control = Recoil Problems: The control stat of 6 is brutal. Rapid follow-up shots cause significant recoil that throws your aim off. You need to manually compensate or accept the accuracy loss, which is especially punishing when using slugs.
Buckshot Range Limitations: Without slugs equipped, the M87A1’s effective range tops out around 12-15 meters. Beyond that, pellet spread becomes too wide for reliable kills. You’re essentially useless at medium-to-long range with standard ammunition.
Multi-Enemy Fights Are Rough: The combination of slow fire rate and small magazine means fighting 2+ enemies simultaneously is extremely difficult. You need perfect positioning and execution, or you’re getting traded.
No Headshot Multiplier (Buckshot): Unlike precision weapons, buckshot deals identical damage regardless of where pellets land. Aiming for heads doesn’t give you any advantage with standard ammo.
Best M87A1 Loadouts: Complete Build Guide
Here are the optimized loadouts for different experience levels and playstyles:
Low Level Build: Early Game Domination
Perfect for players who just started leveling the M87A1:
| Attachment Slot | Choice | Reasoning |
|---|---|---|
| Muzzle | N/A | No early unlocks worth using |
| Barrel | 20″ Factory | Default – solid all-around performance |
| Right Accessory | 5MW Red Laser | +15% hipfire accuracy – essential for CQB |
| Left Accessory | N/A | Save this slot for later unlocks |
| Underbarrel | Alloy Vertical Grip | Helps mitigate terrible recoil control |
| Magazine | 7 Shell Tube | +1 round capacity without major penalties |
| Ammunition | Buckshot | Standard ammo for reliable CQB performance |
| Scope | Iron Sights | Clean sights, no ADS penalty |
| Optic Accessory | N/A | Nothing useful available early |
How to Play This Build:
This is your bread-and-butter close-quarters loadout optimized for what you have available early:
Engagement Range: 0-12 meters Best Modes: Domination, Team Deathmatch, King of the Hill, Rush interior sections Playstyle: Aggressive point defense and building clearing
Key Tactics:
- Hipfire is your primary mode – the Red Laser makes this viable at CQB ranges
- Hold tight angles and doorways where enemies are forced into your kill zone
- Pre-aim common entry points and wait for targets to walk into your spread
- Use the Alloy Vertical Grip to keep your sights on target for follow-up shots
- The 7 Shell Tube gives you one extra round before reloading, which can save your life
When to ADS: Really only at the outer edge of your effective range (10-12 meters) when you need that slight accuracy boost. Otherwise, hipfire keeps you mobile and ready to snap to new targets.
For more close-quarters tips, check our Close Quarters Challenges Guide.
High Level Build: The Ultimate CQB Monster
Once you’ve leveled the M87A1 significantly, this build maximizes its close-quarters potential:
| Attachment Slot | Choice | Reasoning |
|---|---|---|
| Muzzle | N/A | No muzzle needed for this playstyle |
| Barrel | 20″ Factory | Maintains balanced stats |
| Right Accessory | 50MW Blue Laser | Enhanced hipfire + mobility boost |
| Left Accessory | Flashlight | Blind enemies in dark areas/corners |
| Underbarrel | Stippled Stubby Grip | Superior recoil control + handling |
| Magazine | 7 Shell Tube | Capacity over handling speed |
| Ammunition | Buckshot | One-shot consistency in CQB |
| Scope | PVQ-31 4.00X | Situational for mid-range awareness |
| Optic Accessory | N/A | Not necessary for this build |
Why These Attachments:
50MW Blue Laser (Mastery 15): This is a straight upgrade from the Red Laser – better hipfire accuracy AND a mobility boost. Since you’re rarely ADSing with buckshot, this laser is active 90% of the time.
Flashlight: Underrated tactical tool. In dark corners, buildings, or nighttime portions of maps, flashing this in an enemy’s face genuinely disrupts their aim. It’s situational but clutch when it works.
Stippled Stubby Grip: Unlocked later, this grip offers better recoil reduction than Alloy Vertical while also improving weapon handling. Essential for those rare moments when you need a fast second shot.
PVQ-31 4.00X Scope: This seems counterintuitive for a CQB weapon, but hear me out: having a magnified optic helps you spot enemies at range even if you can’t effectively engage them. You can call out positions to teammates or reposition before enemies close the distance. Plus, it makes the slug loadout more viable without changing builds.
7 Shell Tube: The ADS penalty doesn’t matter much since you’re hipfiring constantly, but having 8 rounds instead of 7 means you can potentially secure that crucial multi-kill without reloading.
How to Play This Build:
Engagement Range: 0-15 meters Best Modes: Domination, TDM, Squad Deathmatch, objective interiors Playstyle: Ultra-aggressive room clearing and point holding
Advanced Tactics:
- Master the combat roll – our Combat Roll Guide shows how to dodge incoming fire while maintaining aggression
- Use the flashlight strategically in dark areas to disorient targets
- Pre-fire around corners where you expect enemies (works with controller hipfire especially)
- Chain kills rapidly – your fast reload means you can wipe squads if positioned correctly
- Hold objectives solo by controlling the single entry point with your one-shot potential
Equipment Pairing:
- Proximity Sensors to detect flankers
- C5 Explosives for area denial
- Smoke Grenades to close distance on longer sightlines
This build turns you into an absolute objective-holding machine. One skilled player with this loadout can lock down an entire building or capture point.
Alternative Build: The “Sniper Shotgun” (Slug Loadout)
Want to do something absolutely ridiculous? Turn your shotgun into a mid-range precision weapon:
| Attachment Slot | Choice | Reasoning |
|---|---|---|
| Muzzle | N/A | Optional: add suppressor if available |
| Barrel | 20″ Factory | Best balance for slug velocity |
| Right Accessory | 50MW Blue Laser | Still helps with hipfire in emergencies |
| Left Accessory | Flashlight | Utility in mixed-range scenarios |
| Underbarrel | Stippled Stubby Grip | Critical for slug recoil management |
| Magazine | 7 Shell Tube | You need every round with slugs |
| Ammunition | Slugs | Single projectile, 50m one-shot potential |
| Scope | PVQ-31 4.00X | Mandatory for slug accuracy |
| Optic Accessory | N/A | N/A |
The Slug Game-Changer:
Slug ammunition fundamentally changes the M87A1:
Before (Buckshot):
- 8 pellets spread across a cone
- Effective range: 0-15 meters
- Damage based on pellet hits
- No headshot bonus
- Hipfire viable
After (Slugs):
- Single precision projectile
- Effective range: 0-50+ meters
- One-shot headshot kills up to 50 meters
- ADS required for accuracy
- Essentially becomes a bolt-action rifle
This is a completely different weapon with slugs equipped. You’re trading CQB consistency for mid-range lethality.
How to Play Slug Loadout:
Engagement Range: 15-50 meters (avoid extreme CQB) Best Modes: Breakthrough, Rush, Conquest when defending choke points Playstyle: Defensive precision, hold angles, punish predictable movements
Slug-Specific Tactics:
- Headshots are mandatory for one-shot kills beyond 25 meters
- Pre-aim head-height on common angles and wait for targets
- You’re now playing like a Recon sniper but at medium range
- Miss your shot? Retreat behind cover immediately – your follow-up is too slow
- Use the 4X scope to identify threats and line up precision shots
Where Slugs Excel:
- Defending M-COM stations in Rush with clear sightlines
- Holding choke points on Breakthrough attack/defense
- Surprising enemies who think shotguns are only close-range threats
- Counter-sniping when you can close the distance to 30-50 meters
The Meme Potential: Nothing tilts enemy snipers harder than getting one-tapped at 45 meters by a shotgun. The psychological warfare alone is worth experimenting with this build.
Magazine Choice: 7 Shell Tube vs Standard
This deserves special attention because it’s a meaningful choice:
7 Shell Tube (Recommended):
- +1 magazine capacity (8 total rounds)
- Slightly slower ADS speed
- Minor handling penalties
Why It’s Worth It: In CQB, that 8th round can mean the difference between wiping a squad and dying during reload. The ADS penalty barely matters since you’re hipfiring most engagements. The extra round provides a safety net for missed shots or multi-enemy scenarios.
Standard Magazine:
- Default 7 rounds
- Faster ADS and handling
- Better for slug builds where precision matters
When to Use Standard: If you’re running the slug loadout and need every millisecond of ADS speed for those precision headshots, standard might be better. But for buckshot CQB builds, always take the 7 Shell Tube.
Ammunition Deep Dive: Buckshot vs Slugs
This is the most important decision for any M87A1 build:
Buckshot (Default):
Pros:
- Consistent one-shot kills 0-12 meters
- Forgiving aim – pellet spread covers errors
- Excellent hipfire performance
- Fast target acquisition
- No headshot aiming required
Cons:
- Useless beyond 15 meters
- Inconsistent damage at range
- Pellet RNG can screw you occasionally
Use When:
- Playing CQB-focused modes
- Holding tight interior objectives
- Your playstyle is aggressive and mobile
- You want maximum forgiveness in aim
Slugs (Unlocked):
Pros:
- One-shot headshot potential to 50 meters
- Turns shotgun into mid-range threat
- No pellet RNG – single projectile is consistent
- Can challenge DMRs and snipers in the right hands
Cons:
- Requires precise aim – miss = death
- Terrible in extreme CQB (buckshot outperforms)
- Slow follow-up makes multi-kills difficult
- Significant learning curve
Use When:
- Defending positions with 20-40 meter sightlines
- You have excellent aim and positioning sense
- Playing modes with more open spaces
- You want to surprise enemies with unexpected range
Reality Check: Slugs are fun and effective in specific scenarios, but buckshot is more consistent for most players in most situations. Slugs require excellent aim mechanics and game sense to justify the trade-offs.
M87A1 Tips & Advanced Techniques
Master the One-Pump:
The goal with the M87A1 is always getting the one-shot kill:
How to Maximize One-Shot Consistency:
- Aim center mass – largest target area with buckshot
- Engage at 10 meters or closer when possible
- Wait for the full pump animation before firing again
- Don’t panic-spam shots – accuracy > speed with this weapon
If You Don’t Get the One-Shot:
- Immediately seek cover
- Let your squad finish the weakened enemy
- Reposition rather than challenging a hurt opponent
Positioning is Everything:
Unlike automatic weapons where you can win through raw aim, shotguns demand perfect positioning:
Good Shotgun Positions:
- Corners with 90-degree angles
- Doorways with single entry points
- Stairwells where enemies must funnel
- Capture points with limited approaches
Bad Shotgun Positions:
- Open fields or long sightlines
- Rooftops with 360-degree exposure
- Positions with multiple simultaneous angles to watch
Check our best tips and tricks guide for more positioning fundamentals.
Audio Awareness Saves Lives:
With slow ROF, you cannot afford to be surprised:
- Use High Dynamics audio mix to hear footsteps clearly
- Pre-aim doorways when you hear enemies approaching
- Listen for reloads – that’s when you push
- Use audio to know when you’re outnumbered (retreat if you hear multiple footstep patterns)
Reload Discipline:
Even with the fastest shotgun reload, timing matters:
When to Reload:
- After securing a kill with no immediate threats
- Behind solid cover during combat lulls
- When falling back to regroup with squad
When NOT to Reload:
- With 4+ rounds remaining and enemies nearby
- In the open or soft cover
- When you hear enemies closing in
The M87A1’s fast reload is an advantage, but you’re still vulnerable during the animation.
Mode-Specific Loadout Recommendations
Different Battlefield 6 game modes favor different M87A1 setups:
| Mode | Recommended Build | Reasoning |
|---|---|---|
| Domination | High-Level CQB Build | Constant close-range fights on tiny flags — be a hallway god. |
| Team Deathmatch | High-Level CQB Build | Pure gunfights in cramped maps — aim fast, pew faster. |
| Conquest | Low-Level Build or Slugs | Mixed ranges — adapt to flag locations: run slugs for mid/long, buck for caps. |
| Breakthrough | Slug Build (Defense) | Hold choke points at medium range — one precise shot = wall of salt. |
| Rush | Buckshot CQB Build | M-COMs = cramped chaos — spray or pray, but mostly spray. |
| King of the Hill | High-Level CQB Build | One point = nonstop close engagements — stay mobile, stay deadly. |
Leveling Your M87A1 Efficiently
Want to unlock those high-level attachments fast?
Best Modes for Weapon XP:
- Team Deathmatch – pure kills, no objective distractions
- Domination – high kill counts on small maps
- Close Quarters playlists – designed for shotgun play
XP Optimization:
- Use XP Boosters if you have them
- Complete the campaign pistol-only challenge for Hardware XP Boosters
- Play during Double XP weekends
- Focus on kills over objectives when grinding weapon levels specifically
Attachment Unlock Priority:
- 50MW Blue Laser (Mastery 15) – massive hipfire improvement
- Stippled Stubby Grip – recoil control essential
- Slugs – opens up new playstyle entirely
- PVQ-31 4X Scope – enables slug effectiveness
M87A1 vs Other Shotguns
How does the M87A1 compare to other shotgun options in Battlefield 6’s weapon roster?
M87A1 Advantages:
- Highest base damage
- Fastest reload speed
- Slug viability for range
- Available immediately
When to Use Other Shotguns:
- Auto shotguns for multi-enemy scenarios (higher ROF)
- Specialty shotguns for specific mechanics (if they exist in BF6)
The M87A1 strikes the best balance of power, consistency, and versatility among pump-action shotguns. Most players never need to switch unless they want automatic fire.
Common M87A1 Mistakes
Mistake #1: Using It at Wrong Ranges Don’t challenge medium-range enemies with buckshot. Either switch to slugs or reposition. Respect your effective range.
Mistake #2: Trying to Spray This isn’t an automatic shotgun. Slow down, aim each shot, and prioritize accuracy over volume of fire.
Mistake #3: Fighting in the Open Shotguns need cover and angles. Running across open ground is suicide regardless of your build.
Mistake #4: Not ADSing with Slugs Slug hipfire is atrocious. Always ADS when running slug ammunition unless it’s a panic situation.
Mistake #5: Ignoring the Flashlight It sounds gimmicky, but the flashlight attachment genuinely disorients enemies in the right situations. Use it.
Final Verdict: Is the M87A1 Worth Using?
Absolutely, especially for:
- Close-quarters specialists
- Objective players who hold points
- Players who enjoy positioning-based gameplay
- Anyone who wants a reliable starter weapon that scales into endgame
The M87A1’s combination of highest-in-class damage, fastest reload, and slug versatility makes it a top-tier shotgun that remains competitive even after unlocking other options.
When to Move On: Really only if you discover your playstyle prefers automatic shotguns for their higher fire rate. Otherwise, a fully-kitted M87A1 competes with anything in its category.
Ready to dominate CQB with the M87A1? Grab Battlefield 6 on Steam, PlayStation, or Epic Games and start building your perfect shotgun loadout.
For more weapon guides and optimal builds, explore our complete weapons list guide and join the discussion on r/Battlefield6 to share your M87A1 clips!
Now get out there and show them why shotguns will never go out of style. One pump, one kill. That’s the M87A1 way.