Battlefield 6 gates some of its most powerful weapons behind multiplayer challenges—and if you’re a Support player or LMG enthusiast, the Bullet Storm challenges should be at the top of your priority list. Completing these challenges unlocks two absolutely devastating light machine guns that can turn you into a suppression and area-denial powerhouse.
While Battlefield 6 offers dozens of weapons right out of the gate, the truly meta-defining guns require you to prove your skills through specific challenge completions. The good news? Bullet Storm challenges are actually more straightforward than they initially appear, especially once you understand the underlying mechanics.
Let’s break down exactly what you need to do, the best strategies to complete these challenges quickly, and why the rewards are worth the effort.
Bullet Storm Challenge Requirements
Before diving into strategies, here’s what you’re working toward:
Unlock Requirements
Important: You must reach Rank 23 in multiplayer before these challenges become available. If you’re still grinding levels, check out our XP farming and fast leveling guide to hit that milestone quickly.
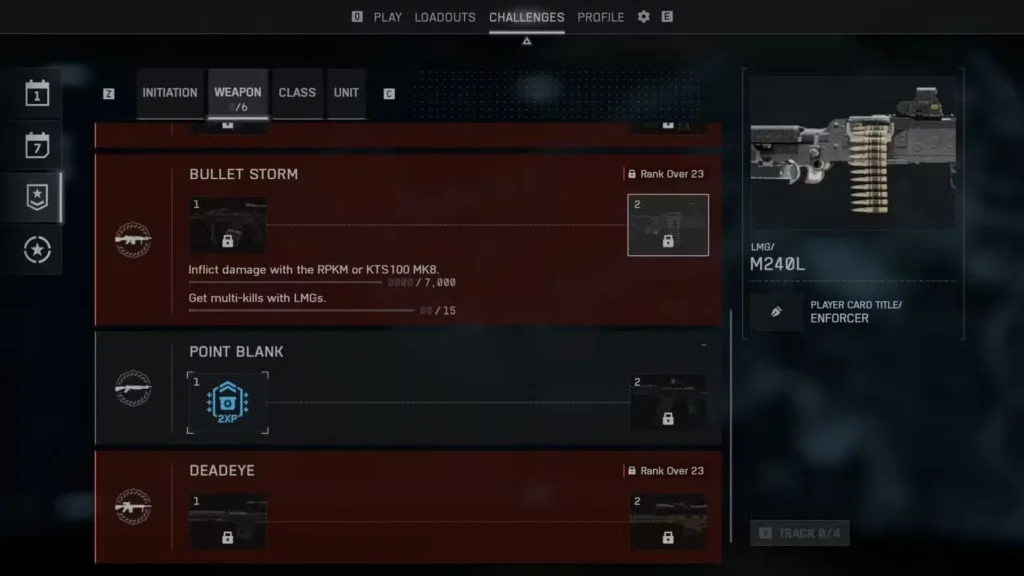
Bullet Storm Challenge 1
| Requirement | Details |
|---|---|
| Suppress 300 Enemies | Shoot near enemies with LMGs to suppress them — kills not required. |
| Deal 10,000 Hip-Fire Damage | Inflict damage while firing from the hip — no ADS (aim down sights) needed. |
| Reward | 🏆 KTS100 MK8 LMG |
Bullet Storm Challenge 2
| Requirement | Details |
|---|---|
| Deal 7,000 Damage | Use either the RPKM or KTS100 MK8 LMG to rack up total damage. |
| Get 15 Multi-Kills | Eliminate multiple enemies in rapid succession with LMGs. |
| Reward | 🏆 M240L LMG + Enforcer Player Card Title |
Once both challenges are complete, you’ll have access to two of the most competitive LMGs in the game—weapons that excel in the Support class loadouts and can completely control entire sections of the battlefield.
Understanding Suppression Mechanics
Here’s where many players get confused: What exactly is suppression, and how do I trigger it?
How Suppression Works in Battlefield 6
Suppression is a status effect you apply to enemies by firing your weapon near them—you don’t actually have to hit them. When properly suppressed, enemy players experience:
- Reduced accuracy – Their aim becomes shakier and less reliable
- Visual distortion – Screen effects that make targeting more difficult
- Audio feedback – Distinct sound cues indicating they’re under fire
- Combat effectiveness reduction – They become significantly less dangerous
Why LMGs are perfect for suppression:
- High magazine capacity – You can sustain fire for extended periods (60-200 rounds depending on the weapon)
- Excellent range – LMGs maintain effectiveness at medium to long distances
- Sustained fire rate – Continuous bullet streams keep enemies pinned
Best Tactics for Suppression Challenge
Target-rich environments: Play large-scale modes like Conquest or Breakthrough where enemies naturally cluster around objectives. More enemies = more suppression opportunities.
Spray and pray (strategically): When you see enemies taking cover or engaging your teammates, lay down suppressive fire even if you don’t have a clean shot. You’re racking up suppression assists while making the enemy’s life miserable.
Use bipods: Deploy your LMG on cover or use a bipod to maintain accuracy during sustained fire. This is particularly effective with the Fire Support field spec.
Don’t reload obsessively: One advantage of LMGs is their massive magazines. Use them. Keep firing to maintain constant suppression rather than reloading after every burst.
Pro Tip: Suppression assists count toward your challenge progress, so even if teammates get the kills, you’re still making progress. It’s a win-win situation that also makes you a valuable team player.
Mastering Hip-Fire Damage
The 10,000 hip-fire damage requirement might sound daunting, but it’s more achievable than you think once you adjust your playstyle.
Hip-Fire Strategy Breakdown
What counts as hip-fire? Any damage dealt while NOT aiming down sights (ADS). If you’re firing with your crosshairs instead of looking through your optic, it counts.
Best Approaches for Hip-Fire Damage
1. Play Close-Quarters Maps
Focus on maps with tight corridors, urban environments, and buildings where close-range encounters are common. Hip-fire naturally performs better at close range. Check our ranked maps guide to identify CQC-friendly locations.
2. Choose the Right LMG
Not all LMGs are created equal for hip-fire:
- RPKM – Excellent hip-fire accuracy and mobility
- Higher RPM LMGs – Compensate for accuracy with volume of fire
- Lighter LMGs – Better movement speed while hip-firing
3. Optimize Your Loadout
- Laser sights – If available, attachments that improve hip-fire accuracy are invaluable
- Short-range optics – Even though you’re hip-firing, having the option to ADS when necessary is smart
- Extended magazines – More bullets = more damage without reloading
4. Best Game Modes for Hip-Fire
- Team Deathmatch – Constant close-range combat
- Domination – Small maps with objective clusters
- Close Quarters playlist – If available (see our guide on Open vs Closed Weapons Playlists)
5. Tactical Hip-Fire Tips
- Pre-fire corners – Start shooting before you fully clear corners in buildings
- Strafe while shooting – Movement makes you harder to hit while dealing damage
- Burst fire at medium range – Short bursts maintain better accuracy than full auto
- Aim center mass – Don’t worry about headshots; focus on consistent body damage
Reality Check: You don’t need to complete this challenge by exclusively hip-firing. Play normally with your LMG in appropriate situations, but consciously choose hip-fire in close encounters where you’d normally ADS. The damage accumulates faster than you’d expect, especially in high-intensity modes.
Completing Bullet Storm Challenge 2
Once you’ve unlocked the KTS100 MK8 from the first challenge, you’re already halfway done. The second challenge is actually easier because it focuses on what LMGs do best: dealing consistent damage and controlling areas.
Challenge 2 Requirements Deep Dive
Deal 7,000 Damage with RPKM or KTS100 MK8
You have two weapon choices:
RPKM:
- Available from the start (no unlock required)
- Highly modular—customize to match your playstyle
- Versatile enough for multiple ranges
- Lower recoil than many LMGs
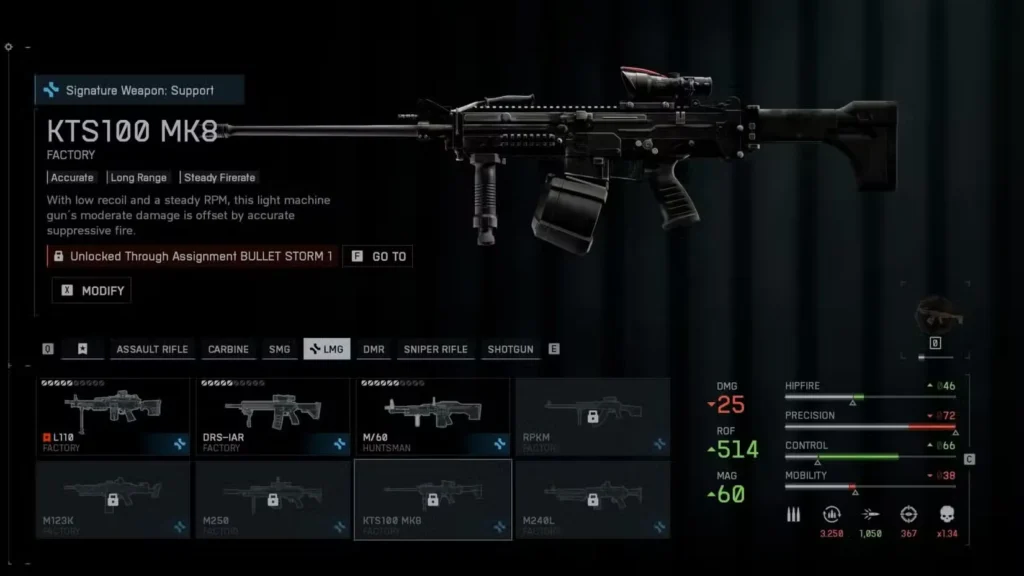
KTS100 MK8:
- Unlocked from Bullet Storm Challenge 1
- Typically higher damage per shot
- Excellent for sustained fire
- Great range characteristics
My recommendation: Start with the RPKM while working on Challenge 1, then switch to the KTS100 MK8 once unlocked. This gives you experience with both weapons and helps you identify which suits your style better.
How quickly can you complete this? With focused gameplay, 7,000 damage typically takes 1-2 solid matches on modes like Conquest or Breakthrough. Play aggressively, engage enemies consistently, and prioritize staying alive over high-risk plays.
Getting 15 Multi-Kills with LMGs
What is a multi-kill? Eliminating two or more enemies within a short timeframe (usually 3-5 seconds between kills).
Multi-Kill Farming Strategies
1. Target Enemy Clusters
Look for situations where enemies naturally group:
- Capture points – Enemies stacking on objectives
- Choke points – Doorways, stairwells, narrow passages
- Vehicle exits – Enemies bailing from destroyed transports
- Revive attempts – Medics trying to revive teammates
2. Use Your Gadgets
Pair your LMG with equipment that helps create multi-kill opportunities:
- Smoke grenades – Push into groups under cover (check our Combat Roll guide for aggressive movement)
- Frag grenades – Weaken clustered enemies before engaging
- Portable cover – Set up firing positions overlooking high-traffic areas
3. Optimal Game Modes
- Breakthrough (Attack) – Enemies defend objectives in predictable positions
- Conquest – High player counts and objective-focused gameplay
- Domination – Smaller maps = more enemy density
- Operation modes – Linear gameplay funnels enemies into kill zones
4. Positioning is Everything
- Flanking routes – Catch enemies focused on other threats
- Elevated positions – Overlook objectives with clear sightlines
- Pre-fire common paths – Anticipate enemy movement and start shooting as they appear
5. Don’t Force It
Multi-kills will happen naturally during normal gameplay if you position well and engage smartly. Don’t make suicide rushes trying to force multi-kills—play smart, and they’ll come.
Pro Tip: The 15 multi-kill requirement might sound like a lot, but remember you’re likely completing this across multiple matches while also working on the damage requirement. By the time you hit 7,000 damage, you’ll probably already have most of your multi-kills done.
Best Loadouts for Bullet Storm Challenges
Challenge 1 Loadout (Suppression & Hip-Fire)
| Slot | Recommendation |
|---|---|
| Primary | RPKM (modular and accessible) |
| Gadget 1 | Ammo Pack (for self-sufficiency and constant uptime) |
| Gadget 2 | Smoke Grenades (to close distance for hip-fire fights) |
| Field Spec | Combat Medic or Fire Support |
Strategy: Play aggressively on close-quarter maps. Use smoke to close gaps safely, hip-fire in close combat, and spray sustained fire at distant enemies for suppression.
Challenge 2 Loadout (Damage & Multi-Kills)
| Slot | Recommendation |
|---|---|
| Primary | KTS100 MK8 or RPKM |
| Gadget 1 | Deployable Cover (for creating firing positions) |
| Gadget 2 | Frag Grenades (to weaken enemy groups) |
| Field Spec | Fire Support (for improved mounted accuracy) |
Strategy: Set up strong positions overlooking objectives. Use your massive magazine to engage multiple enemies sequentially. Mount your weapon for stability when possible.
For more detailed Support class builds, check out our complete Support loadouts guide.
Why These Rewards Matter
Let’s talk about why you’re putting in this effort:
KTS100 MK8 LMG (Challenge 1 Reward)
This weapon is a game-changer for Support players:
- High damage per shot – Wins more 1v1 gunfights
- Excellent range – Remains effective at distances where other guns struggle
- Large magazine – Sustain fire without constant reloads
- Versatile – Works in both aggressive and defensive playstyles
M240L LMG (Challenge 2 Reward)
Often considered one of the best LMGs in Battlefield 6:
- Exceptional DPS – High damage output melts enemies
- Superior suppression – Keep entire teams pinned down
- Meta-competitive – Regularly featured in top-tier loadouts
- Area denial specialist – Perfect for holding objectives
The Bottom Line: These aren’t just participation trophies—they’re legitimate meta weapons that can elevate your performance. Many top Support players consider these challenges essential early progression goals.
Efficient Challenge Completion Timeline
Want to knock these out quickly? Here’s a realistic timeline:
Session 1 (2-3 hours):
- Focus on suppression (play Conquest/Breakthrough)
- Naturally accumulate some hip-fire damage
- Goal: 200+ suppressions, 5,000+ hip-fire damage
Session 2 (1-2 hours):
- Switch to close-quarters focused gameplay
- Aggressive hip-fire tactics
- Goal: Complete Challenge 1, unlock KTS100 MK8
Session 3 (2-3 hours):
- Use KTS100 MK8 or RPKM
- Normal gameplay with focus on multi-kills
- Goal: Complete Challenge 2, unlock M240L
Total time investment: 5-8 hours of focused gameplay across multiple sessions.
Obviously, this varies based on skill level and luck, but these challenges are absolutely achievable in a weekend if you’re dedicated.
Common Mistakes to Avoid
❌ Ignoring suppression assists: You don’t need kills—just lay down fire near enemies ❌ Only hip-firing: Play naturally and hip-fire when appropriate; don’t handicap yourself ❌ Wrong game modes: Avoid modes with low player counts or long engagement ranges ❌ Forcing multi-kills: They’ll happen naturally; don’t suicide rush for them ❌ Poor positioning: LMGs need good firing positions to shine ❌ Neglecting ammo management: Use Supply Bags to maintain uptime
Additional Challenge Guides
Working on other class challenges? We’ve got you covered:
- Assault Class Challenges Guide
- Recon Class Challenges Guide
- Deadeye Challenges Guide
- Close Quarters Challenges Guide
- Danger Close Challenges Guide
Optimize Your Settings
Don’t forget that proper settings can make these challenges significantly easier. Hip-fire accuracy benefits from optimized sensitivity settings, and suppression is more effective when you can track targets smoothly. Check our complete tips, tricks, and settings guide for recommendations.
Get Battlefield 6
Ready to start working on these challenges? Grab Battlefield 6 on:
Join the Battlefield 6 community on Reddit to share your challenge completion strategies and learn from other players.
Final Thoughts: The Bullet Storm challenges represent some of the most rewarding progression in Battlefield 6. Unlike challenges that require obscure playstyles or luck-based scenarios, these challenges reward you for simply being a good Support player—suppressing enemies, dealing damage, and controlling the battlefield. The KTS100 MK8 and M240L you unlock aren’t just cosmetic rewards; they’re legitimate meta weapons that will serve you well throughout your Battlefield career.
The key is playing smart: choose the right game modes, understand the mechanics, and don’t try to force unnatural playstyles. Let the challenges progress naturally as you play aggressively and position intelligently. Before you know it, you’ll be wielding two of the deadliest LMGs in the game.
Looking to explore other weapon types? Don’t miss our guide on all game modes to understand where different weapons shine, and master the complete campaign missions to warm up your shooting skills before diving into competitive play.