The Deploy Beacon is one of those gadgets that separates coordinated squads from random players running around aimlessly. It’s basically a tactical teleporter that lets your entire squad spawn exactly where you need them, turning the tide of matches through superior positioning alone.
But here’s the catch: unlike previous Battlefield games, the Deploy Beacon isn’t just handed to you. You’ll need to grind through some requirements to unlock it, and it’s been completely redesigned from how veteran players remember it. No longer a Recon tool for setting up sniper nests, it’s now an Assault class gadget focused on aggressive objective play.
I’ve used the Deploy Beacon extensively since unlocking it, and I can confidently say it’s one of the most impactful gadgets in the entire game when used correctly. This guide will walk you through everything: how to unlock it, how to use it effectively, where to place it, and the tactical implications that can genuinely win matches.
Let’s get into it.
What Is the Deploy Beacon?
Before we talk about unlocking it, let’s establish what the Deploy Beacon actually does and why you should care about getting it.
Deploy Beacon Basics:
- Creates a spawn point for you and your squadmates
- Can be placed anywhere on the map (with some restrictions)
- Limited uses before it self-destructs
- Tactical positioning tool for flanking and objective pressure
- Squad-only – only your squad can spawn on it, not the entire team
Key Changes From Previous Battlefield Games:
The Deploy Beacon (formerly called Spawn Beacon) has undergone significant changes in Battlefield 6:
- Class Migration: Moved from Recon to Assault class
- Limited Uses: Now has finite spawns before destruction
- Auto-Destruct: Disappears when the owner spawns on it
- Aggressive Focus: Designed for objective pressure rather than camping
These changes fundamentally alter how the gadget should be used. Veterans expecting to set up permanent sniper positions will be disappointed, but players who understand modern Battlefield’s objective-focused gameplay will find this version incredibly powerful.
Why the Deploy Beacon Is Essential
You might be thinking: “Why not just spawn on squadmates?” Fair question. Here’s why the Deploy Beacon is actually game-changing:
Strategic Advantages:
- Flanking Routes – Set up behind enemy lines for surprise attacks
- Objective Pressure – Your entire squad can spawn on a contested point
- Position Maintenance – Return to strategic positions instantly after death
- Team Coordination – Enables coordinated squad pushes
- Defensive Fallback – Create backup spawn points when pushing fails
Real-World Application:
Imagine this: You’re playing Breakthrough and the enemy is locked down defending an objective. You sneak around their flank, place a Deploy Beacon behind their defensive line, and suddenly your entire squad is spawning behind them. The objective falls in seconds because the enemy is caught in a crossfire.
That scenario happens constantly with good Deploy Beacon usage. It’s not just useful—it’s match-winning when coordinated properly.
For players who focus on objective-based gameplay, the Deploy Beacon is arguably the single most valuable gadget in the game.
Prerequisites: Reaching Rank 20
Before you can even begin unlocking the Deploy Beacon, you need to hit Rank 20 in multiplayer. This is a hard gate—there’s no way around it.
How Long Does Rank 20 Take?
Time Investment: Approximately 8-12 hours of gameplay for average players
This varies significantly based on:
- Your skill level and score per match
- Whether you’re using XP boosters
- Game modes you’re playing
- Whether you’re playing with a squad
Fastest Ways to Reach Rank 20
High XP Game Modes:
- Conquest – Multiple objectives provide constant score opportunities
- Breakthrough – High-intensity combat with big score rewards
- Rush – Objective-focused with good XP per time investment
XP Optimization Strategies:
- Play the objective – Capturing flags gives massive XP
- Squad up – Squad bonuses multiply your score
- Use XP boosters – Check our XP booster guide
- Complete weapon challenges – Extra XP while playing normally
- Focus on assists – You get points for damage even without kills
Pro Tip: Don’t just chase kills. A player capturing objectives and supporting their team will often earn more XP than a player with twice the kills who ignores objectives. Battlefield rewards team play heavily.
For comprehensive leveling strategies, see our XP farming and fast leveling guide.
Checking Your Progress
Your current rank is displayed in the top-right of the main menu screen. You can also check detailed progression stats in the career/profile section. The game shows exactly how much XP you need for the next rank, so you’ll always know how close you are to that critical Rank 20 threshold.
Assault Challenge 1: Unlock Requirements
Once you hit Rank 20, class challenges become available. The Deploy Beacon is locked behind Assault Challenge 1, which has two specific requirements.
Challenge Requirements Breakdown
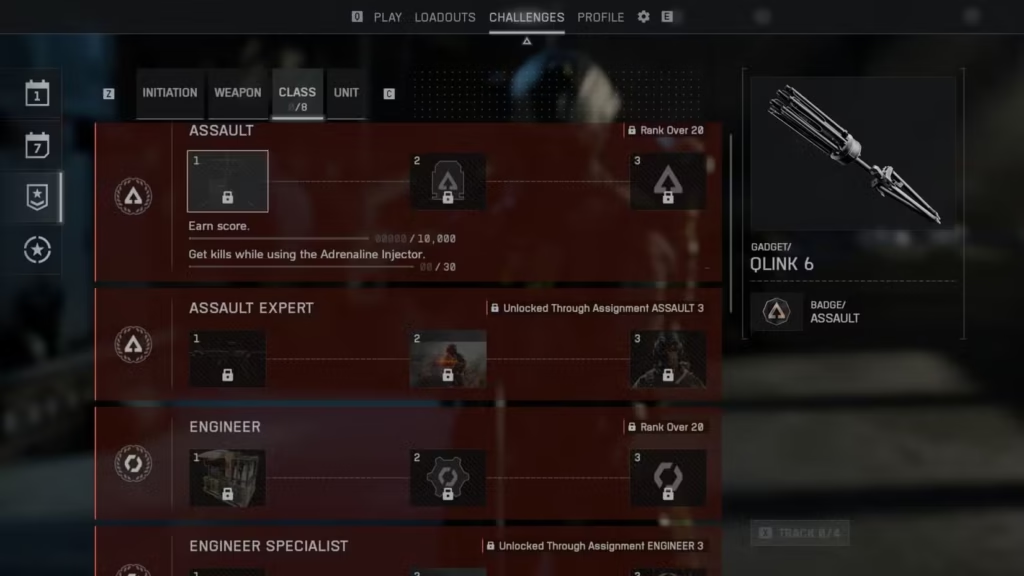
Assault Challenge 1 Objectives:
- Earn 10,000 score
- Get 30 kills while using Adrenaline Injector
Reward: Deploy Beacon (plus other items)
Let me break down each requirement and the fastest ways to complete them.
Requirement 1: Earn 10,000 Score
This is the easier of the two requirements and will likely complete passively while you work on the kill requirement.
Fast Score Methods:
- Objective captures – 200+ points per flag in Conquest
- Objective defenses – Killing enemies near your objectives
- Revives – 100 points per revive (synergizes with Assault class)
- Kills – 100 points per kill (more if multi-kills or objective-based)
- Assist points – Damage enemies for assist credit
- Squad orders – Following squad leader orders gives bonus points
Time Estimate: 2-4 matches of active objective play
My Experience: I hit 10,000 score before getting even 20 of my 30 Adrenaline Injector kills. If you’re playing Assault class normally and focusing on objectives, this requirement basically completes itself.
Requirement 2: 30 Kills With Adrenaline Injector
This is the actual challenge that requires focused effort. You need 30 kills while having the Adrenaline Injector active.
What Is Adrenaline Injector?
The Adrenaline Injector is an Assault class gadget that:
- Provides temporary health regeneration boost
- Increases sprint speed slightly
- Duration of about 10-15 seconds
- Has a cooldown between uses
The Challenge Requirement Explained:
The key phrase is “while using” the Adrenaline Injector. This means:
- The gadget must be ACTIVE when you get the kill
- You need to activate it, then get kills during its effect duration
- Kills without the buff active don’t count
- You can track progress in the challenge menu
Strategy for Completing This:
Step 1: Loadout Setup
- Primary Weapon: Use something you’re comfortable with (M4A1, M433, or M277)
- Gadget 1: Adrenaline Injector (mandatory)
- Gadget 2: Med crate or Defibrillator
- Equipment: Grenades for multi-kills
Step 2: Gameplay Approach
The most efficient method is aggressive objective play:
- Position yourself near contested objectives
- Activate Adrenaline Injector before engaging
- Push aggressively while the buff is active
- Get as many kills as possible during the 10-15 second window
- Retreat, wait for cooldown, repeat
Best Scenarios for Kills:
- Breakthrough attacking – Concentrated enemy positions
- Conquest flag captures – Enemies defending objectives
- Tight corridors – Close-quarters combat favors multiple quick kills
- Flanking routes – Surprise enemies from behind
Timing Your Injector:
Don’t waste your Adrenaline Injector when running across empty map areas. Save it for:
- Right before pushing into buildings
- When you spot enemy groups
- Defending objectives from attackers
- Any engagement where you expect multiple enemies
Time Estimate: 4-8 matches depending on your playstyle and aggression
My Experience: This took me about 6 matches. Some matches I’d get 7-8 kills, others only 2-3 depending on how well I timed the injector usage. The key was being patient and only activating it when I knew combat was imminent.
Common Mistakes to Avoid
Mistake #1: Forgetting to Activate
You’ll get kills and wonder why your progress isn’t updating—then realize you forgot to use the injector. Build a habit of activating it before every engagement.
Mistake #2: Wasting Cooldown
Activating the injector when no enemies are around wastes it. Be strategic about timing.
Mistake #3: Too Passive
You can’t complete this challenge by playing defensively. You need to actively seek combat while the buff is up.
Mistake #4: Wrong Game Modes
Low-intensity modes or sniper-focused maps make this challenge harder. Stick to high-action modes with dense combat.
For complete Assault class optimization, check our Assault class challenges guide and best Assault loadouts guide.
How to Equip the Deploy Beacon
Once you’ve completed Assault Challenge 1, the Deploy Beacon unlocks immediately. Here’s how to equip it:
Equipment Process:
- Go to the loadout customization screen
- Select the Assault class
- Navigate to Gadget slots
- Choose Deploy Beacon from available gadgets
- Confirm your loadout
Gadget Slot Consideration:
The Deploy Beacon takes up a gadget slot, meaning you sacrifice another tool. Common alternatives you’ll be giving up:
- Grenade launchers
- Rocket launchers
- Extra medical equipment
- Smoke grenades
Is It Worth the Slot?
Absolutely, especially in squad play. The tactical advantage of controlling spawn locations outweighs most other gadget options. Solo players might find less value, but in coordinated squads, this gadget is irreplaceable.
How to Use the Deploy Beacon
Now for the important part: actually using the Deploy Beacon effectively. The mechanics are simple, but the strategy is nuanced.
Deployment Mechanics
How to Place:
- Equip the Deploy Beacon from your gadget wheel
- You’ll enter placement mode showing a holographic preview
- Position it where you want (must be valid terrain)
- Confirm placement
- The beacon activates immediately
Placement Restrictions:
You cannot place Deploy Beacons:
- Inside enemy spawn zones
- On extremely steep terrain
- In out-of-bounds areas
- Too close to other spawn points
- On moving objects
The game will show red when placement is invalid, green when valid. If you’re struggling to place it somewhere, adjust your position slightly or try nearby terrain.
Beacon Lifespan and Limitations
Understanding the Deploy Beacon’s limitations is critical to using it effectively.
Key Mechanics:
- Limited spawns: Each beacon allows multiple spawns before destruction
- Owner auto-destruct: When YOU spawn on your own beacon, it self-destructs
- Enemy destruction: Enemies can destroy your beacon if they find it
- One beacon per player: Placing a new one destroys your previous beacon
- Squad-only access: Only your squadmates can use it
Strategic Implication:
Because the beacon self-destructs when you use it, you need to think carefully about whether YOU should spawn on it or let squadmates use it while you spawn elsewhere. Sometimes it’s better to let your squad spawn on the beacon while you spawn on them to preserve the beacon longer.
Spawn Beacon vs. Squad Spawning
Why Use Deploy Beacon Instead of Spawning on Squadmates?
- Position preservation: Keeps spawn point even if all squadmates die
- Better positioning: You can place it in spots squadmates might not reach
- Stealth: Hidden beacons are harder to counter than visible squadmates
- Tactical control: You decide where your squad spawns, not random squadmate positions
Both systems have value, but the Deploy Beacon gives you strategic control that squad spawning doesn’t provide.
Best Deploy Beacon Placement Strategies
Placement is everything. A well-placed beacon wins matches. A poorly placed beacon wastes a gadget slot. Here’s how to place them strategically.
Offensive Placement
Behind Enemy Lines:
The classic Deploy Beacon play—sneak behind enemy defenses and create a spawn point for your squad to materialize behind them.
How to Execute:
- Flank around enemy positions using cover and concealment
- Find a hidden spot with good access to objectives
- Place beacon in a concealed location (behind rocks, in buildings, under debris)
- Let squadmates know it’s ready (voice chat or text)
- Your squad spawns and attacks from behind
Best Locations:
- Buildings with multiple exits
- Rock formations providing cover
- Elevated positions overlooking objectives
- Areas with natural concealment
Pro Tip: Don’t place the beacon directly ON the objective. Place it near enough to quickly reach it, but far enough that enemies won’t stumble upon it accidentally. 30-50 meters from the objective is usually ideal.
Defensive Placement
Protecting Held Objectives:
When defending objectives, Deploy Beacons ensure your squad can quickly return to defensive positions if overrun.
Strategic Defensive Positions:
- Inside buildings – Allows quick access to defend capture points
- High ground – Gives spawn advantage over attackers
- Fallback positions – Secondary positions if primary defense fails
- Chokepoint overwatch – Positions covering enemy approach routes
Why This Works:
If your squad gets wiped defending an objective, you can all respawn immediately at the beacon and retake the position before enemies can fully capture it. This dramatically improves defensive staying power.
Flanking Routes
Creating Pressure From Multiple Angles:
Place beacons on flanking routes to enable your squad to attack from unexpected directions.
Key Flanking Positions:
- Side routes around main combat areas
- Elevated positions overlooking enemy movements
- Routes that bypass enemy defensive lines
- Positions behind natural cover
For map-specific flanking routes and strategies, check our maps ranking guide where we break down each battlefield’s key tactical positions.
Concealment Tactics
Hiding Your Beacon:
The longer your beacon survives, the more value it provides. Hide it well.
Good Concealment Spots:
- Inside buildings: Corners, behind furniture, upstairs rooms
- Natural cover: Behind rocks, in bushes, under debris
- Elevated positions: Rooftops, cliffs where enemies won’t look
- Out of traffic: Avoid main routes where enemies will walk past it
Bad Placement:
- Open ground with no cover
- Directly on objectives where enemies are constantly present
- Main pathways where it’ll be spotted immediately
- Next to your squad (defeats the purpose)
Visual Tip: Deploy Beacons emit a subtle glow and sound. Place them where these cues won’t be noticed—dark corners, noisy areas, or places enemies aren’t looking.
Game Mode-Specific Deploy Beacon Strategies
Different game modes require different beacon strategies. Here’s how to adapt:
Conquest Mode
Multi-Objective Strategy:
Conquest has multiple flags spread across large maps, making Deploy Beacons incredibly valuable for holding contested objectives.
Beacon Placement Strategy:
- Place beacons at contested flags (B and C flags typically)
- Put them in flanking positions around heavily defended objectives
- Create backup spawns when pushing isolated objectives
- Use them to maintain pressure on flags your team is trying to capture
Why It Works:
In Conquest, map control is everything. Having spawn points at strategic locations lets your squad respond to threats faster than enemies can rotate. You effectively control more of the map with fewer players.
Breakthrough Mode
Attacker Strategy:
When attacking in Breakthrough, Deploy Beacons are game-changing for maintaining momentum.
Offensive Beacon Placement:
- Flank around defensive lines and place beacons behind enemy positions
- Put them on objectives you’re trying to capture
- Create spawn points that bypass chokepoints
- Position near but not on the exact objective point
Defender Strategy:
When defending, beacons ensure you can hold objectives even against overwhelming attacks.
Defensive Beacon Placement:
- Inside buildings on objectives
- On high ground overlooking objectives
- At fallback positions if first defensive line collapses
- Near ammo stations to sustain defense
Breakthrough is arguably where Deploy Beacons shine brightest. The focused nature of the mode means a well-placed beacon can completely flip the match.
Rush Mode
Objective-Focused Placement:
Rush has clear attack/defend objectives, making beacon placement straightforward but critical.
Attacker Beacons:
- Near the objectives you’re arming
- Flanking positions around defender setups
- Fallback positions if push fails
Defender Beacons:
- On objectives to quickly retake if lost
- Overwatch positions covering multiple objectives
- Positions covering enemy approach routes
For detailed game mode strategies, see our complete game modes guide.
Squad Coordination and Communication
The Deploy Beacon’s power multiplies when used with good squad coordination.
Voice Communication
Call Out Your Beacon:
When you place a beacon, let your squad know:
- Where it is (“Beacon placed behind B flag, west side”)
- What it’s for (“Use for flanking their position”)
- When to use it (“Spawn on beacon when ready to push”)
Coordinate Spawns:
Timing squad spawns on the beacon maximizes impact:
- “Everyone spawn on beacon in 5 seconds”
- “Wait for my mark, then spawn beacon”
- “Beacon up, hit it when you die”
Squad Composition
Ideal Squad Setup With Deploy Beacon:
- Assault with Beacon – You, providing spawn point and medical support
- Support – Ammo and sustained fire
- Engineer – Anti-vehicle capability
- Recon – Spotting and area denial
This composition covers all bases while leveraging the Deploy Beacon for tactical positioning.
Solo vs. Squad Play
Solo Play Limitations:
If your squad isn’t coordinating, the Deploy Beacon loses significant value. Random squadmates often:
- Don’t notice you placed a beacon
- Spawn elsewhere anyway
- Don’t understand the tactical position you created
Maximizing Solo Value:
Even with random squads, you can get value by:
- Placing beacons near objectives so squadmates naturally use them
- Using it yourself as a personal respawn point
- Hoping at least one squadmate notices and uses it
Squad Play Advantages:
With coordination, the Deploy Beacon becomes dominant:
- Entire squad spawns exactly where needed
- Coordinated pushes from flanking positions
- Maintained pressure that random spawning can’t provide
For solo players, consider finding a regular squad or clan. The game transforms when playing with coordinated teammates.
Advanced Deploy Beacon Techniques
Once you’re comfortable with basics, these advanced tactics will elevate your play.
The Beacon Fake
Place a beacon in an obvious location, then set up nearby waiting for enemies to investigate. When they come to destroy it, ambush them. You sacrifice the beacon but get easy kills.
When to Use: When enemies are actively hunting your beacons or when you need kills more than spawn positioning.
Chain Beaconing
In longer matches, constantly replace your beacon as situations change. Don’t commit to one position all match—adapt beacon placement as the combat flow shifts.
Example: Start with offensive beacon behind enemy lines, then switch to defensive beacon on captured objective, then back to offensive as you push the next point.
Beacon Baiting
Place your beacon partially hidden, then defend the approach route. Enemies often focus on destroying beacons, making them predictable and vulnerable.
The Sacrifice Play
Sometimes YOU spawning on your beacon (destroying it) is worth it for critical moments:
- Defusing the last objective in Rush
- Contesting a flag in Conquest’s final seconds
- Saving a squadmate who’s about to die
- Securing a critical position
Don’t be precious about preserving the beacon if using it wins the match.
Mobile Beaconing
Constantly moving and replacing beacons keeps enemies guessing. Place a beacon, push with your squad, then place a new beacon at your new position. This creates rolling spawn pressure that enemies can’t predict.
Deploy Beacon Counters and Defenses
Understanding how enemies counter your beacon helps you place them more effectively.
How Enemies Destroy Beacons
Detection Methods:
- Visual spotting (seeing the beacon physically)
- Audio cues (beacons make subtle sounds)
- Noticing enemies spawning from nowhere
- Systematic searching of common beacon locations
Destruction Methods:
- Shooting it (a few shots destroys most beacons)
- Explosives (grenades, rockets)
- Melee attacks
Protecting Your Beacon
Defensive Strategies:
- Hide it well – Concealment is your first defense
- Unexpected locations – Don’t use obvious spots
- Defend the area – Stay nearby to kill beacon hunters
- Multiple placements – Replace destroyed beacons immediately
- Distraction – Combat in the area distracts from beacon hunting
When to Abandon a Beacon
If enemies discover your beacon’s general location, they’ll hunt it. Sometimes it’s better to:
- Place a new beacon elsewhere
- Let them waste time destroying it while you create pressure elsewhere
- Use their distraction to push objectives
Don’t fall into the trap of defending a compromised beacon position when you could just place a new one somewhere better.
Deploy Beacon and Training Paths
The Deploy Beacon synergizes particularly well with certain Assault training paths.
Frontliner Training Path
The Frontliner path provides buffs to nearby allies, which stacks beautifully with Deploy Beacon usage. When squadmates spawn on your beacon, they benefit from:
- Increased health regeneration
- Faster sprint speed
- Better resistance to suppression
This makes beacon spawns even more powerful for aggressive pushes.
Other Training Path Considerations
While Frontliner is optimal, other paths work too:
- Grenadier – More explosives for clearing objectives after beacon spawns
- Assault Training – Better overall combat effectiveness
- Medic – Enhanced healing for sustained pushes
Check our Field Specs guide for complete training path details.
Comparing Deploy Beacon to Other Assault Gadgets
Should you always run Deploy Beacon? Let’s compare it to alternatives.
Deploy Beacon vs. Grenade Launcher
Grenade Launcher Advantages:
- Direct combat effectiveness
- Can clear rooms and bunkers
- Useful in all situations
Deploy Beacon Advantages:
- Strategic value for squad play
- Enables tactics impossible otherwise
- Force multiplier for coordinated teams
Verdict: Grenade launcher for solo play, Deploy Beacon for squad play.
Deploy Beacon vs. Rocket Launcher
Rocket Launcher Advantages:
- Anti-vehicle capability
- Building destruction
- High explosive damage
Deploy Beacon Advantages:
- Squad spawning control
- Tactical positioning
- Sustained presence on objectives
Verdict: Depends on whether the match is vehicle-heavy or infantry-focused.
Deploy Beacon vs. Medical Equipment
Medical Equipment Advantages:
- Sustain for your team
- More revives and healing
- Consistent value in all scenarios
Deploy Beacon Advantages:
- Tactical positioning control
- Aggressive push enabler
- Map control and pressure
Verdict: Medical equipment for general play, Deploy Beacon for objective-focused squad gameplay.
For complete Assault loadout optimization, see our Assault class best loadouts guide.
Common Deploy Beacon Mistakes
I’ve made every possible beacon mistake. Learn from my failures:
Mistake #1: Obvious Placement
Placing beacons in obvious, well-traveled locations gets them destroyed instantly. Always prioritize concealment.
Mistake #2: Forgetting You Placed It
You place a beacon, then respawn normally forgetting it exists. Build a habit of using your beacons.
Mistake #3: Beacon on the Exact Objective
Placing it directly on the capture point means constant enemy presence. Place it NEAR objectives, not on them.
Mistake #4: Never Replacing It
Your beacon got destroyed 5 minutes ago and you haven’t placed a new one. Place beacons constantly—don’t wait for the perfect moment.
Mistake #5: Not Communicating
Your squadmates don’t know you placed a beacon, so they spawn elsewhere. Use voice chat or text to let them know.
Settings and Keybind Optimization
Proper settings make beacon deployment smoother.
Key Settings to Adjust:
- Gadget keybinds – Make beacon easily accessible
- Placement sensitivity – Affects how quickly you can position the beacon
- Minimap settings – See where your beacon is on the map
For complete optimization, check our best settings guide.
Deploy Beacon in Campaign
Want to practice with the Deploy Beacon in a lower-pressure environment? Some campaign missions let you use it:
Practice placement and get comfortable with the mechanics before jumping into competitive multiplayer. You can also grab collectibles while you’re at it.
Final Thoughts: Is Deploy Beacon Worth Unlocking?
After extensive use, here’s my honest verdict:
You should prioritize unlocking Deploy Beacon if:
- You play with a regular squad
- You focus on objectives and teamwork
- You understand tactical positioning
- You play Breakthrough or Conquest regularly
- You want to impact matches beyond just getting kills
Skip it if:
- You exclusively solo queue with no communication
- You prefer combat-focused gadgets
- You play mostly Team Deathmatch or infantry modes
- Your playstyle is very individualistic
For me personally, the Deploy Beacon is a permanent fixture in my Assault loadout when playing with my squad. The ability to control spawn positioning has won us countless matches that would have been losses otherwise.
The unlock grind isn’t too bad—maybe 6-10 hours total including reaching Rank 20 and completing the challenge. The tactical advantage it provides is absolutely worth that investment for objective-focused players.
Master the Deploy Beacon and you’ll understand why coordinated squads dominate in Battlefield 6. It’s not just a gadget—it’s a force multiplier that turns good squads into unstoppable ones.
Now get out there, place some beacons, and start controlling the battlefield like a tactical genius!
Ready to dominate with superior positioning? Get Battlefield 6 on Steam, PlayStation Store, or Epic Games. Visit the official Battlefield 6 site and join the tactical discussion on Reddit!