The Engineer class in Battlefield 6 is all about vehicular warfare—blowing up enemy armor, keeping friendly tanks alive, and generally making life hell for anyone who dares roll onto the battlefield in a vehicle. But beyond just being fun to play, the Engineer class has some seriously worthwhile challenges that unlock unique rewards you can’t get anywhere else.
I’ve grinded through every single Engineer challenge, and I’ll be honest: some are easy, some are tedious, and a couple will have you pulling your hair out waiting for the right opportunities. But the rewards—especially those exclusive character skins and the M136 AT Launcher—make it all worthwhile.
This guide breaks down every Engineer challenge, gives you practical strategies to complete them efficiently, and helps you avoid the frustrating mistakes I made along the way. Whether you’re just hitting Rank 20 or you’re already deep into the grind, let’s get you those rewards.
Understanding the Engineer Challenge System
Before diving into specific challenges, let’s talk about how the system works because it’s a bit different from other progression systems in Battlefield 6.
Key Points to Know:
- Rank 20 Requirement – You must reach Rank 20 before ANY class challenges unlock
- Sequential Progression – You must complete Engineer 1 before Engineer 2, and so on
- Specialist Challenges – Only unlock after completing all three basic Engineer challenges
- No Time Limit – Challenges don’t expire; progress is permanent
- Cross-Mode Progress – Most challenges work in any multiplayer mode
The Engineer challenges are designed to teach you the class’s role while rewarding mastery. They force you to engage with every aspect of Engineer gameplay—repairing, destroying vehicles, and using specialized equipment.
If you’re not Rank 20 yet, check our XP farming guide to get there faster. Using XP boosters during double XP events can cut your grind time significantly.
Engineer Challenge Prerequisites
Let’s start with what you need before you can even begin these challenges.
Rank 20 Unlock Requirement
You absolutely must be Rank 20 in multiplayer before class challenges become available. There’s no way around this—it’s a hard gate. The good news? If you’ve been playing regularly and mixing up your classes, you’ve probably already hit this naturally.
Fastest Ways to Reach Rank 20:
- Play game modes with high score potential like Conquest and Breakthrough
- Focus on objectives rather than just kills
- Use XP boosters during peak playtime
- Complete other class challenges and weapon masteries
- Play with a full squad for bonus XP
Once you hit Rank 20, all class challenges (not just Engineer) become available in the progression menu. You’ll see them under the “Challenges” tab for each specific class.
Engineer Class Basics
If you’re new to Engineer or coming from other classes, here’s a quick refresher on what makes this class unique:
Engineer Class Identity:
- Primary anti-vehicle role
- Repair friendly vehicles
- Deploy anti-tank mines and launchers
- Support armor pushes and defend against enemy vehicles
For a complete breakdown of the class, including best loadouts and tactics, check our Engineer class best loadouts guide.
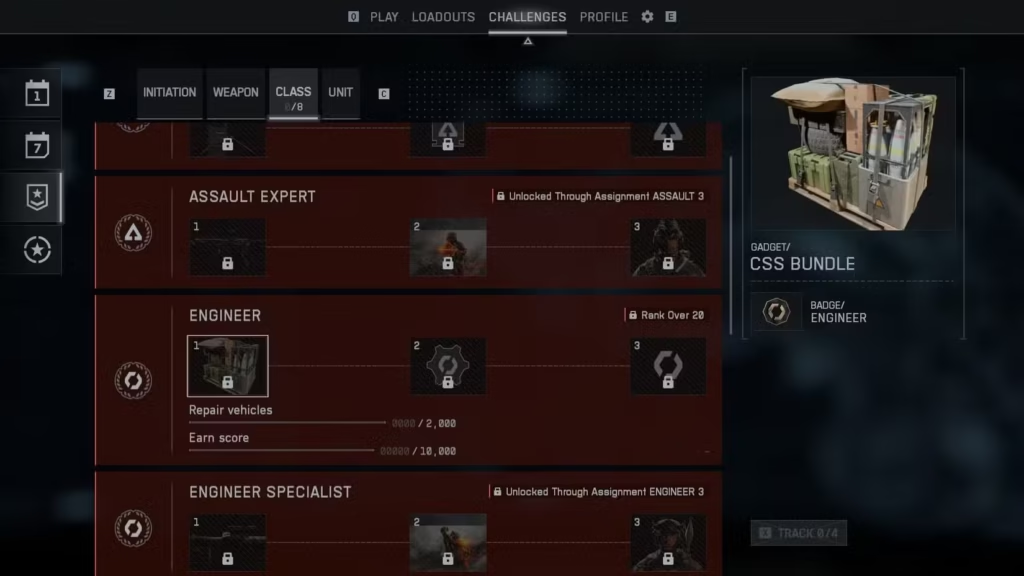
Engineer Challenge 1: Getting Started
The first Engineer challenge introduces you to the basic responsibilities of the class. It’s pretty straightforward, but let me break it down anyway.
Challenge Requirements
Engineer 1 Objectives:
- Repair vehicles for 2,000 damage
- Earn 10,000 score
Rewards:
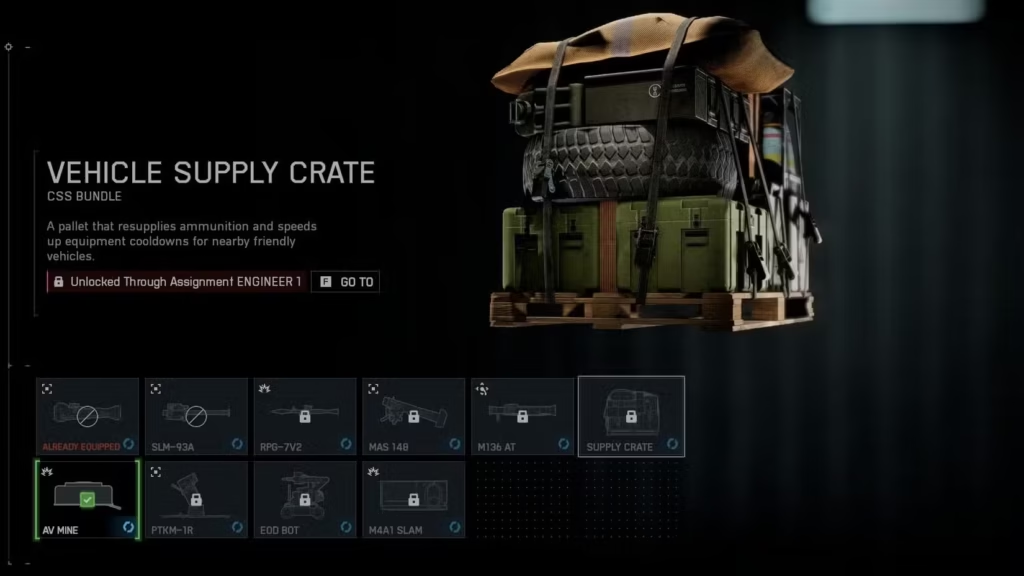
- CSS Bundle Vehicle Supply Crate
- Progress toward Specialist challenges
Strategy: Repair Vehicles for 2,000 Damage
This is the easiest requirement in the entire challenge set. Here’s how to complete it efficiently:
Best Approach:
- Equip the Repair Tool – Obvious, but make sure it’s in your gadget slot
- Follow Friendly Tanks – Stick near any armor on your team
- Repair During Downtime – Between engagements, top off vehicle health
- Focus on Heavy Armor – Tanks have more HP, meaning more repair credit
- Don’t Ignore Critical Repairs – Saving a low-health tank gives massive repair credit
Where to Farm Repairs:
- Conquest – Multiple vehicles per team, constant combat
- Breakthrough – Defending team’s vehicles take consistent damage
- Vehicle-Heavy Maps – Check our maps ranking guide for vehicle-focused maps
Pro Tip: You don’t need to repair from 0% to 100%. Any amount of repairing counts toward your progress. Even small touch-ups contribute. I’ve found the best strategy is finding a friendly tank that’s actively pushing objectives—they take consistent damage but rarely die, giving you continuous repair opportunities.
The 2,000 damage requirement sounds like a lot, but it goes surprisingly fast. One good Conquest match where you’re actively supporting armor can net you 400-600 repair damage easily.
Strategy: Earn 10,000 Score
This requirement is even easier and will likely complete itself while you’re doing other challenges.
Fastest Score Sources:
- Objective captures – 200+ points per flag
- Objective defense – Points for kills near friendly flags
- Vehicle assists – Damage vehicles for assist credit
- Resupply teammates – Vehicle Supply Crate points
- Revives – If you’re running medic equipment
Optimal Game Modes for Score:
- Conquest – Multiple objectives = more capture opportunities
- Breakthrough – High intensity = more kills and assists
- Rush – Objective-focused gameplay rewards Engineer play
The 10,000 score requirement is basically asking you to play 2-3 matches while focusing on objectives. If you’re actively completing the repair requirement, you’ll hit this score naturally. Don’t stress about it—it’s really just asking you to engage with the game normally.
Engineer 1 Completion Tips
Loadout Recommendation:
- Primary: Any reliable weapon (M4A1 or M433 work great)
- Gadget 1: Repair Tool (mandatory)
- Gadget 2: Anti-tank mines or launcher (start building habits)
- Equipment: Whatever fits your playstyle
Time Estimate: 3-5 matches of active play
This first challenge should take you just a few hours at most. It’s designed as an introduction, so don’t overthink it. Play the objective, help your team’s vehicles, and you’ll have it done before you know it.
Engineer Challenge 2: Vehicle Destruction Focus
Now things get more interesting. Engineer Challenge 2 is where you really start living the anti-vehicle fantasy.
Challenge Requirements
Engineer 2 Objectives:
- Deal 5,000 damage to ground vehicles with launchers
- Deal 2,000 damage to ground vehicles with Anti-Vehicle Mines
Rewards:
- Combat Engineer Training Path
- Progress toward Specialist challenges
Strategy: 5,000 Damage With Launchers
This is where you become a tank’s worst nightmare. 5,000 damage sounds intimidating, but it’s actually pretty achievable with the right approach.
Best Launchers for This Challenge:
- FXM-33 AA – Works on ground vehicles too, not just aircraft
- M5 Recoilless Rifle – High damage, direct fire
- SMAW – Guided option for longer ranges
- RPG-7 – Classic, reliable, high damage
Damage Values (Approximate):
- Direct hit on light vehicle: 40-60 damage
- Direct hit on tank: 30-40 damage
- Rear/side shots: 50-75 damage
- Mobility hits: Bonus damage + disabled vehicle
Optimal Tactics:
Target Priority:
- Light vehicles (LAVs, APCs) – Less armor, easier kills
- Stationary vehicles – Repairing or capturing objectives
- Damaged vehicles – Finish them off for full credit
- Transport vehicles – Easy targets, count toward progress
Positioning Matters:
Always try to hit vehicles from the sides or rear. Frontal armor significantly reduces your damage. A rear shot can deal nearly double the damage of a frontal hit. Position yourself on flanks and wait for vehicles to pass—ambush tactics work incredibly well.
Best Maps for Launcher Damage:
- Large open maps with lots of vehicle spawns
- Conquest maps with multiple ground vehicle objectives
- Any map where armor plays a key role
Check which maps are vehicle-heavy in our complete maps guide.
Pro Tips:
- Lead Your Shots – Vehicles move fast; aim ahead of their trajectory
- Use Cover – Fire, relocate, fire again; don’t be stationary
- Coordinate With Squad – Multiple engineers = faster vehicle kills
- Target Immobile Vehicles – Vehicles on objectives are sitting ducks
- Don’t Waste Shots on Disabled Vehicles – If it’s already immobile, save ammo for fresh targets
One critical thing I learned: you get damage credit even if you don’t get the kill. If you hit a tank for 40 damage and someone else finishes it, you still get credit for your 40 damage. This means focusing on consistent hits matters more than securing kills.
Strategy: 2,000 Damage With Anti-Vehicle Mines
Mines are a different beast entirely. They’re passive, sneaky, and absolutely infuriating for enemy drivers—which is exactly why they’re so satisfying.
Mine Placement Strategy:
High-Traffic Routes:
- Roads leading to objectives
- Main vehicle thoroughfares on maps
- Chokepoints where vehicles must pass
- Near enemy vehicle spawns (risky but effective)
Placement Tips:
- Hide Them – Place mines on dark surfaces, in shadows, or debris
- Cluster Placement – 2-3 mines in a small area guarantees a kill
- Post-Explosion Reset – Immediately replace destroyed mines
- Mark Your Mines – Remember where you placed them (or you’ll forget)
Best Locations:
- Narrow roads – Vehicles can’t avoid them
- Objective approaches – Vehicles pushing flags drive over these
- Bridge choke points – Limited paths force vehicles over mines
- Behind cover – Place mines where they’re not visible until too late
Why Mines Are Tricky:
The 2,000 damage requirement is actually more difficult than the launcher requirement because mines are unreliable. You need enemy vehicles to actually drive over them, which means:
- They might avoid your mines entirely
- Teammates might destroy vehicles before they reach mines
- Enemies might spot and destroy your mines
- Matches might not have enough vehicle traffic
Time-Saving Approach:
Don’t overthink this. Place mines on high-traffic routes at the start of every match and check back periodically. You’ll eventually get the damage, but it requires patience. This is one challenge that you’ll complete passively over multiple matches rather than in a single focused session.
I averaged about 200-400 mine damage per match when I was actively placing them in smart locations. The full 2,000 damage took me about 6-8 matches, but that was while also working on other challenges.
Engineer 2 Completion Tips
Recommended Loadout:
- Primary: Mobile weapon for anti-vehicle positioning
- Gadget 1: AT Launcher (your main tool)
- Gadget 2: Anti-Vehicle Mines
- Equipment: Ammo crate if available (resupply your mines)
Time Estimate: 8-12 matches depending on vehicle availability
Critical Advice: Focus on one requirement at a time. Spend a few matches dedicated to launcher damage, then switch focus to mines. Trying to do both simultaneously dilutes your effectiveness at either.
For more vehicle combat strategies, see our best vehicle loadouts guide.
Engineer Challenge 3: Advanced Anti-Vehicle Warfare
This is where the Engineer challenges get genuinely tricky. Challenge 3 introduces specific requirements that depend on teamwork and situational opportunities.
Challenge Requirements
Engineer 3 Objectives:
- Deal 2,500 damage to aircraft with AA Launchers
- Deal 1,000 damage to Laser Designated enemy vehicles using lock-on weapons
Rewards:
- Dead Air Player Card Icon
- Patch Job Character Patch
- Unlock Specialist challenges
Strategy: 2,500 Damage to Aircraft
Aircraft damage is straightforward conceptually but execution requires practice and patience.
Best AA Launchers:
- FXM-33 AA – Lock-on, reliable, standard choice
- Stinger – Similar stats, equally effective
- Igla – Faster lock-on, slightly less damage
Aircraft Damage Values:
- Direct hit on helicopter: 45-55 damage
- Direct hit on jet: 35-45 damage
- Mobility hit: Reduced damage but disables maneuverability
- Two hits typically destroy helicopters
- Jets require 2-3 hits depending on angle
Tactics for Hitting Aircraft:
Timing Is Everything:
- Lock on when aircraft are flying straight
- Fire when they’re focused on ground targets
- Aim during strafing runs when they’re predictable
- Wait out their flares, then fire immediately after
Flare Counterplay:
All aircraft have flares that break your lock. Here’s how to deal with them:
- Get your lock
- Wait for them to flare (you’ll lose lock)
- Immediately re-lock
- Fire before they reload flares (usually 15-20 second cooldown)
Best Situations:
- Aircraft attacking your team’s objectives
- Helicopters hovering while repairing
- Transport helicopters (easier targets, count toward progress)
- Aircraft damaged by teammates (finish them off)
Map Selection:
Not all maps have equal aircraft presence. Play on maps with consistent air vehicles. Generally, larger Conquest maps have more aircraft spawns.
Why This Is Challenging:
Aircraft are fast, pilots use flares, and good pilots avoid hovering. You’ll miss shots, waste ammo, and feel frustrated. That’s normal. The key is persistence and learning aircraft patterns.
I found the best approach was playing defensively near objectives. Aircraft often strafe objectives, giving you predictable approach angles. Set up near high-traffic objectives and wait for opportunities rather than chasing aircraft around the map.
Time Estimate for Aircraft Damage: This varies wildly based on enemy aircraft activity. Could be 5 matches if aircraft are abundant, or 15+ if pilots are scarce or exceptionally good.
Strategy: 1,000 Damage to Laser Designated Vehicles
This is hands-down the most frustrating requirement in all Engineer challenges because it requires teamwork with a Recon player who knows how to use the Laser Designator.
What Is Laser Designation?
Recon class has a gadget called the Laser Designator that “paints” enemy vehicles, allowing lock-on weapons to track them. When a vehicle is laser designated, your launcher gets enhanced lock-on capabilities and deals bonus damage.
The Problem:
Most Recon players don’t use the Laser Designator. They’re focused on sniping, not supporting Engineers. This means you’ll need to either:
- Play with friends who can coordinate
- Get lucky with random squadmates
- Ask in team chat for laser designation (rarely works)
How to Complete This:
Option 1: Squad Coordination (Best Method)
Find a friend or squadmate willing to play Recon with Laser Designator. Have them mark enemy vehicles while you hit them with lock-on weapons. This is by far the fastest method.
Option 2: Opportunistic Play (Realistic Method)
Play Engineer with lock-on weapons equipped and hope random Recon players mark targets. When you see the “Laser Designated” indicator on a vehicle, immediately engage it.
Option 3: Self-Designation (If Possible)
Some players switch to Recon, designate a vehicle, then switch back to Engineer and engage it. This requires specific game modes and timing but can work.
Identifying Laser Designated Targets:
Designated vehicles have a distinct red diamond marker and emit a sound cue. Your HUD will show “Laser Designated Target” when you aim at them. You cannot miss the indication—it’s very obvious.
Lock-On Weapons That Work:
- Javelin (if available for Engineer)
- Stinger/Igla (works on designated vehicles)
- Any launcher with lock-on capability
Damage Values:
Hitting a laser designated vehicle deals normal damage PLUS you get credit toward this challenge. The actual damage doesn’t change—what changes is that it counts toward your objective.
Why This Is The Worst Requirement:
It entirely depends on factors outside your control. You can be the best Engineer player in the world, but if no Recon players use Laser Designator, you simply cannot progress this challenge. It’s poor game design honestly, but it is what it is.
My Experience:
This took me about 10 matches to complete, and most of that was just waiting for opportunities. I got lucky with one match where a Recon player was actively designating targets, which gave me about 600 damage in a single game. The rest came from random, occasional designations over multiple matches.
Pro Tip: If you’re in a squad with voice chat, politely ask if anyone can swap to Recon and help. Many players are willing to help with challenges if asked nicely. Community coordination beats random luck.
Engineer 3 Completion Tips
Recommended Loadout:
- Primary: Reliable all-purpose weapon
- Gadget 1: AA Launcher (FXM-33 or Stinger)
- Gadget 2: Lock-on capable launcher
- Equipment: Flexible based on situation
Time Estimate: 10-20 matches (heavily dependent on aircraft presence and Recon cooperation)
Critical Mindset: This challenge requires patience more than skill. You’re waiting for opportunities rather than creating them. Accept that some matches will give you zero progress and that’s okay.
For more details on working with Recon players, check our Recon class challenges guide.
Engineer Specialist Challenge 1: Vehicle Supply Crate
Once you’ve completed all three basic Engineer challenges, the Specialist challenges unlock. Interestingly, these are actually easier than the prerequisites.
Challenge Requirements
Engineer Specialist 1 Objectives:
- Deploy the Vehicle Supply Crate 5 times
- Earn 40,000 score
Rewards:
- M136 AT Launcher (this alone makes the grind worth it)
Strategy: Deploy Vehicle Supply Crate 5 Times
This is almost comically easy compared to what you just went through. You literally just need to place the crate five times. You don’t even need vehicles to use it.
How to Complete:
- Equip the Vehicle Supply Crate (you unlocked it from Engineer 1)
- Deploy it anywhere five times across any matches
- Done
That’s it. No requirements for vehicles actually using it, no damage thresholds, no nothing. Just place it five times. This can be done in a single match if you wanted to spam it.
Why Include This Strategy Section?
Honestly, there’s not much to say. Deploy it near friendly vehicles if you want to be helpful, or just drop it for credit. This requirement exists purely as a checkbox.
Strategy: Earn 40,000 Score
Just play the game normally across a few matches while focusing on Engineer gameplay.
Fast Score Methods:
- Destroy vehicles (200+ points per kill)
- Capture objectives (200+ points per flag)
- Repair friendly vehicles (points per repair tick)
- Vehicle damage assists (50-100 points)
- Kill enemies near objectives (bonus points)
Time Estimate: 5-8 matches of normal gameplay
The 40,000 score sounds like a lot, but it’s really just asking you to play Engineer for a few hours. If you’re actively destroying vehicles and playing objectives, you’ll average 5,000-8,000 score per match, meaning this takes less than 10 matches.
Specialist 1 Completion Tips
This is a freebie challenge compared to what you just completed. The M136 AT Launcher reward is excellent—it’s one of the better anti-vehicle weapons in the game. Definitely worth having in your arsenal.
For optimal Engineer loadouts using your new launcher, check our comprehensive guide.
Engineer Specialist Challenge 2: Aircraft Mastery
Back to aircraft hunting, but this time with a twist.
Challenge Requirements
Engineer Specialist 2 Objectives:
- Get 50 assists or destroy aircraft
Rewards:
- Heavy Weaponry Player Card Background
Strategy: 50 Aircraft Assists or Destroys
This challenge is significantly easier than Challenge 3’s aircraft requirement because assists count.
Why This Is Easier:
You don’t need to destroy the aircraft—just contribute damage. If you hit a helicopter for 45 damage and someone else finishes it, that counts as an assist toward this challenge.
Optimal Approach:
- Damage > Kills – Focus on hitting aircraft, not necessarily destroying them
- Team Damage Stacks – Let teammates help finish aircraft
- Persistence Matters – Keep firing at every aircraft you see
- Transport Helicopters – Easy targets, full credit
Best Loadout:
- AA Launcher (FXM-33, Stinger, or Igla)
- Ammo crate to resupply yourself
- Position near objectives where aircraft strafe
Time Estimate: 8-15 matches depending on aircraft activity
This is much less frustrating than the Challenge 3 aircraft requirement because the goal is lower and assists count. You’re basically just doing what you learned earlier, but for longer.
Engineer Specialist Challenge 3: Repair Mastery
The final Engineer challenge tests your support skills.
Challenge Requirements
Engineer Specialist 3 Objectives:
- Repair vehicles in a single match for 6,000 damage
Rewards:
- Brazer Character Skin (NATO)
- Thunder Character Skin (Pax Armata)
- Demolisher Player Card Title
Strategy: 6,000 Repair in One Match
This is the only challenge that requires significant accomplishment in a SINGLE match rather than cumulative progress. That makes it both easier (only needs one good match) and harder (must focus entirely on it).
How to Achieve This:
Method 1: Find a Tank Buddy
The absolute best way is coordinating with a tank player. Have them push aggressively while you repair them constantly. A good tank player taking consistent damage while staying alive can easily give you 6,000+ repair credit in one match.
Method 2: Breakthrough Defense
Play Breakthrough on the defending side. Your team’s vehicles will take heavy, consistent damage while holding positions. Follow armor and repair non-stop.
Method 3: Conquest Vehicle Clusters
Some Conquest maps have central objectives with multiple friendly vehicles. Station yourself there and bounce between vehicles, repairing whoever needs it.
Critical Requirements:
- Vehicle must survive – You get more credit from keeping vehicles alive than repairing ones that die
- Consistent damage – Vehicles need to take damage for you to repair
- Full match commitment – This needs an entire match focused on repairs
Why This Can Be Tricky:
If your team’s vehicles keep dying quickly, you can’t get enough repair credit. If your team dominates and vehicles take minimal damage, you can’t get enough credit. You need a match where vehicles are actively engaged but surviving.
Time Estimate: Could be 1 match if perfect, or 10+ matches if you keep getting bad vehicle scenarios
My Experience:
I completed this in my third attempt. First two matches had vehicles either dying too fast or taking too little damage. Third match had a great tank driver who pushed aggressively but smartly, taking consistent damage while staying alive. I followed him the entire match and ended with 7,200 repair credit.
Specialist 3 Completion Tips
Recommended Loadout:
- Primary: Something mobile and defensive
- Gadget 1: Repair Tool (obviously)
- Gadget 2: Smoke grenades (to protect vehicles you’re repairing)
- Equipment: Stay close to vehicles
Game Mode: Breakthrough (defense) or vehicle-heavy Conquest
Patience Required: This might take multiple attempts to get the right match conditions
The character skins you earn are exclusive to completing this challenge, making them great flex items. The Demolisher title is also a nice badge of honor showing you’ve mastered every aspect of Engineer gameplay.
General Tips for All Engineer Challenges
Having completed every single Engineer challenge, here are some universal tips that apply across the board:
Loadout Optimization
Primary Weapon Choices:
Your primary weapon matters less than your gadget selection for these challenges, but having something reliable helps you survive while completing objectives.
Game Mode Selection
Best Modes for Engineer Challenges:
- Conquest – Vehicle-heavy, long matches, multiple objectives
- Breakthrough – Concentrated combat, predictable vehicle routes
- Rush – Good for specific challenges, smaller player count
Avoid modes like Team Deathmatch or infantry-only servers—these won’t have the vehicles you need for most challenges.
Squad Play Benefits
Playing with a coordinated squad makes EVERYTHING easier:
- Recon squadmates can laser designate for you
- Tank squadmates give you consistent repair opportunities
- Communication helps coordinate anti-vehicle focus
- Squad spawning keeps you near vehicles
XP Booster Usage
Save your XP boosters for when you’re actively grinding these challenges. The score requirements will benefit from boosted XP, and you’ll level up faster overall.
Settings Optimization
Proper settings make vehicle combat significantly easier. Check our best settings guide for optimal configurations, especially for:
- Vehicle sensitivity
- Aim assist settings (console)
- Crosshair customization
- Audio settings (hearing vehicles is crucial)
Challenge Completion Rewards: Are They Worth It?
Let’s talk honestly about whether this grind is worthwhile.
Tangible Rewards:
- M136 AT Launcher – Excellent weapon, very useful
- Vehicle Supply Crate – Helpful for team support
- Character Skins – Exclusive, shows mastery
- Player Card Items – Flex on other players
- Combat Engineer Training Path – XP boost for Engineer class
Intangible Rewards:
- Mastery of Engineer class mechanics
- Better understanding of vehicle warfare
- Improved teamwork and positioning skills
- Satisfaction of completion
My Verdict:
If you main Engineer or play it regularly, absolutely worth completing. The M136 launcher alone justifies the grind. If you rarely touch Engineer, maybe skip it and focus on challenges for classes you actually play.
The character skins are legitimately cool and fairly rare since many players don’t complete all challenges. If you like cosmetics and showing off mastery, these are great flex items.
Common Mistakes to Avoid
I made every mistake possible while grinding these challenges. Learn from my failures:
Mistake #1: Not Focusing
Trying to complete multiple challenges simultaneously reduces efficiency. Focus on one objective at a time for faster completion.
Mistake #2: Wrong Game Modes
Playing infantry-focused modes when you need vehicle damage wastes time. Pick appropriate modes for your current challenge.
Mistake #3: Poor Positioning
Running into the open to hit vehicles gets you killed. Use cover, flank, and be smart about engagement timing.
Mistake #4: Giving Up on Hard Challenges
The laser designation requirement is frustrating, but it IS completable with persistence. Don’t abandon challenges halfway through.
Mistake #5: Ignoring Your Team
Being so focused on challenges that you ignore objectives loses matches and makes the game less fun. Balance challenge focus with good teamwork.
Alternative Challenge Options
If Engineer challenges aren’t your thing, there are plenty of other challenge paths to explore:
- Assault Class Challenges
- Support Class Challenges
- Recon Class Challenges
- Deadeye Challenges
- Close Quarters Challenges
- Danger Close Challenges
- Bulletstorm Challenges
Each challenge set offers unique rewards and focuses on different playstyles. Find what you enjoy and master it.
Achievements and Trophies Connection
Completing Engineer challenges contributes to several achievements and trophies in Battlefield 6. If you’re a completionist hunting platinum/100% completion, you’ll need to finish these challenges anyway.
Campaign Practice
If multiplayer is overwhelming and you want to practice Engineer mechanics in a lower-pressure environment, try the campaign:
These missions feature vehicle combat and let you get comfortable with launchers and repair mechanics. Plus, you can grab collectibles while you’re at it.
Final Thoughts
The Engineer class challenges in Battlefield 6 are a marathon, not a sprint. They’ll test your patience, require coordination, and occasionally frustrate you. But completing them gives you exclusive rewards, improves your gameplay, and provides genuine satisfaction.
The key is approaching them systematically: focus on one challenge at a time, play appropriate game modes, and don’t stress about perfect efficiency. Some matches will give massive progress, others will give none—that’s just how Battlefield works.
Whether you’re hunting that M136 launcher, chasing exclusive character skins, or just want to prove your Engineer mastery, stick with it. The rewards and bragging rights are absolutely worth the effort.
Now get out there and start blowing up some tanks. Those challenges won’t complete themselves!
Ready to dominate? Get Battlefield 6 on Steam, PlayStation Store, or Epic Games. Visit the official Battlefield 6 site for updates and join discussions on Reddit to share your challenge completion strategies!