The bipod is one of those attachments that separates casual players from tactical masterminds in Battlefield 6. When used correctly, it transforms your weapon into a laser-accurate death machine. When used poorly? Well, you become a sitting duck for every sniper on the map.
I’ve spent countless hours testing bipod setups across different classes and situations, and I can tell you this: understanding when and how to deploy your bipod can completely change your gameplay. Whether you’re mowing down squads with an LMG or landing perfect headshots with a DMR, this guide will show you everything you need to know about mastering this underrated attachment.
Let’s break down exactly how to deploy the bipod, what it actually does, and most importantly—when you should (and shouldn’t) use it.
What Exactly Is the Bipod?
Before we get into the technical stuff, let’s talk about what the bipod actually does. Think of it as a portable weapon mount that dramatically improves your accuracy and stability. When deployed, your weapon essentially becomes a stationary turret with near-zero recoil and scope sway.
Key Bipod Benefits:
- Massive recoil reduction – Your weapon becomes incredibly stable
- Eliminates scope sway – Perfect for long-range engagements
- Sustained fire capability – Hold down the trigger without losing accuracy
- Increased precision – Land shots at distances that would normally be impossible
- Better damage consistency – More bullets on target means faster kills
The trade-off? You’re locked into position and can’t move freely. It’s the classic Battlefield risk-reward scenario—maximum firepower for reduced mobility.
Which Weapons Can Use Bipods?
Not every weapon in your arsenal can equip a bipod. Here’s the breakdown of what works:
Available from the Start:
- All Light Machine Guns (LMGs)
- All Sniper Rifles
Requires Weapon Mastery:
- Designated Marksman Rifles (DMRs)
- Select Assault Rifles
This is an important distinction. If you’re running Support class loadouts with LMGs or Recon class builds, you can start using bipods immediately. But if you want to run a bipod on your favorite assault rifle, you’ll need to put in some work first.
For DMRs and ARs, you’ll need to rank up your weapon mastery by getting kills, completing objectives, and earning XP. Check out our XP farming guide if you want to unlock these attachments faster.
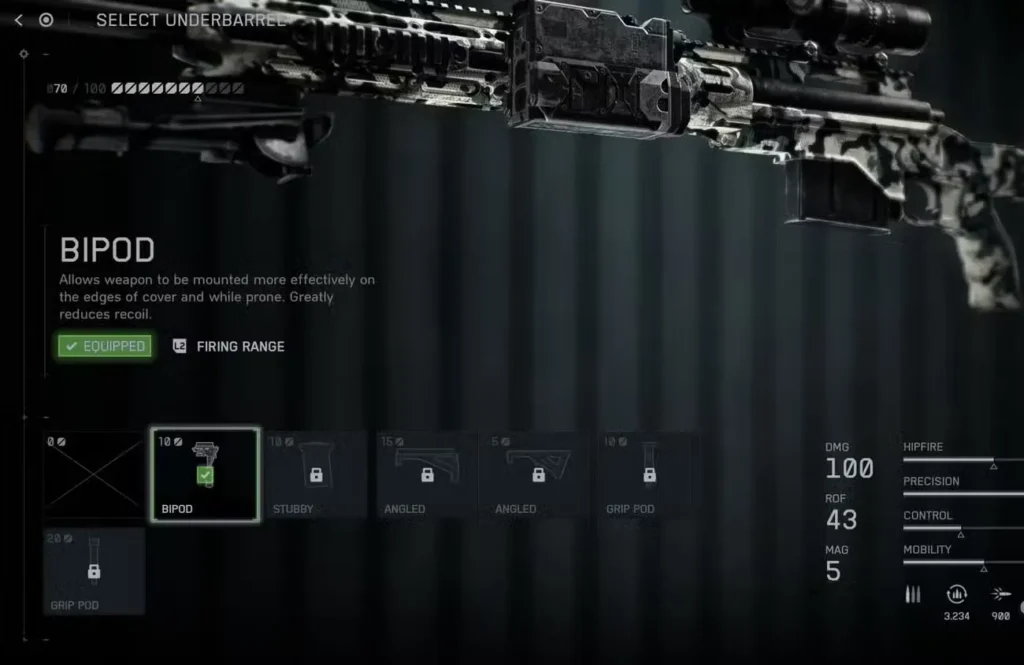
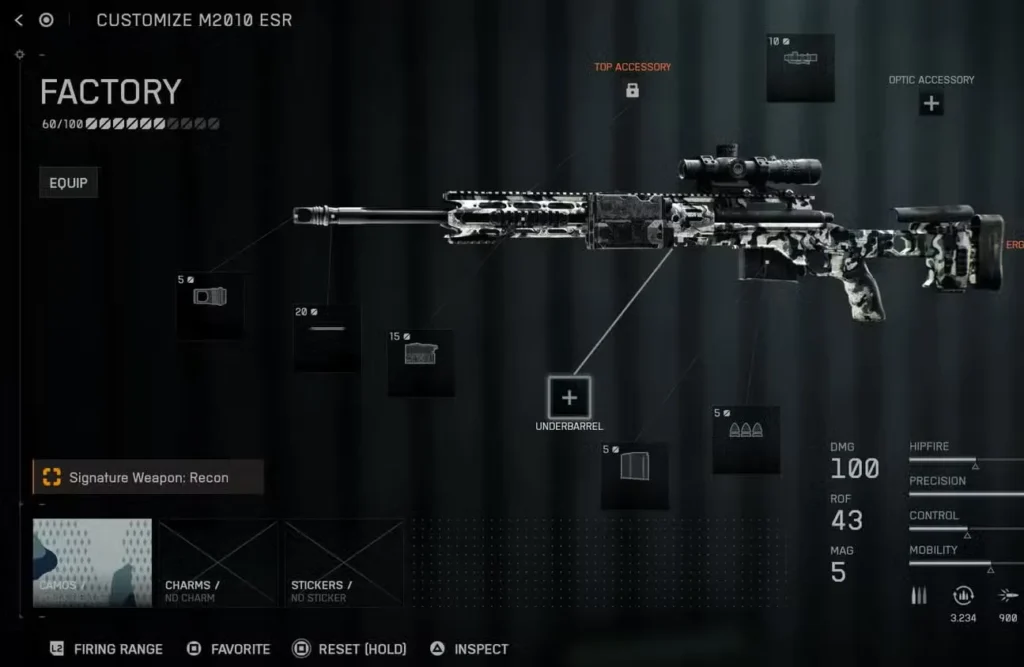
How to Equip the Bipod
The setup process is straightforward, but let me walk you through it step-by-step since the menus can be a bit confusing if you’re new.
Step 1: Access Your Loadout
Head to the main menu or the deploy screen during a match. Select the class you want to customize (Support or Recon typically work best with bipods).
Step 2: Choose Your Weapon
Select the weapon you want to equip the bipod on. Remember, it needs to be an LMG, sniper rifle, or a DMR/AR with sufficient mastery level unlocked. For complete weapon options, check our weapons list guide.
Step 3: Customize Attachments
Go into the weapon customization menu and navigate to the Underbarrel category. The bipod will be listed here along with other options like vertical grips or grenade launchers.
Step 4: Select and Confirm
Choose the bipod attachment and confirm your selection. Your weapon is now equipped and ready to deploy in combat.
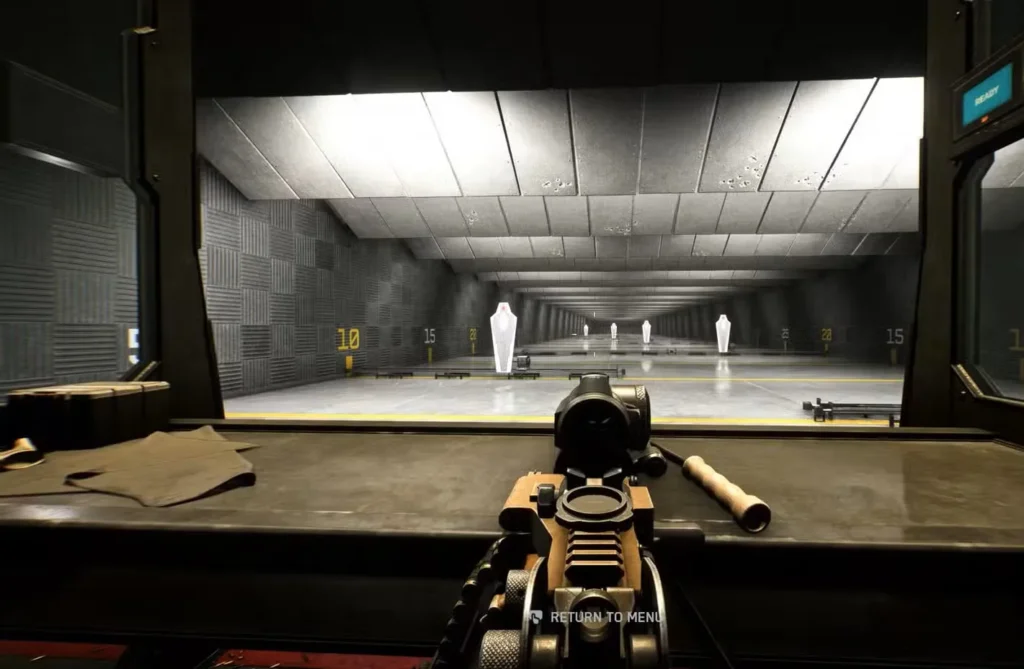
Pro tip: I recommend testing your bipod setup in the practice range first. Get comfortable with the deploy mechanics before jumping into a live match. Trust me, fumbling with bipod controls while getting shot at is not fun.
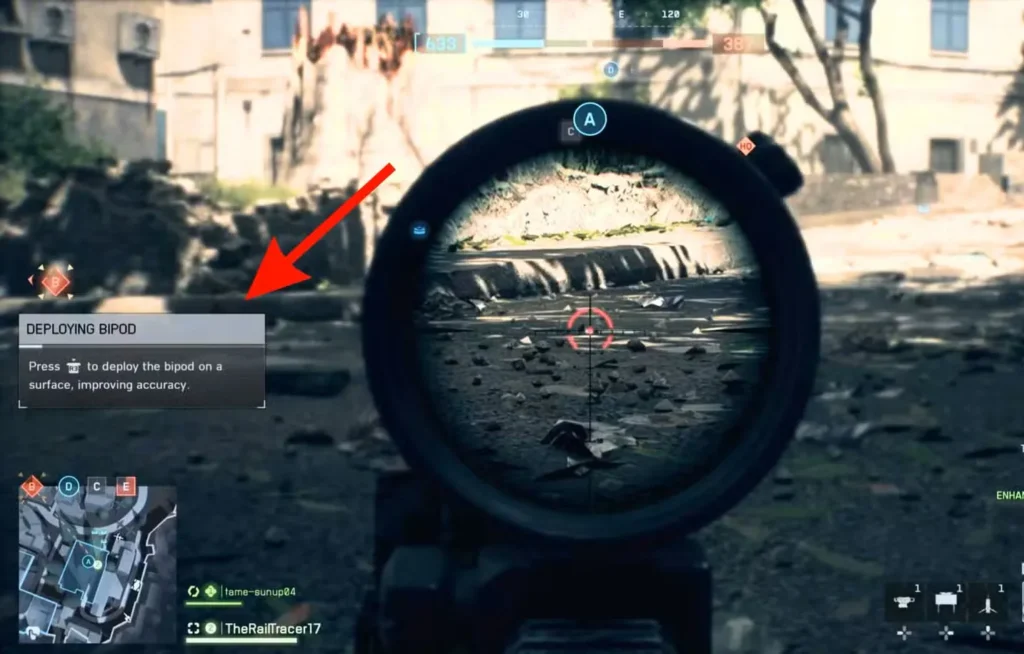
How to Deploy the Bipod in Combat
Alright, you’ve got the bipod equipped—now let’s talk about actually using it. The deployment mechanics are simple once you know them, but there are some nuances worth understanding.
Deployment Controls:
- PlayStation: Press R3 (right stick click) while aiming down sights
- Xbox: Press RS (right stick click) while aiming down sights
- PC: Press V while aiming down sights
The Deployment Process:
- Find suitable cover or lie prone in a good position
- Aim down your sights (ADS)
- Wait for the bipod prompt to appear on your screen (left side)
- Press the deploy button (R3/RS/V)
- Your weapon locks into position with reduced recoil
When deployed correctly, you’ll notice your camera locks into a limited horizontal arc. This is intentional—you’re trading mobility for stability. You can still look left and right within a certain range, but you can’t do a full 360-degree turn unless you undeploy.
To Undeploy: Simply stop aiming down sights or stand up from your prone/crouched position. The bipod automatically retracts and you regain full mobility.
Surface Matters: Where You Can Deploy
Here’s something the game doesn’t explicitly tell you: not every surface works for bipod deployment. I learned this the hard way trying to set up in weird positions.
Surfaces That Work:
- Ground while prone (most reliable)
- Sandbags and barriers
- Window ledges
- Low walls and cover
- Boxes and crates
- Vehicle cover
- Building rubble
Surfaces That Don’t Work:
- Steep inclines or angles
- Most moving objects
- Unstable debris
- Very low cover (sometimes)
- Certain irregular surfaces
The game will show you the deployment prompt when you’re on a valid surface. If you’re not seeing it, adjust your position slightly. Sometimes moving a foot to the left or right makes all the difference.
Tactical Bipod Usage: When to Deploy
Knowing how to deploy is one thing. Knowing when to deploy is what separates good players from great ones. Let me share some tactical insights I’ve picked up.
Ideal Deployment Situations:
Defending Objectives This is where bipods truly shine. Set up in a building overlooking a capture point, deploy your bipod, and become an absolute nightmare for attackers. I’ve single-handedly held objectives against multiple squads using this strategy in Breakthrough mode.
Long-Range Engagements If you’re engaging enemies beyond 75 meters, the bipod gives you a massive advantage. The recoil reduction lets you land consistent shots at ranges where most players struggle. Pair this with proper spotting and you control entire sections of the map.
Suppressing Enemy Advances Got an LMG with 100+ rounds? Deploy that bipod and lay down suppressive fire. Even if you’re not getting kills, you’re forcing enemies into cover and buying time for your team. This is core Support class strategy.
Covering Team Pushes When your squad is advancing on an objective, deploy behind them and provide covering fire. Your accuracy will be high enough to quickly eliminate anyone trying to stop your teammates.
Situations to AVOID Deploying:
- Open areas with no cover – You’re a free kill for snipers
- Close-quarters combat – You need mobility here, not stability
- When enemies know your position – They’ll flank you while you’re locked down
- During active pushes – Save it for when you’re holding, not advancing
- Against vehicles – Unless you’re using anti-vehicle loadouts, mobility matters more
Bipod + LMG: The Ultimate Combo
If there’s one weapon category made for bipods, it’s LMGs. The synergy is incredible. Let me explain why this combination is so powerful.
Why LMGs Love Bipods:
Light Machine Guns have high capacity magazines (often 75-200 rounds) but suffer from significant recoil during sustained fire. The bipod eliminates that recoil, letting you use the entire magazine with consistent accuracy. It’s basically like having a mounted machine gun that you can set up anywhere.
My Favorite LMG Bipod Setup:
- Primary: M240B or PKM
- Attachments: Bipod (obviously), compensator, 3x scope
- Playstyle: Find elevated positions overlooking objectives
With this setup, you can engage 3-4 enemies in quick succession without losing accuracy. I’ve gotten some of my highest killstreaks using this exact combination while defending in Conquest.
The key is positioning. Find spots where you have good sightlines but aren’t exposed from multiple angles. Use the bipod to laser enemies, then undeploy and reposition before they figure out where you are.
For complete LMG optimization, check our best settings guide to maximize your performance.
Bipod Sniping: Eliminating Scope Sway
Recon players, listen up—the bipod is a game-changer for long-range sniping. If you’ve ever struggled with scope sway ruining your perfect shot, the bipod solves that problem entirely.
Why Snipers Need Bipods:
When you’re scoped in with a high-magnification optic, weapon sway becomes a major issue, especially at extreme ranges. Holding your breath helps, but it’s temporary. A deployed bipod gives you rock-solid stability indefinitely.
Bipod Sniper Strategy:
- Scout your target area first
- Find a concealed position with good elevation
- Go prone and deploy your bipod
- Take your time lining up shots
This approach works beautifully on large Battlefield 6 maps where engagements happen at 200+ meters. You become incredibly effective at range denial and can support your team by eliminating high-value targets.
Important: Don’t stay in one spot too long. Even with a bipod, after 2-3 kills from the same position, enemy snipers will zero in on you. Take your shots, then relocate. For more advanced tactics, see our Recon challenges guide.
Common Bipod Mistakes (And How to Avoid Them)
I’ve made every bipod mistake in the book, so let me save you some frustration by pointing out the most common errors.
Mistake #1: Deploying in the Open Nothing screams “shoot me” like going prone in the middle of an open field. Always deploy near cover or in concealed positions. If you don’t have cover, don’t deploy.
Mistake #2: Staying Deployed Too Long The bipod locks you in place, making you predictable. Good players will flank you or call in vehicle strikes. Deploy, get your kills, then move.
Mistake #3: Using Bipods in CQB Close-quarters combat requires mobility. If you’re inside buildings or tight corridors, the bipod’s stability doesn’t matter—you need to move and react quickly. Check our close-quarters challenges guide for better CQB tactics.
Mistake #4: Poor Angle Selection Deploying with a limited field of view is asking for trouble. Make sure you can cover the area you need to without being exposed to multiple angles. Corner positions are usually safest.
Mistake #5: Forgetting About Explosives A deployed bipod user is a perfect target for grenades and C5 explosives. Always have an escape route planned.
Advanced Bipod Techniques
Once you’ve mastered the basics, these advanced techniques will take your bipod game to the next level.
The Rapid Redeploy Instead of staying deployed continuously, learn to quickly undeploy and redeploy between bursts. This gives you better situational awareness while maintaining most of the accuracy benefits.
Window Mounting Deploying on window ledges gives you excellent cover while maintaining a good field of fire. You’re harder to spot and can quickly duck down when taking fire. This is especially effective in urban maps.
Prone Transitioning Master going from standing to prone with quick bipod deployment. This lets you instantly create a stable firing position when you need it. Combine this with the combat roll for maximum survivability.
Angle Pre-Positioning Deploy your bipod aimed slightly to one side of where you expect enemies. When they appear, you need minimal adjustment to engage, reducing your reaction time.
Suppression Tactics Even if you’re not getting kills, keeping enemies suppressed with accurate sustained fire prevents them from advancing or returning effective fire. This team-focused approach wins games.
Bipod Loadout Optimization
Your overall loadout should complement your bipod usage. Here’s what works best:
For LMG Bipod Users:
- Optic: 2x-4x magnification for mid-long range
- Barrel: Compensator or extended barrel
- Underbarrel: Bipod (obviously)
- Ammo: Extended mags if available
- Gadget: Ammo crate to sustain long deployments
For Sniper Bipod Users:
- Optic: 6x-8x scope for long range
- Barrel: Extended barrel for bullet velocity
- Underbarrel: Bipod
- Gadget: Range finder or spawn beacon
For DMR Bipod Users:
- Optic: 3x-4x magnification
- Barrel: Compensator
- Underbarrel: Bipod
- Gadget: Depends on class
For specific weapon builds, our M4A1 loadout guide and M277 loadout guide offer detailed recommendations.
Bipod vs. Other Underbarrel Attachments
Is the bipod always the best choice? Not necessarily. Let’s compare it to alternatives.
Bipod Advantages:
- Maximum accuracy when deployed
- Zero recoil for sustained fire
- Best for defensive play
- Ideal for long-range engagements
Vertical Grip Advantages:
- Improves handling in all situations
- Better for mobile gameplay
- No deployment required
- More versatile overall
When to Choose Bipod:
- Playing Support or Recon primarily
- Focusing on defensive objectives
- Playing on large, open maps
- Your playstyle favors positioning over mobility
When to Choose Grip:
- Aggressive rushing playstyle
- Assault class gameplay
- Close-medium range focus
- Constantly on the move
I actually run different loadouts for different maps. On something like a wide-open desert map, bipod all the way. On tight urban maps, I switch to vertical grip for the mobility.
Map-Specific Bipod Strategies
Different maps call for different bipod approaches. Here’s how to adapt:
Large Open Maps: These are bipod paradise. Find elevated positions, deploy, and control massive areas. Focus on long sightlines and defending key routes.
Urban Maps: Use bipods in buildings overlooking streets and capture points. Window deployment is key here. Be ready to undeploy quickly if enemies push your building.
Mixed Terrain Maps: The most challenging for bipod users. You need to read the flow of battle and set up in areas where combat is currently focused. Flexibility is crucial.
For detailed map strategies, check our complete maps ranking guide.
Using Bipods for Challenge Completion
Several achievements and challenges in Battlefield 6 become much easier with bipod usage.
Challenges Bipods Help With:
- Deadeye challenges – Long-range kills
- Bulletstorm challenges – Multi-kills with LMGs
- Assault class challenges – Accuracy-based tasks
- Weapon mastery progression
- Class-specific objectives
The improved accuracy from bipod deployment makes headshots and long-range eliminations significantly easier. If you’re grinding for weapon camos or character skins, the bipod can speed up your progress.
Bipod Settings and Optimization
There aren’t specific bipod settings, but your overall game settings affect bipod effectiveness. Here’s what matters:
Sensitivity Settings: Lower your ADS sensitivity for better control when deployed. You’re making smaller adjustments anyway, so you don’t need high sensitivity. Our best settings guide covers this in detail.
Deploy Toggle vs. Hold: Check if your game has a toggle option for bipod deployment. Toggle means you press once to deploy and once to undeploy. Hold requires holding the button. I prefer toggle for less finger strain.
Visual Settings: Ensure your graphics settings allow you to clearly see distant targets. A deployed bipod is useless if you can’t spot enemies at range.
Should You Use the Bipod?
After all this, you might be wondering: is the bipod actually worth using? The honest answer is: it depends on your playstyle.
You’ll love the bipod if you:
- Enjoy tactical, position-based gameplay
- Main Support or Recon classes
- Like holding objectives and area denial
- Play on large maps frequently
- Value accuracy over mobility
Skip the bipod if you:
- Prefer aggressive rushing
- Constantly move around the map
- Main Engineer or close-range Assault
- Get bored staying in one position
- Play mostly small, chaotic game modes
For me personally, the bipod is situational but powerful. I have loadouts with and without it, switching based on the map and my team’s needs. That flexibility has made me a much more effective player overall.
Final Thoughts
The bipod in Battlefield 6 is one of those attachments that rewards smart play and punishes mistakes. It’s not a crutch that automatically makes you better—it’s a tool that amplifies good positioning and tactical awareness.
Master the deployment mechanics, understand when to use it, and always have an exit strategy. Combine these principles with solid tips and tricks and you’ll dominate in situations where other players struggle.
Whether you’re holding down an objective in Conquest, providing covering fire in Breakthrough, or taking out targets from extreme range, the bipod gives you options that simply aren’t available otherwise.
Now get out there and start practicing. Your first few attempts might be rough, but once it clicks, you’ll wonder how you ever played without it.
Want to improve your overall game? Check out the official Battlefield 6 page or grab the game on Steam, PlayStation Store, or Epic Games. Join the community discussion on Reddit for more tips and strategies!