Let’s talk about the elephant in the room—Battlefield 6 has some serious recoil. DICE clearly decided that weapons should feel like actual firearms instead of laser pointers, which is great for immersion but rough on your accuracy. The good news? There are tons of ways to tame that kick and turn your wildly bucking weapon into a precision instrument.
I’ve spent way too many hours testing every setting, attachment, and technique to minimize recoil in BF6, and I’m breaking down everything that actually works. We’re covering visual recoil tricks that make shooting feel smoother, attachment combinations that dramatically reduce weapon kick, and deployment mechanics that most players don’t even know exist.
Understanding the Two Types of Recoil in Battlefield 6
Before we dive into solutions, you need to understand what you’re fighting against. BF6 has two distinct recoil systems working simultaneously:
Visual Recoil – This is the camera shake and screen movement when you fire. It doesn’t affect where your bullets go, but it makes tracking enemies significantly harder because your view is bouncing around like a paint mixer.
Actual Recoil – This is the physical weapon kick that makes your shots climb vertically and drift horizontally. This directly impacts bullet placement and is what attachments primarily address.
Most players only focus on reducing actual recoil through attachments, but honestly? Controlling visual recoil through settings can be just as impactful for your accuracy. Let me show you how.
The Settings That Change Everything: Visual Recoil Reduction
Here’s something most guides won’t tell you—you can dramatically improve your shooting experience without touching a single attachment. These settings adjustments make weapons feel more controllable, which translates to better accuracy in actual combat.
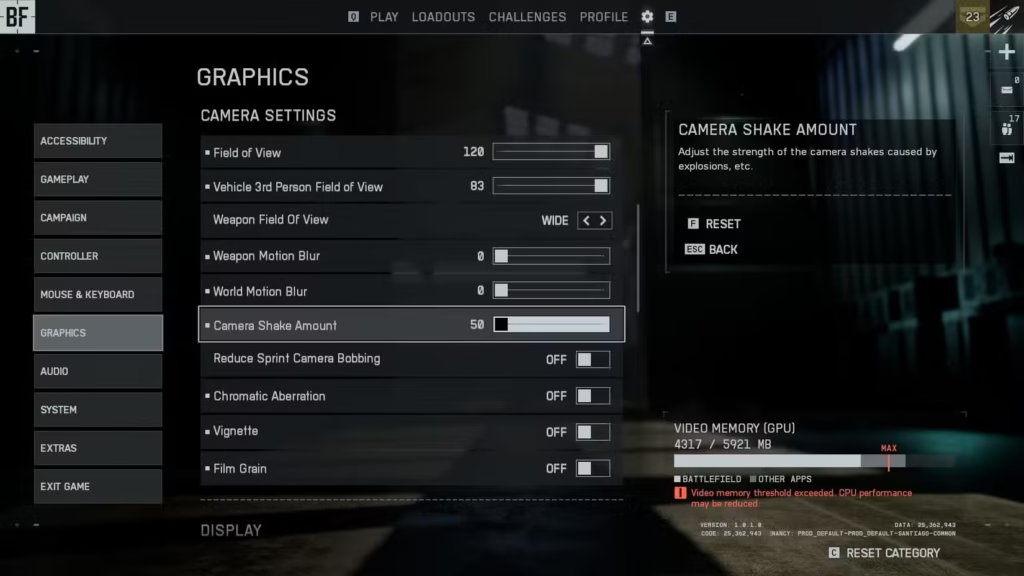
Camera & Visual Settings Configuration
Navigate to your Graphics settings menu and make these critical adjustments:
Field of View (FOV): Set to 105-110
This is the single biggest visual recoil reducer in the game. Higher FOV zooms your camera out, making the recoil movement at your crosshair appear less dramatic. Think of it like watching someone shake a phone from across the room versus holding it in your hand—same movement, completely different perception.
Here’s the sweet spot: 105-110 FOV gives you the recoil reduction benefits without making enemies appear too small at range. Going beyond 110 starts affecting your ability to spot targets at medium distances.
Camera Shake Amount: 50%
Default camera shake is obnoxious. Cutting it in half makes explosions, nearby impacts, and your own gunfire far less disorienting. You maintain situational awareness instead of feeling like your character has a concussion every time something happens nearby.
Weapon Motion Blur: 0% World Motion Blur: 0%
Motion blur might look cinematic in trailers, but in competitive gameplay it’s visual poison. When you’re tracking a strafing enemy, motion blur smears your view and makes precise aim impossible. Turn both of these completely off.
These settings won’t change your weapon’s actual stats, but they’ll make controlling recoil exponentially easier because you can actually see what you’re shooting at. If you want more optimization tips, check out our complete settings and optimization guide.
The Optic Factor: Why Your Sight Choice Matters
Here’s something interesting—visual recoil becomes more noticeable with higher magnification optics. A 1x red dot sight will have minimal visual shake, while a 6x scope will look like you’re operating a jackhammer.
This is why aggressive players prefer lower magnification sights even at medium range—the visual recoil reduction is worth more than the zoom for tracking moving targets. If you’re running magnified optics, the visual recoil settings above become even more critical.
Best Attachments for Maximum Recoil Control
Now let’s talk about reducing actual weapon kick through attachments. The attachment system in BF6 is surprisingly deep, and understanding which combinations work best can transform an unruly weapon into a laser beam.
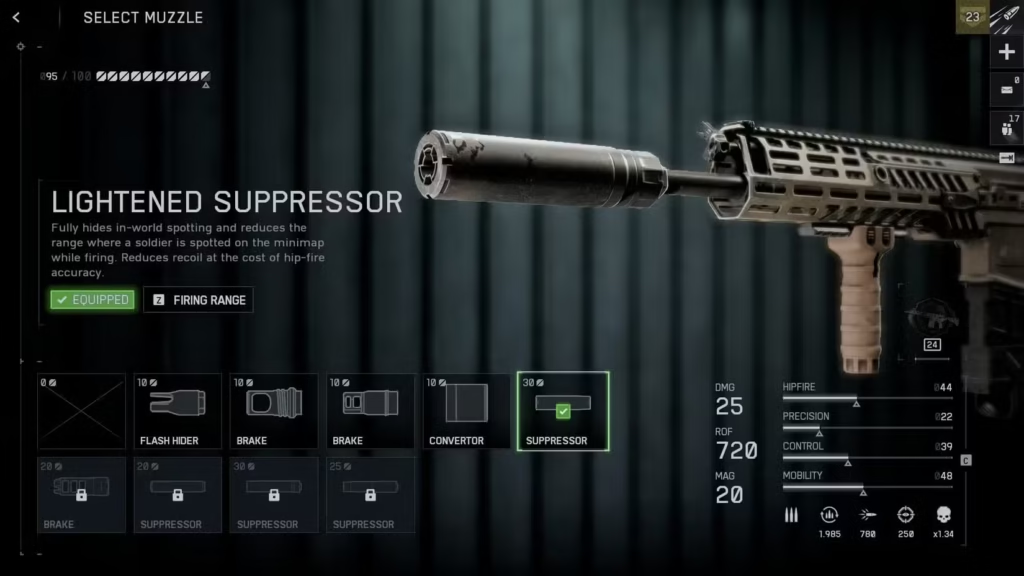
Muzzle Devices: Your First Line of Defense
Muzzle attachments are arguably the most impactful recoil-reduction category. Here are your best options ranked by effectiveness:
Top-Tier Muzzle Attachments:
- Double-Port Brake – Maximum vertical recoil reduction, best for weapons with heavy upward kick
- Compensated Brake – Balanced reduction of both vertical and horizontal recoil
- Linear Compensator – Reduces horizontal bounce while maintaining some vertical control
- Lightened Suppressor – Modest recoil reduction plus stealth benefits
The Trade-Off You Need to Know:
Muzzle brakes make you incredibly visible. When you fire:
- You appear as a red diamond on enemies’ minimaps
- Your muzzle flash becomes a beacon for anyone looking your direction
- The spotting system marks your location for nearby enemies
My honest take? Use brakes for weapons you’re struggling to control until you master the recoil pattern, then switch to the Lightened Suppressor. The stealth benefits outweigh the slightly higher recoil once you’ve developed the muscle memory.
For loadout inspiration using suppressors effectively, check out our M277 carbine builds and M4A1 configurations.
Foregrips: The Recoil Tamers
Foregrips work in tandem with your muzzle device to create seriously controllable weapons. Here are the heavy hitters:
Best Foregrips for Recoil Reduction:
- Classic Vertical Grip – Maximum vertical recoil reduction, the gold standard
- Low Profile Stubby Grip – Balanced vertical/horizontal reduction with minimal penalties
- Full Angled Grip – Horizontal recoil specialist, great for weapons that drift sideways
The Hidden Cost:
Foregrips that dramatically reduce recoil typically decrease your ADS accuracy (the “first shot spread” statistic). This means your initial bullet has slightly more random deviation from your crosshair placement.
Practical impact: For most engagements, this trade-off is worth it. Landing 8 out of 10 follow-up shots beats missing 7 out of 10 because of uncontrollable recoil. The accuracy penalty matters most for tap-firing at extreme ranges.
Optimal Attachment Combinations
Here’s how to pair muzzle devices and foregrips for maximum effectiveness:
For Maximum Recoil Control (Learning Phase):
- Muzzle: Double-Port Brake or Compensated Brake
- Foregrip: Classic Vertical Grip
- Result: Weapon feels like a totally different gun, almost no kick
For Competitive Stealth Play (Advanced):
- Muzzle: Lightened Suppressor
- Foregrip: Low Profile Stubby Grip
- Result: Controllable recoil while staying off enemy radar
For Horizontal Recoil Problems:
- Muzzle: Linear Compensator
- Foregrip: Full Angled Grip
- Result: Minimizes left-right weapon drift on specific problem weapons
The Secret Weapon: Bipods and Weapon Mounting
Here’s a mechanic that probably 60% of players don’t even know exists—weapon mounting provides massive recoil reduction. We’re talking near-zero kick for sustained fire. It’s almost cheating when used correctly.
How to Deploy Bipods in Battlefield 6
For Keyboard & Mouse:
- Aim down sights (right-click)
- Position yourself prone or near a mountable surface (walls, windowsills, ledges)
- Press F to deploy your bipod
- Enjoy laser-beam accuracy
For Controller Players:
- Aim down sights (L2/LT)
- Get into position (prone or near cover)
- Double-tap L2/LT to mount
- Watch enemies melt
Bipods vs. Grip Pods: Understanding the Difference
Bipods (LMGs and some DMRs):
- Provide maximum recoil reduction when deployed
- Only available when prone or mounted on surfaces
- No recoil benefits when not deployed
- Best for defensive positions and suppressive fire
Grip Pods (Rifles like M4A1, M277):
- Moderate recoil reduction when deployed
- Still provide minor recoil reduction when NOT mounted (this is huge!)
- More versatile than pure bipods
- Great for aggressive players who occasionally post up
Pro tip: You can mount weapons even without a bipod/grip pod attachment, but you get almost no recoil benefit. The attachment itself is what provides the actual reduction.
Best Mounting Positions and Strategies
Knowing where to mount is as important as knowing how:
Top-tier mounting spots:
- Second-floor windows overlooking objectives
- Sandbag positions near capture points
- Low walls that provide head-glitch angles
- Prone positions on ridgelines with clear sight lines
When to use mounting:
- Defending planted objectives in Breakthrough
- Suppressing enemy advances with LMGs
- Holding angles in various game modes
- Pre-firing common enemy routes
When NOT to mount:
- During aggressive pushes (mobility is more important)
- Against snipers who can headshot your stationary position
- In close-quarters buildings where you need movement
For class-specific mounting strategies, check out our Support class loadouts guide which covers LMG deployment in depth.
Advanced Recoil Control Techniques
Attachments and settings get you 70% of the way there, but these techniques push you into the top tier of players:
Burst Fire Discipline
The golden rule: Full-auto is for emergencies only (unless you’re within 10 meters of an enemy).
- 4-6 round bursts for assault rifles at medium range
- 2-3 round bursts for high-recoil carbines and DMRs
- 8-10 round bursts for LMGs when mounted
- Single fire for anything beyond 50 meters
Your accuracy will literally double overnight if you commit to burst firing. Yes, even if the enemy is standing still. Even if you think you can control the full spray. Burst fire wins.
Counter-Strafing for Accuracy
Here’s an esports technique that works in BF6: release your movement keys the instant before you fire. Even a fraction of a second of standing still dramatically improves first-shot accuracy.
The sequence:
- Strafe to peek around cover
- Release movement key
- Fire your burst
- Resume strafing
It feels unnatural at first, but this technique is the difference between “pretty good” and “scary accurate” players.
Crosshair Placement Pre-Aiming
This reduces the amount of recoil compensation you need to do in the first place:
- Aim head-height by default – Even with recoil climb, you’ll still hit upper chest/head
- Pre-aim common corners – Start shooting before they even appear
- Lead moving targets slightly – Account for projectile travel time
These fundamentals matter more than any attachment combination.
Using the Range Finder for Compensation
For long-range engagements, use the range finder gadget to know your exact distance. This helps you:
- Judge how much recoil compensation to apply
- Decide between burst fire and single fire
- Choose appropriate optic zoom levels
Weapon-Specific Recoil Tips
Not all weapons respond equally to recoil reduction techniques. Here’s a quick breakdown:
Assault Rifles:
- High vertical recoil, minimal horizontal drift
- Prioritize vertical grips and double-port brakes
- Burst fire beyond 30 meters
Carbines:
- Moderate recoil in both directions
- Balanced attachments (compensated brake + stubby grip)
- Extremely responsive to burst firing
LMGs:
- Heavy first-shot recoil, then stabilizes
- Always use bipods when defending positions
- First 5-10 rounds are wild, then becomes laser
SMGs:
- High rate of fire = lots of total recoil
- Focus on reducing horizontal bounce
- Full-auto is viable under 15 meters, burst beyond that
For specific weapon builds optimized for minimal recoil, explore our complete weapons list and guide.
The Reality Check: Perfect Recoil Control Doesn’t Exist
Let me be honest—you’re never getting true zero recoil in Battlefield 6. DICE intentionally designed weapons to have realistic kick because it raises the skill ceiling and prevents people from laser-beaming across the map with assault rifles.
What you can achieve is:
- Predictable, controllable recoil patterns
- Reduced visual shake that makes tracking easier
- Muscle memory for compensating specific weapon patterns
- Smart positioning that minimizes the need for long-range spraying
The goal isn’t eliminating recoil—it’s making it manageable enough that your aim skill determines gunfight outcomes, not RNG weapon kick.
Practice Makes Permanent: Where to Train
Theory is useless without practice. Here’s how to develop actual recoil control:
Test Range Drills:
- Spray full magazines at walls to visualize recoil patterns
- Practice burst-firing at different ranges
- Test attachment combinations side-by-side
- Find your personal optimal burst length for each weapon
In-Game Practice:
- Start with lower-recoil weapons and gradually move to harder ones
- Play game modes with frequent gunfights (Team Deathmatch, Domination)
- Focus on recoil control in one session, K/D be damned
- Record gameplay and review when you lost control of your spray
Campaign Mode Training:
- The single-player missions are perfect for low-pressure practice
- Try completing missions with higher recoil weapons
- Experiment with mounting mechanics during defensive scenarios
While you’re improving your fundamentals, might as well knock out some challenges and earn Pro Tokens along the way.
Common Mistakes That Sabotage Your Recoil Control
I see these errors constantly, even from experienced players:
Over-gripping your mouse/controller – Tension creates micro-movements that amplify recoil. Stay relaxed.
Fighting recoil instead of riding it – Pull down smoothly, don’t jerk your aim around trying to correct.
Using the wrong attachments for your playstyle – If you’re aggressive, don’t stack maximum recoil reduction attachments that kill your mobility and ADS speed.
Ignoring visual recoil settings – Seriously, adjust your FOV and disable motion blur. It’s free accuracy.
Never mounting weapons – Even aggressive players should mount during natural pauses in combat. It’s an insane advantage.
Spraying at inappropriate ranges – Just because you can hold the trigger doesn’t mean you should.
Bringing It All Together: Your Action Plan
Here’s your step-by-step implementation guide:
Week 1: Settings Optimization
- Adjust FOV to 105-110
- Disable motion blur
- Reduce camera shake to 50%
- Test in matches and fine-tune
Week 2: Attachment Experimentation
- Try max recoil reduction builds (brakes + vertical grips)
- Note which weapons benefit most
- Gradually transition to suppressors as you improve
Week 3: Technique Integration
- Focus on burst firing discipline
- Practice counter-strafing
- Experiment with mounting in defensive positions
Week 4: Refinement
- Record and review gameplay
- Identify specific recoil struggles
- Optimize attachments per weapon
For overall gameplay improvement, don’t forget to check our best tips and tricks guide and XP farming strategies to level up weapons faster.
Final Thoughts: Recoil Is a Feature, Not a Bug
The learning curve for recoil control in Battlefield 6 is steeper than previous entries, and that’s intentional. DICE wanted gunplay where skill expression matters, where a player with great recoil control consistently outperforms someone spraying and praying.
Embrace the challenge. The satisfaction of landing a clean 10-round burst at 60 meters and dropping an enemy who never even hit you? That’s what makes BF6’s gunplay so rewarding.
Start with the settings adjustments (they’re instant improvements), add appropriate attachments, then gradually develop the muscle memory through consistent practice. Within a few weeks, you’ll wonder how you ever played without proper recoil management.
Get Battlefield 6:
Now get into the practice range, dial in those settings, and transform yourself into a recoil-controlling machine. Your K/D will thank you.