Operation Ember Strike is the eighth mission in Battlefield 6‘s single-player campaign, and it’s one of the more action-packed ones. You’re playing as SSgt Simone “Gecko” Espina, and your main objective is breaking through Pax Armata’s air defense network—which means plenty of explosions, drone strikes, and intense firefights.
But beyond just completing the mission, there are 4 Dog Tag collectibles scattered throughout Operation Ember Strike that you’ll want to grab for 100% completion. These aren’t just random pickups—they represent fallen soldiers and add some environmental storytelling to the chaos around you. Plus, collecting all of them contributes to the “Campaign – Operation Ember Strike” challenge and your overall achievement/trophy progress.
I’ll walk you through every Dog Tag location with clear directions so you don’t miss any. These collectibles aren’t missable in the traditional sense (you can replay the mission), but grabbing them all in one playthrough saves time and lets you focus on other campaign missions afterward.
How Dog Tags Work in BF6 Campaign
Before we jump into locations, here’s what you need to know:
Pickup controls:
- PC: Press E
- Xbox: Press X
- PlayStation: Press Square
Visual identification: Dog Tags have a distinctive shine/glint that makes them stand out from the environment. When you’re near one, you’ll notice the metallic reflection catching light. Once you pick one up, it displays the soldier’s name and date of birth—a small but nice touch that adds personality to these collectibles.
Progress tracking: The game tracks your collectibles automatically. If you miss one, you can use mission select to replay Operation Ember Strike and grab only the ones you’re missing. Already-collected Dog Tags won’t respawn, so you don’t need to recollect them.
Related challenges: Collecting all Dog Tags in Operation Ember Strike contributes toward:
- Mission Complete 3 – Finish the mission on any difficulty
- Campaign – Operation Ember Strike – Complete all mission-specific objectives
For strategies on other campaign missions, check out our guides for Moving Mountains, Nile Guard, Night Raid, Operation Gladius, No Sleep, and The Rock.
Dog Tag #1: Maruf Khorr
Soldier Info: Pax Armata Infantry – Born 22 August 1999
When You’ll Find It
This is the earliest collectible in the mission, appearing shortly after the tutorial section where the game introduces you to the drone feature.
Exact Location
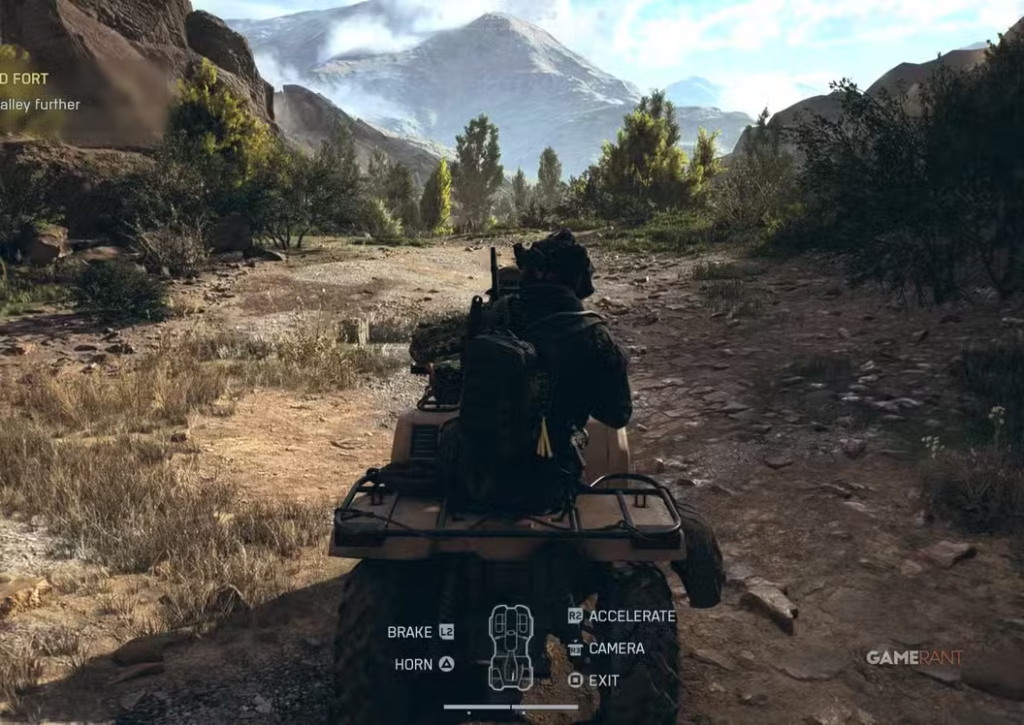
After completing the drone tutorial segment where you spot and eliminate Pax soldiers, you’ll get into a vehicle and drive toward a cluster of broken-down buildings. You can’t miss this area—it’s the first significant structure group you encounter after the initial combat sequence.
Step-by-step directions:
- Drive the vehicle toward the destroyed buildings (you’ll see three structures)
- Head to the easternmost house of the three
- Enter the building and look near the window area
- The Dog Tag will be on the ground or near a surface close to the window
Navigation tip: “East” in this context means the rightmost building when approaching from your starting vehicle position. If you’re having trouble with orientation, just check all three buildings systematically—the Dog Tag’s shine should catch your eye once you’re inside the correct one.
Tactical note: This area is clear of enemies after the initial drone sequence, so take your time searching. There’s no combat pressure forcing you to rush past this collectible.
Dog Tag #2: Sorbon Vokhidov
Soldier Info: Pax Armata Infantry – Born 6 September 2002
When You’ll Find It
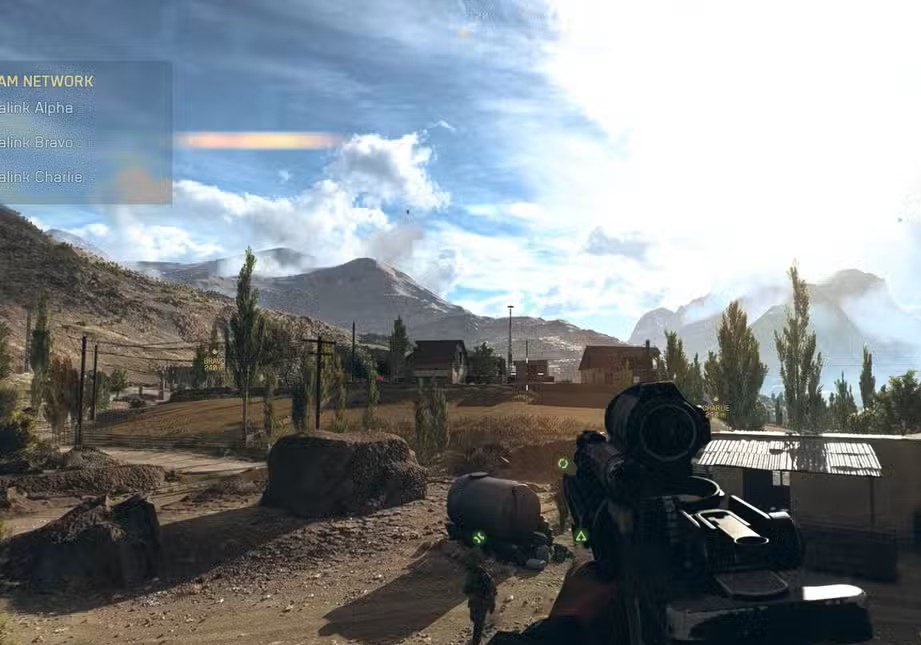
This collectible becomes accessible during the “Take out Datalink (Disable the SAM Network)” objective. You’ll be approaching Datalink Bravo as part of the mission’s main sequence.
Exact Location
As you get close to Datalink Bravo—approximately 200 meters away from the objective marker—start looking for a cluster of three houses with distinctively colored roofs.
Step-by-step directions:
- Approach Datalink Bravo until you’re about 200m out
- Identify the three houses ahead with different colored roofs (black, red, and another color)
- Look for a small building between the black-roofed and red-roofed houses
- Enter this small structure
- The Dog Tag is on top of boxes/crates inside
Visual landmark: The colored roofs make this area impossible to miss once you know what you’re looking for. The small building between two of the houses is essentially a shed or storage structure—much smaller than the actual houses.
Combat consideration: This area may have light enemy presence depending on how you’ve approached. You can either clear the area first or make a quick dash to grab the collectible if you’re playing on easier difficulties. On harder difficulties, I recommend clearing enemies first so you’re not getting shot while searching for the exact location.
Dog Tag #3: Sonia Lima
Soldier Info: Pax Armata Special Operations – Born 25 April 1992
When You’ll Find It
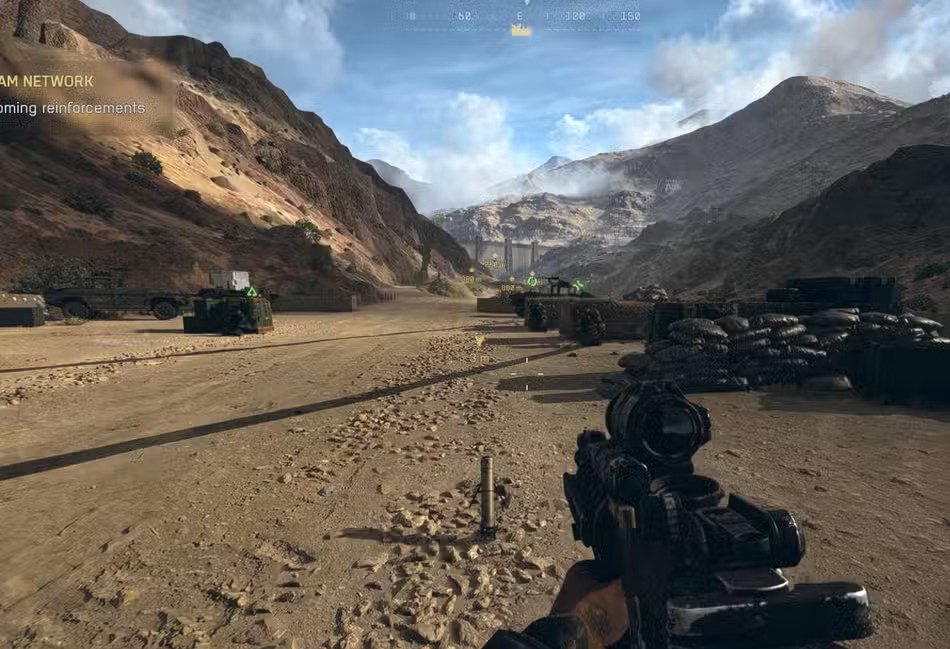
This collectible appears after a significant story moment—your encounter with a sniper enemy—and during the “Take out the incoming reinforcements (Disable the SAM Network)” objective.
Exact Location
You’ll use the Switchblade drone (second time in the mission) to destroy two helicopters and multiple armored vehicles. After completing this, resist the urge to follow the obvious main path forward.
Step-by-step directions:
- Complete the Switchblade drone sequence (destroy the helicopters and armored vehicles)
- Do not proceed down the main path toward the next objective marker
- Instead, turn left from where you’re standing
- Head up the hill toward the elevated position
- This is where the sniper was positioned earlier
- The Dog Tag is at the sniper’s former location
Why it’s easy to miss: The game is pushing you forward with objective markers and urgency. Most players naturally follow the path markers and completely miss this elevated position. You need to consciously go off the beaten path.
Orientation help: Think back to where the sniper was shooting you from. That elevated hill position with good sightlines over the valley—that’s where you need to go. If you’re still confused, just look for any elevated terrain to your left after the Switchblade sequence and explore it systematically.
Tactical benefit: Beyond getting the collectible, visiting the sniper position also gives you an excellent vantage point to survey the area ahead. You can spot enemy positions and plan your approach, making this detour tactically useful even beyond collectible hunting.
Dog Tag #4: Sidi Konate
Soldier Info: Pax Armata Infantry – Born 2 October 2003
When You’ll Find It
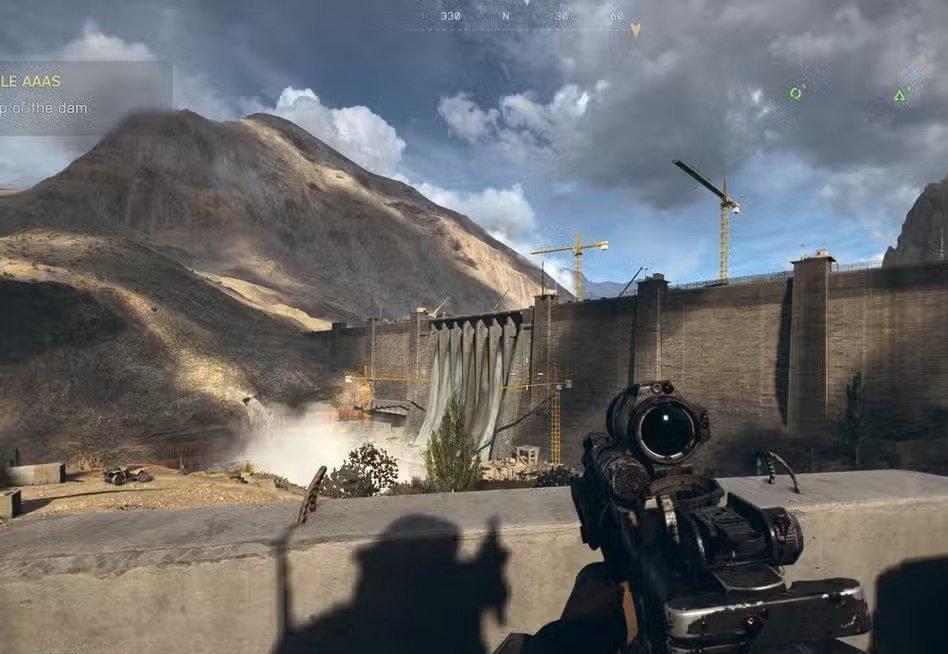
This is the final collectible in Operation Ember Strike, appearing near the mission’s climax during the dam sequence.
Exact Location
After progressing through the mission, you’ll reach the dam and watch a cutscene. Following this, your objective updates to “Reach the top of the dam (Take Out Mobile AAAs).”
Step-by-step directions:
- Watch the dam cutscene (can’t miss this—it’s a major story beat)
- Start following your squad up the slope toward the dam
- Look to your left side as you ascend
- You’ll see several vehicles parked in this area
- Move behind these vehicles
- The Dog Tag is on a box/crate behind the vehicle cluster
Visual marker: The vehicles are obvious and positioned in a way that your path naturally leads near them. The Dog Tag isn’t hidden inside a vehicle—it’s on equipment/boxes behind or near the vehicles.
Timing note: Grab this before you get too far up the dam. Once you’re heavily engaged with enemies higher up, backtracking becomes annoying. The collectible is accessible right as you start the ascent, so grab it immediately.
Combat situation: This area typically has some enemy presence, but they’re focused on positions higher up the dam. You can usually grab this collectible with minimal interruption, but stay aware of your surroundings.
Mission Overview: Operation Ember Strike
For context on what you’re doing while hunting these collectibles:
Mission objectives:
- Break through Pax Armata air defenses
- Disable SAM (Surface-to-Air Missile) network
- Take out multiple datalinks
- Use drone and Switchblade technology
- Assault the dam facility
- Eliminate mobile AAA (Anti-Aircraft Artillery) positions
Playable character: SSgt Simone “Gecko” Espina
Mission themes: This is one of the more tech-focused campaign missions, heavily featuring drone warfare and coordinated strikes. The pacing alternates between vehicle sections, on-foot combat, and drone operation sequences.
Difficulty consideration: If you’re specifically hunting collectibles, consider playing on easier difficulties for your first run. You can always replay on harder difficulties afterward once you know where everything is. This lets you focus on exploration without constantly dying to enemy fire.
Challenge Completion Tips
Collecting all four Dog Tags contributes toward challenge completion, but here’s how to maximize your efficiency:
Mission Complete 3 Challenge
This requires finishing Operation Ember Strike on any difficulty. Combine collectible hunting with your first playthrough to knock out multiple objectives simultaneously.
Campaign – Operation Ember Strike Challenge
This typically requires:
- Completing the mission
- Collecting all Dog Tags
- Potentially completing optional objectives (varies by challenge structure)
Check your challenge menu to see exact requirements.
Efficient Completion Strategy
First playthrough approach:
- Play on Normal or Easy difficulty
- Follow this guide for Dog Tag locations
- Take your time exploring—no rush
- Complete all main objectives naturally
Replay approach (if you missed collectibles):
- Use mission select to jump to Operation Ember Strike
- Skip cutscenes to save time
- Rush directly to the Dog Tag you missed (already-collected ones won’t respawn)
- No need to finish the mission—collectibles save upon pickup
For comprehensive challenge guides, check out our Assault Class Challenges, Recon Class Challenges, Deadeye Challenges, Close Quarters Challenges, Danger Close Challenges, and Bullet Storm Challenges.
Common Mistakes When Hunting Collectibles
I’ve seen players struggle with these Dog Tags, so here are the most common pitfalls:
Mistake #1: Following objective markers too closely The game is designed to push you forward toward objectives. Dog Tag #3 especially requires you to actively ignore the main path and explore off-route. Don’t let the objective marker tunnel-vision you.
Mistake #2: Not exploring buildings thoroughly Dog Tags #1 and #2 are inside structures. Players often glance inside, don’t immediately see the collectible, and leave. Remember the shine/glint—look for that visual cue and systematically check all surfaces.
Mistake #3: Rushing through vehicle sections When you’re in a vehicle, it’s tempting to just drive straight to the next objective. Dog Tag #1 appears right after a vehicle section, so slow down and explore the buildings before continuing.
Mistake #4: Not checking behind objects Dog Tag #4 is behind vehicles, and #2 is on top of boxes. Players looking at ground level often miss collectibles placed on elevated surfaces or obscured by objects. Always check behind, on top of, and around objects in the area.
Mistake #5: Forgetting about the sniper hill That elevated position where Dog Tag #3 is located serves no gameplay purpose after the sniper encounter. The game gives you zero reason to return there, which is precisely why so many players miss it. Consciously make the detour.
Optimizing Your Campaign Experience
While you’re working through Operation Ember Strike and other missions, consider these tips:
Settings optimization: Campaign missions benefit from good visibility and responsive controls. Check our best settings guide for performance tweaks.
XP and progression: Campaign progress contributes to overall player XP. Use XP farming strategies and XP boosters if available during campaign play.
Weapon familiarity: Campaign missions let you experiment with weapons in controlled environments. This is good practice for multiplayer. Check our complete weapons list to understand what you’re using.
Cosmetic unlocks: Some campaign completion rewards carry over to multiplayer, including character skins and potentially camos.
After Operation Ember Strike: What’s Next?
Once you’ve completed this mission with all collectibles, you have several options:
Continue the campaign: Work through remaining missions and collectible hunts to achieve 100% campaign completion.
Jump into multiplayer: Apply lessons learned from campaign into competitive play:
Master specific classes:
Weapon mastery:
Advanced mechanics:
- Combat roll guide
- Spotting and pinging enemies
- Laser designator usage
- Range finder guide
- Field Specs guide
Achievement/Trophy Hunters
If you’re going for 100% completion, Operation Ember Strike collectibles are part of the larger achievement/trophy ecosystem:
Campaign-related achievements:
- Complete all missions
- Collect all Dog Tags across every mission
- Complete missions on specific difficulties
- Achieve optional objectives
Multiplayer tie-ins: Some games include achievements that require both campaign and multiplayer progress. Check the full achievements and trophies guide for the complete picture.
Pro Token system: If BF6 includes Pro Tokens, campaign completion might award them. See our Pro Token guide for details on what they do and how to earn them.
Conclusion: Mastering Operation Ember Strike
Operation Ember Strike is one of the more memorable campaign missions in Battlefield 6, combining vehicle combat, drone warfare, and infantry engagements into a cohesive experience. The four Dog Tag collectibles add an extra layer of exploration that rewards players who take time to look around instead of just rushing objectives.
Quick recap of locations:
- Dog Tag #1 (Maruf Khorr): Eastern house near window after drone tutorial
- Dog Tag #2 (Sorbon Vokhidov): Small building between black and red-roofed houses, on boxes
- Dog Tag #3 (Sonia Lima): Sniper hill position, go left after Switchblade sequence instead of following main path
- Dog Tag #4 (Sidi Konate): Behind vehicles on left side when ascending dam
None of these are particularly difficult to find once you know where to look. The challenge is remembering to explore instead of getting tunnel-vision on objective markers.
Take your time, enjoy the campaign’s story and setpieces, and grab these collectibles along the way. You’ll have Operation Ember Strike 100% completed in a single efficient playthrough, leaving you free to focus on the multiplayer grind or other campaign missions.
Good luck out there, and enjoy breaking through those Pax air defenses!
Official Battlefield 6 Resources: